
In the age of smartphones, capturing and sharing memories has become easier than ever. With the advancement of technology, our mobile phones have transformed into powerful devices capable of not only taking stunning photos but also creating personalized albums. Among the various mobile phones available in the market, the iPhone stands out as a popular choice due to its exceptional camera capabilities and user-friendly interface.
If you are an iPhone user looking to create an album to organize and showcase your precious memories, you’ve come to the right place. In this article, we will guide you through the process of making an album on your iPhone, from selecting the photos to choosing a theme and sharing the final masterpiece with your friends and family. So, grab your iPhone, get ready to unleash your creativity, and let’s dive into the world of iPhone album creation!
Inside This Article
- Overview of iPhone Albums
- Step 1: Organizing Photos
- Step 2: Creating a New Album
- Step 3: Adding Photos to the Album
- Step 4: Rearranging and Deleting Photos in the Album
- Step 5: Adding Captions and Descriptions
- Step 6: Editing and Enhancing Photos
- Step 7: Sharing the Album
- Conclusion
- FAQs
Overview of iPhone Albums
iPhone albums are a convenient and efficient way to organize and keep track of your photos. The album feature allows you to group related photos together, making it easier to find and view specific images. With just a few simple steps, you can create a new album, add photos, arrange them in a specific order, and even add captions and descriptions. Additionally, you can edit and enhance photos directly within the album and easily share the album with others. Let’s dive into the details of how to create and utilize albums on your iPhone.
Creating albums on your iPhone is a breeze. Whether you want to organize your vacation photos, create a collection of your favorite memories, or categorize your professional snapshots, the process is the same. You can create as many albums as you need, and each album can contain an unlimited number of photos. This allows for maximum flexibility in organizing your images to suit your specific needs.
Once you have created an album, you can start adding photos to it. You can select photos from your camera roll, existing albums, or even import photos from other devices. The ability to add multiple photos at once makes it efficient and saves time. You can also rearrange the order of the photos within the album, allowing you to customize the visual flow and storytelling of your collection.
Adding captions and descriptions to your photos can bring them to life and provide additional context. With iPhone albums, you can easily add captions and descriptions to individual photos or the entire album. This allows you to create a detailed narrative or simply provide a brief description of the content.
Editing and enhancing your photos directly within an album is a convenient feature of iPhone albums. You can apply filters, adjust brightness and contrast, crop or rotate images, and even remove red-eye. This eliminates the need to switch between different apps, giving you a seamless editing experience right within your album.
Sharing your album with others is simple and straightforward. You can easily share a link to your album through messages, email, or social media platforms. Additionally, you can choose whether to share the album with specific individuals or make it public for anyone to access. This makes it easy to share your memories, collaborate on projects, or showcase your photography skills.
Step 1: Organizing Photos
Before you can create a new album on your iPhone, it’s important to make sure that your photos are well-organized. With a large collection of images, finding the pictures you want to include in your album can become a daunting task if they are scattered all over your device.
One way to organize your photos is by creating separate folders or albums based on specific themes or events. This could include albums for vacations, family gatherings, or even categories like landscapes or food photography.
To begin organizing your photos, open the Photos app on your iPhone. You’ll see multiple tabs at the bottom of the screen, such as “Photos,” “For You,” “Albums,” “Search,” and “Library.”
Tap on the “Photos” tab to view all your photos in chronological order. Swipe up or down to scroll through your photo library and locate the images you wish to include in your new album.
If you want to select multiple photos at once, tap the “Select” button located at the top right corner of the screen. This will allow you to tap on each photo you want to include in your album, and they will be marked with a blue checkmark.
Once you have selected all the photos you want to organize into an album, tap on the “Add To” button at the bottom of the screen.
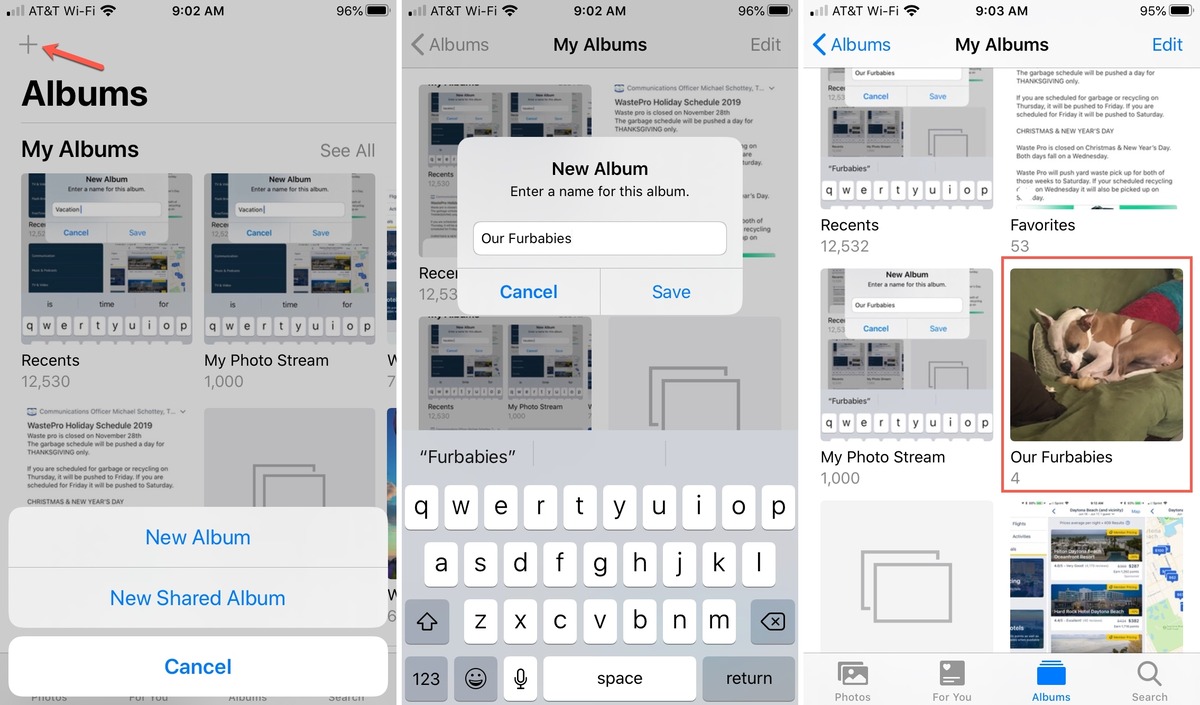
A new window will appear with various options, including the ability to create a new album. Tap on “New Album” to proceed.
Next, you will be prompted to give your new album a name. Choose a descriptive and memorable name that reflects the content of the photos you’ve selected. For example, if you’re creating an album for a recent vacation to Hawaii, you could name it “Hawaii Trip 2021.”
After naming your album, tap on “Save” to create the new album and add the selected photos to it. You can access this album at any time by tapping on the “Albums” tab in the Photos app and locating the album you just created.
By organizing your photos into albums, you can easily find and access your favorite images without having to sift through your entire photo library. This will save you time and allow you to create personalized albums with ease.
Step 2: Creating a New Album
Once you have sorted your photos and organized them into various collections, it’s time to create a new album on your iPhone. Creating a new album allows you to keep your photos organized and easily accessible whenever you need them.
To create a new album on your iPhone, follow these simple steps:
- Open the Photos app on your iPhone. The app is represented by a multicolored flower icon.
- Tap on the “Albums” tab located at the bottom of the screen. This will take you to the Albums section of your Photos app.
- Scroll down to the bottom of the Albums section and tap on the “See All” option. This will display all the existing albums on your iPhone.
- Tap on the “+”, “Add” or “Create New Album” option, depending on the version of iOS you have. This will open a new page where you can create your album.
- Enter a name for your album in the provided field. Choose a descriptive name that will help you quickly identify the contents of the album.
- Tap on the “Save” or “Done” button to create your new album. Your album will now appear in the Albums section of your Photos app.
Creating a new album on your iPhone is a simple and efficient way to manage your photos. Whether you want to group photos based on a specific event, location, or theme, having customized albums makes it easier to find and share your favorite moments.
Step 3: Adding Photos to the Album
Once you have created a new album on your iPhone, the next step is to add photos to it. Adding photos to an album is a simple and straightforward process that allows you to organize and access your favorite memories with ease.
To add photos to an album, follow these steps:
- Open the Photos app on your iPhone.
- Navigate to the Albums tab at the bottom of the screen and tap on the album you want to add photos to.
- Tap on the + icon at the top right corner of the screen.
- Choose the photos you want to add to the album. You can either select multiple photos by tapping on them individually or use the Select option to choose multiple photos at once.
- Once you have selected the desired photos, tap on the Done button at the top right corner.
After following these steps, the selected photos will be added to the album, making it convenient for you to access them whenever you want. You can repeat this process to add more photos to the same album or create new albums for different photo collections.
Additionally, you can also add photos directly to an album while viewing the photo in the Photos app. Simply tap on the share icon (a box with an arrow pointing upwards) and choose the album you want to add the photo to.
Remember, adding photos to albums not only declutters your photo library but also allows you to quickly locate and share specific moments with friends and family.
Step 4: Rearranging and Deleting Photos in the Album
Once you have created an album on your iPhone, you may want to rearrange the order of the photos or delete some that you no longer wish to include. The process is simple and can be done directly from the album itself.
To rearrange the photos in your album, follow these steps:
- Open the Photos app on your iPhone and select the album containing the photos you want to rearrange.
- Tap the “Select” button in the top right corner of the screen.
- Select the photos you want to rearrange by tapping on each one. You can also tap “Select All” to choose all the photos in the album.
- Once you have selected the photos, tap and hold on one of the selected photos and drag it to the desired position.
- Release your finger to drop the photo in its new position. The other selected photos will automatically adjust accordingly.
If you want to delete photos from your album, follow these steps:
- Open the Photos app on your iPhone and select the album containing the photos you want to delete.
- Tap the “Select” button in the top right corner of the screen.
- Select the photos you want to delete by tapping on each one. You can also tap “Select All” to choose all the photos in the album.
- Once you have selected the photos, tap the trash can icon in the bottom right corner of the screen.
- Confirm your decision by tapping “Delete X Photos” (where X is the number of photos you have selected).
It’s important to note that when you delete a photo from an album, it will still be available in your main Photos library unless you delete it from there as well.
Rearranging and deleting photos in an album allows you to customize your collection and remove any unwanted or duplicate images. This convenient feature gives you full control over your albums, ensuring that they reflect your desired order and content.
Step 5: Adding Captions and Descriptions
Along with organizing your photos, iPhone allows you to add captions and descriptions to make your album more personalized and meaningful. Adding captions and descriptions not only provides context to your photos but also makes the album more enjoyable for others to view. Follow these simple steps to add captions and descriptions to your iPhone album:
1. Open the Photos app on your iPhone and navigate to the album where you want to add captions and descriptions.
2. Tap on a photo in the album to view it in full-screen mode.
3. Tap on the “Edit” button located at the top right corner of the screen.
4. You will see a text field at the bottom of the screen. Tap on it to enter the desired caption or description for the photo.
5. After entering the caption or description, tap on the “Done” button to save it.
6. To add captions and descriptions to other photos in the album, swipe left or right to go to the next photo and repeat the above steps.
7. Once you have added captions and descriptions to all the photos in the album, tap on the “Done” button at the top right corner of the screen to exit the editing mode.
Now, when you or others view the album, the captions and descriptions will be displayed below each photo, providing additional context and enhancing the overall viewing experience.
Adding captions and descriptions is a great way to tell a story or share details about the photos in your album. Whether it’s a memorable moment, a beautiful landscape, or a fun outing with friends, adding captions and descriptions will help you cherish those memories and share them with others in a more meaningful way.
Step 6: Editing and Enhancing Photos
Editing and enhancing photos is a key step in making your album on iPhone more visually appealing and professional. With a variety of editing tools and features available, you can easily enhance your photos right within the Photos app. Here’s how:
1. Open the Photos app on your iPhone and locate the album you want to edit. Tap on the album to open it.
2. Tap on the photo you want to edit to open it in full-screen view. Look for the “Edit” button in the top-right corner of the screen and tap on it.
3. Once in the editing mode, you’ll have access to a range of editing tools. These tools include options to adjust the brightness, contrast, saturation, and exposure of the photo. You can also crop, rotate, and straighten the image.
4. To enhance the colors and tones of the photo, you can use the “Filters” feature. Browse through the available filters and select the one that best suits the mood or style you want to convey.
5. If you’re not satisfied with the changes you’ve made, you can always revert back to the original photo. Simply tap on the “Revert” button at the bottom-right corner of the screen.
6. Additionally, you can apply special effects to your photos using the “Brilliance” and “Vignette” tools. These effects can add depth and emphasize certain elements in your images.
7. Once you’re done editing the photo, tap on the “Done” button to save the changes. The edited photo will automatically replace the original one in the album.
8. Repeat the above steps for each photo you want to edit and enhance within the album. This way, you can ensure that every photo looks its best before sharing with others.
By taking the time to edit and enhance your photos, you can elevate the overall quality and impact of your iPhone album. Whether it’s adjusting the lighting, applying filters, or adding special effects, these editing tools offer endless possibilities to make your photos stand out.
Step 7: Sharing the Album
Once you have organized, created, and customized your album on your iPhone, you will likely want to share it with others. Sharing your album is a great way to showcase your photos and memories with friends, family, or even on social media platforms. Luckily, the iPhone offers various options for sharing your albums with just a few taps.
The first method to share your album is through the native sharing option within the Photos app. To do this, open the album you want to share and tap on the “Share” button located at the bottom left corner of the screen. You will then be presented with multiple sharing options, such as messaging, email, AirDrop, and social media platforms like Facebook and Instagram. Simply choose the desired sharing method and follow the prompts to complete the sharing process.
Another way to share your album is by generating a shared iCloud link. This feature allows you to share your album with anyone, even if they don’t own an iPhone. To create a shared iCloud link, go back to the album and tap on the “Options” button (represented by three dots) at the top right corner of the screen. From there, select “Public Website” and then tap on “Share Link.” You can copy the link and send it to whoever you want to share the album with. They will be able to view the album on any device with internet access.
Additionally, if you have iCloud Photo Sharing enabled, you can create a shared album within the Photos app. This allows you to invite specific people to contribute their own photos and videos to the album. To create a shared album, open the album you want to share and tap on the “Options” button. From there, select “Shared Album” and follow the prompts to set up the sharing settings. You can add people to the album by entering their email addresses or selecting contacts from your address book.
When sharing your album, it’s important to consider the privacy and preferences of the people you are sharing it with. Make sure you are aware of the sharing settings and restrictions to ensure your photos are shared securely and only with the intended audience.
Sharing your album on social media platforms can also be a popular choice. If you choose to share your album on platforms like Instagram or Facebook, you can access the sharing options directly from the sharing menu within the Photos app. Simply select the desired platform and follow the prompts to share your album with your followers or friends.
Remember, sharing your album is a fantastic way to relive and cherish your memories with others. Whether it’s via messaging, email, social media, or creating a shared link, the iPhone offers a variety of options to conveniently share your albums with ease.
Conclusion
Creating an album on your iPhone is a simple and convenient way to organize and cherish your precious memories. With just a few taps, you can easily create albums based on themes, events, or personalized categories. The Photos app offers a user-friendly interface that allows you to sort and arrange your photos effortlessly.
By organizing your photos into albums, you can quickly locate specific moments and share them with friends and family. The ability to add captions, rearrange photos, and customize album covers further enhances the overall experience. Whether you are documenting a special trip, capturing unforgettable moments with loved ones, or showcasing your photography skills, creating an album on your iPhone ensures that your memories are preserved and easily accessible.
So, get started today and unlock the full potential of your iPhone’s photo organizing capabilities. Organize your photos, relive your favorite memories, and share them with the world – all at your fingertips.
FAQs
Q: Can I make an album on my iPhone?
A: Yes, you can easily create an album on your iPhone to organize and group your photos. Here’s how you can do it!
Q: What is the benefit of creating an album?
A: Creating an album allows you to organize and categorize your photos in a way that makes it easier to find them later. It helps in decluttering your Camera Roll and gives you quick access to specific sets of photos.
Q: How do I create an album on my iPhone?
A: To create an album on your iPhone, follow these steps:
1. Open the Photos app on your iPhone.
2. Tap on the “Albums” tab at the bottom.
3. Tap on the “New Album” button (usually a plus sign or “Add” button).
4. Give your album a name.
5. Select the photos you want to add to the album by tapping on them.
6. Tap on the “Done” button to create the album.
Q: How do I add photos to an existing album?
A: To add photos to an existing album on your iPhone:
1. Open the Photos app on your iPhone.
2. Tap on the “Albums” tab at the bottom.
3. Select the album you want to add photos to.
4. Tap on the “Edit” button (usually represented by three dots or a pencil icon).
5. Tap on “Add Photos” or the corresponding button.
6. Select the photos you want to add to the album.
7. Tap on “Done” to add the photos to the album.
Q: Can I rearrange the photos within an album?
A: Yes, you can rearrange the photos within an album on your iPhone. Follow these steps:
1. Open the Photos app on your iPhone.
2. Tap on the “Albums” tab at the bottom.
3. Select the album you want to rearrange.
4. Tap on “Select” (usually in the top right corner).
5. Tap and hold on a photo until it becomes movable.
6. Drag the photo to the desired position.
7. Repeat the process to rearrange other photos.
8. Tap on “Done” to save the changes.
Q: Can I delete an album on my iPhone?
A: Yes, it is possible to delete an album on your iPhone. However, note that deleting an album will not delete the photos inside it. Here’s how you can delete an album:
1. Open the Photos app on your iPhone.
2. Tap on the “Albums” tab at the bottom.
3. Select the album you want to delete.
4. Tap on the “Edit” button (usually represented by three dots or a pencil icon).
5. Tap on the “Delete Album” option.
6. Confirm the deletion when prompted.