
Sharing photos with friends and family has become an integral part of our digital lives. And with the advancements in smartphone technology, it has never been easier to capture and store our precious memories on our iPhones. Whether it’s a collection of vacation snapshots or a curated album of memorable events, sharing these moments with others can bring joy and create lasting connections.
In this article, we will explore the various methods and techniques to effectively share albums on your iPhone. From utilizing native iOS features to using third-party apps, we will guide you through the step-by-step process, ensuring that you can effortlessly share your favorite photos and albums with your loved ones. So, if you’re ready to spread the joy and showcase the memories you hold dear, let’s dive in and learn how to share albums on your iPhone.
Inside This Article
- I. Overview of album sharing on iPhone
- II. Steps to share an album on iPhone
- III. Sharing options for iPhone albums
- IV. Troubleshooting common issues with album sharing on iPhone
- Conclusion
- FAQs
I. Overview of album sharing on iPhone
Sharing albums on the iPhone is a fantastic way to share your favorite memories with friends, family, and colleagues. With just a few taps, you can effortlessly share entire albums of photos and videos directly from your iPhone. Whether you want to share a vacation album, a collection of wedding photos, or a compilation of funny moments, the album sharing feature on the iPhone makes it quick and convenient.
To make album sharing even more convenient, the iPhone allows you to choose the specific people you want to share your album with. This ensures that your photos and videos are shared only with those you intend to share them with, providing you with control and privacy over your memories.
The album sharing feature on the iPhone also offers various sharing options, allowing you to choose how you want to share your albums. From sharing via Messages or Email to sharing through social media platforms like Facebook or Instagram, the iPhone provides you with a range of options to suit your preferences and the preferences of your recipients.
Whether you’re sharing an album of stunning landscapes, adorable pet photos, or memorable family moments, the album sharing feature on the iPhone is designed to make sharing seamless and enjoyable. So, grab your iPhone and let’s dive into the steps of sharing an album.
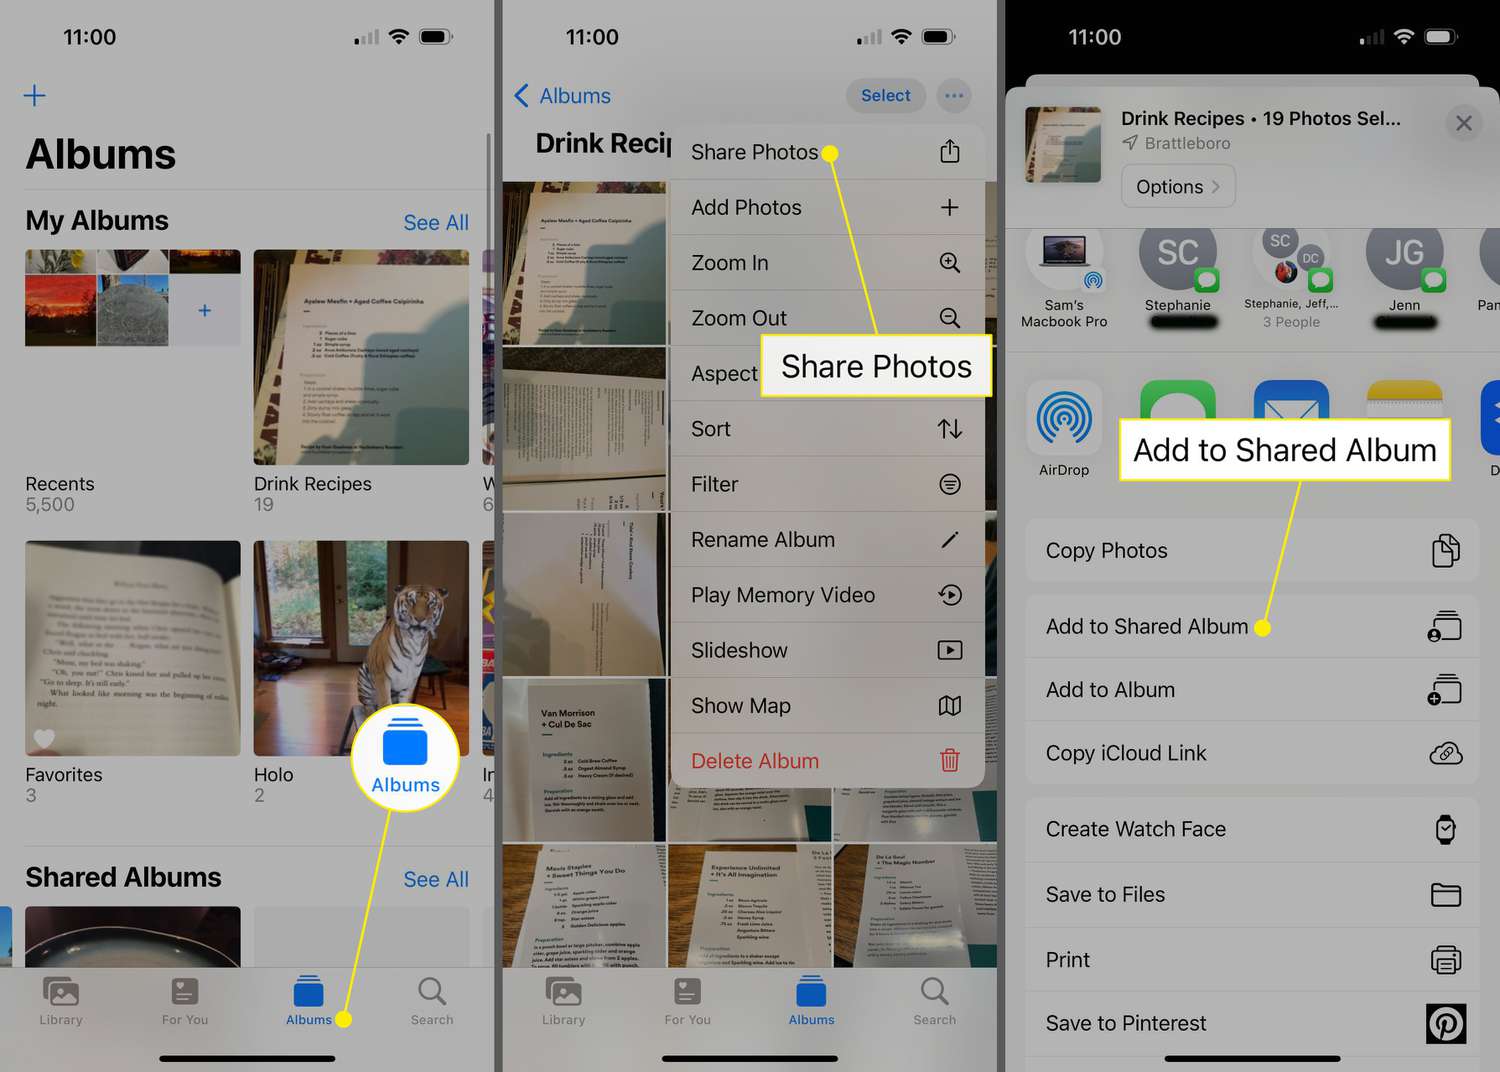
II. Steps to share an album on iPhone
Sharing albums on your iPhone is a great way to share your favorite photos with friends and family. Whether you want to share a vacation album, a collection of special memories, or just some fun moments, the process is simple and straightforward. Here are the steps you need to follow:
Step 1: Open the Photos app
Start by opening the Photos app on your iPhone. You can find the app on your home screen, represented by a multicolored flower icon.
Step 2: Select the album you want to share
Navigate to the Albums tab within the Photos app and select the album that you want to share. You can create a new album or choose an existing one that contains the photos you wish to share.
Step 3: Tap the “Share” button
Once you have selected the desired album, tap on the “Share” button located at the bottom center of the screen. This button is represented by a square with an upward arrow.
Step 4: Choose your sharing method
After tapping the “Share” button, a menu will appear with different sharing options. You can choose to share the album via AirDrop, Messages, Mail, or by uploading it to a cloud service like iCloud or Google Drive.
Step 5: Customize the sharing settings
Depending on the sharing method you choose, you might have additional options to customize the sharing settings. For example, you can select specific contacts to share with or set a password for the shared album.
Step 6: Send or save the shared album
Once you have customized the sharing settings, simply tap the “Send” or “Save” button to finalize the sharing process. The album will be sent to the chosen recipients or saved to the selected storage location.
By following these steps, you can easily share albums on your iPhone and spread joy through your cherished memories. So, go ahead and start sharing your favorite moments with your loved ones!
III. Sharing options for iPhone albums
When it comes to sharing albums on your iPhone, you have a variety of options to choose from. Whether you want to share with individuals or a larger group, Apple has built-in features that make album sharing a breeze. Let’s explore some of the sharing options available on your iPhone.
1. Sharing via Messages: If you want to share an album with a specific person or a small group of people, using the Messages app is a quick and convenient option. Simply open the Photos app, select the album you wish to share, and tap on the “Share” button. From there, choose the Messages option, select the contacts you want to share the album with, and send it off. The recipients will receive a message with a link to access the album.
2. Sharing via AirDrop: AirDrop allows you to share files, including albums, wirelessly between Apple devices. To share an album via AirDrop, make sure both devices have AirDrop enabled. Open the Photos app, select the album, and tap on the Share button. Locate the device you want to share with in the AirDrop section and tap on it. The recipient will receive a notification to accept the album transfer. Once accepted, the album will be available on their device.
3. Sharing via iCloud Photo Sharing: iCloud Photo Sharing is a great option for sharing albums with a larger group of people. To use this feature, open the Photos app, select the album you want to share, tap on the Share button, and choose “Add People.” You can then enter the email addresses or iCloud usernames of the people you want to share the album with. They will receive a notification and can access the shared album through the Photos app.
4. Sharing via Shared Albums: Shared Albums is another option for sharing albums with specific people. To create a shared album, open the Photos app, select the album you wish to share, tap on the Share button, and choose “Add People.” You can then invite people to the album by entering their email addresses or iCloud usernames. Once they accept the invitation, they can view, comment, and even add photos to the shared album.
5. Sharing via Social Media: If you want to share your album with a wider audience, you can use the sharing options available on popular social media platforms like Facebook, Instagram, and Twitter. Simply open the Photos app, select the album, tap on the Share button, and choose the social media platform you want to share to. Follow the prompts to post the album on your social media account for others to see.
With these sharing options, you can easily share your favorite albums with friends, family, or even a broader audience. Whether it’s through messages, AirDrop, iCloud Photo Sharing, Shared Albums, or social media, your iPhone offers an array of ways to spread the joy of your cherished memories.
IV. Troubleshooting common issues with album sharing on iPhone
Sharing albums on iPhone is a convenient feature that allows you to share your cherished photos and videos with friends and family. However, like any technology, you may encounter some common issues along the way. Don’t worry, we’ve got you covered. In this section, we will address these common problems and provide troubleshooting tips to help you resolve them.
1. Album not appearing: Sometimes, you may encounter an issue where the album you want to share is not appearing in your iPhone’s photo app. Ensure that you have created the album and that it contains the photos or videos you want to share. Additionally, check if you are using the latest version of your iPhone’s operating system, as outdated software can sometimes cause visibility issues.
2. Unable to add photos to the album: If you are having trouble adding photos to an album, make sure that you have the necessary permissions to modify the album. Go to the album settings and ensure that you have the authority to edit and add photos. If you are still experiencing issues, try restarting your iPhone and attempt to add the photos again.
3. Slow or unsuccessful album sharing: If you are experiencing slow or unsuccessful album sharing, it could be due to a weak internet connection. Ensure that you are connected to a stable Wi-Fi or cellular network. Additionally, check if there are any restrictions or limits imposed by your network provider on file sharing. You can also try clearing the cache of the photo app or restarting your phone to improve the sharing performance.
4. Compatibility issues: In some cases, you may encounter compatibility issues when sharing albums between different iPhone models or with users who have different operating systems. Ensure that both you and the recipient have compatible devices and operating systems. If the issue persists, try exporting the photos or videos individually and sharing them through alternative methods, such as email or cloud storage platforms.
5. Privacy settings: If you are unable to share albums with specific individuals or groups, check your privacy settings. Make sure that the album is set to be shared with the desired recipients. Also, ensure that the people you are sharing the album with have the necessary permissions to view the content. If the problem persists, try removing and re-adding the recipients or adjusting the album’s privacy settings.
6. App freezing or crashing: If the photo app freezes or crashes while attempting to share an album, close the app and restart your iPhone. This simple action can resolve most app-related issues. If the problem persists, ensure that you have enough storage space on your device for the album and consider freeing up some space by deleting unnecessary content.
Remember, technology can sometimes be unpredictable, but with these troubleshooting tips, you should be able to overcome common issues with album sharing on your iPhone. Happy sharing!
Conclusion
In conclusion, sharing albums on your iPhone is a convenient and efficient way to share your favorite memories with friends and family. With a few simple steps, you can easily create and share albums in just a matter of minutes. Whether you want to organize your photos by event, create a collection of your best shots, or collaborate on a shared album, the iPhone provides a variety of options to meet your needs. By utilizing the native Photos app or exploring third-party options, you can enhance your photo-sharing experience and ensure that your precious moments are enjoyed by those closest to you. So start curating your albums and spreading the joy of your memories today!
FAQs
1. How do I share an album on my iPhone?
To share an album on your iPhone, follow these steps:
- Open the Photos app on your iPhone.
- Navigate to the album you want to share.
- Tap on the “Select” button to choose the photos from the album.
- Once you have selected the photos, tap on the Share button, which is represented by a square box with an upward arrow.
- From the sharing options, select the method you prefer, such as Messages, Mail, AirDrop, or any other compatible app.
- Follow the prompts to complete the sharing process.
2. Can I share an album with someone who doesn’t have an iPhone?
Yes, you can share an album with someone who doesn’t have an iPhone. When you choose to share an album, you can select the sharing method that best suits your needs, such as email or a cloud storage service like Dropbox or Google Drive. This allows you to share the photos with people using different devices and platforms.
3. Can I share an album with multiple people at once?
Yes, you can share an album with multiple people at once. When you choose to share an album, you can select multiple contacts or email addresses to send the photos to. Additionally, you can use apps like WhatsApp or group messaging to share the album with a larger group of people.
4. Can I control who can see the photos in the shared album?
Yes, you can control who can see the photos in the shared album. When you share an album, you can choose to send it as a link with specific permissions. This allows you to set restrictions on who can view, edit, or add photos to the shared album. You can also revoke access to the shared album at any time if needed.
5. Can I share an album on social media directly from my iPhone?
Yes, you can share an album on social media directly from your iPhone. When you choose to share an album, you can select social media platforms such as Facebook, Instagram, or Twitter as the sharing method. This allows you to quickly and easily share your favorite photos with your friends and followers on social media.