
Are you looking for a convenient way to access a shared album on your iPhone? Sharing photos with friends and family has never been easier, thanks to the modern technological advancements. Apple’s iOS provides a seamless and user-friendly solution for sharing and accessing photo albums with your loved ones. Whether it’s for a special event, a memorable trip, or just to share your latest captures, the shared album feature on your iPhone lets you effortlessly view and contribute to a collective album. In this article, we will guide you through the steps to access a shared album on your iPhone, ensuring you don’t miss out on any cherished moments captured by your friends and family members.
Inside This Article
- What is a Shared Album?
- How to Access a Shared Album on iPhone
- Sign in to iCloud
- Open the Photos app
- Go to the Shared Albums tab
- Select the desired album
- Conclusion
- FAQs
What is a Shared Album?
A shared album is a feature on iPhone that allows users to create and share photo albums with friends, family, or colleagues. It provides a convenient way to collaborate and exchange photos, making it easier to relive memories and experiences together.
When you create a shared album, you can invite others to contribute their photos, comment on pictures, and even subscribe to receive notifications when new photos are added. This collaborative approach to sharing photos ensures that everyone involved can have access to and participate in the album’s content.
Shared albums are not only limited to iPhone users; they can also be accessed by individuals using other iOS devices, such as iPads and Mac computers. This cross-platform compatibility allows for seamless sharing and viewing experiences across different devices and operating systems.
Now that you have a basic understanding of what a shared album is, let’s explore the different methods you can use to access them on your iPhone.
How to Access a Shared Album on iPhone
Sharing photos and albums with friends and family has become incredibly convenient with smartphones. If you have received an invitation to access a shared album on your iPhone, you might be wondering how to access it. Fortunately, there are multiple methods available that allow you to effortlessly access shared albums. In this article, we will explore three simple methods to access a shared album on your iPhone.
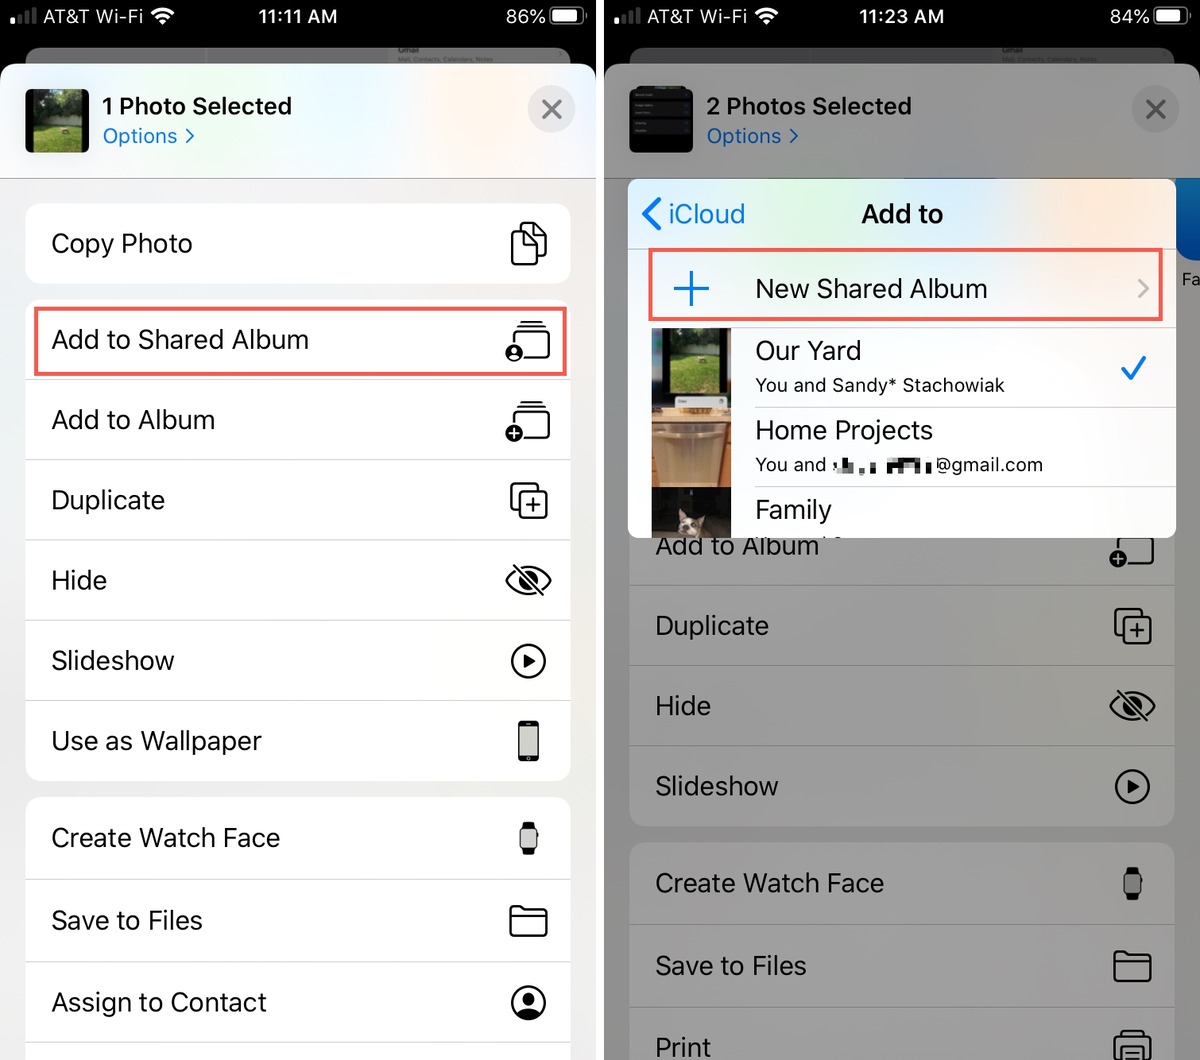
Method 1: Accessing a Shared Album through the Photos App
The easiest way to access a shared album on your iPhone is through the built-in Photos app. Here’s how:
- Open the Photos app on your iPhone.
- Tap on the “Albums” tab at the bottom of the screen.
- Scroll down and locate the “Shared Albums” section.
- Tap on the shared album you want to access.
- You can now view and interact with the photos in the shared album.
Method 2: Accessing a Shared Album through a Shared Link
If you have received a shared link to an album, you can also access it directly from the link. Follow these steps:
- Open the shared link in any web browser on your iPhone.
- You will be redirected to the shared album page.
- Tap on the “Open in Photos” button.
- This will open the shared album in your Photos app, allowing you to view and save the photos.
Method 3: Accessing a Shared Album through the iCloud Shared Albums Tab
If you have iCloud set up and the shared album is connected to your iCloud account, you can also access it through the iCloud Shared Albums tab. Here’s how:
- Open the Photos app on your iPhone.
- Tap on the “Shared” tab at the bottom of the screen.
- Look for the shared album you wish to access.
- Tap on the shared album to view its contents.
With these three simple methods, accessing a shared album on your iPhone becomes a breeze. Whether it’s through the Photos app, a shared link, or the iCloud Shared Albums tab, you can easily view and engage with the shared photos. So, go ahead and enjoy the memorable moments captured in the shared albums on your iPhone!
Sign in to iCloud
To access a shared album on your iPhone, the first step is to sign in to your iCloud account. iCloud is Apple’s cloud storage service that allows you to sync your photos, videos, and other files across all your Apple devices. By signing in to iCloud, you can easily access and manage any shared albums you have created or have been invited to.
To sign in to iCloud, follow these steps:
- Open the Settings app on your iPhone.
- Tap on your name at the top of the Settings menu.
- Scroll down and tap on “iCloud.”
- Enter your Apple ID and password when prompted.
- Once you have successfully signed in to iCloud, you are ready to access your shared albums.
It is important to note that you need to have an iCloud account configured on your iPhone to access shared albums. If you don’t have an iCloud account, you can easily create one by tapping on “Create a new Apple ID” when prompted to sign in.
Open the Photos app
Once you have received a shared album invitation or link, you can access it by following these simple steps:
To begin, locate and open the Photos app on your iPhone. The Photos app is represented by a colorful icon that resembles a sunflower. It is usually found on your home screen or in the app drawer.
When you open the app, you will be taken to the “Photos” tab, which displays all the photos and videos in your local library. To access the shared album, you will need to switch to the “Albums” tab, which is located at the bottom of your screen.
Navigate to the bottom of the screen and tap on the “Albums” tab. This will open a list of all the albums on your device, including the shared albums you have been invited to.
Scroll through the list of albums until you find the one you want to access. Shared albums are usually labeled with the name of the person or group who created them. Once you’ve found the album, give it a tap to open it.
After opening the shared album, you can view all the photos and videos that have been shared with you. You can swipe left or right to browse through the media files, and pinch to zoom in or out to get a closer look at the photos.
If you want to save any of the photos or videos to your own library, simply select the media file and tap on the “Save” button, which looks like a downward-facing arrow. This will save the selected item to your local Photos library, so you can access it even when the shared album is no longer available.
Moreover, you can also like, comment, and share photos within the shared album. This allows you to interact with the other participants and make the experience more engaging and fun.
Remember, accessing a shared album through the Photos app allows you to have all the photos and videos in one convenient location, making it easy to relive and cherish the memories shared with others.
Go to the Shared Albums tab
Once you have accepted the invitation to view a shared album on your iPhone, you can easily access the album through the Shared Albums tab in the Photos app. Here’s how:
1. Open the Photos app on your iPhone.
2. At the bottom menu, tap on the “Albums” tab.
3. Scroll down until you see the “Shared Albums” tab. Tap on it to open.
4. In the Shared Albums section, you will find all the albums that have been shared with you. Tap on the album you want to access.
5. Once you are in the shared album, you can view and interact with the photos, comment, like, and even add your own photos if the album allows it.
By using the Shared Albums tab, you have a dedicated space on your iPhone to access and enjoy the photos and videos shared with you by your friends, family, or colleagues. It provides a convenient way to keep track of all the shared albums in one place.
If you want to remove a shared album from the Shared Albums tab, simply tap on the “Edit” button, then tap on the “Minus” icon next to the album you want to remove. Confirm the deletion by tapping on the “Remove” button.
Accessing a shared album on your iPhone is a seamless process, giving you the opportunity to cherish and relive precious moments captured by your loved ones.
Select the desired album
Once you have successfully accessed the Shared Albums section of the Photos app, it’s time to select the specific album you want to explore. You will see a list of all the albums that have been shared with you.
Scroll through the list to find the album you’re looking for. Albums are sorted chronologically, with the most recent ones appearing first. If you’re having trouble finding a specific album, you can use the search bar at the top of the screen to quickly locate it.
When you find the desired album, simply tap on it to open it. The contents of the album will then be displayed on your screen.
Keep in mind that the accessibility of certain features within the album may vary depending on the permissions set by the album owner. For example, the ability to add or delete photos, like or comment on photos, and save photos to your device may or may not be permitted.
Now that you have successfully selected the desired album, you can start exploring the shared photos and videos within it. Enjoy the experience of accessing and viewing the shared memories captured by your friends, family, or colleagues.
In conclusion, accessing a shared album on your iPhone is a convenient way to view and share photos with your friends and family. Whether you’re using the native Photos app or a third-party app like Google Photos, the process is relatively straightforward. By following the steps outlined in this article, you can easily access and enjoy the shared memories captured by your loved ones.
FAQs
1. Can I access a shared album on my iPhone?
Yes, you can easily access a shared album on your iPhone. Apple provides a native feature called “Shared Albums” that allows you to showcase and access photos and videos with your family, friends, or colleagues.
2. How do I access a shared album on my iPhone?
To access a shared album on your iPhone, follow these steps:
- Launch the Photos app on your iPhone.
- Scroll down to the “Shared” tab located at the bottom of the screen.
- Tap on the “Shared” tab to open it.
- You will see a list of shared albums you have access to. Tap on the album you want to view.
- Once you open the shared album, you can browse through the photos and videos shared within.
3. Can I add my own photos to a shared album on my iPhone?
Yes, you can contribute your own photos to a shared album on your iPhone. To add your own photos, follow these steps:
- Open the shared album you want to add photos to.
- Tap on the “Add” button located at the bottom of the screen.
- Select the photos you want to add from your camera roll or other albums.
- Tap on “Done” to confirm and add the selected photos to the shared album.
4. How can I invite others to view or contribute to a shared album on my iPhone?
To invite others to view or contribute to a shared album on your iPhone, follow these steps:
- Open the shared album you want to invite others to.
- Tap on the “People” button located at the top-right corner of the screen.
- Tap on the “Invite People” option.
- Select the desired method to invite others, such as through Messages or Mail.
- Enter the contact details of the people you want to invite and send the invitation.
5. Can I remove someone from a shared album on my iPhone?
Yes, you have the ability to remove someone from a shared album on your iPhone. To remove someone, follow these steps:
- Open the shared album you want to remove someone from.
- Tap on the “People” button located at the top-right corner of the screen.
- Find the person you want to remove and swipe left on their name.
- Tap on the “Remove” option to remove them from the shared album.