
Have you ever found yourself in a situation where you desperately needed some uninterrupted time with your iPhone? Whether it’s during an important meeting, a relaxing evening, or a crucial nap, we’ve all been there. Thankfully, iOS provides a useful feature called “Do Not Disturb” (DND) that can help you silence your iPhone temporarily. But how exactly do you put your iPhone on DND? In this article, we’ll guide you through the process step by step, ensuring that you can enjoy some peace and quiet whenever you need it. So, let’s dive in and discover how to put your iPhone on DND and regain control over those incessant notifications!
Inside This Article
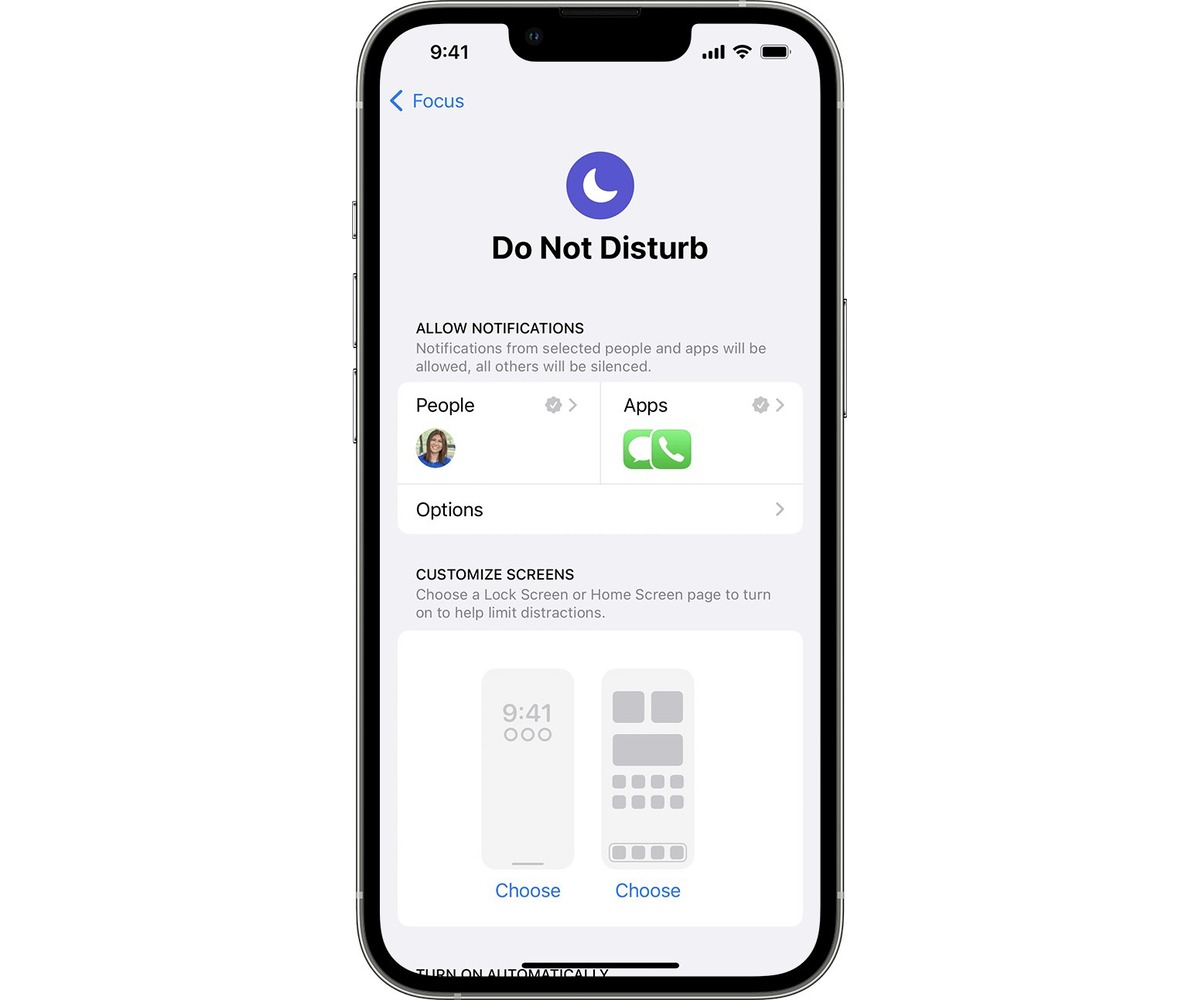
- Enabling Do Not Disturb on iPhone
- Customizing Do Not Disturb Settings
- Scheduling Do Not Disturb Mode
- Allowing Calls From Certain Contacts and Repeated Calls
- Conclusion
- FAQs
Enabling Do Not Disturb on iPhone
When you’re in need of uninterrupted time or simply want to minimize disruptions, activating the Do Not Disturb feature on your iPhone can be immensely helpful. Do Not Disturb allows you to silence calls, notifications, and alerts, ensuring a peaceful and distraction-free experience. Fortunately, enabling this feature is incredibly easy. Here’s how:
1. Open the Settings app on your iPhone. It can be found on your home screen.
2. Scroll down and tap on “Do Not Disturb.”
3. On the next screen, you’ll see a toggle switch labeled “Manual.” Slide it to the right to turn on Do Not Disturb. You’ll notice a crescent moon icon appear in the top right corner of your screen, indicating that Do Not Disturb is now activated.
That’s it! Your iPhone is now in Do Not Disturb mode, meaning all incoming calls and notifications will be silenced until you disable the feature.
Keep in mind that when Do Not Disturb is enabled, notifications will still be received, but they won’t cause your device to make sounds or display alerts. Instead, they’ll be stored silently in the Notification Center, which you can access by swiping down from the top of the screen.
Additionally, by default, your iPhone will automatically turn on Do Not Disturb when the device is locked. This ensures that you’re not disturbed by notifications while you’re in a meeting, sleeping, or simply want some uninterrupted time. However, you can manually override this setting if you prefer.
In the next sections, we will explore how to further customize Do Not Disturb settings, schedule it to activate automatically during specific times, and allow calls from certain contacts even when Do Not Disturb is enabled.
Customizing Do Not Disturb Settings
When it comes to customizing the Do Not Disturb settings on your iPhone, you have a range of options to tailor it according to your preferences. Here are some key settings you can adjust:
- Silence: You can choose to silence calls and notifications completely or allow them to display on your screen silently.
- Scheduled: This setting allows you to set a specific time range during which Do Not Disturb mode will automatically activate. Whether it’s for a daily meeting or a quiet night’s sleep, you can ensure that you won’t be interrupted.
- Allow Calls From: In this setting, you can decide whether to allow calls from everyone, no one, or only your favorites. Selecting the “Favorites” option ensures that important calls can still get through even when Do Not Disturb mode is active.
- Repeated Calls: Enabling this option allows a second call from the same person to bypass Do Not Disturb mode. This can be useful in emergency situations or when someone needs to reach you urgently.
- Respond With Text: If you don’t want to leave someone hanging, you can set up an automatic response to let them know that you’re currently unavailable due to Do Not Disturb mode. This feature comes with pre-set text messages or the option to customize your own.
To customize these settings, follow these steps:
- Open the Settings app on your iPhone.
- Scroll down and tap on “Do Not Disturb”.
- Adjust the settings according to your preferences.
By customizing the Do Not Disturb settings on your iPhone, you can ensure that you have greater control over your interruptions and enjoy uninterrupted focus when you need it most.
Scheduling Do Not Disturb Mode
Do Not Disturb mode on your iPhone can be easily scheduled to automatically activate and deactivate at specific times. This feature is particularly useful if you want to avoid any disruptions during certain hours of the day or when you’re sleeping. Here’s how you can schedule Do Not Disturb mode on your iPhone:
- Open the Settings app on your iPhone.
- Scroll down and tap on “Do Not Disturb.”
- Toggle on the “Scheduled” switch.
- Set the “From” and “To” times to specify when you want Do Not Disturb mode to start and end.
- You can also choose to enable the “Bedtime Mode” option. When this option is turned on, Do Not Disturb mode will automatically activate during your scheduled bedtime, which is set in the Clock app.
With the scheduled Do Not Disturb mode, you can ensure that your iPhone remains quiet and undisturbed during specific times, allowing you to focus, relax, or sleep without any interruptions. Whether it’s during important meetings, study sessions, or personal time, you have the flexibility to tailor Do Not Disturb mode according to your needs and preferences.
Allowing Calls From Certain Contacts and Repeated Calls
Do Not Disturb mode on the iPhone allows you to silence calls, notifications, and alerts. However, in certain situations, you may still want to receive important calls from specific contacts or handle repeated calls that could be urgent. Luckily, with the iPhone’s Do Not Disturb settings, you can easily allow calls from certain contacts and repeated calls to come through, ensuring that you don’t miss any important communication.
To allow calls from certain contacts while in Do Not Disturb mode, follow these steps:
- Open the Settings app on your iPhone.
- Scroll down and tap on “Do Not Disturb.”
- Under the “Allow Calls From” section, select “Allow Calls From.”
- Here, you have three options: “Everyone,” “No One,” or “Favorites.”
- If you choose “Everyone,” all calls will come through.
- If you select “No One,” all calls will be silenced.
- Choosing “Favorites” will allow calls only from your designated favorites contacts.
- To add contacts to your favorites, tap on “Favorites” and then tap on “Add Contact.”
- Select the contacts you want to add as favorites and tap “Done.”
This way, when you enable Do Not Disturb mode, calls from your chosen favorite contacts will still ring through, ensuring that important calls can reach you even when you are limiting distractions.
In addition to allowing calls from certain contacts, you can also choose to handle repeated calls differently while in Do Not Disturb mode. This can be useful in emergency situations or when you want to ensure that urgent calls can reach you.
Here’s how to enable repeated calls to bypass Do Not Disturb:
- Go back to the “Do Not Disturb” settings menu.
- Scroll down to “Repeated Calls.”
- Toggle the switch to enable it.
When this feature is enabled, if someone calls you twice within a three-minute window, the second call will not be silenced, even if you have Do Not Disturb mode turned on.
By allowing calls from certain contacts and enabling repeated calls to bypass Do Not Disturb, you can strike a balance between limiting distractions and ensuring that you don’t miss any important communication.
Conclusion
Putting your iPhone on Do Not Disturb (DND) is a simple and effective way to regain control of your device’s notifications and enjoy uninterrupted moments. Whether you’re in a meeting, need some peaceful downtime, or simply want to avoid distractions, enabling DND on your iPhone can provide the necessary respite.
With just a few taps, you can activate DND mode and enjoy a phone-free experience without worrying about missed calls or notifications. You can even customize the settings to allow important contacts to break through the silence, ensuring you stay connected to what matters most.
Remember, DND mode can be quickly toggled on and off through the Control Center, making it a convenient feature to have at your fingertips. So, take advantage of this functionality, put your iPhone on DND, and savor moments of uninterrupted peace and focus.
FAQs
1. How do I put my iPhone on Do Not Disturb (DND) mode?
To put your iPhone on Do Not Disturb mode, simply follow these steps:
- Swipe up from the bottom of your screen to access the Control Center.
- Tap on the crescent moon icon to activate Do Not Disturb mode. The icon will turn purple when enabled.
- Alternatively, you can enable Do Not Disturb mode by going to Settings > Do Not Disturb and toggling on the feature.
2. Can I schedule Do Not Disturb mode on my iPhone?
Yes, you can schedule Do Not Disturb mode on your iPhone. This feature allows you to automatically enable and disable Do Not Disturb mode at specific times or during recurring events. To set up a schedule, follow these steps:
- Go to Settings > Do Not Disturb.
- Toggle on the “Scheduled” switch.
- Set the desired start and end times for the Do Not Disturb mode.
- You can also choose whether you want the schedule to repeat daily or only on specific days of the week.
3. Will I still receive calls and messages in Do Not Disturb mode?
In Do Not Disturb mode, you can customize the settings to allow certain calls and messages to come through. By default, your iPhone is set to receive calls from your favorites and repeated calls within three minutes. However, you can adjust these settings to suit your preferences. To do this, follow these steps:
- Go to Settings > Do Not Disturb.
- Scroll down to the “Allow Calls From” section.
- Select the desired option, such as “Favorites” or “Everyone.”
4. Will alarms still work in Do Not Disturb mode?
Yes, alarms will still sound even if your iPhone is in Do Not Disturb mode. This ensures that important wake-up calls or reminder alarms are not silenced. However, it’s important to note that notifications and alerts from apps will be muted until you disable Do Not Disturb mode.
5. Can I allow certain apps or contacts to bypass Do Not Disturb mode?
Unfortunately, it is not possible to individually allow specific apps or contacts to bypass Do Not Disturb mode on iPhones. The settings apply universally, and all notifications will be muted unless you customize the settings to allow calls from specific numbers or favorites. However, you can always check your missed notifications when you disable Do Not Disturb mode.