
Do Not Disturb (DND) is a handy feature on the iPhone 13 that allows you to maintain your focus and uninterrupted peace of mind. Whether you’re in a meeting, taking a nap, or simply need some quiet time, DND helps you stay undisturbed by muting notifications, calls, and alerts.
The iPhone 13 takes DND functionality to the next level with added customization options and enhanced features. In this article, we will explore how Do Not Disturb works on the iPhone 13 and how you can make the most of this feature to optimize your phone usage. From scheduling DND sessions to creating exceptions for important contacts and emergencies, we’ll cover it all.
So, if you’re curious about how to silence your iPhone 13 effectively and minimize distractions, keep reading to discover the ins and outs of Do Not Disturb mode.
Inside This Article
- What is “Do Not Disturb” on iPhone 13?
- Enabling “Do Not Disturb” on iPhone 13
- Customizing “Do Not Disturb” settings on iPhone 13
- “Do Not Disturb” options and features on iPhone 13
- Conclusion
- FAQs
What is “Do Not Disturb” on iPhone 13?
The “Do Not Disturb” feature on iPhone 13 is a powerful tool that allows you to temporarily silence notifications, calls, and alerts, ensuring you can focus on what matters without any interruptions. Whether you need to concentrate on a task, have a moment of peace, or simply want to avoid any disruptions during specific hours, “Do Not Disturb” is here to help.
With “Do Not Disturb,” you have the flexibility to choose when and how notifications are muted. You can set it to activate manually whenever you want or schedule it to turn on automatically during certain times. This way, you can have a peaceful night’s sleep without being disturbed by incoming calls or notifications from various apps.
When “Do Not Disturb” is enabled, your iPhone 13 will still receive notifications, but they won’t play a sound or vibration, and the screen won’t light up. Instead, they will be discreetly displayed in the Notification Center, allowing you to check them at your convenience.
Moreover, “Do Not Disturb” offers additional features to enhance its functionality. You can enable the option to allow repeated calls, which ensures that if someone calls you multiple times within a short period, the call will go through. This is especially useful for urgent situations or when you need to be reachable by specific contacts.
With customizable settings, you can choose to receive calls from your favorite contacts even when “Do Not Disturb” is enabled. This way, you won’t miss important calls from your loved ones, while still enjoying a peaceful environment.
Enabling “Do Not Disturb” on iPhone 13
Do Not Disturb is a useful feature on the iPhone 13 that allows you to temporarily silence all incoming calls, notifications, and alerts. Whether you’re in a meeting, enjoying some downtime, or simply want to avoid distractions, enabling Do Not Disturb can help you maintain focus and peace of mind.
To enable Do Not Disturb on your iPhone 13, you have a couple of options. The easiest way is to swipe down from the top right corner of the screen to open the Control Center. Alternatively, you can go to Settings, then scroll down and tap on “Do Not Disturb.”
Once you’re in the Control Center or the Do Not Disturb settings, you’ll see a crescent moon icon. Simply tap on it to activate Do Not Disturb mode. When enabled, the icon will turn purple, indicating that Do Not Disturb is active.
By default, enabling Do Not Disturb will silence all incoming calls and notifications. However, you can customize the settings to allow certain calls or notifications to get through. This is particularly useful if you’re expecting an important call or need to stay connected to certain apps.
To customize Do Not Disturb settings, go to Settings on your iPhone 13 and tap on “Do Not Disturb.” Here, you’ll find a range of options to tailor Do Not Disturb to your preferences.
One option is to allow calls from specific contacts to bypass Do Not Disturb. You can create a favorites list, or select “Allow Calls From” and choose a group of contacts such as “All Contacts,” “No One,” or “Everyone.”
In addition to calls, you can also choose to allow repeated calls to go through. This means that if someone calls you twice within three minutes, the second call will not be silenced by Do Not Disturb. It’s a useful setting to ensure that urgent calls from certain contacts are not missed.
Furthermore, you can set a schedule for Do Not Disturb to automatically activate and deactivate at specific times. This is perfect if you want to have uninterrupted moments during bedtime or certain hours of the day.
Once you’ve customized the Do Not Disturb settings to your liking, all that’s left to do is enjoy the peace and quiet. You can easily disable Do Not Disturb by tapping on the crescent moon icon in the Control Center or going back to the Do Not Disturb settings and disabling the toggle.
Enabling Do Not Disturb on your iPhone 13 is a simple and effective way to control your notifications and ensure you’re not interrupted when you don’t want to be. Give it a try and experience a more focused and uninterrupted iPhone experience.
Customizing “Do Not Disturb” settings on iPhone 13
Do Not Disturb is a convenient feature on iPhone 13 that allows you to customize your device’s settings so that you can enjoy uninterrupted periods of time without any distractions. Whether you’re in a meeting, trying to focus on work, or simply need some downtime, customizing your Do Not Disturb settings can help you create a peaceful environment without constantly being bombarded by notifications.
To customize your Do Not Disturb settings on iPhone 13, follow these simple steps:
- Open the “Settings” app on your iPhone 13.
- Scroll down and tap on “Do Not Disturb.”
- Here, you’ll find various options to tailor your Do Not Disturb settings according to your preferences.
One of the first customization options you’ll encounter is the ability to schedule when Do Not Disturb is automatically enabled. This feature allows you to set specific times during which notifications will be silenced. To set a schedule, simply tap on “Scheduled” and configure the start and end times according to your needs. You can also choose to repeat the schedule on specific days of the week.
In addition to scheduling, you can further customize Do Not Disturb settings by enabling options such as “Allow Calls from Favorites” or “Repeated Calls.” Enabling “Allow Calls from Favorites” ensures that you still receive calls from your favorite contacts, even when Do Not Disturb is enabled. On the other hand, enabling “Repeated Calls” allows a second call from the same person within three minutes to come through, as it may be an urgent matter.
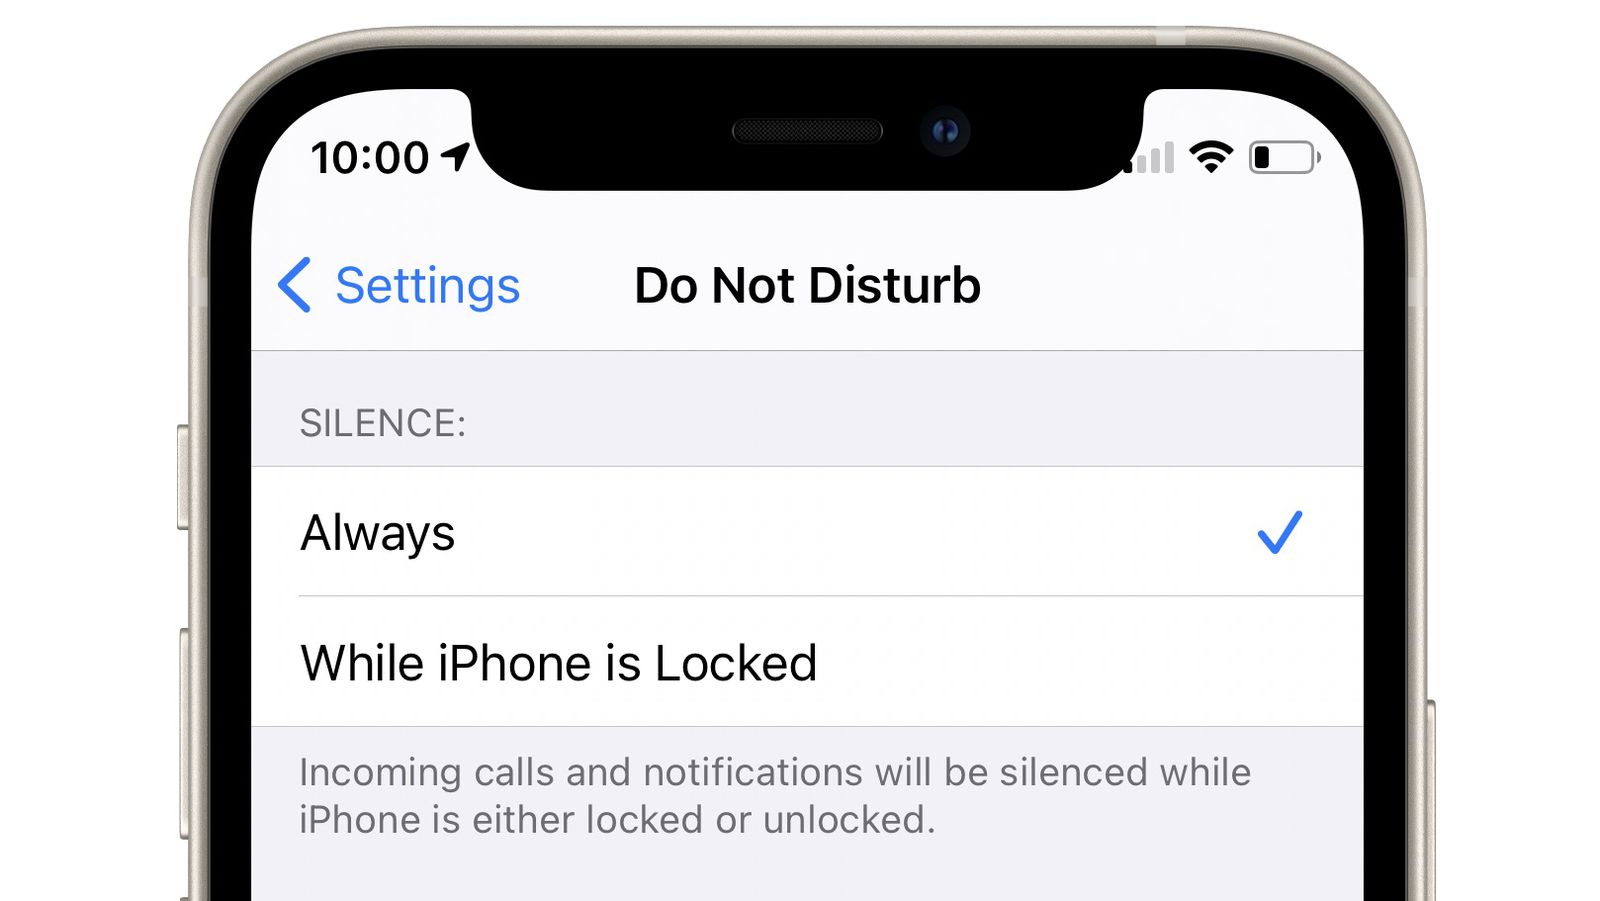
If you don’t want any exceptions to your Do Not Disturb setting, you can simply enable “Silence” mode. This will make sure that all calls, notifications, and alerts are silenced, ensuring uninterrupted tranquility. You can also choose to allow notifications from specific apps by selecting “Allow Notifications” and selecting the apps you want to receive notifications from even when Do Not Disturb is turned on.
Furthermore, you have the option to set Do Not Disturb for specific situations. For instance, you can enable Do Not Disturb while driving to prevent distractions while on the road. This can be done by tapping on “Activate” under the “Do Not Disturb While Driving” section and selecting “Automatically” or “When Connected to Car Bluetooth.
To ensure that you don’t miss any important notifications, you can enable “Repeated Text Messages” under the “Messages” settings. This feature allows your iPhone 13 to notify you repeatedly if you receive multiple messages in a short period. You can also create an “Emergency Bypass” for specific contacts, which will allow their calls and messages to bypass Do Not Disturb settings.
By taking advantage of the customization options available with Do Not Disturb on iPhone 13, you can truly tailor your device’s behavior to suit your needs. Whether you want to mute notifications during specific hours, prioritize calls from loved ones, or silence distractions while driving, Do Not Disturb offers a range of features to help you achieve a more peaceful and focused experience with your iPhone 13.
“Do Not Disturb” options and features on iPhone 13
The “Do Not Disturb” feature on iPhone 13 offers a range of options and features that allow you to customize and control your phone’s notifications and interruptions. Whether you need some quiet time or want to avoid disruptions during important activities, the “Do Not Disturb” options on iPhone 13 have got you covered.
Let’s take a closer look at some of the key options and features available:
- Schedule: One of the most useful features of “Do Not Disturb” is the ability to set a schedule. You can specify a time period during which your iPhone 13 will automatically activate “Do Not Disturb” mode. This is perfect for blocking out distractions when you want to focus or ensuring a peaceful night’s sleep.
- Allow Calls: While in “Do Not Disturb” mode, you can choose to allow calls from specific contacts or groups. This means that even if your phone is in silent mode, you’ll still receive calls from important people like family members, close friends, or colleagues.
- Repeated Calls: Enabling the “Repeated Calls” option ensures that if the same person calls you again within three minutes, the call will not be silenced. This is particularly handy in emergency situations where you need to be reachable.
- Bedtime Mode: The Bedtime Mode option is a part of “Do Not Disturb” and helps you wind down before sleep. When enabled, it dims the display and automatically silences calls and notifications until morning. This feature promotes better sleep hygiene and reduces disturbances during your restful hours.
- Silence: You can determine how “Do Not Disturb” mode affects your phone’s alerts. You have the option to silence all calls, notifications, and vibrations, or you can choose to allow certain alerts to break through the silence, like alarms or urgent messages.
- Driving Mode: “Do Not Disturb” has a built-in driving mode that can be automatically activated when you’re behind the wheel. It helps minimize distractions by muting calls and notifications, allowing you to focus on the road. You can even set up auto-replies to let people know you’re driving and will respond later.
By leveraging the various options and features offered by “Do Not Disturb” on your iPhone 13, you can regain control over your notifications and create a more focused and uninterrupted mobile experience.
Conclusion
The Do Not Disturb feature on the iPhone 13 is an invaluable tool for managing your notifications and maintaining uninterrupted focus. Whether you’re in an important meeting, enjoying quality time with loved ones, or simply needing some time to yourself, Do Not Disturb can provide the peace and quiet you desire without missing any critical notifications.
By customizing your Do Not Disturb settings, you can establish specific time periods, allow calls from specific contacts, and even configure repeated calls to ensure you never miss any urgent matters. The various options and flexibility make it easy to tailor the feature to your individual needs.
With its seamless integration, intuitive interface, and powerful functionality, Do Not Disturb on the iPhone 13 sets a new standard for managing notifications and maintaining focus in our digital age. So, take advantage of this remarkable feature and reclaim control over your device, allowing you to live your life on your terms and stay connected on your own schedule.
FAQs
1. How does Do Not Disturb work on iPhone 13?
2. Can I customize the Do Not Disturb settings on my iPhone 13?
3. Will Do Not Disturb block all notifications on iPhone 13?
4. Can I set up a schedule for Do Not Disturb on my iPhone 13?
5. Can I use Do Not Disturb while driving on my iPhone 13?