
In today’s technologically advanced world, our smartphones have become an integral part of our lives. One of the most popular smartphones on the market is the iPhone, loved for its sleek design and powerful features. With the iPhone, you can do so much more than just make calls and send messages. One useful feature is the ability to record phone calls. Whether it’s for professional purposes, legal documentation, or simply for personal reference, recording phone calls can be incredibly handy. In this article, we will explore the various methods and apps available to quickly and easily record phone calls on your iPhone, so you can never miss out on important conversations again.
Inside This Article
- Methods to Record Phone Calls on iPhone
- Legal Considerations for Recording Phone Calls on iPhone
- How to Use Voice Memo App to Record Phone Calls on iPhone
- How to Use Third-Party Call Recording Apps on iPhone
- How to Utilize Phone Service Provider Options to Record Phone Calls on iPhone
- How to Record Phone Calls on iPhone Using Speakerphone and External Recorder
- Conclusion
- FAQs
Methods to Record Phone Calls on iPhone
Recording phone calls can be useful for a variety of reasons, from capturing important conversations to creating a record of interviews or business meetings. If you’re an iPhone user, there are several methods available to record phone calls on your device. In this article, we will explore four different methods: using the Voice Memo app, utilizing third-party call recording apps, taking advantage of phone service provider options, and using the speakerphone and an external recorder.
Voice Memo App
The Voice Memo app is a built-in feature on your iPhone that allows you to record audio directly. While the app was primarily designed for taking voice notes, you can also use it to record phone calls. Here’s how:
- Enable the Voice Memo app on your iPhone. If it’s not visible on your home screen, you can find it by swiping down and using the search feature.
- During a phone call, open the Voice Memo app and tap the record button to start recording.
- Once you’ve finished recording, tap the stop button. Your recorded phone calls will be saved in the Voice Memo app.
Third-Party Call Recording Apps
If you prefer more advanced features and customization options, you can turn to third-party call recording apps. These apps are available on the App Store and offer additional functionalities to enhance your recording experience. Here’s how to use them:
- Research and choose a reliable call recording app from the App Store. Popular options include TapeACall, Call Recorder – IntCall, and Rev Call Recorder.
- Download and install the chosen call recording app on your iPhone.
- Follow the app’s instructions to set it up and grant necessary permissions.
- Once installed, open the call recording app before making or receiving phone calls to record them automatically.
- You can access and manage your recorded phone calls through the call recording app.
Phone Service Provider Options
Some phone service providers offer call recording features as part of their services. Check with your service provider to see if they provide this option. Here’s how you can utilize it:
- Verify if your service provider offers call recording features and if it is available in your subscription package.
- Contact your service provider’s customer support and request activation of the call recording service, if applicable.
- Follow your service provider’s instructions to enable call recording on your iPhone.
- Once activated, you can easily record phone calls by using the designated key or feature provided by your service provider.
- Your recorded phone calls can be accessed and managed through your service provider’s platform.
Speakerphone and External Recorder
If you don’t want to rely on apps or service provider options, you can use the speakerphone feature on your iPhone and an external recorder to capture phone calls. Here’s how:
- During a phone call, activate the speakerphone mode on your iPhone.
- Position your iPhone near an external recorder, such as a handheld recorder or a separate mobile device with a recording app.
- Press record on the external recording device to start capturing the conversation.
- Deactivate the speakerphone mode on your iPhone to improve call quality and privacy.
- Your recorded phone calls will be saved on the external recording device for you to access and manage.
Remember, it’s vital to familiarize yourself with local laws and regulations regarding phone call recordings. Always obtain the consent of all parties involved in the call and use call recordings ethically and responsibly.
By using these different methods, you can easily record phone calls on your iPhone to keep important conversations and valuable information organized and accessible.
Legal Considerations for Recording Phone Calls on iPhone
Familiarize Yourself with Local Laws
Before recording any phone calls on your iPhone, it is crucial to familiarize yourself with the local laws and regulations regarding call recordings. Different countries and regions have varying rules on call recording, including requirements for consent, disclosure, and intended use of the recordings. By understanding the legal framework, you can ensure that you comply with the applicable laws and avoid any potential legal consequences.
Consent of All Parties Involved
Obtaining the consent of all parties involved in the phone call is usually a fundamental legal requirement when recording phone calls on your iPhone. Before hitting that record button, it is essential to inform all participants that the call is being recorded and obtain their explicit permission. This applies to both incoming and outgoing calls. Consent ensures that the recorded conversations are done ethically and legally.
Use of Call Recording for Personal or Professional Purposes
When recording phone calls on your iPhone, it is essential to have a clear understanding of your intended use of the recorded calls. Are you capturing calls for personal reference, such as recording important conversations or interviews? Or are you recording calls for professional purposes, such as documenting business transactions or client interactions?
While the use of call recordings for personal purposes may not raise significant legal concerns, using recordings for professional purposes may require additional considerations. If you plan to use the recordings for business-related activities, it is advisable to consult legal counsel or seek guidance from your organization’s policies to ensure compliance with any industry-specific regulations or legal requirements.
How to Use Voice Memo App to Record Phone Calls on iPhone
The Voice Memo app is a built-in feature on iPhones that allows you to record audio. While it was primarily designed for recording voice memos, you can also use it to record phone calls on your iPhone. Follow these steps to use the Voice Memo app for call recording:
1. Enable Voice Memo App on iPhone: By default, the Voice Memo app is installed on your iPhone. If you can’t find it on your home screen, you can search for it using the Spotlight Search. If you don’t have the app on your device, visit the App Store and install it.
2. Start a Voice Memo Recording During a Phone Call: Once you have located the Voice Memo app, open it and adjust the recording settings if needed. During a phone call, put the call on speakerphone and launch the Voice Memo app. Tap the red record button to start recording your conversation.
3. Save and Access Recorded Phone Calls in the Voice Memo App: After you have finished recording the call, tap the stop button within the Voice Memo app to end the recording. The recorded phone call will automatically be saved within the app. You can access and listen to your recorded phone calls by opening the Voice Memo app and selecting the appropriate recording from the list.
Remember to inform the other party involved in the call that you are recording it, as this may be required by local laws. Additionally, note that the Voice Memo app may have limitations in terms of call quality and duration, so consider these factors before relying solely on this method for call recording.
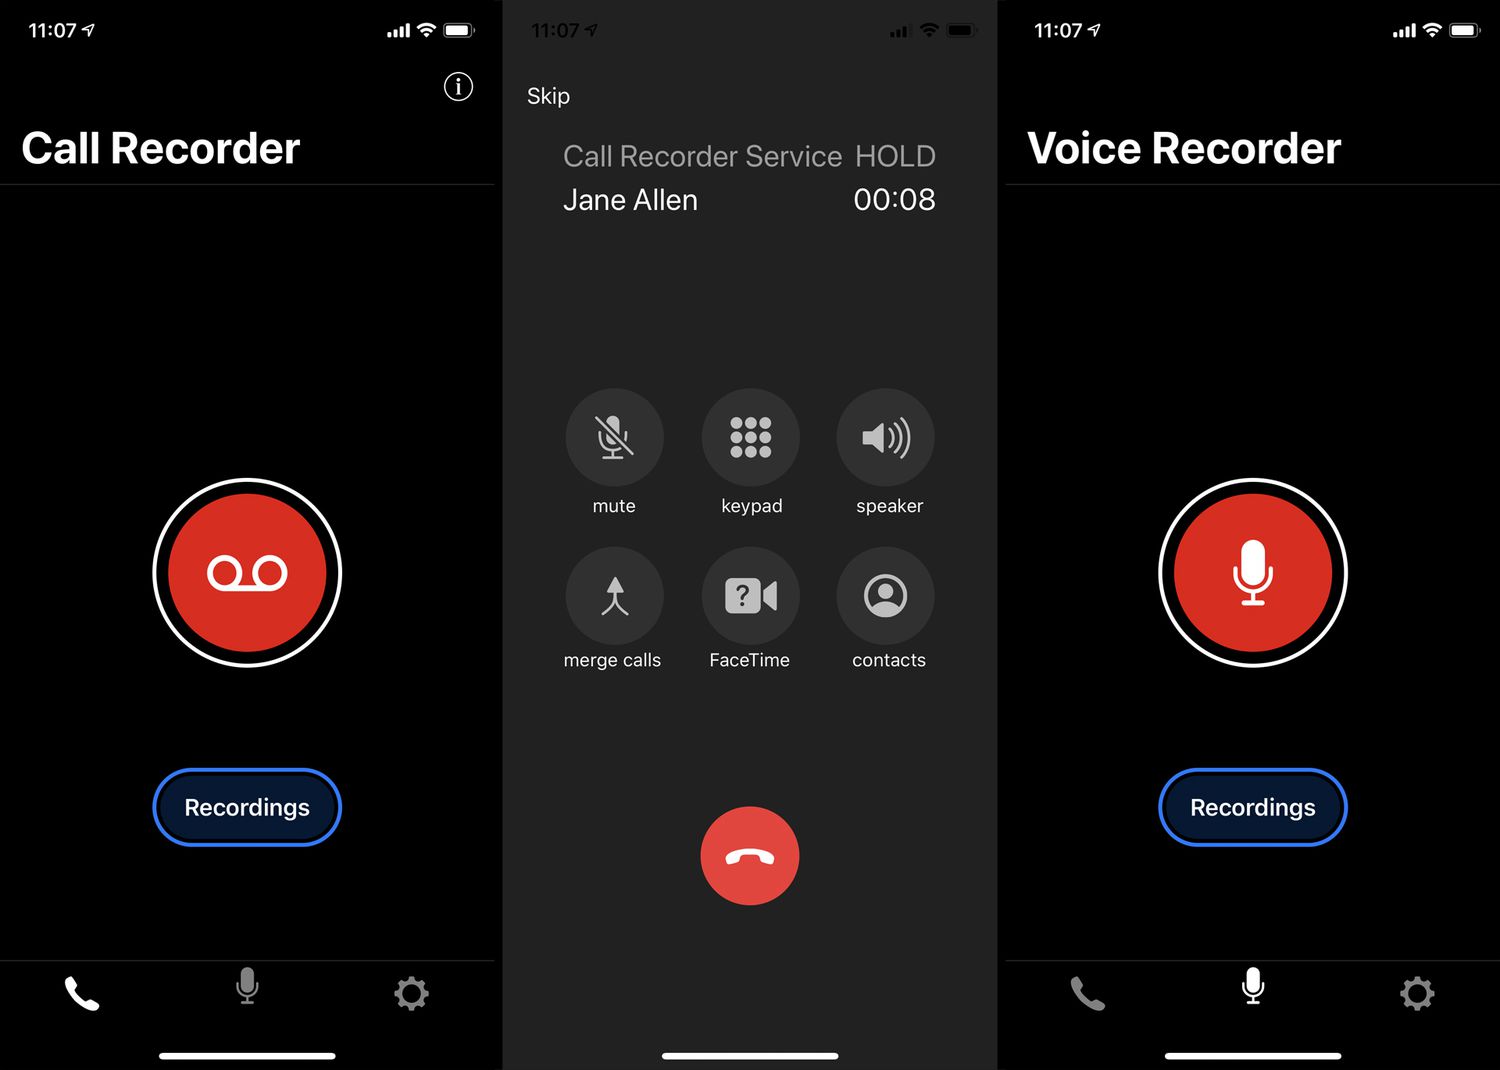
How to Use Third-Party Call Recording Apps on iPhone
Using third-party call recording apps on your iPhone is a convenient way to record phone calls for various purposes. Whether you need to keep an important conversation for future reference or want to have a record of a professional discussion, these apps can be a valuable tool. Here’s a step-by-step guide on how to use third-party call recording apps on your iPhone.
The first step is to research and choose a reliable call recording app from the App Store. Look for apps that have positive user reviews and high ratings. Pay attention to features such as call recording quality, ease of use, and compatibility with your iPhone model and operating system.
Once you have found the app that suits your needs, download and install it on your iPhone. Follow the on-screen instructions provided by the app to complete the installation process. Make sure to grant any necessary permissions requested by the app.
After the installation is complete, launch the call recording app on your iPhone. Familiarize yourself with the app’s interface and settings. Most call recording apps have a simple and user-friendly interface, making it easy to navigate and access the recording feature.
When you want to record a phone call, open the call recording app and follow the instructions provided. Typically, you will need to open the app before making or receiving a call and initiate the recording process from within the app. The app will start recording the call once it’s connected.
During the call, the app will record both sides of the conversation, ensuring that you have a complete and accurate record of the phone call. Some call recording apps also offer additional features like the ability to pause and resume recordings, add notes to recordings, or customize recording settings according to your preferences.
Once the call is finished, the recording will be saved within the call recording app. You can access and manage your recorded phone calls through the app’s interface. Most apps provide options to organize your recordings, search for specific calls, and share recordings via email, messaging apps, or cloud storage platforms.
It’s important to note that the availability and functionality of call recording apps may vary based on your geographical location and local laws. Make sure to review and comply with any legal requirements regarding call recording in your area.
By following these steps, you can effectively use third-party call recording apps on your iPhone and have a convenient way to record and manage your phone calls.
How to Utilize Phone Service Provider Options to Record Phone Calls on iPhone
When it comes to recording phone calls on your iPhone, one convenient option is to utilize the call recording features offered by your phone service provider. This method allows you to seamlessly integrate call recording into your existing phone service and manage your recorded calls through your provider’s platform. Here’s how to make the most of this option:
1. Check if Your Service Provider Offers Call Recording Features: Start by determining if your phone service provider offers call recording as part of its features. Not all providers offer this service, so it’s important to verify if it’s available.
2. Contact Your Service Provider to Activate Call Recording Service: If call recording is offered by your service provider, reach out to their customer support to activate this feature on your account. They will guide you through the necessary steps to enable call recording.
3. Follow Service Provider Instructions to Record Phone Calls on iPhone: Once call recording is activated, your service provider will provide you with instructions on how to initiate the recording process on your iPhone. This may involve specific button combinations or accessing a dedicated recording feature within your phone’s settings.
4. Access and Manage Recorded Phone Calls through Your Service Provider’s Platform: After recording a call, you can typically access and manage your recorded phone calls through your provider’s platform. This may involve logging into an online portal or using a mobile app provided by your service provider. From there, you can play back recordings, organize them, and even download or share them if needed.
It’s important to note that the availability of call recording features and the specific steps may vary depending on your phone service provider. Make sure to follow the instructions provided by your provider and familiarize yourself with their terms and conditions regarding call recording.
By utilizing the call recording options provided by your phone service provider, you can easily record and manage your phone calls on your iPhone without the need for third-party apps or additional hardware. Simply check with your provider, activate the service, follow the instructions, and explore the convenience of recording and accessing your calls all in one place.
How to Record Phone Calls on iPhone Using Speakerphone and External Recorder
Recording phone calls on an iPhone can be done using various methods, and one such option is utilizing the speakerphone mode and an external recorder. This method allows you to capture both sides of the conversation easily. Here’s a step-by-step guide on how to record phone calls on your iPhone using the speakerphone and an external recorder:
1. Activate Speakerphone Mode during Phone Calls
To begin, when you are on a call, tap the speakerphone button located on the call screen. This will activate the speakerphone mode and allow you to continue the conversation hands-free.
2. Position Your iPhone Near an External Recorder
Next, place your iPhone near an external recorder, such as a digital voice recorder or another phone recording device. Make sure that the external recorder is within range of capturing both your voice and the voice of the person you are speaking to.
3. Start Recording on the External Device
Once your iPhone is positioned properly, start the recording on the external device. Refer to the device’s instructions on how to initiate the recording feature.
4. Deactivate Speakerphone Mode to Enhance Call Quality
While recording, it’s recommended to deactivate the speakerphone mode on your iPhone. This can improve the call quality and reduce any echoing or distortion that may occur when the audio is picked up by the iPhone’s internal microphone.
5. Access and Manage Recorded Phone Calls on the External Recorder
After the phone call has ended, you can stop the recording on the external device. The recorded phone call can then be accessed and managed through the features offered by your chosen external recorder. This may involve transferring the recording to a computer or accessing it directly on the device itself.
By using the speakerphone mode on your iPhone and an external recorder, you can easily capture phone conversations. This method provides a convenient and effective way to record important discussions or interviews for personal or professional purposes. Just remember to comply with local laws and regulations concerning phone call recordings and respect the privacy of others.
Conclusion
In conclusion, recording phone calls on your iPhone can be a valuable tool for various purposes, such as documenting important conversations, conducting interviews, or simply capturing memorable moments. With the right app, the process is quick and easy, allowing you to record calls effortlessly.
By following the steps outlined in this article, you can ensure that you have the necessary permissions and settings in place to record phone calls legally and ethically. Whether you choose to use a third-party app or the built-in recording feature of your iPhone, always remember to respect the privacy and consent of the individuals you are communicating with.
Recording phone calls can provide peace of mind, convenience, and a reliable record of important conversations. Just be sure to familiarize yourself with the legal guidelines and check the local regulations in your area before proceeding. Happy recording!
FAQs
1. Can I record phone calls on my iPhone?
Yes, you can. Apple has introduced a call recording feature starting from iOS 14. However, please keep in mind that the laws regarding call recording vary from country to country, so make sure to familiarize yourself with the legalities in your region before recording any phone calls.
2. How do I enable call recording on my iPhone?
To enable call recording on your iPhone, follow these steps:
- Go to the Settings app on your iPhone.
- Scroll down and tap on “Phone”.
- Under “Calls”, enable the “Call Recording” option.
- Once enabled, all your incoming and outgoing calls will be recorded automatically.
3. How can I access and listen to the recorded calls?
To access and listen to your recorded calls, follow these steps:
- Open the Phone app on your iPhone.
- Tap on the “Recents” tab.
- Look for the call you want to listen to and tap on it.
- Scroll down and tap on the “Play” button to listen to the recording.
4. Can I share or save the recorded calls on my iPhone?
Yes, you can. Once you have accessed the recorded call, you have the option to share it or save it to your device. To share the recording, tap on the share icon and choose the desired sharing option. To save the recording, tap on the save icon and select the location where you want to save it.
5. Can I use third-party apps to record phone calls on my iPhone?
Yes, there are several third-party apps available on the App Store that offer advanced call recording features. These apps allow you to record calls, transcribe recordings, and even organize and share them. However, please ensure that you thoroughly research and choose a reputable app to comply with legal requirements and protect your privacy.