
Are you facing a situation where you need to restore your iPhone from an iTunes backup? Well, you’re in the right place! Restoring your iPhone from an iTunes backup can be a lifesaver, especially when you’ve accidentally deleted important data or experienced a device malfunction. In this article, we’ll guide you through the step-by-step process of restoring your iPhone from an iTunes backup, ensuring that you can seamlessly retrieve your precious photos, videos, contacts, and more. Whether you’re a novice or an experienced user, this comprehensive guide will provide you with all the information you need to successfully restore your iPhone from an iTunes backup. So, let’s get started and ensure that you can have your iPhone up and running with your data restored in no time!
Inside This Article
- Understanding iPhone Restores from iTunes Backup
- Step-by-Step Guide to Restoring iPhone from iTunes Backup
- What to do if the iTunes Restore Process Fails
- Troubleshooting Common Issues during iPhone Restoration
- Conclusion
- FAQs
Understanding iPhone Restores from iTunes Backup
When it comes to restoring your iPhone, iTunes backup is one of the most reliable and convenient methods. It allows you to recover your device’s data, settings, apps, and more with just a few simple steps. But what exactly happens when you restore your iPhone from an iTunes backup?
When you initiate the restore process, iTunes accesses the backup file stored on your computer or in iCloud and transfers the data onto your iPhone. This means that all the data and settings from the backup, including contacts, messages, photos, and app data, will replace the existing data on your iPhone.
It’s important to note that restoring your iPhone from an iTunes backup is a complete restore process. This means that any data and settings that were not included in the backup will be permanently lost. Therefore, it is crucial to ensure that you have a recent and comprehensive backup before proceeding with the restore.
During the restore process, iTunes transfers not only the data but also the iOS version that was backed up. This means that if you had a newer version of iOS installed on your iPhone before the restore, it will be rolled back to the version included in the backup.
Additionally, the restore process will also reinstall your apps from the App Store. iTunes will download and install the latest version of each app that was included in the backup, ensuring that all your apps are up to date.
Understanding how iPhone restores from iTunes backup work is essential to ensure a smooth and successful restoration process. By being aware of what to expect, you can confidently proceed with restoring your iPhone and regain access to your data and settings.
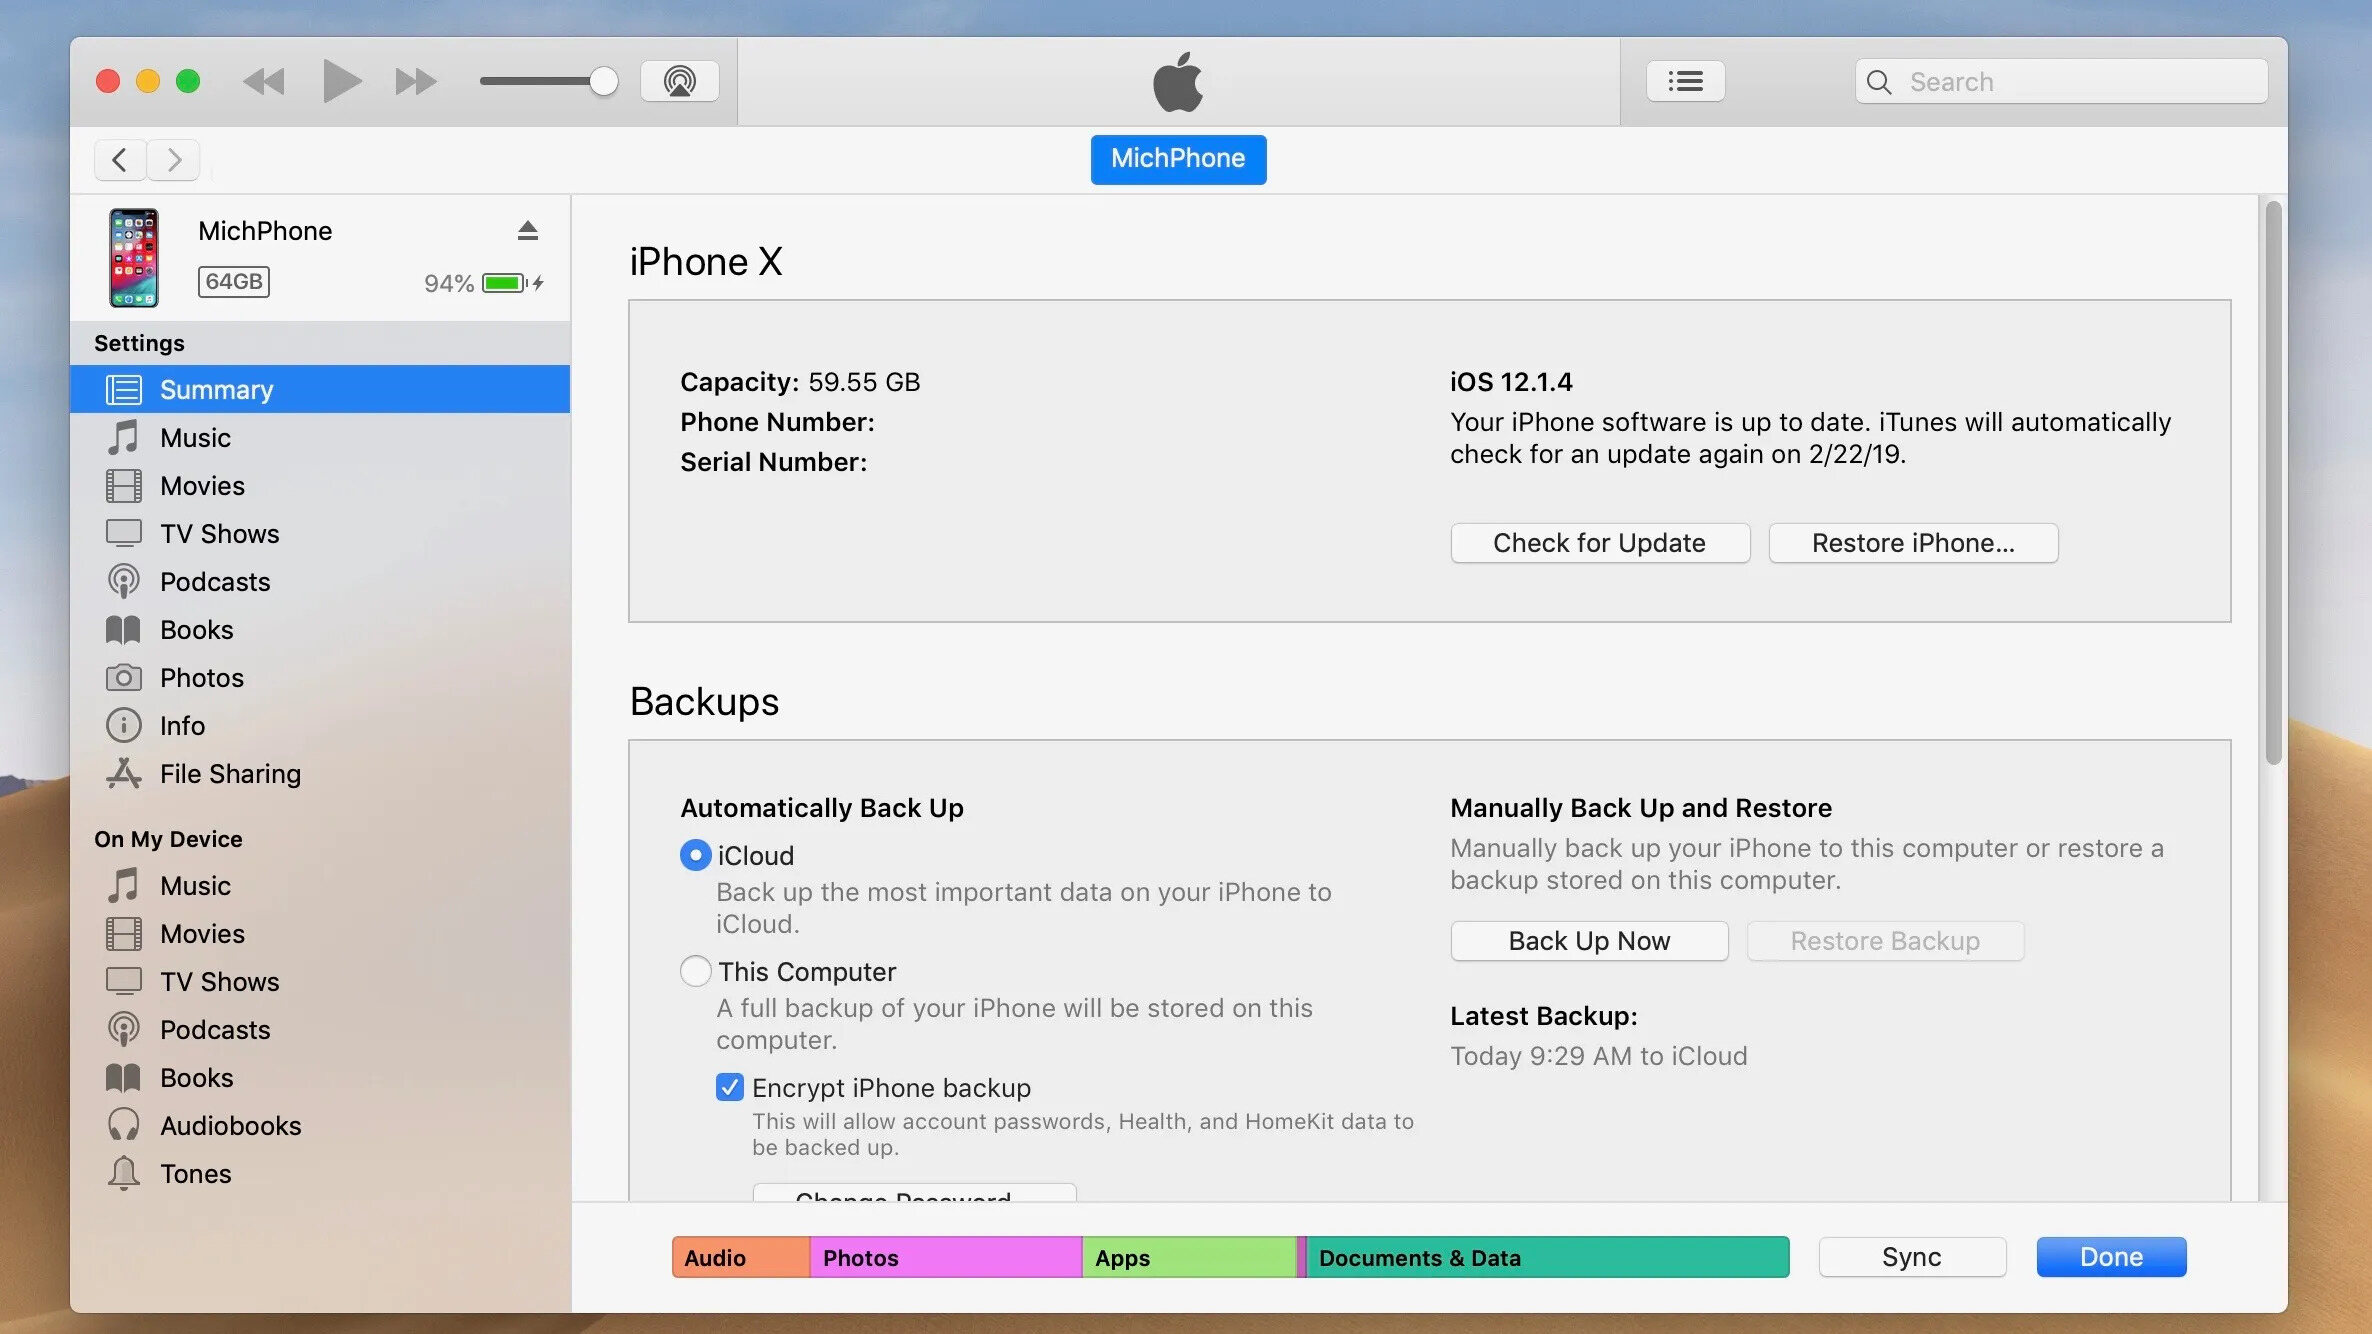
Step-by-Step Guide to Restoring iPhone from iTunes Backup
Restoring your iPhone from an iTunes backup is a simple and effective way to recover your data and settings after a software update, accidental deletion, or device replacement. Here’s a step-by-step guide to help you through the process:
Step 1: Launch iTunes and connect your iPhone
The first step is to open iTunes on your computer and then connect your iPhone using a USB cable. Make sure you have the latest version of iTunes installed on your computer before proceeding.
Step 2: Select your iPhone in iTunes
Once your iPhone is connected, it will be recognized by iTunes. Click on the device icon that appears in the upper left corner of the iTunes window to select your iPhone.
Step 3: Choose the desired backup file to restore from
In the Summary tab of your iPhone’s settings in iTunes, you will find a section called “Backups”. Here, you can choose the backup file you want to restore from. iTunes will display a list of available backups, including the date and time of each backup.
Step 4: Confirm the restore operation and wait for the process to complete
Before proceeding with the restore, it is essential to review the information displayed on the screen. Make sure you have selected the correct backup file and that you understand the consequences of restoring your iPhone. Once you are ready, click on the “Restore iPhone” button and confirm your decision. iTunes will start the restore process, and you will need to wait for it to complete. The duration of the restore process will depend on the size of the backup and the speed of your computer.
By following these simple steps, you can restore your iPhone from an iTunes backup and regain access to your apps, contacts, messages, photos, and other data.
What to do if the iTunes Restore Process Fails
While restoring your iPhone from an iTunes backup is usually a smooth process, there are rare instances when things don’t go as planned. If you encounter any issues during the iTunes restore process, don’t panic. There are a few steps you can take to troubleshoot and overcome the problem. Here’s what you should do if the iTunes restore process fails:
1. Check your USB connection: Firstly, ensure that the USB cable connecting your iPhone to your computer is securely plugged in. Sometimes, a loose or faulty connection can interrupt the restore process. Try disconnecting and reconnecting the cable, or use a different USB port on your computer.
2. Update iTunes: Make sure you have the latest version of iTunes installed on your computer. Outdated software can sometimes prevent a successful restore. Open the iTunes app and check for updates. If an update is available, install it and then attempt to restore your iPhone again.
3. Restart your devices: Restarting both your iPhone and computer can help resolve any temporary glitches or conflicts that may be causing the restore process to fail. Turn off your iPhone, then turn it back on. Also, restart your computer and relaunch iTunes before attempting the restore again.
4. Try a different computer or cable: If you’re still encountering issues, it’s worth trying to restore your iPhone using a different computer or a different USB cable. This can help determine if the problem lies with your computer or cable rather than the iPhone itself.
5. Put your iPhone in recovery mode: If all else fails, putting your iPhone in recovery mode may help resolve the restore issue. To do this, connect your iPhone to your computer and open iTunes. Press and hold the Sleep/Wake (or Side) button and the Volume Down button simultaneously. Keep holding the buttons until you see the recovery mode screen on your iPhone. From there, follow the prompts in iTunes to restore your device.
6. Consult Apple Support: If you’ve tried all the previous steps and still can’t restore your iPhone, it’s recommended to contact Apple Support for further assistance. They can provide specific troubleshooting steps or guide you through a more advanced restoration process if needed.
Remember, encountering a failure during the iTunes restore process doesn’t necessarily mean your iPhone is permanently damaged. By following these troubleshooting steps, you can overcome the issue and successfully restore your device from an iTunes backup.
Troubleshooting Common Issues during iPhone Restoration
Restoring an iPhone from an iTunes backup can sometimes encounter challenges. Here are some common issues that users may face during the restoration process and steps to troubleshoot them:
Issue 1: Unable to Restore Backup
If you are unable to restore your iPhone from an iTunes backup, try the following solutions:
- Ensure that you have the latest version of iTunes installed on your computer.
- Check if there is enough free space on your iPhone to accommodate the backup.
- Disconnect your iPhone and reconnect it to your computer.
- Restart both your iPhone and computer before attempting the restore again.
- If all else fails, try using a different USB cable or USB port.
Issue 2: Slow Restoration Process
If the iPhone restoration process is taking longer than expected, try the following troubleshooting steps:
- Make sure that your computer has a stable and fast internet connection.
- Disable any antivirus software or firewall that might be interfering with the restoration process.
- Quit unnecessary applications and processes running in the background to allocate more resources to the restoration process.
- Restart your iPhone and computer to free up any lingering processes that might be causing the slowdown.
Issue 3: Error Messages during Restoration
If you encounter error messages during the iPhone restoration process, try these troubleshooting steps:
- Check if you are using the latest version of iTunes. If not, update it to the latest version.
- Make sure that you have enough storage space on both your computer and iPhone for the restoration.
- Disable any security software or firewalls that may be blocking iTunes from accessing the necessary files.
- Try restarting your iPhone and computer and then attempt the restore process again.
- If the error persists, refer to the Apple support website or contact Apple support for further assistance.
Issue 4: Data Loss or Corruption
In rare cases, data loss or corruption can occur during the iPhone restoration process. Here are some steps to mitigate this issue:
- Ensure that you have a recent backup available in iTunes or iCloud before initiating the restore.
- If possible, perform a manual backup of your important data, such as photos and contacts, before starting the restoration.
- Consider using third-party software that specializes in data recovery to retrieve any lost or corrupted data.
- Contact Apple support for further assistance if the data loss or corruption is severe.
By following these troubleshooting steps, you can address common issues that may arise during the iPhone restoration process and successfully restore your device from an iTunes backup. Remember to always make regular backups to avoid any data loss or complications in the future.
Conclusion
Restoring your iPhone from an iTunes backup is a valuable tool to have in your mobile phone arsenal. Whether you’re upgrading to a new device, experiencing software issues, or simply want to recover deleted data, iTunes backup comes to the rescue.
In this article, we’ve explored the step-by-step process of restoring an iPhone from an iTunes backup. From connecting your device to iTunes, selecting the backup file, to confirming the restore, we’ve covered it all. By following these instructions, you can successfully restore your iPhone and regain access to your important data.
Remember, creating regular backups using iTunes is essential to ensure the safety of your data. Additionally, there are other methods such as iCloud backup and third-party software that offer similar functionalities. Choose the option that best suits your needs and preferences.
So whether you drop your phone in a puddle, accidentally delete your contacts, or simply want to start fresh with a new device, knowing how to restore your iPhone from an iTunes backup will save you time, effort, and frustration.
Now, armed with this knowledge, go ahead and restore your iPhone with confidence!
FAQs
1. Can I restore my iPhone from an iTunes backup?
Yes, you can restore your iPhone from an iTunes backup. iTunes allows you to back up your iPhone data, including contacts, messages, photos, and more. By connecting your iPhone to your computer and launching iTunes, you can easily restore your device from a previous backup to recover your data.
2. How do I restore my iPhone from an iTunes backup?
To restore your iPhone from an iTunes backup, follow these steps:
– Connect your iPhone to your computer and launch iTunes.
– Select your iPhone from the list of devices in iTunes.
– Click on the “Restore Backup” button.
– Choose the backup you want to restore from the list of available backups.
– Click “Restore” to begin the restoration process.
– Wait for iTunes to complete the restore process, and then disconnect your iPhone from the computer.
3. What should I do if I don’t have an iTunes backup?
If you don’t have an iTunes backup, you can still restore your iPhone using other methods. One option is to use iCloud backup if you have previously enabled it on your device. You can also consider using third-party tools or services that specialize in iPhone data recovery to try and retrieve your lost data.
4. Will restoring my iPhone from an iTunes backup delete my current data?
Yes, restoring your iPhone from an iTunes backup will erase all the current data on your device and replace it with the data from the backup you selected. Therefore, it’s important to ensure you have a recent backup that contains the data you want to restore before proceeding with the restoration process.
5. Can I selectively restore data from an iTunes backup?
By default, when restoring your iPhone from an iTunes backup, all the data in the backup will be restored to your device. However, there are third-party tools available that allow you to selectively extract and restore specific types of data from an iTunes backup. These tools can be useful if you only want to recover specific items like photos, messages, or contacts without restoring the entire backup.