
Welcome to our comprehensive guide on how to scan photos on an iPhone! In today’s digital age, preserving and sharing memories has never been easier. With the latest iOS 16 update, iPhone users now have access to powerful photo scanning features right at their fingertips. Whether you want to digitize old family photos, preserve important documents, or simply share printed images with friends and family, the iPhone offers a convenient and user-friendly solution. In this article, we will walk you through the step-by-step process of scanning photos on your iPhone, highlighting the key features, tips, and tricks to achieve the best results. So, grab your iPhone, dust off those photo albums, and let’s dive into the world of scanning and preserving memories in the digital era!
Inside This Article
- Overview of Scanning Photos on iPhone (iOS 16)
- Step 1: Open the Notes App
- Step 2: Create a New Note
- Step 3: Tap the Camera Icon within the Note
- Step 4: Select “Scan Document” Option
- Step 5: Position the Photo and Capture the Scan
- Step 6: Adjust the Scan if Needed
- Step 7: Save and Share the Scanned Photo
- Step 8: Add Additional Scans to the Same Note
- Step 9: Organize and Manage Scanned Photos in Notes App
- Step 10: Enable iCloud Sync for Scanned Photos
- Conclusion
- FAQs
Overview of Scanning Photos on iPhone (iOS 16)
Scanning photos on your iPhone has become easier than ever with the latest iOS 16 update. The Notes app now features an efficient built-in scanning feature that allows you to digitize your printed photos with just a few simple steps. With this handy tool, you can preserve your precious memories, organize them digitally, and easily share them with family and friends.
Gone are the days of relying on bulky scanners or external apps to scan your photos. The scanning feature in the Notes app harnesses the power of your iPhone’s camera to capture high-quality scans of your photos, eliminating the need for extra equipment or complicated processes.
Whether you want to digitize old family photos, store important documents, or simply save interesting images, the scanning feature in iOS 16 offers a convenient solution that is accessible to all iPhone users.
In the following sections, we will guide you through the step-by-step process of scanning photos on your iPhone using the built-in Notes app. So, grab your iPhone, open the Notes app, and let’s get started!
Step 1: Open the Notes App
The first step in scanning photos on your iPhone (iOS 16) is to open the Notes app. This app comes pre-installed on your iPhone and is represented by a yellow icon with a white notepad. Simply locate the Notes app on your home screen and tap on it to open it.
Once the Notes app is launched, you will be greeted with a blank screen, ready for you to start taking notes or scanning photos. This versatile app allows you to capture and store all your important information conveniently in one place.
Whether you want to scan photos, create to-do lists, or jot down random thoughts, the Notes app has got you covered. It’s a handy tool that brings convenience and organization to your digital life.
By opening the Notes app as the first step, you are ready to embark on the journey of scanning your precious photos right from the comfort of your iPhone.
Step 2: Create a New Note
Once you have opened the Notes app on your iPhone running on iOS 16, it’s time to create a new note to start scanning your photos. Creating a new note is simple and can be done in just a few taps.
Firstly, look for the “New Note” button, usually located at the bottom right corner of the screen. It is represented by a pen and paper icon. Tap on it, and a blank note will instantly appear on your screen.
Alternatively, if you are already inside a note, you can create a new note by tapping on the back arrow icon in the top left corner of the screen. This will take you back to the main notes view, where you can proceed to create a new note as mentioned before.
Once you are inside the new note, you will notice that the keyboard is automatically activated, allowing you to start typing or adding any other content you desire. Don’t worry, you won’t be limited to just typing. You can easily insert photos, drawings, and of course, scan photos with the built-in camera.
To proceed with scanning your photos, you will need to tap on the camera icon within the note. This will bring up the camera options specifically tailored for scanning documents and photos.
By creating a new note, you are setting the foundation to conveniently store and organize your scanned photos. So go ahead and create that new note, and let’s move on to the next step of the process.
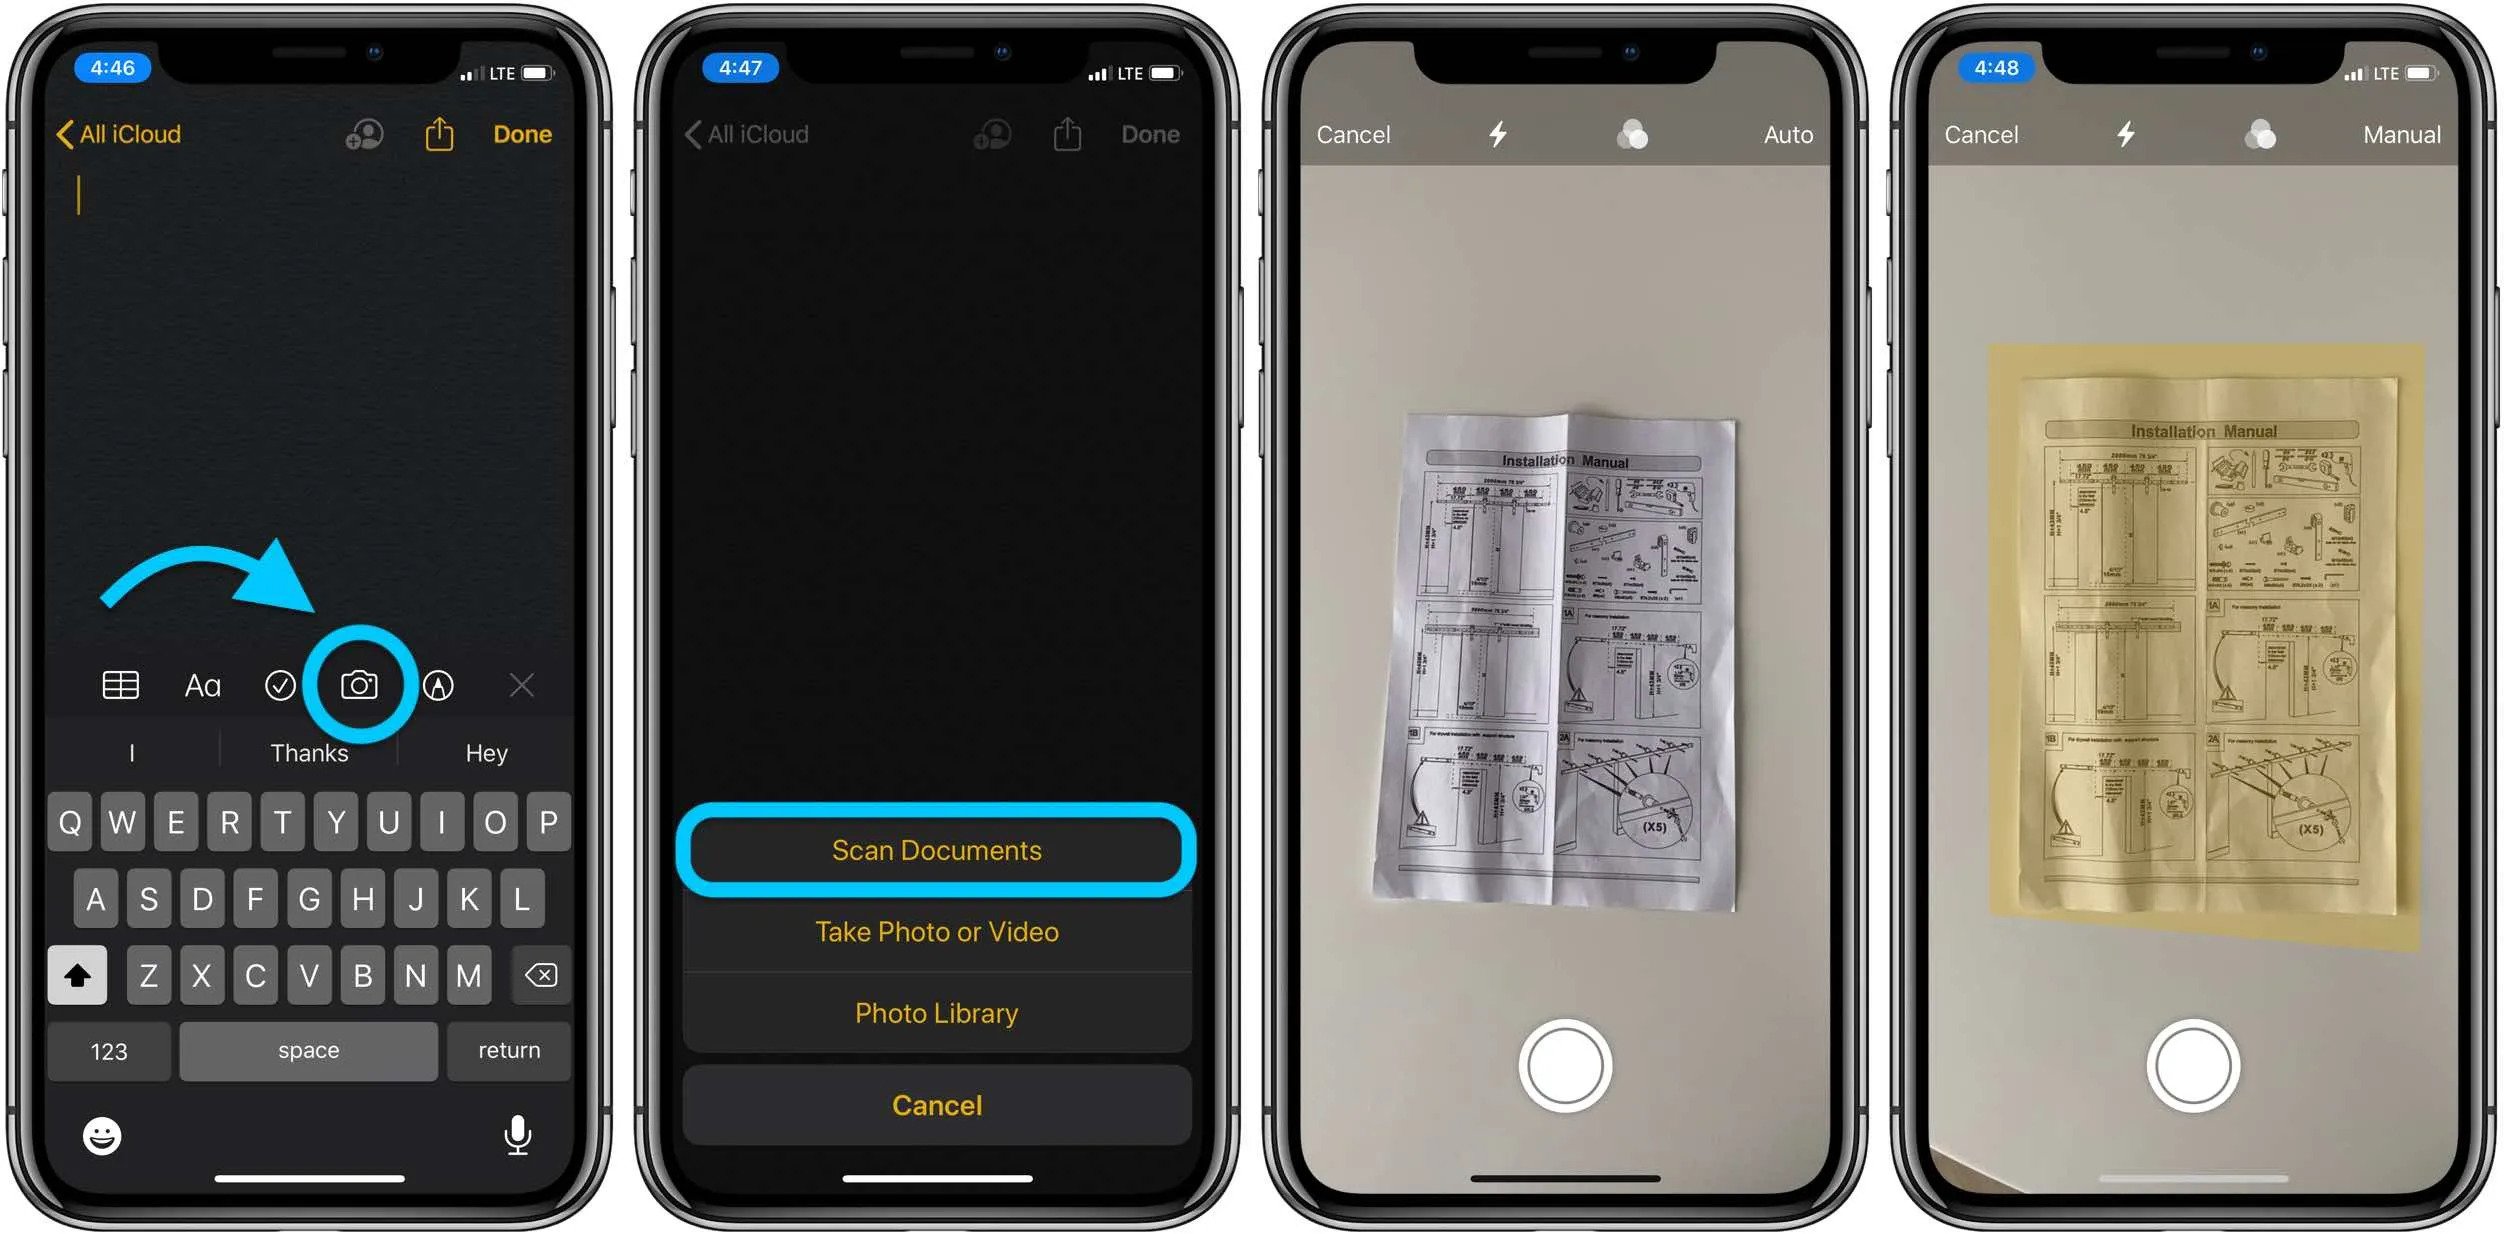
Step 3: Tap the Camera Icon within the Note
Now that you have created a new note in the Notes app, it’s time to start scanning your photos. The next step is to tap on the camera icon within the note. This will open up the scanning feature, allowing you to capture your photos and save them as digital scans.
The camera icon is located at the bottom of the note, towards the middle of the screen. It looks like a small camera with a white background. Once you tap on it, you will see a menu with options for capturing different types of media.
Make sure to select the “Scan Document” option from the menu. This option is specifically designed for scanning photos and documents, ensuring that you get the best possible results. Tapping on this option will activate the camera and prepare it for scanning your photos.
By tapping the camera icon within the note and choosing the “Scan Document” option, you are now ready to start capturing digital scans of your photos. This convenient feature makes it incredibly easy to digitize your physical photo collection and preserve those precious memories in a digital format.
Step 4: Select “Scan Document” Option
Once you have opened the Notes app and created a new note, the next step is to tap the camera icon within the note to begin scanning your photo. When you tap the camera icon, a menu of options will appear.
Scroll through the options and look for the “Scan Document” option. It is usually located towards the middle of the menu. Once you have found it, give it a tap to select it.
Selecting the “Scan Document” option will activate your iPhone’s camera and prepare it for scanning. This feature utilizes advanced image recognition technology to detect and capture the photo with optimal clarity and quality.
Make sure to hold your iPhone steady and position it above the photo you want to scan. This will ensure that the photo is captured properly without any blurriness or distortion.
When you are ready, tap the capture button to take the scan. Your iPhone will analyze the photo and make adjustments to enhance its readability.
After capturing the scan, you will have the option to adjust the corners of the scan if needed. This allows you to fine-tune the framing and alignment of the photo within the scan.
Simply tap and drag the corners of the scan to adjust them, ensuring that the photo is properly aligned and centered. Once you are satisfied with the adjustments, tap the “Keep Scan” button to proceed.
The scan will now be saved within the note. You can give it a title or add any additional notes or comments if desired. The scanned photo will appear as an image within the note, making it easy to view and access.
Now that you have successfully scanned your photo, you have the option to save and share it. You can save the scanned photo to your Photos app or any other preferred location by tapping the share icon and selecting the “Save Image” option.
If you want to share the scanned photo with others, simply tap the share icon and choose your preferred method of sharing, such as via email, messaging, or social media platforms.
By following these steps, you can easily select the “Scan Document” option within the Notes app on your iPhone (iOS 16) and capture high-quality scans of your photos. This convenient feature allows you to digitize your physical photos with ease and keep them organized within the Notes app for easy access and sharing.
Step 5: Position the Photo and Capture the Scan
In this step, you’ll need to position the photo within the frame on your iPhone screen and capture the scan. Here’s how:
1. After selecting the “Scan Document” option, you’ll be presented with a live camera view. Place the photo within the frame, aligning it as best as possible.
2. Take a moment to ensure the photo is well-lit and positioned correctly so that all the important details are captured. You can use the camera gridlines to help align the photo.
3. Make sure to hold your iPhone steady and tap the capture button to capture the scan. You can find the capture button either on the screen or as a physical button on the side of your device.
4. If needed, you can retake the scan by tapping the retake button. This allows you to capture a clearer or better-aligned scan of the photo.
5. Once you’re satisfied with the scan, tap the “Keep Scan” button to save it. The scanned photo will now be added to your note.
6. Repeat the process for any additional photos you want to scan within the same note. The Notes app allows you to scan multiple photos and keep them together for easy organization and reference.
Remember, the quality of the scan largely depends on the clarity and positioning of the photo. Take your time to ensure you capture the best possible scan, preserving the details and memories of your photos.
Now that we’ve covered how to position and capture the scan, let’s move on to the next step – adjusting the scan if needed.
Step 6: Adjust the Scan if Needed
After capturing the scan of your photo, you may find that some adjustments are required to ensure the best possible quality. Fortunately, the Notes app on your iPhone (running iOS 16) provides several editing tools for this purpose.
To begin with, you can tap on the scan to select it. Once selected, a toolbar will appear at the bottom of the screen. This toolbar includes options for cropping, rotation, and color adjustment.
If you need to crop the scan, simply tap on the crop icon and adjust the borders accordingly. This is particularly useful when there are unwanted elements or black borders around the photo. You can drag the edges of the borders or use the preset aspect ratios for easy cropping.
In addition to cropping, you can also rotate the scan if needed. Just tap on the rotate icon, and the scan will turn 90 degrees clockwise with each tap. Keep tapping until the scan is in the desired orientation.
Furthermore, the Notes app allows you to adjust the color and lighting of the scan. By tapping on the color adjustment icon, you can choose from options such as grayscale, black and white, or color to suit your preference. These options can help enhance the overall appearance of the scanned photo.
If you’re not satisfied with the adjustments made, you can easily reset the scan to its original state. Just tap on the “Reset” button, usually located in the toolbar, to revert any changes made and start fresh.
Once you’re satisfied with the adjustments, you can proceed to the next step of saving and sharing the scanned photo.
Step 7: Save and Share the Scanned Photo
Once you have captured a high-quality scan of your photo using the iPhone’s Notes app, it’s time to save and share it. Follow these simple steps to ensure your scanned photo is securely stored and easily accessible:
1. After capturing the scan, you will see a preview of the scanned photo on your screen. To save the scan, tap the “Save” option in the upper-right corner of the screen. This action will store the scanned photo within the note you created earlier.
2. To share the scanned photo with others, tap the share button, which is represented by a square with an arrow pointing upwards. This button is located at the bottom of the screen.
3. When you tap the share button, a menu will pop up with various sharing options. You can choose to send the scanned photo via email, text message, social media platforms, or even save it to your cloud storage services like iCloud. Simply select the desired sharing option from the menu.
4. If you choose to share the scanned photo via email or text message, the Notes app will automatically generate a new message with the scanned photo attached. All you have to do is enter the recipient’s email address or phone number and hit the send button.
5. If you decide to share the scanned photo on social media, you will be redirected to the respective app, such as Instagram or Facebook, where you can compose a post and attach the scanned photo.
6. To save the scanned photo to your cloud storage services like iCloud, select the “Save to Files” option from the sharing menu. This option will allow you to choose the desired location within your iCloud Drive where the scanned photo will be stored.
7. After you have successfully saved or shared the scanned photo, you can return to the Notes app by tapping the “Done” button. Your scanned photo will remain safely stored within the note you created earlier, ready to be accessed whenever you need it.
Remember, it’s always a good practice to backup your scanned photos and regularly transfer them to another device or cloud storage to ensure their long-term preservation.
Step 8: Add Additional Scans to the Same Note
Once you have successfully scanned a photo using the Notes app on your iPhone running iOS 16, you may want to add more scans to the same note. Adding additional scans to the same note is a convenient way to keep all your scans organized and easily accessible in one place.
To add more scans to the same note, follow these simple steps:
- Open the Note that contains the initial scan: Launch the Notes app on your iPhone and navigate to the note where you added the first scan. You can do this by tapping on the “Notes” tab at the bottom of the screen, locating the desired note, and tapping on it.
- Tap the camera icon within the note: Once you have the note open, look for the camera icon located at the bottom of the screen, just above the keyboard. Tap on it to access the scanning feature.
- Select the “Scan Document” option: A menu will appear with various options. Choose the “Scan Document” option to activate the scanning mode.
- Position the photo and capture the scan: Just like in the previous step, position the photo within the frame and make sure it is well-lit and clear. Once everything is set, tap the capture button to take the scan.
- Adjust the scan if needed: After capturing the scan, you can make adjustments if necessary. The Notes app provides tools to crop, rotate, or enhance the scan to ensure it looks its best.
- Save the scan: Once you are satisfied with the scan, tap on the “Save” button to add it to the note. The scan will be appended to the existing scans in that note.
- Repeat steps 2-6 for additional scans: If you have more photos to scan and add to the same note, you can repeat steps 2-6 as many times as needed. Each new scan will be saved within the same note, creating a collection of scanned photos.
- Organize and arrange scans: After adding multiple scans to the same note, you can rearrange their order by tapping and dragging them within the note. This allows you to arrange the scans in a specific sequence that makes sense to you.
- Continue scanning or finish: If you have additional photos to scan, you can repeat the process from step 2 onwards. If you have finished scanning and organizing the photos for the note, you can simply close the scanning feature and return to the note-taking interface.
By following these steps, you can easily add multiple scans to the same note using the Notes app on your iPhone running iOS 16. This feature is perfect for capturing and organizing a collection of scanned photos or documents in one convenient place.
Step 9: Organize and Manage Scanned Photos in Notes App
Once you’ve scanned your photos using the Notes app on your iPhone, you may want to organize and manage them efficiently. The good news is that the Notes app provides several options to help you stay organized and easily find your scanned photos.
Here are some tips on how to organize and manage your scanned photos in the Notes app:
- Create Folders: To keep your scanned photos organized, you can create folders within the Notes app. Simply tap on the back arrow at the top-left corner of the screen to go back to the main Notes view, and then tap on the “Folders” button at the bottom. From there, you can create new folders and name them accordingly.
- Move Scanned Photos to Folders: To move a scanned photo to a specific folder, open the note containing the photo, and tap on the share icon at the top-right corner of the screen. In the share sheet, tap on the “Move to…” option and select the desired folder.
- Use Keywords and Tags: If you have a large collection of scanned photos, it can be helpful to use keywords or tags to label and categorize them. You can do this by opening the note containing the photo, tapping on the share icon, and then selecting the “Add People…” option. From there, you can enter relevant keywords or tags to easily search for specific photos later.
- Sort and Filter Photos: The Notes app allows you to sort and filter your scanned photos based on various criteria. To access these options, go back to the main Notes view and tap on the “…” button at the top-right corner. From the menu, you can choose to sort your photos by date created or date modified, and filter them by folder, attachment type, or size.
- Share and Collaborate: If you want to share your scanned photos with others or collaborate on a particular photo, the Notes app makes it easy. Simply open the note containing the photo, tap on the share icon, and choose the desired sharing option, such as email, message, or AirDrop.
By utilizing these organizing and managing features in the Notes app, you can keep your scanned photos neatly organized, easily find specific photos, and collaborate with others seamlessly. Whether you’re digitizing old photo albums or scanning important documents, the Notes app on your iPhone is a versatile tool to help you stay organized and efficient.
Step 10: Enable iCloud Sync for Scanned Photos
When it comes to organizing and managing your scanned photos on your iPhone, enabling iCloud sync can be a great option. With iCloud sync, you can seamlessly access your scanned photos across all your Apple devices, including your iPhone, iPad, and Mac. This eliminates the need to manually transfer photos or rely on physical storage devices.
To enable iCloud sync for scanned photos, follow these simple steps:
1. Go to your iPhone’s settings menu and tap on your Apple ID at the top of the screen.
2. Scroll down and tap on “iCloud.”
3. Ensure that the “Photos” toggle switch is turned on. This will enable iCloud sync for all your photos, including the scanned images.
4. To ensure that your scanned photos are being synced to iCloud, open the Photos app on your iPhone.
5. Tap on the “Photos” tab at the bottom of the screen.
6. Scroll to the bottom of the screen and locate the “Scans” album. This album should contain all your scanned photos.
7. If you don’t see the “Scans” album, ensure that the “Photos” toggle switch is turned on in the iCloud settings menu.
8. Once you have verified that your scanned photos are being synced to iCloud, you can access them on your other Apple devices, such as your iPad or Mac.
Enabling iCloud sync for scanned photos provides you with the convenience of having your photos readily available on all your devices. It also serves as a backup, ensuring that your precious memories are safely stored in the cloud.
Now that you have successfully enabled iCloud sync for your scanned photos, you can enjoy the flexibility of accessing and managing your photos across multiple devices without the hassle of manual transfers.
Conclusion
Scanning photos on your iPhone has never been easier with the latest iOS 16 update. The advanced scanning features not only save you time but also ensure the photos are digitized with exceptional quality. Whether you are looking to preserve old family albums or simply want to create digital copies, the built-in scanner on your iPhone is a convenient tool at your fingertips.
By following the step-by-step guide in this article, you can easily scan photos using the Notes app and enjoy the benefits of having digital copies of your cherished memories. Remember to experiment with the different scanning options available to find the settings that work best for you.
Embrace the power of your iPhone and unleash its scanning capabilities to organize and preserve your precious photo collections. Bring your memories to life in the digital world and share them with friends and family effortlessly. Start scanning today and delve into a world of endless possibilities!
FAQs
Q: Can I scan photos on an iPhone?
A: Absolutely! With the advancements in technology, you can now easily scan photos on your iPhone using various methods and apps. Keep reading to learn how!
Q: What is the best app to scan photos on an iPhone?
A: There are several great apps available for scanning photos on an iPhone. Some popular options include Google Photoscan, Microsoft Office Lens, and Adobe Scan. These apps offer features like automatic edge detection, image enhancement, and cloud storage options.
Q: Do I need any additional equipment to scan photos on my iPhone?
A: No, you don’t need any additional equipment to scan photos on your iPhone. The built-in camera of your iPhone is sufficient to capture high-quality images. However, using a tripod or a phone stand can help stabilize your device and ensure better scan results.
Q: How can I ensure the best scan quality while scanning photos on my iPhone?
A: To ensure the best scan quality, follow these tips:
1. Place the photo on a flat surface with good lighting.
2. Hold your iPhone steady and avoid any shakes or movement while capturing the photo.
3. Make sure the entire photo is visible within the frame.
4. Use the built-in grid lines on your camera app to align the photo properly.
5. Clean the camera lens to avoid any blurriness or smudges on the scan.
6. Experiment with different scanning apps to find the one that suits your needs and preferences the best.
Q: Are there any precautions I should take while scanning old and fragile photos?
A: Yes, when scanning old and fragile photos, it is important to handle them with care to prevent any damage. Consider these precautions:
1. Wear clean, lint-free gloves to avoid leaving fingerprints on the photos.
2. Place the photos on a padded surface or use a photo scanner with a gentle feeding mechanism.
3. If the photos are stuck together, consult a professional before attempting to separate them.
4. Make sure the scanning surface is clean and free from debris that can scratch the photos.
5. Choose a low-resolution setting if the photos are very delicate to minimize any potential harm.