
Setting the clock on your Android phone is a straightforward process that ensures accurate timekeeping and convenient access to essential features such as alarms and notifications. While it may seem like a simple task, it’s important to know how to navigate the settings and make the necessary adjustments.
In this article, we will guide you through the steps to set the clock on your Android phone, with easy-to-follow instructions and helpful tips along the way. Whether you’re a new Android user or just need a refresher, we’ve got you covered. So let’s dive in and make sure your Android phone’s clock is set to the correct time!
Inside This Article
- Setting the Clock Manually
- Syncing with Network Time
- Changing Time Format
- Setting the Alarm Clock
- Conclusion
- FAQs
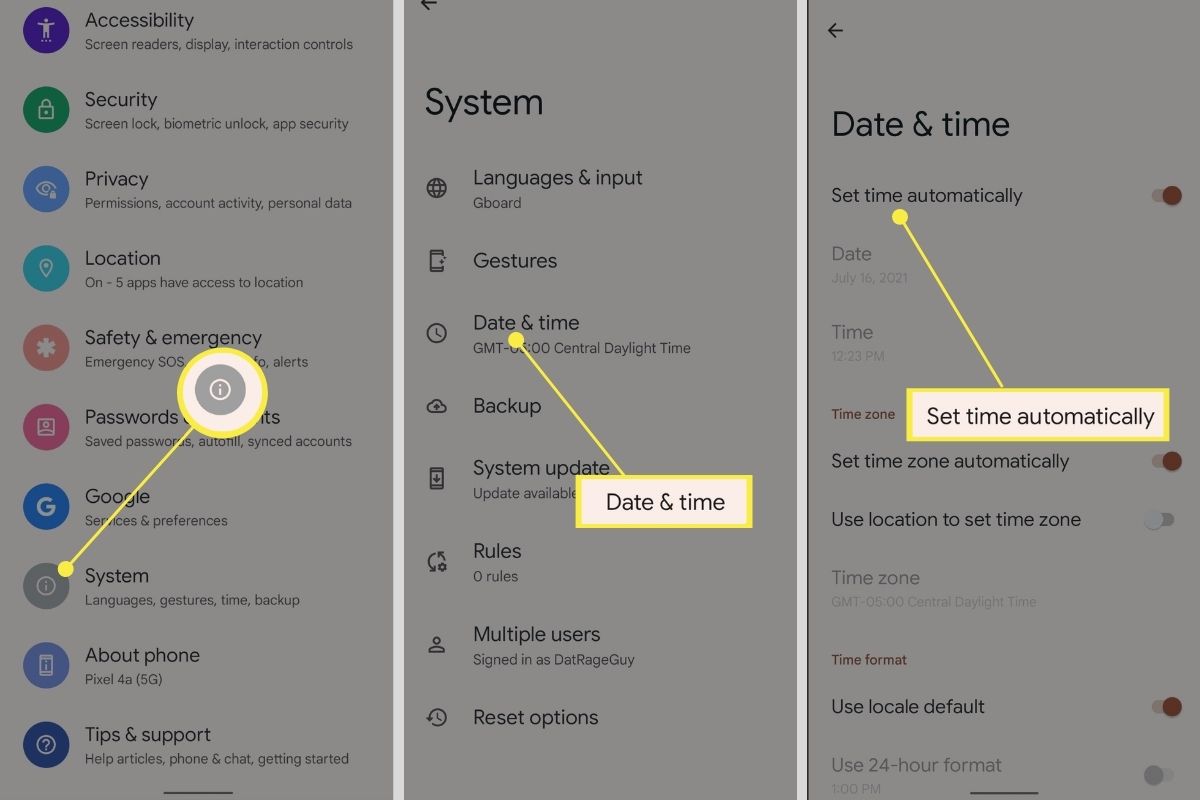
Setting the Clock Manually
Setting the clock manually on your Android phone is a simple and straightforward process. Whether you prefer the convenience of manual control or you find that your device’s automatic time setting isn’t accurate enough, here’s how you can set the clock manually:
- Unlock your Android phone and head to the home screen.
- Swipe down from the top of the screen to reveal the notification panel.
- Tap on the gear icon or navigate to the Settings app to access the device settings.
- Scroll down and tap on the “System” option.
- Under the System menu, select “Date & time.”
- You’ll see an option to toggle on or off the “Automatic date & time” setting. Make sure it is turned off.
- Tap on the “Set date” option to set the current date manually.
- Select the month, day, and year using the respective drop-down menus or the on-screen calendar.
- After setting the date, tap on the “Set time” option to set the current time manually.
- Choose the time by scrolling through the hours and minutes or using the “+” and “-” buttons on the screen.
- Once you’ve set the correct time, tap on the “OK” button to confirm the changes.
And there you have it! You have successfully set the clock manually on your Android phone. It’s worth noting that some Android devices may have slightly different menu options or layouts, but the general steps should remain the same.
Syncing with Network Time
One of the most convenient features of an Android phone is its ability to automatically sync with network time. By doing so, your device will always display the correct time, whether you’re traveling or if there’s a time change due to daylight saving. Here’s how you can sync your Android phone with network time:
1. Go to the “Settings” menu on your Android phone. You can usually find it by swiping down from the top of the screen and tapping on the gear icon.
2. Scroll down and tap on “System” or “System and Device” depending on your phone’s manufacturer.
3. Look for the “Date & Time” option and tap on it.
4. In the “Date & Time” settings, you will see an option to “Automatic date & time.” Toggle this option on.
5. Once the “Automatic date & time” option is enabled, your Android phone will connect to a network time server and sync its clock. This ensures that your phone’s time is always accurate.
6. In some cases, you may have an additional option called “Automatic time zone.” If available, enable this option as well to automatically adjust your phone’s time zone based on your location.
By syncing your Android phone with network time, you eliminate the need to manually set the clock and ensure that it remains accurate no matter where you are. This is especially useful when traveling across time zones or during daylight saving time changes.
Changing Time Format
Your Android phone allows you to customize the time format to suit your preferences. Whether you prefer the 12-hour or 24-hour format, you can easily adjust the time display on your device. Follow these steps to change the time format on your Android phone.
1. Start by accessing the Settings menu on your phone. You can usually find it by swiping down from the top of the screen and tapping on the gear icon or by locating the Settings app in your app drawer.
2. Scroll down and tap on “System” or “System & Device,” depending on your phone’s manufacturer and Android version. In some cases, you may need to tap on “General Management” or “Date & Time.”
3. Look for the option that says “Date & Time” or “Time & Date”; tap on it to proceed.
4. Once you’re in the “Date & Time” settings, look for the “Time Format” or “Use 24-hour format” option. This option may be accompanied by a toggle switch or a drop-down menu.
5. If there’s a toggle switch, simply tap on it to switch between the 12-hour and 24-hour format. If there’s a drop-down menu, tap on it to reveal the available options and select your desired time format.
6. After selecting the desired time format, exit the settings menu by pressing the back button or using the navigation gestures on your phone.
7. Your Android phone will now display the time in the format you have chosen. You can check the time by glancing at the lock screen, status bar, or clock widget.
Changing the time format on your Android phone allows you to view the time in a way that is familiar and convenient for you. Whether you’re accustomed to the 12-hour format or prefer the simplicity of the 24-hour format, customizing the time display on your device is a simple and straightforward process.
Setting the Alarm Clock
If you’re someone who relies on an alarm clock to wake up in the morning, your Android phone can be a convenient tool to ensure you never oversleep. Setting the alarm on your Android phone is a simple process that can be done in just a few steps. Here’s how you can do it:
1. Open the Clock app on your Android phone. This app is typically pre-installed on most Android devices and can be found in the app drawer.
2. Once the Clock app is open, locate and tap on the “Alarm” tab. This will take you to the alarm settings screen.
3. To set a new alarm, tap on the “+” or “Add” button. This will allow you to create a new alarm.
4. Set the time for your alarm by adjusting the hour and minute sliders. You can also toggle between AM and PM by tapping on the “AM/PM” button.
5. Choose the days of the week you want the alarm to go off. You can select specific days or choose the “Repeat” option to set a recurring alarm on multiple days.
6. Customize the alarm sound by tapping on the “Sound” option. You can choose from a variety of preset sounds or select your own custom sound from your phone’s storage.
7. If you want the alarm to vibrate in addition to playing the sound, toggle the “Vibrate” option on.
8. Once you have finished setting up your alarm, tap on the “Save” or “Done” button. Your alarm is now set and will go off at the specified time.
9. To view or edit your existing alarms, go back to the alarm settings screen and you will see a list of all your saved alarms. From here, you can turn the alarm on or off, edit the settings, or delete the alarm entirely.
Setting the alarm on your Android phone is a breeze and gives you peace of mind that you won’t oversleep. Whether you have an important meeting to attend or simply want to wake up early to start your day, your Android phone can help you stay punctual.
Conclusion
Setting the clock on your Android phone is a simple task that can greatly improve your user experience. With just a few taps, you can ensure that your phone displays the correct time and helps you stay organized and punctual throughout the day.
By following the steps outlined in this article, you can easily adjust the clock settings on your Android phone to match your preferred time zone, enable or disable automatic time updates, and customize the clock style to suit your personal taste.
Remember, keeping your phone’s clock accurate is not only important for time management but also for various apps and functions that rely on accurate time stamps. So take a few moments to adjust your Android phone’s clock and enjoy a more synchronized and hassle-free mobile experience.
FAQs
1. How do I set the clock on my Android phone?
Setting the clock on your Android phone is a simple process. Just follow these steps:
- Go to the “Settings” app on your Android phone.
- Scroll down and tap on “Date & Time”.
- Toggle the switch to enable “Automatic date & time” if you want your phone to automatically update the time based on your network.
- If you prefer to set the clock manually, disable “Automatic date & time” and tap on “Set date” or “Set time”.
- Use the on-screen controls or keypad to adjust the date and time to your desired settings.
- Tap on “Set” to save your changes.
2. Why is the clock on my Android phone not accurate?
There could be various reasons why the clock on your Android phone is not accurate. One possibility is that the automatic time setting is disabled, and you haven’t manually set the correct time. It is also possible that your network or cellular provider is experiencing synchronization issues. Additionally, outdated software or a faulty system clock can cause inaccuracies. Try enabling the automatic date and time settings or manually adjust the clock to correct any discrepancies.
3. Can I customize the clock widget on my Android phone?
Yes, you can customize the clock widget on your Android phone to suit your personal preference or match your phone’s theme. Depending on your phone model and launcher, you can usually long-press on the home screen to access the widget options or go to the Widgets section in the app drawer. Look for clock-related widgets, and once you find the one you like, tap and hold it to place it on your home screen. Some clock widgets may offer additional customization options, such as choosing the style, color, or displaying additional information along with the time.
4. How do I change the time format on my Android phone?
To change the time format on your Android phone, follow these steps:
- Open the “Settings” app on your Android phone.
- Scroll down and tap on “Date & Time”.
- Look for an option called “Use 24-hour format” or “Time format”.
- Toggle the switch or select the desired time format (either 24-hour or AM/PM).
- The time format on your Android phone will be updated according to your selection.
5. Is there a way to set multiple alarms on my Android phone?
Yes, most Android phones allow you to set multiple alarms. To set multiple alarms on your Android phone, follow these steps:
- Open the Clock app on your Android phone.
- Tap on the “+” or “Add” button to create a new alarm.
- Set the desired time, alarm tone, and any other preferences.
- Repeat the process to set additional alarms with different settings and timings.
- You can customize each alarm with a unique label, tone, and snooze options.