
In today’s digital age, mobile phones have become an indispensable part of our lives. They serve as our communication devices, personal assistants, and even entertainment sources. With the increasing reliance on smartphones, it’s crucial to prioritize our online security and privacy. One way to achieve this is by setting up a VPN (Virtual Private Network) on our iPhones. By doing so, we can browse the internet safely and anonymously, without worrying about our personal information falling into the wrong hands. In this article, we will guide you through the process of setting up a VPN on an iPhone, ensuring that your online activities remain private and secure. So let’s dive in and discover how to protect yourself while browsing on your iPhone.
Inside This Article
- Why Use a VPN on an iPhone?
- Step-by-Step Guide: Setting up a VPN on an iPhone
- Choosing a VPN Provider
- Configuring VPN Settings on an iPhone
- Testing the VPN Connection
- Tips for Safe Browsing with a VPN on an iPhone
- Conclusion
- FAQs
Why Use a VPN on an iPhone?
In today’s digital age, privacy and security are paramount concerns for smartphone users. Whether you use your iPhone for personal or professional purposes, protecting your sensitive data from prying eyes is crucial. This is where a VPN (Virtual Private Network) comes into play. A VPN creates a secure, encrypted connection between your device and the internet, allowing you to browse the web anonymously and safeguard your online activities.
Here are a few compelling reasons why you should use a VPN on your iPhone:
- Enhanced Privacy: When connected to a VPN, your IP address is masked, making it nearly impossible for anyone to trace your online activities back to you. This is particularly beneficial when accessing public Wi-Fi networks, as it prevents hackers from intercepting your data.
- Bypass Geo-Restrictions: Some websites and streaming platforms impose geographic restrictions on their content. By using a VPN, you can easily bypass these restrictions and access your favorite websites, apps, and streaming services from anywhere in the world.
- Secured Data Transmission: With a VPN, all your data is encrypted, ensuring that it remains secure during transmission. This is especially important when dealing with sensitive information such as online banking transactions or sharing confidential work documents.
- Protection Against Online Threats: A VPN provides an extra layer of protection against malware, phishing attacks, and other online threats. By encrypting your internet connection, it prevents cybercriminals from stealing your personal information or injecting malicious code onto your device.
- Anonymity: By using a VPN, you can browse the web without revealing your true identity. This is particularly useful for whistleblowers, journalists, and activists who wish to protect their privacy while accessing or sharing sensitive information.
Overall, using a VPN on your iPhone offers numerous benefits, including enhanced privacy, the ability to bypass geo-restrictions, secure data transmission, protection against online threats, and maintaining anonymity. It is a valuable tool for anyone seeking to browse the internet safely and securely on their iPhone.
Step-by-Step Guide: Setting up a VPN on an iPhone
Setting up a VPN on your iPhone is a simple yet crucial step in ensuring secure and private internet browsing. With a VPN, you can encrypt your connection and protect your data from prying eyes. Follow these step-by-step instructions to set up a VPN on your iPhone:
1. Research and choose a reliable VPN provider: Start by researching different VPN providers and choose one that best fits your needs. Look for providers that offer a user-friendly app, a wide server network, strong encryption protocols, and a good reputation for privacy protection.
2. Subscribe to a VPN service: Once you’ve chosen a VPN provider, subscribe to their service. Most providers offer different subscription plans, so select one that works for you. Consider the length of the subscription and any discounts or extra features included.
3. Download and install the VPN app: Go to the App Store on your iPhone and search for the VPN app provided by your chosen VPN provider. Download and install the app onto your device. You may need to enter your Apple ID password to authorize the download.
4. Launch the VPN app and sign in: Open the VPN app and sign in using the credentials you created when subscribing to the VPN service. If you haven’t created an account yet, follow the on-screen instructions to sign up.
5. Connect to a VPN server: Once you’re signed in to the app, you’ll typically see a list of available server locations. Choose a server location based on your preferences or specific needs. For example, if you want to access geo-restricted content, select a server in that region.
6. Enable the VPN connection: After selecting a server, toggle the VPN connection switch to enable the VPN. This will encrypt your internet traffic and route it through the selected server.
7. Ensure VPN connection is active: To confirm that the VPN connection is active, check the status bar on your iPhone. You should see a VPN icon indicating that the connection is established. This will vary depending on your iPhone’s model and iOS version.
8. Test your VPN connection: Once the VPN is active, open a web browser on your iPhone and visit a site like whatismyip.com or any other IP checker to ensure that your IP address reflects the VPN server location you selected. This confirms that your internet traffic is being routed through the VPN successfully.
9. Customize VPN settings (optional): Some VPN apps offer additional settings that you can customize according to your preferences. Take some time to explore the app settings and adjust them as needed, such as enabling or disabling features like the kill switch or split tunneling.
10. Disconnect from the VPN: When you’re done using the VPN, simply open the app again and toggle the VPN connection switch to disable it. This will restore your normal internet connection.
By following these step-by-step instructions, you can easily set up a VPN on your iPhone and enjoy secure and private internet browsing. Remember to always connect to a trusted VPN server and keep the VPN app updated for optimal performance and security.
Choosing a VPN Provider
When it comes to selecting a VPN provider for your iPhone, there are several factors to consider. Here are some key points to keep in mind:
1. Security and Privacy: Look for a VPN provider that prioritizes security and privacy. Make sure they offer strong encryption protocols and have a strict no-logs policy to ensure your data remains confidential.
2. Server Network: Check the VPN provider’s server network. The more server locations they have, the better chances you’ll have of finding a fast and stable connection. Look for servers in the countries you frequently access online content from.
3. Speed and Performance: It’s important to choose a VPN provider that offers fast and reliable connections. Look for providers that offer high-speed servers and have a reputation for delivering consistent performance.
4. User-Friendly Interface: Consider the user interface of the VPN provider’s app. It should be intuitive and easy to navigate. Look for features like a one-click connect option and a kill switch for added convenience and security.
5. Multi-Device Compatibility: If you use multiple devices, such as an iPhone, iPad, and MacBook, make sure the VPN provider supports simultaneous connections across all your devices. This way, you can protect your online activities on all your devices simultaneously.
6. Customer Support: A reliable VPN provider should offer prompt and helpful customer support. Look for options like live chat or 24/7 email support to address any issues or queries you may have.
7. Pricing and Plans: Compare the pricing and subscription plans offered by different VPN providers. Look for providers that offer affordable plans with flexible payment options, such as monthly or yearly subscriptions.
8. Reviews and Reputation: Take the time to read reviews and assess the reputation of VPN providers. Look for feedback from users regarding the overall performance, reliability, and customer support of the provider.
By considering these factors, you can choose a VPN provider that best fits your needs and ensures a secure and seamless browsing experience on your iPhone.
Configuring VPN Settings on an iPhone
Setting up a VPN on your iPhone is a straightforward process that can provide you with enhanced security and privacy while browsing the internet. To configure VPN settings on your iPhone, follow the step-by-step guide below:
1. Open the Settings app on your iPhone. It’s the icon that looks like a gear.
2. Scroll down and tap on “General.”
3. In the General settings menu, scroll down and select “VPN.
4. Tap on “Add VPN Configuration.
5. You will be presented with several options to configure your VPN settings. The first option is the “Type” of VPN. Choose the type of VPN protocol your VPN provider supports, such as IKEv2, L2TP, or PPTP.
6. Enter the required details for the VPN configuration. This includes the description (a name to identify the VPN connection), the server (provided by your VPN provider), and your username and password (also provided by your VPN provider).
7. If your VPN provider uses a proxy, toggle the “Proxy” switch to “On” and enter the proxy details.
8. Once you have entered all the necessary information, tap on “Done” to save the VPN configuration.
9. Back in the VPN settings menu, you will see the configured VPN listed under “VPN Configurations.” Tap on the switch next to the VPN to connect or disconnect from the VPN.
10. To further customize your VPN settings, tap on the “i” icon next to the VPN configuration. Here, you can toggle on or off features like “Connect On Demand” which automatically connects to the VPN when accessing specific networks, or “Send All Traffic” which routes all your internet traffic through the VPN.
11. You can also reorder your VPN configurations by tapping and holding the hamburger icon next to the VPN configuration, then dragging it up or down.
12. To delete a VPN configuration, swipe left on the configuration name and tap “Delete.”
Configuring the VPN settings on your iPhone allows you to quickly and easily connect to your VPN provider and enjoy a secure browsing experience. Remember to always enable the VPN when connecting to public Wi-Fi networks or when you need an extra layer of online privacy.
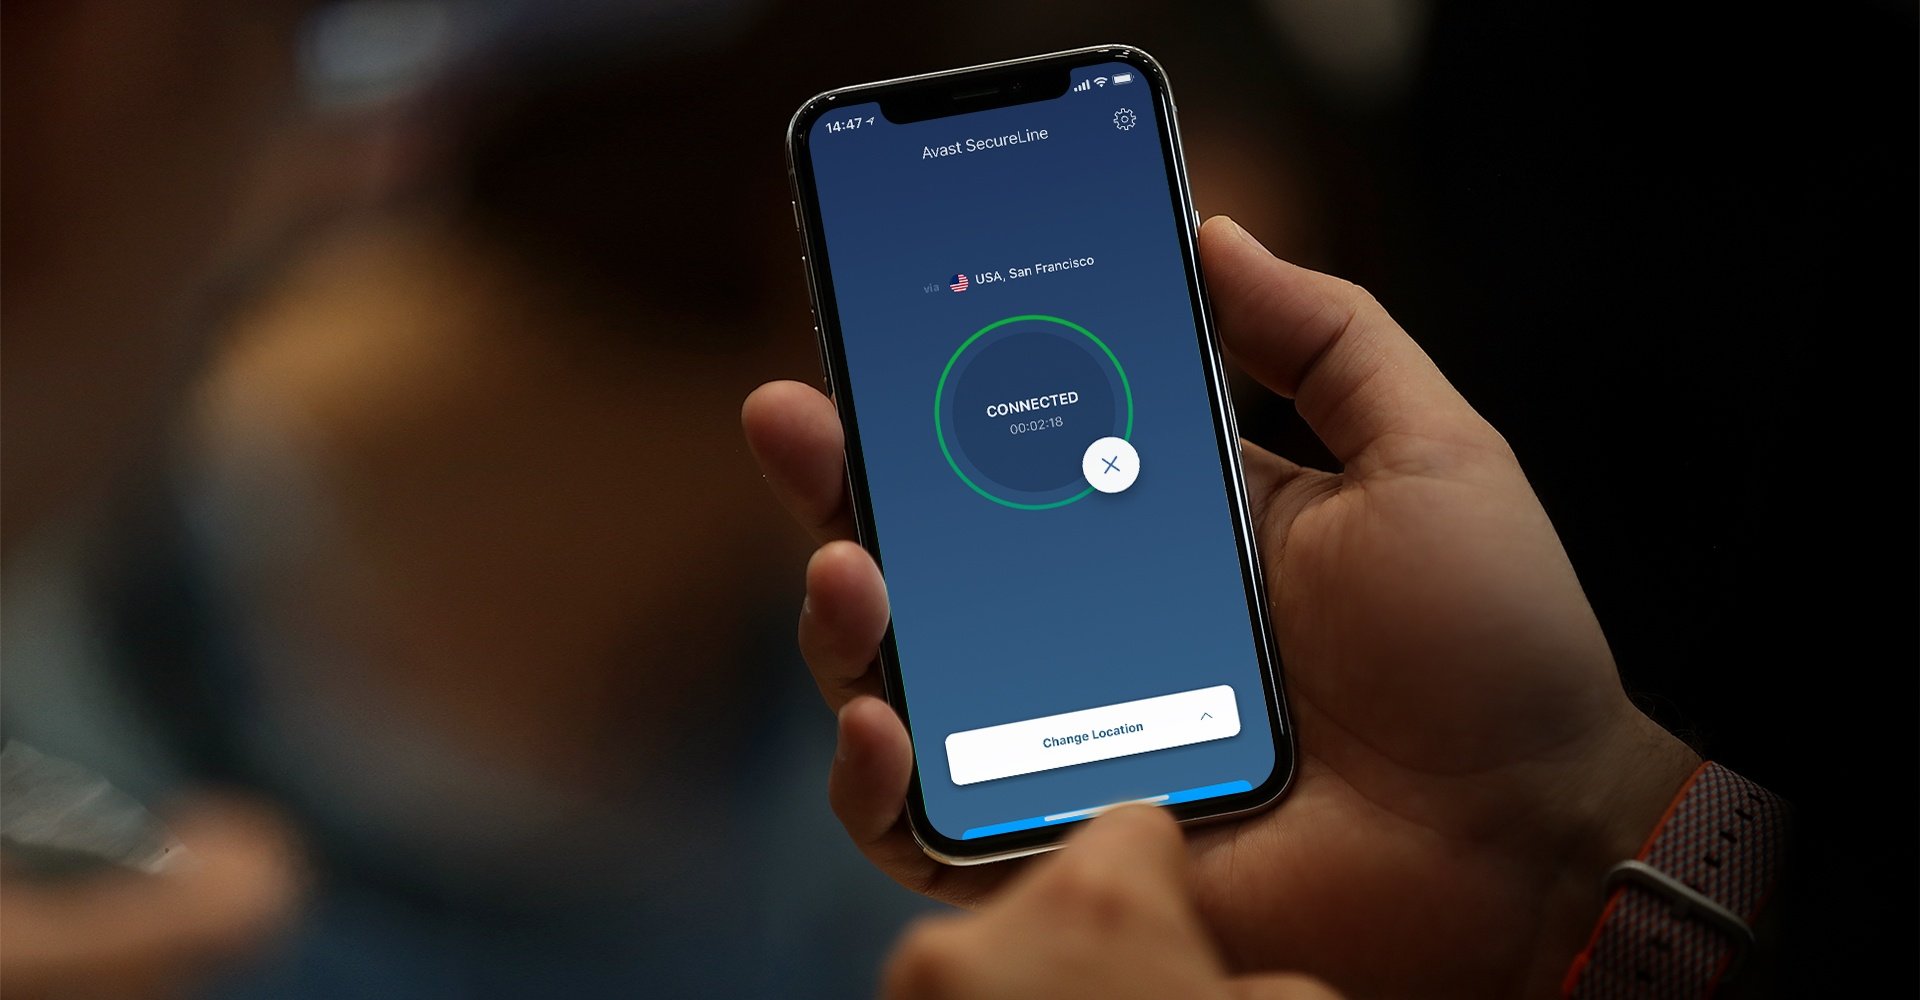
Testing the VPN Connection
Once you have successfully configured your VPN settings on your iPhone, it’s important to test the connection to ensure that it is working properly. Follow these steps to test your VPN connection:
1. Open the Settings app on your iPhone.
2. Tap on the VPN option to access your VPN settings.
3. Toggle the switch next to the VPN connection to turn it on.
4. Open a web browser on your iPhone and search for “what is my IP address”.
5. Note down the IP address displayed on the search results page.
6. Next, open your VPN app or profile on your iPhone.
7. Connect to a server location of your choice. This can usually be done by tapping on a button or selecting a location from a list.
8. Once connected, go back to your web browser and search for “what is my IP address” again.
9. Compare the IP address displayed this time with the previous one.
If the IP address has changed and reflects the server location you connected to, congratulations! Your VPN connection is working as intended. This means your internet traffic is now being securely routed through the VPN server, keeping your data encrypted and your online activities private.
If the IP address has not changed or the location does not match the server location you connected to, there may be an issue with your VPN connection. In such cases, you can try disconnecting and reconnecting to the VPN server, or contact your VPN provider’s support team for assistance.
It’s worth noting that VPN connections can sometimes be affected by factors such as network congestion or server load. If you experience any performance issues or slow speeds while using the VPN, try connecting to a different server location or contacting your VPN provider for further guidance.
By testing the VPN connection on your iPhone, you can ensure that your online activities are protected and your data remains secure. With a properly functioning VPN, you can browse the internet with peace of mind, knowing that your sensitive information is being safeguarded.
Tips for Safe Browsing with a VPN on an iPhone
Using a VPN on your iPhone is a great way to enhance your online security and privacy. While a VPN encrypts your internet traffic and masks your IP address, there are still a few extra measures you can take to ensure safe browsing. Here are some tips to help you make the most out of using a VPN on your iPhone:
1. Keep your VPN app updated: VPN providers regularly release updates to fix any vulnerabilities or bugs. It’s important to keep your VPN app up to date to ensure you have the latest security features.
2. Enable the Kill Switch: Most reputable VPN providers offer a Kill Switch feature. This feature automatically cuts off your internet connection if the VPN connection drops, preventing any of your data from being exposed. Make sure to enable this feature in your VPN settings.
3. Choose secure VPN protocols: When setting up your VPN connection, make sure to choose a secure protocol such as OpenVPN. This protocol has strong encryption and is widely regarded as one of the most secure options available.
4. Use additional security measures: Consider using additional security features such as two-factor authentication (2FA) to add an extra layer of protection to your online accounts. This can provide added security even if your VPN connection is compromised.
5. Beware of phishing attempts: While a VPN can encrypt your traffic and protect you from external threats, it’s still important to be cautious of phishing attempts. Be wary of any suspicious emails or links and avoid entering sensitive information on unsecure websites.
6. Disconnect when not in use: If you’re not actively using your VPN connection, it’s a good idea to disconnect from it. This can help preserve battery life and ensure maximum security when you’re not browsing the internet.
7. Avoid public Wi-Fi without a VPN: Public Wi-Fi networks are often insecure and can pose a significant risk to your online privacy. Whenever possible, avoid connecting to public Wi-Fi without using a VPN to ensure your data remains encrypted and secure.
8. Use strong, unique passwords: To further enhance your online security, make sure to use strong, unique passwords for all your online accounts. This reduces the risk of unauthorized access to your personal information, even if your VPN connection is breached.
9. Regularly monitor your VPN connection: Keep an eye on your VPN connection to ensure it’s functioning properly. Look for any warning signs such as unexpected disconnections or unusually slow speeds, as these could indicate a security issue.
10. Trust reputable VPN providers: When choosing a VPN provider, opt for reputable companies with a proven track record of privacy and security. Research different providers, read user reviews, and choose one that aligns with your specific needs and requirements.
By following these tips, you can maximize the benefits of using a VPN on your iPhone and ensure your online browsing is safe and secure. Remember, a VPN is an essential tool for protecting your privacy and keeping your sensitive information out of the wrong hands.
Conclusion
Setting up a VPN on your iPhone is a simple yet crucial step in ensuring your online privacy and security. By following the steps outlined in this guide, you can confidently browse the internet knowing that your data is encrypted and your identity is protected.
A VPN not only allows you to access geo-restricted content and bypass censorship, but it also shields your personal information from hackers and prying eyes. With numerous VPN providers available in the market, you can choose the one that best suits your needs, whether it’s speed, reliability, or a wide range of server locations.
Remember to regularly update your VPN app to benefit from the latest security features and improvements. Additionally, always connect to trusted and secure Wi-Fi networks to enhance your browsing experience and safeguard your data.
By setting up a VPN on your iPhone, you’re taking a proactive approach to protect your digital life. Don’t compromise your online privacy and security – take control with a VPN and browse the internet safely and privately.
FAQs
1. How do I set up a VPN on my iPhone?
Setting up a VPN on an iPhone is easy. Here’s a step-by-step guide:
- Go to the App Store and search for a reliable VPN app.
- Install the app and open it.
- Create an account or sign in if you already have one.
- Follow the app’s instructions to connect to a VPN server.
- Once connected, your iPhone will now be protected and you can browse safely.
2. Why should I use a VPN on my iPhone?
Using a VPN on your iPhone offers several benefits. It encrypts your internet traffic, protecting your sensitive data from hackers and snooping eyes. It also allows you to bypass geo-restrictions, accessing content that is blocked in your region. Additionally, a VPN enhances your online privacy by masking your IP address and making your online activities anonymous.
3. Are there any free VPN options available for iPhone?
Yes, there are free VPN options available for iPhone. However, it’s important to note that they often come with limitations such as restricted data usage, slow connection speeds, and limited server locations. Paid VPN services generally offer more reliable and secure connections, along with a wider range of server options to choose from.
4. Can I use a VPN on public Wi-Fi networks?
Absolutely! In fact, using a VPN on public Wi-Fi networks is highly recommended. Public Wi-Fi networks are often unsecured, making them prime targets for hackers. By using a VPN on your iPhone while connected to public Wi-Fi, you can encrypt your internet traffic and protect your personal information from potential attacks.
5. Will using a VPN impact my internet speed on my iPhone?
While using a VPN may slightly decrease your internet speed, a good VPN service will minimize the impact. The encryption and rerouting of your internet traffic can cause a small reduction in speed, but the difference is typically negligible. Moreover, with fast and reliable VPN providers, you’ll hardly notice any change in your browsing experience.