
Are you looking to change the IP address on your iPhone’s cellular data network? In this increasingly connected world, having the ability to change your IP address can be useful for various reasons, such as improving your online privacy and security, accessing region-restricted content, or troubleshooting network connectivity issues. While changing the IP address on your iPhone’s Wi-Fi network is relatively straightforward, the process for changing the IP address on the cellular data network is a bit different.
In this article, we will guide you through the steps to change the IP address on your iPhone’s cellular data network. Whether you want to switch to a different IP address or simply refresh your current one, we have got you covered. With our step-by-step instructions, you will be able to change your IP address on the go, giving you more control over your internet connection on your iPhone.
Inside This Article
- Overview
- Step 1: Accessing the Settings
- Step 2: Selecting the Wi-Fi Option
- Step 3: Finding the Connected Network
- Step 4: Changing IP Address
- Conclusion
- FAQs
Overview
In today’s interconnected world, having the ability to change your IP address is crucial for various reasons. Whether you want to protect your online privacy, access geo-restricted content, or troubleshoot network issues, being able to change your IP address can be a handy skill to have. In this article, we will specifically focus on how to change the IP address on your iPhone when using cellular data.
Your IP address is a unique identifier assigned to your device by your internet service provider (ISP). It allows websites and online services to recognize and interact with your device. By changing your IP address, you can mask your location, making it more difficult for third parties to track your online activities.
Note: Changing your IP address on an iPhone using cellular data is different from changing it while connected to Wi-Fi. This guide specifically addresses the process when using the cellular network, providing you with steps to follow.
Now, let’s dig into the methods you can use to change your IP address on your iPhone when using cellular data.
Step 1: Accessing the Settings
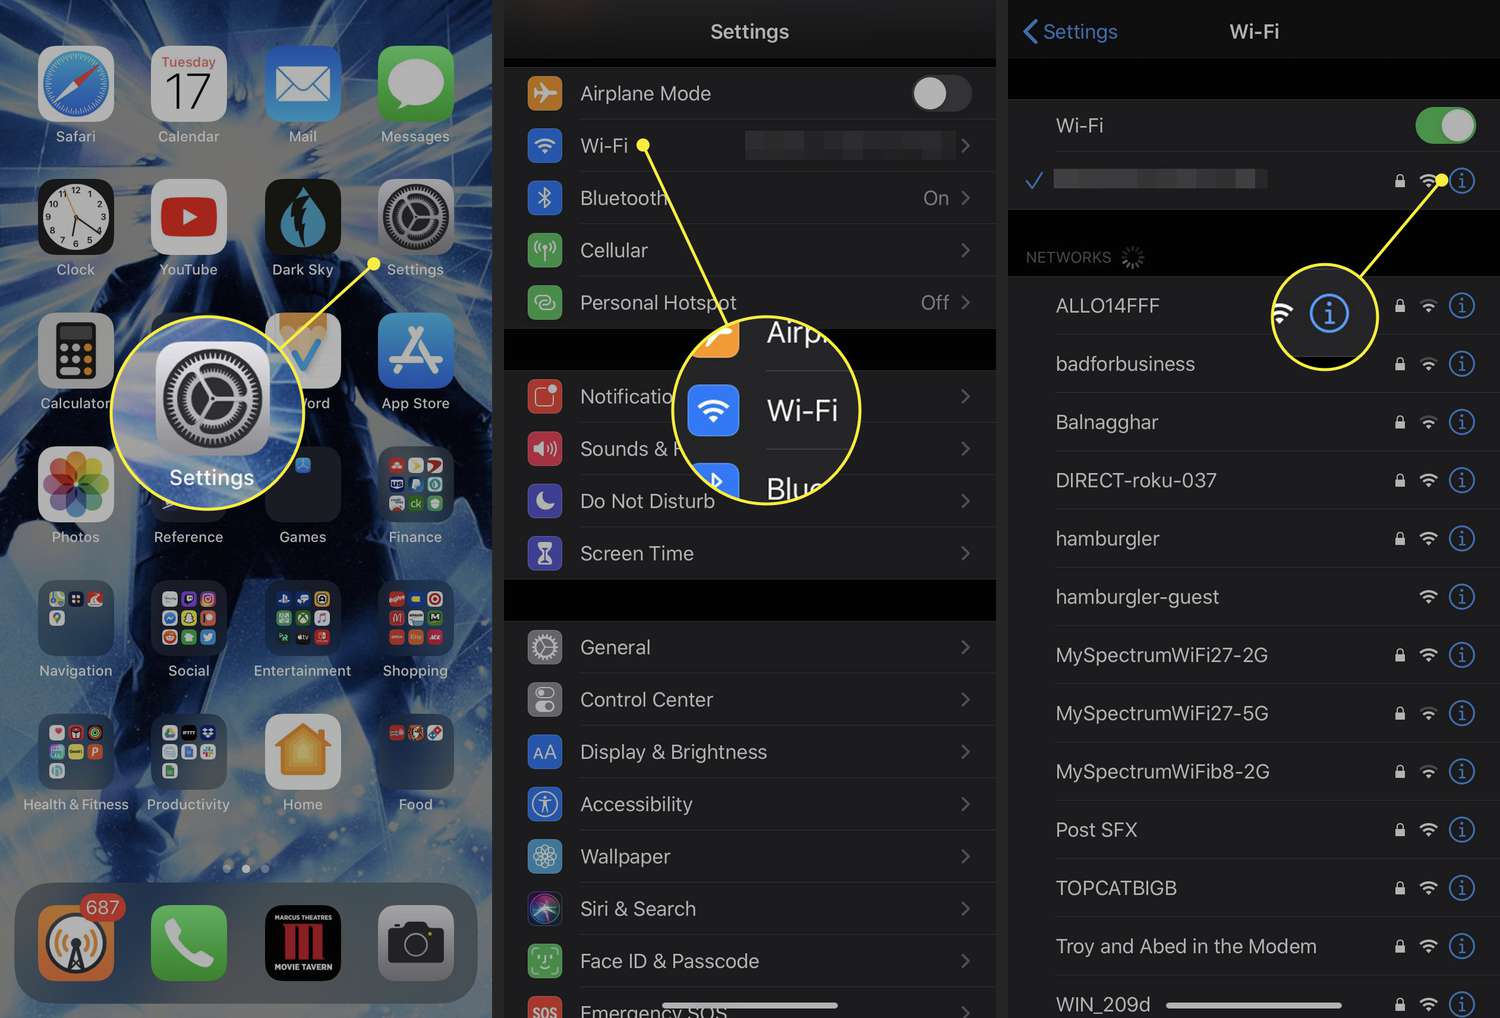
Changing the IP address on your iPhone’s cellular data requires accessing the device settings. To begin, unlock your iPhone and locate the “Settings” app on the home screen. It is represented by a gray icon with gears. Tap on the “Settings” app to open it.
Once you have opened the “Settings” app, you will be presented with a list of options. Look for the “Wi-Fi” option and tap on it. This will open a new screen with various Wi-Fi settings and networks.
Scroll down to the bottom of the “Wi-Fi” settings screen until you find the “Cellular” option. Tap on it to access the cellular data settings.
On the next screen, you will see a list of options related to your iPhone’s cellular data network. Look for the option labeled “Cellular Data Network” and tap on it. This will open the cellular data network settings.
Step 2: Selecting the Wi-Fi Option
Once you have enabled Airplane Mode on your iPhone, the next step is to select the Wi-Fi option. To do this, go to your iPhone’s Settings and tap on “Wi-Fi”. This will bring up a list of available Wi-Fi networks in your vicinity.
Look for the Wi-Fi network that you want to connect to and tap on it. If the network is secured, you will be prompted to enter the password. Simply enter the password and tap on “Join” to connect to the Wi-Fi network.
It is important to note that when you connect to a Wi-Fi network, your iPhone will obtain an IP address from the router of the network. This IP address is assigned to your device for the duration of your connection to the network. If you want to change your IP address, you will need to disconnect from the Wi-Fi network and connect to a different network, or use cellular data.
Now that you have selected the Wi-Fi option and connected to a network, let’s move on to the next step.
Step 3: Finding the Connected Network
Once you have accessed the Wi-Fi settings on your iPhone, the next step is to find the connected network. This information is essential as it will help you identify the network that you want to change the IP address for.
To locate the connected network, look for the option labeled “Wi-Fi” under the “Settings” menu on your iPhone. Tap on “Wi-Fi” to access the list of available networks. The connected network will be indicated by a blue checkmark next to its name.
If you can’t locate the connected network in the list, make sure that you are within range of the Wi-Fi network and that the device is properly connected. You may also need to refresh the list by swiping down on the screen to trigger a network scan.
Take note of the name of the connected network as you will need it for the next step. This is especially important when you have multiple Wi-Fi networks available, and you want to change the IP address for a specific network.
Step 4: Changing IP Address
Changing your IP address on your iPhone can be done through the use of a VPN (Virtual Private Network). A VPN allows you to create a secure and encrypted connection to a server located in a different location, effectively changing your IP address.
There are many VPN apps available in the App Store that you can choose from. Simply search for “VPN” in the App Store and you’ll find a wide variety of options. It’s important to choose a reliable and reputable VPN that offers strong security and privacy features.
Once you’ve downloaded and installed a VPN app on your iPhone, follow these steps to change your IP address:
- Launch the VPN app on your iPhone.
- Sign in to your VPN account or create a new account if necessary.
- Select a server location from the available options. This can usually be done by tapping on a country or region on the app’s interface.
- Once you’ve selected a server location, tap on the Connect or Start button to establish a connection to that server.
- Wait for the VPN app to establish the connection. Once connected, your IP address will be changed to the IP address of the server you’ve selected.
It’s important to note that using a VPN may affect your internet connection speed. The distance between your physical location and the server you’re connecting to can impact your internet speed. Additionally, some VPNs may have a limited number of server locations available.
Remember to disconnect from the VPN when you no longer need to change your IP address. This will restore your internet connection to its default settings.
Conclusion
Changing the IP address on your iPhone’s cellular data can be an essential troubleshooting step or a way to protect your privacy and security. Whether you are encountering connectivity issues or want to browse the internet anonymously, knowing how to modify your IP address is a valuable skill.
In this article, we have explored two methods to change the IP address on your iPhone’s cellular data. The first method involves requesting a new IP address from your network provider, while the second method utilizes a VPN app to mask your IP address. Both options offer their unique set of advantages and it’s up to you to decide which one suits your needs best.
By following the steps outlined in this guide, you can easily change your IP address on iPhone cellular data and enjoy a seamless internet browsing experience. Remember to choose a reliable VPN service if you opt for that method and always protect your personal information while using public Wi-Fi networks.
So go ahead, take control of your IP address, and enjoy the benefits of a secure and unrestricted online experience.
FAQs
1. Why would I need to change my IP address on my iPhone?
There are several reasons why you might need to change your IP address on your iPhone. One common reason is to bypass certain restrictions or access geo-blocked content. Additionally, changing your IP address can provide an added layer of privacy and security while browsing the internet.
2. How can I change my IP address on my iPhone?
To change your IP address on your iPhone, you can follow these steps:
- Go to the “Settings” app on your iPhone.
- Select the “Wi-Fi” or “Cellular” section, depending on your internet connection.
- Find the network you are connected to and tap on the (i) icon next to it.
- Choose the “Renew Lease” option. This will release your current IP address and assign a new one.
3. Will changing my IP address affect my data plan or cellular connection?
No, changing your IP address will not affect your data plan or cellular connection. It only changes the IP address assigned to your device, allowing you to access different networks or bypass certain restrictions.
4. Is it legal to change my IP address?
In most cases, changing your IP address is completely legal. However, it’s important to note that using a different IP address to engage in illegal activities or to circumvent copyrights and licensing agreements is not legal.
5. Are there any risks or drawbacks of changing my IP address on my iPhone?
While changing your IP address on your iPhone is generally safe and doesn’t pose any significant risks, it’s important to exercise caution. Some websites or online services may detect and restrict access to users who frequently change their IP addresses. Additionally, if you’re using a VPN or proxy server to change your IP address, make sure to choose a reputable provider to protect your privacy and security.