
As cell phone technology continues to advance, having access to cellular data on your Android device has become essential for staying connected and enjoying a variety of online services on the go. Whether you’re browsing the web, streaming videos, or using navigation apps, having a reliable cellular data connection is crucial. However, sometimes you may find that your cellular data is turned off on your Android device, preventing you from accessing the internet or using certain apps. In this comprehensive guide, we will walk you through the step-by-step process of turning on cellular data on your Android device, ensuring that you can stay connected and make the most out of your mobile experience.
Inside This Article
- Enabling Cellular Data on Android
- Steps to Turn On Cellular Data on Android
- Troubleshooting Cellular Data Issues on Android
- Managing Data Usage on Android
- Conclusion
- FAQs
Enabling Cellular Data on Android
If you’re using an Android device and want to connect to the internet while on the go, you’ll need to enable cellular data. Cellular data allows your device to use mobile networks to access the internet and download data, such as emails, apps, and web pages. By following a few simple steps, you’ll be able to turn on cellular data on your Android device and stay connected wherever you are.
Before you proceed, it’s important to note that the exact steps may vary slightly depending on the version of Android you’re using and the device you have. However, the general steps should be similar across most Android devices.
Here are the basic steps to enable cellular data on Android:
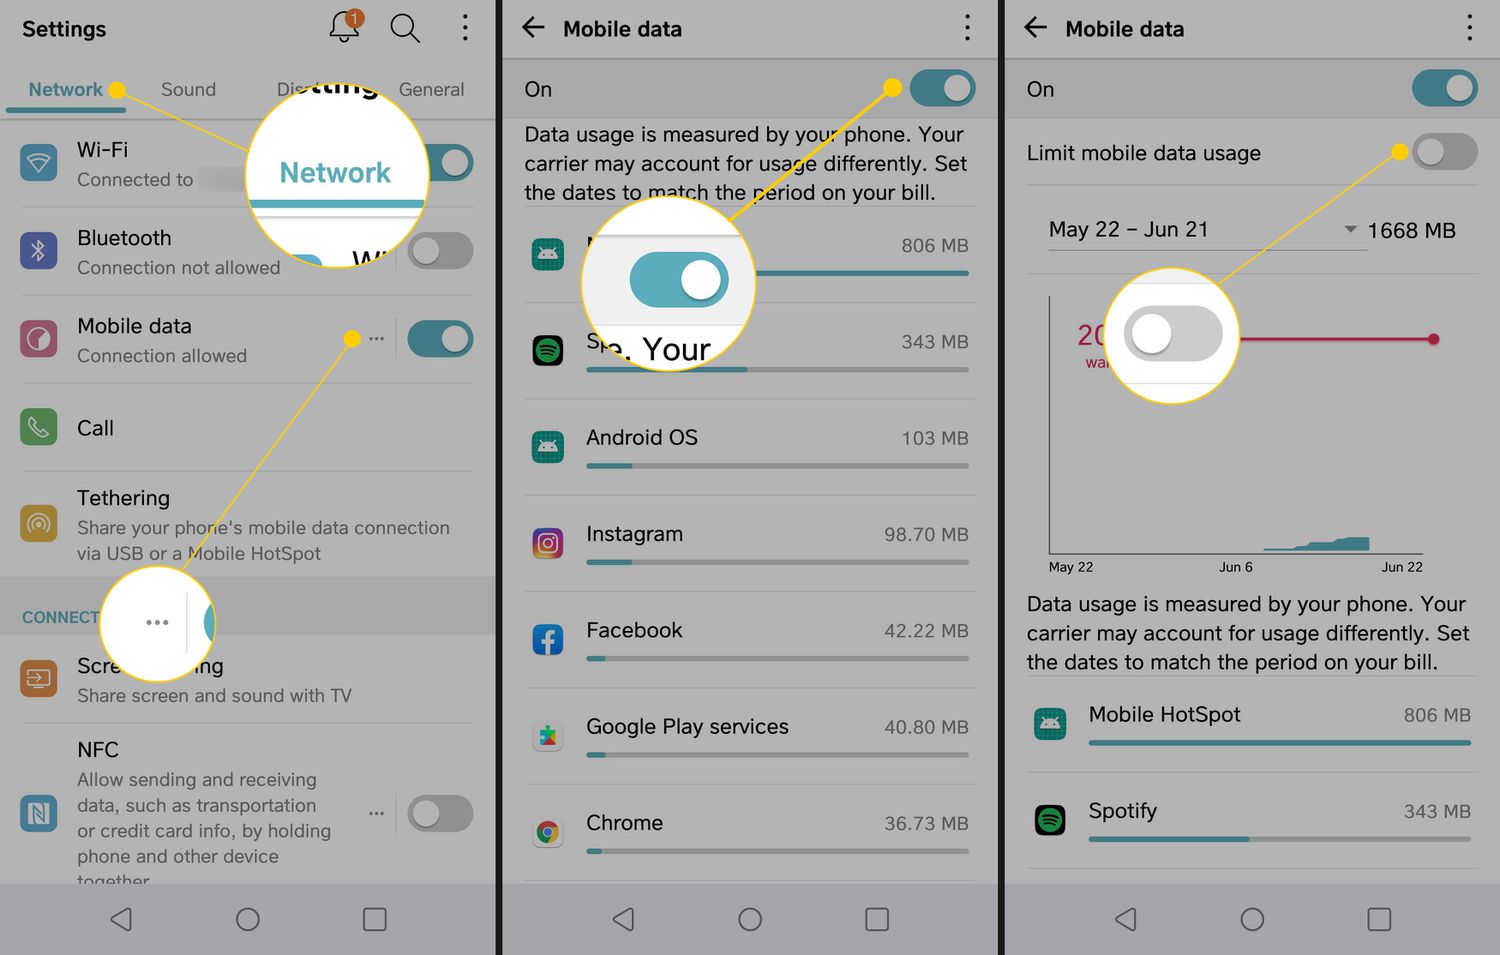
- Open the Settings app on your Android device. You can typically find the Settings app in the app drawer or by swiping down from the top of the screen and tapping the gear icon.
- Scroll down and tap on “Network & internet.” The exact wording may vary slightly.
- Tap on “Mobile network” or “Cellular network,” depending on your Android version.
- Toggle the switch for “Mobile data” or “Data connection” to the ON position. The switch may be located at the top of the screen or within the Mobile network settings.
Once you’ve enabled cellular data, your Android device will be able to connect to the internet using your mobile data plan. You’ll see the cellular data icon in the status bar, indicating that your device is connected to a mobile network.
If you’re experiencing issues with enabling cellular data on Android, there are a few troubleshooting steps you can try:
- Restart your device: Sometimes a simple restart can fix temporary glitches that may be causing issues with cellular data.
- Check your APN settings: Access Point Name (APN) settings are responsible for connecting your device to the internet. Make sure they are correctly configured for your mobile carrier.
- Reset network settings: If all else fails, you can try resetting your network settings to their default values. Keep in mind that this will remove all saved Wi-Fi networks and Bluetooth connections.
- Contact your mobile carrier: If none of the above steps resolve the issue, it’s best to reach out to your mobile carrier for further assistance.
Managing your data usage is also crucial to ensure that you don’t exceed your data plan limits or incur additional charges. Android devices offer various ways to manage data usage, such as setting data limits, restricting background data, and monitoring app data usage. You can access these settings through the “Data usage” section in the Settings app.
By following the steps and tips mentioned above, you’ll be able to enable cellular data on your Android device and stay connected to the internet while on the go. Enjoy seamless access to emails, social media, web browsing, and more, no matter where you are.
Steps to Turn On Cellular Data on Android
Enabling cellular data on your Android device is essential for accessing the internet and using various mobile services when you are not connected to a Wi-Fi network. Here are the steps to turn on cellular data on your Android phone:
- Go to Settings: Open the settings app on your Android device. You can typically find the settings app in the app drawer or by swiping down from the top of the screen and tapping the gear icon in the notification panel.
- Select “Network & internet”: In the settings menu, scroll down and tap on “Network & internet” to access the network settings of your device.
- Tap on “Mobile network”: Within the “Network & internet” menu, you will find various options related to network connectivity. Look for the option that says “Mobile network” or something similar and tap on it.
- Enable “Mobile data”: On the “Mobile network” screen, you should see a toggle switch next to “Mobile data.” Tap on the toggle switch to turn on cellular data. If the toggle switch is already enabled, cellular data is already turned on.
- Adjust additional settings: Depending on your Android device, there may be additional settings related to cellular data. For example, you might have the option to enable data roaming or select the preferred network type. Make modifications to these settings as per your requirements.
- Confirm activation: Once you have enabled cellular data, you should see the cellular data icon (usually shown as “4G,” “LTE,” or similar) in the status bar of your device. This indicates that cellular data is now active.
By following these steps, you can easily turn on cellular data on your Android device and start utilizing mobile data for internet access, app usage, and other online services.
Troubleshooting Cellular Data Issues on Android
Experiencing issues with your cellular data on your Android device can be frustrating, especially when you need to stay connected on the go. However, there are a few troubleshooting steps you can take to help resolve these issues and get your cellular data working again. In this section, we will explore some common problems and their solutions.
1. Check your signal strength: Low signal strength can affect your cellular data connectivity. Ensure that you are in an area with good network coverage or move to a different location if necessary. Sometimes, simply relocating to a spot with better reception can resolve the issue.
2. Enable and disable Airplane Mode: Toggling Airplane Mode on and off can help reset the cellular connection on your Android device. Swipe down from the top of your screen to access the Quick Settings panel and tap on the Airplane Mode icon. Wait a few seconds and disable Airplane Mode by tapping the icon again.
3. Restart your device: A simple restart can often fix minor software glitches that may be causing your cellular data issues. Press and hold the power button on your Android device, then select “Restart” from the options that appear. Once your device reboots, check if the cellular data is functioning as expected.
4. Reset network settings: Resetting your network settings can help resolve more persistent cellular data issues. Go to the “Settings” menu on your Android device, then tap on “System” or “System & Updates.” Look for the “Reset” option and choose “Reset Wi-Fi, mobile & Bluetooth.” Confirm your selection and allow your device to reset the network settings.
5. Clear cache and data for the cellular data app: If the problem persists, clearing the cache and data for your cellular data app can help resolve any conflicts or corrupted files. Go to the “Settings” menu, then tap on “Apps” or “Applications.” Find the app related to your cellular data, such as “Mobile Network” or “Network Settings,” and select it. Tap on “Storage” and choose the options to clear both the cache and data.
6. Contact your service provider: If none of the above solutions work, it may be worth contacting your service provider for further assistance. They can perform network diagnostics and address any network-related issues that may be affecting your cellular data.
It’s important to note that these troubleshooting steps may vary slightly depending on your Android device model and software version. If you are unsure, consult your device’s user manual or visit the manufacturer’s website for specific instructions.
By following these troubleshooting steps, you can often resolve cellular data issues on your Android device and regain your connectivity. However, if the problem persists, it may indicate a hardware problem, and you should consider taking your device to a professional technician for further evaluation.
Managing Data Usage on Android
Managing data usage on your Android device is crucial to avoid exceeding your data plan limits and incurring additional charges. By effectively managing your data usage, you can optimize your internet experience and ensure that you stay within your monthly data allowance. Here are some tips to help you manage your data usage on Android:
1. Monitor your data usage: Keep track of how much data you are using by regularly checking your data usage statistics on your Android device. Most Android phones have a built-in feature that allows you to monitor your data usage. Simply go to the settings menu, navigate to the “Network & internet” or “Data usage” section, and you’ll find a breakdown of data usage by apps and services.
2. Set data usage limits: Take advantage of the data usage limit feature on your Android device. You can set your desired data usage limit to receive a warning or even disable mobile data when you reach the specified limit. This can help prevent unexpected data overages.
3. Use Wi-Fi whenever possible: Connect to Wi-Fi networks whenever available to save your mobile data. Wi-Fi networks are generally faster and don’t count towards your mobile data usage. Set your Android device to automatically connect to known Wi-Fi networks to ensure you’re always utilizing Wi-Fi when it’s available.
4. Restrict background data usage: Many apps running in the background consume data even when you’re not actively using them. To conserve data, you can restrict background data usage for specific apps or globally on your Android device. This can be done in the settings menu under “Network & internet” or “Data usage.”
5. Use data-saving mode: Android devices often have a data-saving mode or low-data mode option. Enabling this mode can help reduce data usage by optimizing app behavior, restricting background data, and compressing web pages. Activate this mode in the settings menu under “Network & internet” or “Data usage.”
6. Disable auto-updates for apps: By default, apps on your Android device may be set to automatically update over mobile data. This can consume a significant amount of data without you realizing it. Disable auto-updates for apps or set them to update only when connected to Wi-Fi to control when and how your apps consume data.
7. Use data compression apps: There are third-party apps available on the Google Play Store that can help compress data, such as images and web pages, to reduce data usage. These apps work by optimizing files and shrinking their size without compromising quality.
8. Clear app cache and data: Over time, apps accumulate cached data, which can take up valuable storage space and potentially use data when accessed. To clear app cache and data, go to the settings menu, select “Apps” or “Application Manager,” choose the app you want to clear cache for, and tap on “Clear cache” or “Clear data.”
By implementing these tips and techniques, you can effectively manage your data usage on your Android device. This will not only help you stay within your data plan limits but also optimize your internet experience.
Conclusion
In conclusion, knowing how to turn on cellular data on your Android device is essential for staying connected and accessing the internet on the go. By following the steps outlined in this article, you can easily enable cellular data and enjoy all the benefits it offers. Remember to keep an eye on your data usage and optimize it based on your needs to ensure that you don’t exceed your data plan limits.
Having cellular data turned on allows you to browse the web, stream media, and use various online services even when Wi-Fi is not available. It provides convenience and flexibility, especially when you’re traveling or outside of a Wi-Fi coverage area.
By following the instructions provided in this article, you’ll be able to navigate your Android device settings with ease and enable cellular data in no time. Stay connected and make the most out of your mobile phone by having cellular data enabled whenever you need it.
FAQs
1. Why is my cellular data not working on Android?
There can be various reasons why your cellular data is not working on Android. It could be due to a weak signal, network congestion, incorrect APN settings, or a software glitch. Try troubleshooting steps such as restarting your device, checking your APN settings, or contacting your service provider for assistance.
2. How do I turn on cellular data on my Android device?
To turn on cellular data on Android, follow these steps:
- Open the Settings app on your Android device.
- Go to “Network & internet” or “Connections” option.
- Select “Mobile network” or “Data usage”.
- Toggle the switch for “Mobile data” or “Data enabled” to turn it on.
3. Can I control which apps can use cellular data on my Android phone?
Yes, you can control which apps can use cellular data on your Android phone. Here’s how:
- Open the Settings app on your Android device.
- Go to “Network & internet” or “Connections” option.
- Select “Data usage” or “Mobile network”.
- Tap on “App data usage” or “Apps using data”.
- You will see a list of apps. Toggle the switch next to each app to allow or restrict it from using cellular data.
4. How do I monitor my cellular data usage on Android?
To monitor your cellular data usage on Android, follow these steps:
- Open the Settings app on your Android device.
- Go to “Network & internet” or “Connections” option.
- Select “Data usage” or “Mobile data”.
- You will see a graph showing your data usage. Scroll down to view details per app.
5. Can I set a data limit or warning on my Android device to avoid exceeding my data plan?
Yes, you can set a data limit or warning on your Android device to avoid exceeding your data plan. Here’s how:
- Open the Settings app on your Android device.
- Go to “Network & internet” or “Connections” option.
- Select “Data usage” or “Mobile data”.
- Toggle the switch for “Set data warning” or “Set data limit”.
- Adjust the limit or warning level according to your preference.