
Welcome to the ultimate guide on how to turn on autocorrect on iPhone. Autocorrect is a handy feature that helps users avoid embarrassing typos and spelling mistakes while typing on their iPhones. Whether you’re sending a quick text message or drafting an important email, autocorrect can save you time and ensure your messages are error-free. In this article, we’ll walk you through the simple steps to enable autocorrect on your iPhone. We’ll also discuss some tips and tricks to make the most out of this helpful feature. So, whether you’re a new iPhone user or just looking to optimize your typing experience, keep reading to learn how to enable autocorrect on your iPhone.
Inside This Article
- Enabling Auto-Correction on iPhone
- Customizing Auto-Correction Settings on iPhone
- Troubleshooting Auto-Correction Issues on iPhone
- Conclusion
- FAQs
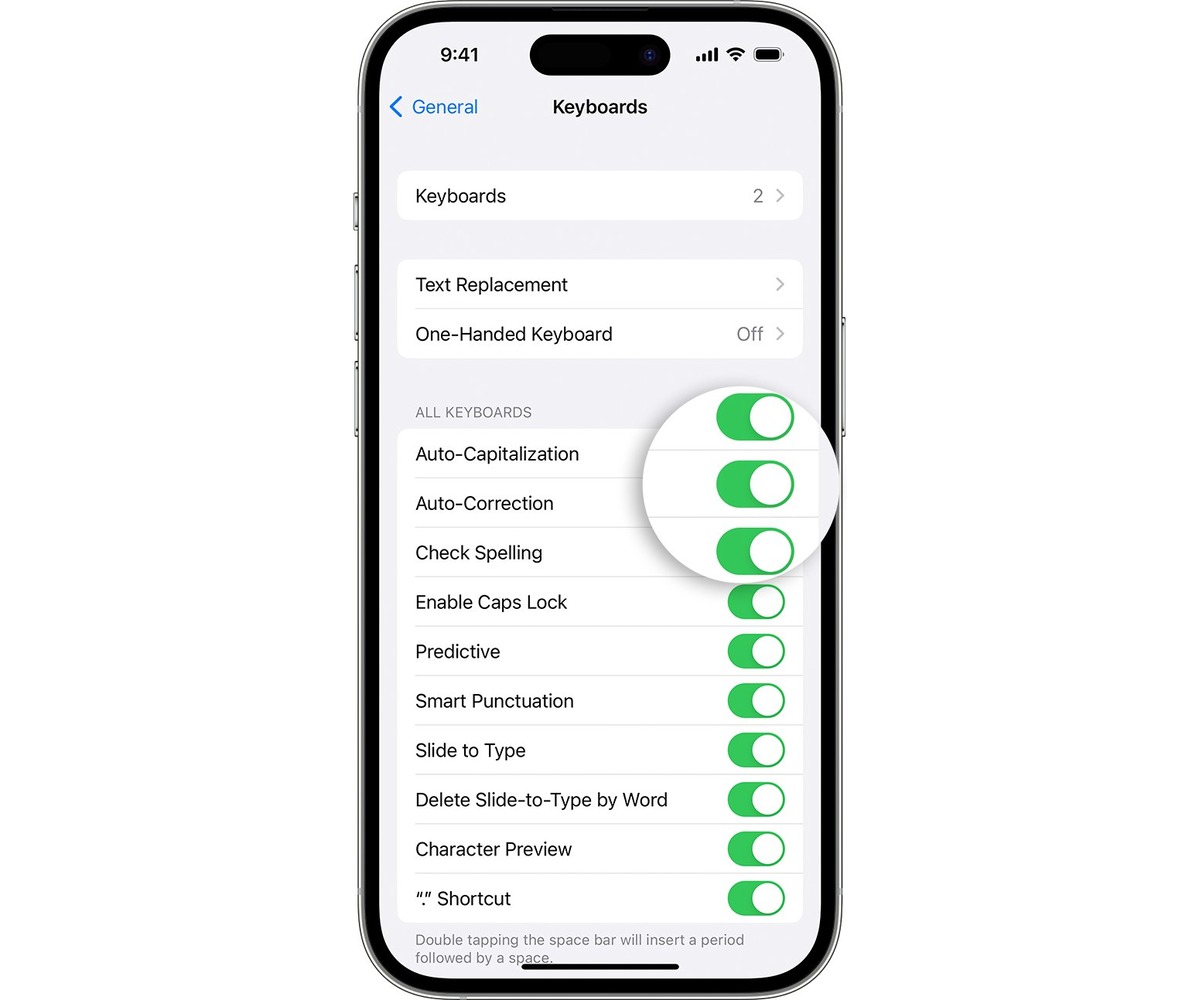
Enabling Auto-Correction on iPhone
Auto-Correction is a useful feature on the iPhone that helps to minimize typing errors and enhance the overall typing experience. It can be especially handy when you’re composing emails, text messages, or any other form of written communication on your device. Enabling this feature is quite simple, and in this section, we’ll guide you through the process step by step.
To enable Auto-Correction on your iPhone, follow these easy steps:
- Unlock your iPhone and access the home screen.
- Tap on the “Settings” app to open it. The app icon resembles a gear.
- Scroll down and tap on the “General” option.
- In the “General” settings, scroll down and tap on “Keyboard.”
- On the “Keyboard” settings page, locate the “Auto-Correction” toggle switch.
- Tap on the toggle switch to enable Auto-Correction. When the switch turns green, it means the feature is enabled.
That’s it! You have successfully enabled Auto-Correction on your iPhone. Now, when you type on your device’s virtual keyboard, the Auto-Correction feature will work in the background, automatically fixing common typing mistakes.
Keep in mind that Auto-Correction is a system-wide feature on the iPhone, so it will apply to all the apps that use the device’s keyboard for input. Whether you’re typing in Messages, Notes, Safari, or any other app, Auto-Correction will help ensure that your text is accurate and error-free.
It’s worth noting that Auto-Correction is not foolproof and may not catch every error. However, it significantly reduces the chances of typing mistakes and saves you valuable time by eliminating the need for manual corrections.
Now that you’ve learned how to enable Auto-Correction on your iPhone, let’s move on to the next section to explore how you can further customize the Auto-Correction settings to suit your personal preferences.
Customizing Auto-Correction Settings on iPhone
Autocorrect is a convenient feature on the iPhone that helps correct typos and spelling errors while typing. However, every individual has different typing styles and preferences. Fortunately, iOS allows users to customize the Auto-Correction settings to better suit their needs. In this article, we will guide you through the process of customizing Auto-Correction settings on your iPhone.
To access the Auto-Correction settings, follow these steps:
Step 1: Open the Settings app on your iPhone.
Step 2: Scroll down and tap on “General.”
Step 3: In the General settings, tap on “Keyboard.”
Step 4: Now, tap on “Auto-Correction.”
In the Auto-Correction settings, you will find various options that you can modify according to your preferences. Let’s explore some of the key customization settings:
1. Enable/Disable Auto-Correction: At the top of the Auto-Correction settings, you can toggle the switch to enable or disable Auto-Correction altogether. If you find Auto-Correction more of a hindrance than a help, you can turn it off here.
2. Capitalization: By default, iOS automatically capitalizes the first letter of a sentence. If you want to disable this feature, simply toggle the switch next to “Capitalization.”
3. Period Shortcut: iOS has a convenient feature that automatically inserts a period and a space when you double-tap the spacebar. If you prefer not to use this shortcut, you can turn it off by toggling the switch next to “Double-Space.”
4. Replace Text: This setting allows you to personalize your Auto-Correction by adding your own custom replacements. For example, if you often mistype a specific word, you can set up a replacement so that it is automatically corrected to the correct word. To add a custom replacement, tap on “Text Replacement” and then the “+” symbol in the top right corner.
5. Predictive: The Predictive feature on the iPhone suggests words as you type. If you find it distracting, you can turn it off by toggling the switch next to “Predictive.”
6. Reset Keyboard Dictionary: If you find that Auto-Correction is constantly correcting words incorrectly or not auto-correcting certain words at all, you can reset the keyboard dictionary. Keep in mind that this will erase any custom words or replacements you have added. To reset the keyboard dictionary, tap on “Reset Keyboard Dictionary” and confirm your choice.
Once you have customized the Auto-Correction settings according to your preferences, you can close the Settings app and start typing with the updated settings in effect. Don’t worry if you want to make further changes later; you can always revisit the Auto-Correction settings and modify them as needed.
Customizing the Auto-Correction settings on your iPhone allows you to fine-tune your typing experience and optimize it according to your needs and preferences. Whether you want to disable Auto-Correction entirely or personalize it with custom replacements, iOS provides the flexibility to make the necessary adjustments. Take a few moments to explore the Auto-Correction settings on your iPhone, and unleash the full potential of this handy feature!
Troubleshooting Auto-Correction Issues on iPhone
If you’re experiencing issues with the Auto-Correction feature on your iPhone, don’t worry! There are a few troubleshooting steps you can take to resolve the problem. Here are some common issues and their solutions:
1. Auto-Correction not working: If Auto-Correction is not working at all on your iPhone, the first thing you should do is check if the feature is enabled. Go to “Settings,” then “General,” and select “Keyboard.” Ensure that the “Auto-Correction” toggle switch is turned on. If it is already enabled, try toggling it off and then back on again to see if that resolves the issue.
2. Incorrect Auto-Corrections: Sometimes, Auto-Correction can make mistakes and suggest incorrect replacements for words. If you find that Auto-Correction is causing more harm than good, you can try resetting the keyboard dictionary. Go to “Settings,” then “General,” and select “Reset.” Choose “Reset Keyboard Dictionary,” enter your passcode if prompted, and confirm the reset. This will remove any personalized words or incorrect Auto-Corrections from the keyboard dictionary.
3. Missing Auto-Corrections: If you’re noticing that certain words or phrases are not being Auto-Corrected, it’s possible that they are not included in the dictionary. To add them, go to “Settings,” then “General,” and select “Keyboard.” Tap on “Text Replacement” and add the desired word or phrase in the “Phrase” field. This way, the Auto-Correction feature will recognize and suggest the correct spelling for these specific words or phrases.
4. Language-specific Auto-Corrections: Auto-Correction can vary depending on the language and keyboard you are using. If you’re using multiple languages or have multiple keyboards enabled, make sure you have selected the correct language for Auto-Correction. Go to “Settings,” then “General,” and select “Keyboard.” Tap on “Keyboards” and ensure that the desired language and keyboard are selected. This will ensure that the Auto-Correction feature works correctly for the chosen language.
5. Updating iOS: If none of the above solutions work, it’s worth considering if your iOS version is up to date. Apple frequently releases updates that include bug fixes and improvements to the operating system. To check for updates, go to “Settings,” then “General,” and select “Software Update.” If an update is available, follow the prompts to download and install it. Updating to the latest iOS version may resolve any Auto-Correction issues you are experiencing.
If you have tried all these troubleshooting steps and are still facing issues with Auto-Correction on your iPhone, it may be helpful to contact Apple Support for further assistance. They can provide personalized guidance and help you resolve any persistent issues with the Auto-Correction feature.
Conclusion
In conclusion, turning on Autocorrect on your iPhone can greatly enhance your typing experience by automatically correcting spelling errors and suggesting words as you type. This feature not only saves time but also improves overall communication by minimizing typos in your texts and messages.
By navigating to the Settings app and accessing the Keyboard settings, you can easily enable Autocorrect and customize its behavior according to your preference. Whether you want to enable or disable Autocorrect, adjust its correction levels, or add shortcuts, the iPhone offers a comprehensive set of options to cater to your specific needs.
Remember, Autocorrect is a helpful tool, but it’s not infallible. It’s always a good idea to proofread your messages before sending them. Additionally, familiarize yourself with the keyboard shortcuts and predictive text suggestions to further expedite your typing process.
With Autocorrect enabled on your iPhone, you can confidently express yourself through text and enjoy a seamless typing experience that helps you avoid errors and inaccuracies.
FAQs
1. How do I turn on autocorrect on my iPhone?
To turn on autocorrect on your iPhone, go to Settings, then tap General, followed by Keyboard. In the Keyboard settings, make sure the toggle next to “Auto-Correction” is switched on. This will enable autocorrect and help you type accurately and efficiently.
2. Can I customize the autocorrect feature on my iPhone?
Yes, you can customize the autocorrect feature on your iPhone. In the Keyboard settings under General, you will find an option called “Text Replacement.” Here, you can add your own customized shortcuts and corresponding phrases. This allows you to create shortcuts for commonly used words or phrases, saving you time while typing.
3. What should I do if autocorrect is making too many mistakes?
If you find that autocorrect on your iPhone is making too many mistakes or incorrect suggestions, you can disable it by following the same steps to turn it on. Simply go to Settings, then tap General, followed by Keyboard. In the Keyboard settings, toggle off the “Auto-Correction” option. This will disable autocorrect and allow you to type without any automatic corrections.
4. Is autocorrect available in multiple languages on iPhone?
Yes, autocorrect is available in multiple languages on the iPhone. To enable autocorrect in a different language, go to Settings, then tap General, followed by Keyboard. Under the “Keyboards” section, tap “Add New Keyboard” to select and add the desired language. Once added, you can switch between different keyboards and autocorrect will work in the selected language.
5. Does autocorrect work in all apps on the iPhone?
Autocorrect works in most apps on the iPhone that involve text input, such as messaging apps, email clients, web browsers, and note-taking applications. However, it might not work in certain apps or fields where autocorrect is intentionally disabled, such as password fields or secure forms. In most cases, autocorrect is designed to assist you in typing accurately across various apps on your iPhone.