
Are you excited about getting a shiny new iPhone? One of the main concerns when switching to a new device is transferring data from your old phone. Thankfully, Apple has made this process hassle-free with the Quick Start feature.
Quick Start allows you to effortlessly transfer your data, settings, and even your Apple ID account to your new iPhone. It streamlines the setup process, ensuring that you can start using your new phone without missing a beat. Whether you are upgrading to the latest iPhone model or replacing a damaged device, Quick Start is a convenient solution.
In this article, we will guide you step-by-step on how to use Quick Start to transfer your data to your new iPhone. From contacts and photos to apps and preferences, you’ll be able to seamlessly migrate everything in just a few taps.
Inside This Article
- Step 1: Update your old iPhone
- Step 2: Turn on your new iPhone
- Step 3: Bring your old and new iPhones close together
- Step 4: Follow the instructions on your new iPhone
- Step 5: Transfer data using Quick Start
- Step 6: Complete the setup process on your new iPhone
- Additional Tips and Troubleshooting
- Conclusion
- FAQs
Step 1: Update your old iPhone
Before you transfer data to your new iPhone using Quick Start, it’s crucial to update your old iPhone to the latest version of iOS. Updating your device ensures that you have the most up-to-date features and security patches, making the transfer process smoother.
To update your iPhone, follow these steps:
- Connect your old iPhone to a stable Wi-Fi network.
- Open the “Settings” app on your old iPhone.
- Scroll down and tap on “General.”
- Select “Software Update.”
- If an update is available, tap on “Download and Install.” Make sure your iPhone is connected to a power source to avoid any interruptions during the update process.
- Enter your passcode if prompted.
- Agree to the terms and conditions and wait for the update to download and install.
Once your old iPhone is updated, you’ll be ready to proceed with the Quick Start process to transfer data seamlessly to your new iPhone.
Step 2: Turn on your new iPhone
After updating your old iPhone, the next step is to turn on your new iPhone. This is an exciting moment as it marks the beginning of your journey with your new device. Here’s how you can do it:
1. Locate the Power button on your new iPhone. On most models, it is located on the side or the top of the device. On newer models like the iPhone X and later, the Power button is replaced with the Side button.
2. Press and hold the Power button until the Apple logo appears on the screen. This indicates that your iPhone is powering on.
3. Once your new iPhone powers on, you will see the “Hello” screen. This screen greets you and prompts you to start the setup process.
4. If you have a SIM card, you will need to insert it into your new iPhone. Look for the SIM card slot, typically located on the side of the device. Use the provided SIM card eject tool or a paperclip to open the slot and insert your SIM card.
5. After inserting the SIM card, your new iPhone will search for a cellular network. If you have a Wi-Fi network available, you will be prompted to connect to it. This will allow your iPhone to download any necessary updates during the setup process.
6. Follow the on-screen instructions to select your language, country or region, and set up Wi-Fi network preferences. You will also have the option to enable location services and enable or disable certain features like Siri and Face ID.
7. Once you have completed the initial setup steps, your new iPhone will begin transferring data from your old iPhone using Quick Start. This process will copy your apps, settings, photos, and other data to your new device.
With these simple steps, you can turn on your new iPhone and be ready to proceed with the data transfer process. It’s an exciting moment as you anticipate the seamless transition from your old iPhone to your new one.
Step 3: Bring your old and new iPhones close together
Now that you’ve updated your old iPhone and turned on your new one, it’s time to bring them close together for a seamless transfer of data. This step is crucial in ensuring that all your precious files and settings are successfully migrated to your new device.
Before proceeding, make sure that both iPhones have enough battery power to complete the transfer process. It’s recommended to have at least 50% battery on both devices to avoid any interruptions.
Once you have ensured the battery levels, find a comfortable and quiet spot with minimal interference from other devices. This will help to establish a stable connection between your old and new iPhones.
Next, hold your old iPhone and unlock it using your passcode or Face ID. Once unlocked, place it next to your new iPhone. Make sure both devices are aligned properly and screen-to-screen, with the back of both phones facing each other.
It’s important to note that if you’re using an iPhone with Face ID, you need to make sure that your face is visible to the front-facing camera of both devices during the transfer process. This will help to authenticate and authorize the data transfer.
Additionally, if you have a protective case or cover on either of the iPhones, it’s recommended to remove it temporarily. This will ensure a better connection and prevent any interference during the transfer.
Once you have positioned your old and new iPhones correctly, keep them close together and remain patient. The devices will establish a connection and initiate the transfer process. The length of time this process takes will depend on the amount of data being transferred, so it’s important not to interrupt or move the devices until prompted by the on-screen instructions.
During the transfer, you may notice a progress bar or percentage indicator on your new iPhone. This will give you an idea of how much data has been transferred and the estimated time remaining. Avoid using or accessing either iPhone during the transfer to ensure a smooth and uninterrupted process.
In some cases, if there are any issues or interruptions during the transfer, the devices may automatically disconnect. If this happens, simply repeat the process from Step 3 and ensure that both devices are properly aligned and close together.
Once the data transfer is complete, you will receive a notification on your new iPhone. This indicates that the transfer was successful and you can now proceed to the next step to complete the setup process.
Remember to keep your old iPhone and new iPhone close together until the transfer is fully completed. This will ensure that all your apps, photos, messages, settings, and other data are safely migrated to your new device, making the transition as seamless as possible.
Step 4: Follow the instructions on your new iPhone
After turning on your new iPhone, a “Hello” screen will appear. This is the initial setup screen where you will follow the on-screen instructions to begin the transfer process.
First, choose your preferred language and region for your new iPhone. This will ensure that your device is set up correctly and is compatible with your location.
Next, connect your new iPhone to a stable Wi-Fi network. This is crucial as it will enable the transfer of data from your old iPhone to the new one. If you don’t have access to Wi-Fi, you can also use a cellular data connection, although it may consume a significant amount of data.
Once connected to the internet, a “Move Data from Android” or “Transfer from iPhone” option may appear on your new iPhone, depending on whether you are switching from an Android device or another iPhone. Select the appropriate option based on your old device.
If you choose the “Move Data from Android” option, you will need to download the “Move to iOS” app from the Google Play Store on your old Android device. Follow the instructions provided on your new iPhone and the “Move to iOS” app to begin transferring your data.
If you select the “Transfer from iPhone” option, you will be prompted to use Quick Start to transfer data wirelessly from your old iPhone. Keep your old iPhone close to your new iPhone and follow the instructions on both devices. This process may take some time depending on the amount of data you have on your old iPhone.
During the transfer process, you will have the option to choose which data you want to transfer, such as contacts, messages, photos, and apps. Select the categories you want to transfer and wait for the process to complete.
Once the data transfer is complete, your new iPhone will prompt you to set up Touch ID or Face ID. These features provide an added layer of security to your device and allow for quick and convenient unlocking.
Finally, set up a passcode or password for your new iPhone. This ensures that only you can access your device and protects your personal information from unauthorized access.
Follow these instructions carefully, and you’ll be able to successfully transfer data using the Quick Start feature on your new iPhone. Enjoy your new device and all the features it has to offer!
Step 5: Transfer data using Quick Start
Once your old and new iPhones are connected, you can begin transferring data using the Quick Start feature. Follow these steps to seamlessly transfer all your important data:
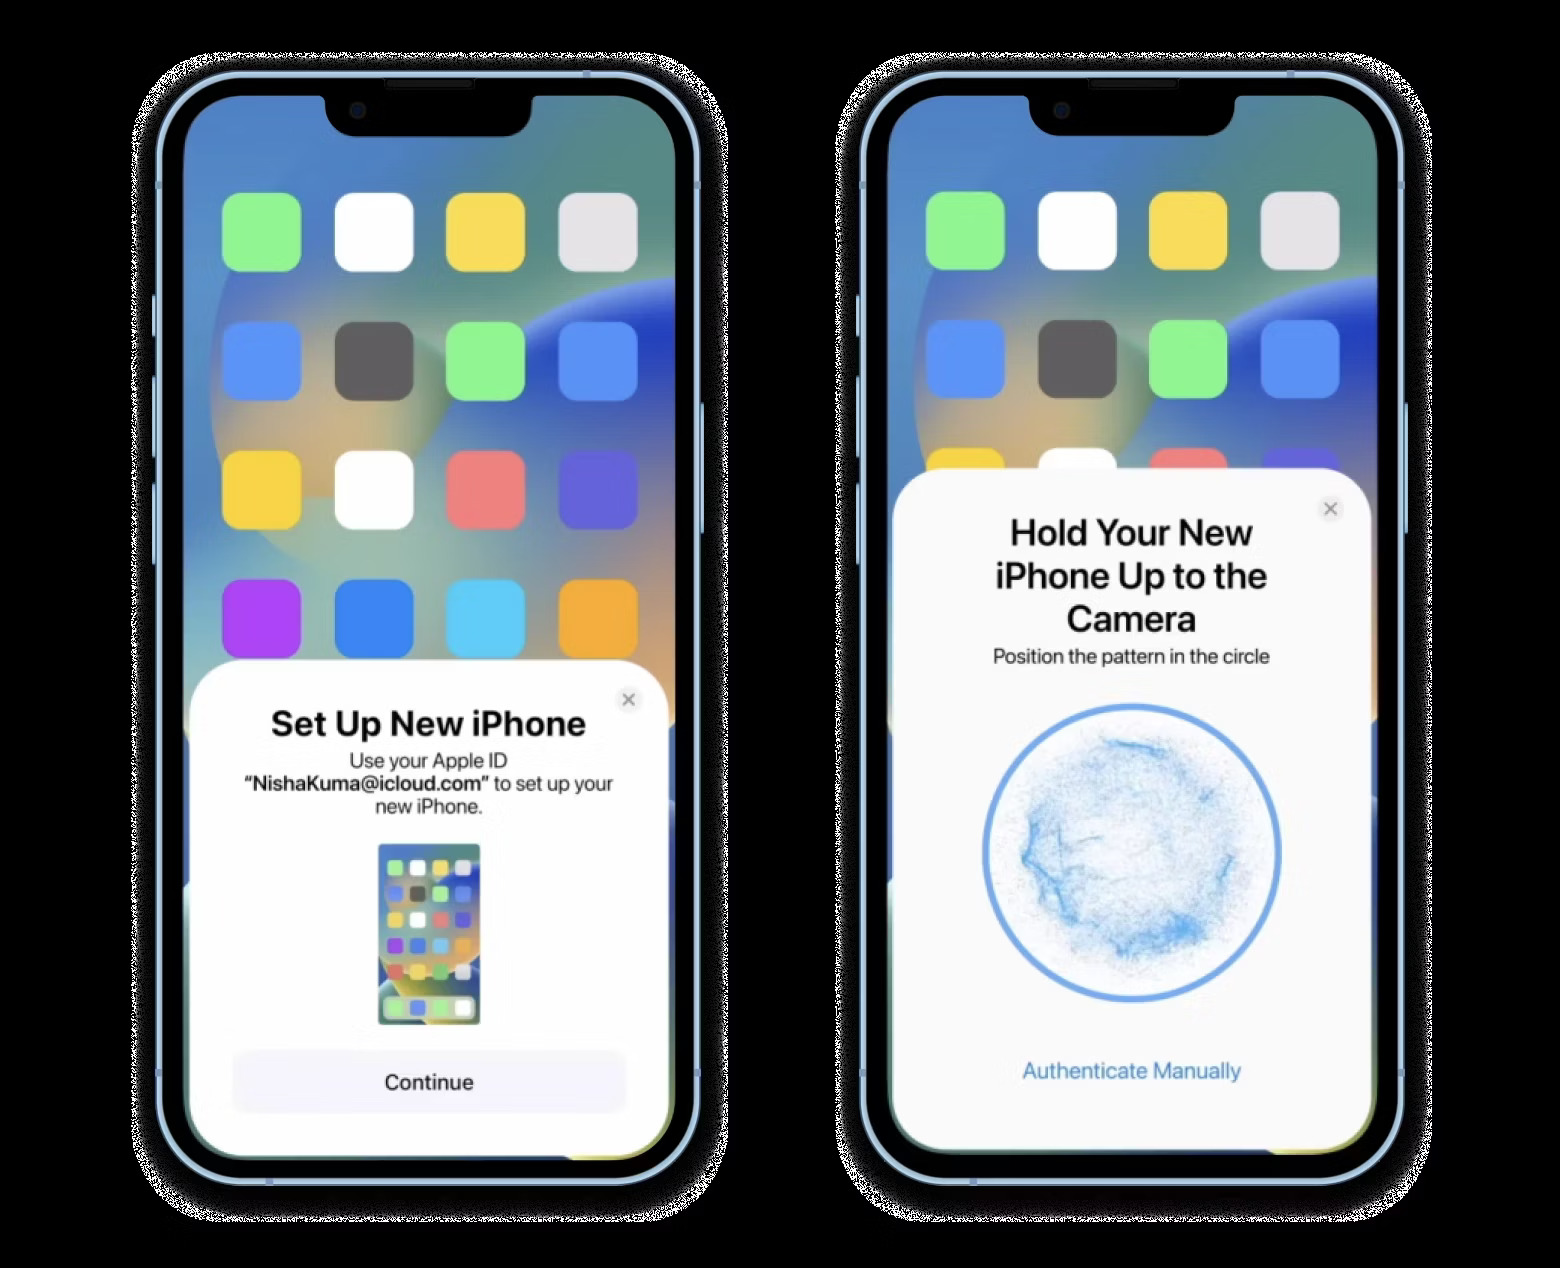
- On your new iPhone, you will see a prompt asking if you want to Transfer from iPhone. Tap on this option to initiate the process.
- You will then need to use your old iPhone to scan the animation that appears on the screen of your new iPhone. Simply hold your old iPhone’s camera in front of the animation until you receive a notification that says Finish on New iPhone.
- This step will transfer all your data, including apps, photos, contacts, messages, and more, from your old iPhone to your new one. The time it takes to complete this transfer will depend on the amount of data being transferred. Large amounts of data, such as photos and videos, may take longer to transfer.
- During the transfer process, your new iPhone may ask you to enter your Apple ID password. This is to ensure the security of your data and to allow your new iPhone to access your iCloud backup.
- Once the transfer is complete, your new iPhone will display the Transfer Complete screen. You can now set up Face ID or Touch ID, decide whether to restore from an iCloud backup or set up as new, and customize other settings according to your preferences.
Using Quick Start to transfer data to your new iPhone is a fast and efficient method that ensures all your important files and settings are seamlessly migrated. It simplifies the process, eliminating the need for manual data transfer and saving you time and effort.
Keep in mind that both your old and new iPhones need to have the latest version of iOS installed for Quick Start to work seamlessly. Additionally, ensure that both devices have sufficient battery life or are connected to a power source to avoid interruptions during the transfer.
By following these steps, you can make the transition to your new iPhone smooth and hassle-free, allowing you to enjoy your new device with all your important data at your fingertips.
Step 6: Complete the setup process on your new iPhone
Once you have successfully transferred all your data using Quick Start, you’re almost there! The final step is to complete the setup process on your new iPhone. This step ensures that your new device is fully personalized and ready to use.
Here’s what you need to do:
- Choose your preferred language: Your new iPhone will prompt you to select a language. Tap on the language you want to use for your device.
- Select your region or country: Next, you’ll be asked to choose your region or country. This helps in setting the correct time, date, and local settings on your iPhone.
- Connect to a Wi-Fi network: To proceed with the setup process, connect your iPhone to a Wi-Fi network. This will enable you to access the internet and download any necessary updates or additional content.
- Set up Face ID or Touch ID: Depending on the model of your iPhone, you will be prompted to set up either Face ID or Touch ID. These features provide an added layer of security by allowing you to unlock your device using your face or fingerprint.
- Create a passcode: To ensure the security of your device, set up a passcode. This passcode will be required every time you unlock your iPhone or access sensitive information.
- Sign in with your Apple ID: If you already have an Apple ID, sign in with it to access all your previous purchases, iCloud backup, and other Apple services. If you don’t have an Apple ID, you can create one during the setup process.
- Set up Siri: Siri is Apple’s virtual assistant that can help you perform various tasks using voice commands. To activate Siri, simply follow the on-screen instructions.
- Enable App Analytics: You will be asked if you want to allow app developers to collect and analyze your data for improving their apps. This step is optional, and you can choose to enable or disable it based on your preferences.
- Review Privacy Settings: As a security measure, it’s essential to review and adjust your privacy settings. Ensure that you are comfortable with the level of data access granted to various apps and services on your iPhone.
- Agree to Terms and Conditions: Like any software update or new device setup, you’ll need to read and agree to Apple’s Terms and Conditions.
- Get started with your new iPhone: Congratulations! You have successfully completed the setup process. Explore your new iPhone, customize your home screen, and start enjoying all the amazing features and functionalities it has to offer!
Remember to keep your old iPhone and new iPhone connected to power during the entire process to ensure a smooth setup and data transfer.
Now that you’re all set up, you can start downloading your favorite apps, customizing your settings, and making the most of your new iPhone. Enjoy the seamless transition and enhanced features that come with your new device!
Additional Tips and Troubleshooting
While using Quick Start to transfer data to your new iPhone is generally a seamless process, there may be some scenarios where you may encounter issues or require additional tips. Here are a few troubleshooting steps and tips to ensure a smooth transition:
- Ensure both iPhones are connected to a stable internet connection: Quick Start requires a stable internet connection for data transfer. Make sure both your old and new iPhones are connected to Wi-Fi or have a strong cellular network signal.
- Charge your iPhones: Before starting the data transfer process, ensure that both your old and new iPhones have sufficient battery life. It is recommended to charge your devices during the transfer to prevent any interruptions due to low battery.
- Disable any VPN or firewall settings: If you are using a virtual private network (VPN) or have firewall settings enabled on either of your iPhones, it may interfere with the Quick Start process. Disable these settings temporarily before attempting to transfer data.
- If Quick Start fails, try using an iCloud backup: If for any reason Quick Start fails to transfer your data, you can still rely on an iCloud backup. Before initiating the Quick Start process, ensure that you have an up-to-date iCloud backup of your old iPhone. You can then restore this backup on your new iPhone during the setup process.
- Reset network settings: If you are facing connectivity issues during the Quick Start process, resetting the network settings on both your old and new iPhones may help resolve the problem. Go to Settings > General > Reset > Reset Network Settings. Keep in mind that this will remove saved Wi-Fi networks and passwords, so be prepared to re-enter them.
- Contact Apple Support: If you have followed all the troubleshooting steps and are still experiencing issues with Quick Start, it is recommended to reach out to Apple Support for further assistance. They will be able to provide more specific guidance tailored to your situation.
By following these additional tips and troubleshooting steps, you can overcome any obstacles that may arise during the Quick Start process and ensure a successful data transfer to your new iPhone.
In conclusion, using the Quick Start feature to transfer data to a new iPhone is a convenient and straightforward process. Whether you’re upgrading to a new device or setting up your iPhone for the first time, Quick Start eliminates the hassle of manually transferring files and settings. By following a few simple steps, you can seamlessly migrate your data, including contacts, photos, apps, and more, to your new iPhone.
With just a few taps, Quick Start simplifies the transition and ensures that you don’t lose any important data in the process. This feature is not only time-saving but also user-friendly, making it accessible to users of all levels of expertise. So, the next time you get a new iPhone, make sure to take advantage of the Quick Start feature to effortlessly transfer all your important data and enjoy a seamless and uninterrupted mobile experience.
FAQs
1. What is Quick Start?
Quick Start is a feature on iPhone that allows you to transfer data from your old iPhone to a new one seamlessly. It helps you set up your new device quickly by transferring your settings, apps, photos, and other data wirelessly.
2. How does Quick Start work?
Quick Start works by using your existing iCloud backup or a direct connection between your old and new iPhone. It transfers your data using a secure connection, ensuring that all your important information is seamlessly transferred to your new device.
3. Can I use Quick Start if my old iPhone is not backed up?
Yes, you can still use Quick Start even if your old iPhone is not backed up. Quick Start gives you the option to directly transfer data between your old and new iPhone using a direct connection. However, it is always recommended to have a recent iCloud backup to ensure a smooth transition to your new device.
4. Do I need an internet connection for Quick Start?
Yes, you need an internet connection for Quick Start to work. Quick Start uses your Wi-Fi network or cellular data connection to transfer data between your devices. Make sure both your old and new iPhone are connected to the internet during the transfer process.
5. Can I use Quick Start to transfer data from an Android phone to iPhone?
No, Quick Start is only available for transferring data between iPhones. If you are switching from an Android phone to iPhone, you can use the “Move to iOS” app available on the Google Play Store to transfer your contacts, messages, photos, and other data to your new iPhone.