
In today’s mobile-driven world, transferring data from an old phone to a new one has become a common need. When you have just set up your new iPhone, it’s essential to transfer all your valuable data, such as contacts, messages, photos, and apps, from your old device. This can seem like a daunting task, but fear not! In this article, we will guide you through the step-by-step process of how to transfer data to a new iPhone after setup. Whether you’re upgrading from an Android device or another iPhone, we’ve got you covered. So, grab your new iPhone and let’s dive into the world of seamless data transfer.
Inside This Article
- Step 1: Backup Your Old iPhone
- Step 2: Set up Your New iPhone
- Step 3: Choose a Data Transfer Method
- – Method 1: Transfer Data Using Quick Start
- – Method 2: Transfer Data Using iCloud
- – Method 3: Transfer Data Using iTunes
- Step 4: Transfer Data to Your New iPhone
- – Option 1: Transfer Data via iCloud
- – Option 2: Transfer Data via iTunes
- – Option 3: Transfer Data using a Third-Party Tool
- Step 5: Verify and Restore Data on Your New iPhone
- Conclusion
- FAQs
Step 1: Backup Your Old iPhone
Before you transfer data to your new iPhone, it is crucial to take a backup of your old iPhone’s data. This ensures that none of your valuable photos, videos, messages, contacts, or other important files are lost in the transition.
To start the backup process, you have a few options:
Option 1: Backup with iCloud – If you have an active iCloud account and enough storage space, you can easily backup your iPhone wirelessly. Simply go to Settings, tap on your name, and select “iCloud”. From there, you can enable the backup feature and choose the data you want to include in the backup. Make sure you have a stable internet connection and enough iCloud storage to complete the backup.
Option 2: Backup with iTunes – If you prefer a more traditional method, you can backup your iPhone using iTunes. Connect your iPhone to your computer, open iTunes, and select your device. Under the “Summary” tab, click on “Back Up Now”. This will create a local backup of your iPhone’s data on your computer.
Option 3: Backup with a Third-Party Tool – There are various third-party tools available that offer advanced backup options. These tools allow you to create comprehensive backups of your iPhone’s data and even give you the flexibility to selectively choose which files to backup. Research and choose a reputable tool that suits your needs.
Regardless of the method you choose, it’s important to ensure that your backup is complete and up-to-date. Double-check that all your important data is included, especially if you have recently added or updated any files on your iPhone.
Remember, taking a backup of your old iPhone is an essential first step before transferring data to your new iPhone. It provides a safety net to prevent any potential data loss during the setup process.
Step 2: Set up Your New iPhone
After unboxing your new iPhone, you’ll need to set it up before transferring your data from your old device. This process ensures that your new iPhone is ready to use and personalized to your preferences. Follow these simple steps to get your new iPhone up and running:
1. Turn on your new iPhone by pressing and holding the power button on the side or top of the device.
2. A “Hello” screen will appear, prompting you to choose your language and region. Select your preferred options and tap “Next.”
3. Connect to a Wi-Fi network. You can choose your home Wi-Fi or any available network in your area. Enter the network password if required.
4. Set up Face ID or Touch ID. This feature allows you to securely unlock your iPhone and authorize payments. Simply follow the on-screen instructions to set up your preferred biometric authentication method.
5. Create or enter your Apple ID. Your Apple ID is essential for accessing the App Store, iCloud, and other Apple services. If you already have an Apple ID, enter your credentials. Otherwise, follow the prompts to create a new Apple ID.
6. Customize your settings. You have the option to enable or disable various features such as Siri, Location Services, and Screen Time. Adjust these settings to your personal preferences, keeping in mind your device’s security and privacy.
7. Set up Siri. Siri is the voice-activated virtual assistant on your iPhone. You can choose to activate Siri by pressing the home button or side button, or by saying “Hey Siri.” Follow the on-screen instructions to configure Siri according to your preferences.
8. Decide whether to restore from a previous backup or set up as a new iPhone. If you want to transfer your data from your old device to the new one, you can do so during the next step of the data transfer process.
9. Review and accept the terms and conditions. Apple provides a comprehensive set of terms and conditions that you must agree to before using your new iPhone. Take a moment to read through them and tap “Agree” to proceed.
10. Sign in to iCloud. If you want to access your iCloud backup or enable iCloud features like Photos, iCloud Drive, or Find My iPhone, sign in with your Apple ID in the iCloud settings.
11. Complete the setup. Follow any additional on-screen instructions to finish setting up your new iPhone. Once you reach the home screen, your iPhone is now ready for data transfer.
By following these steps, you can ensure that your new iPhone is properly set up and ready to receive your data from your old device. Now, you can move on to the next step of the data transfer process and choose the method that best suits your needs.
Step 3: Choose a Data Transfer Method
Once you have set up your new iPhone, it’s time to choose a data transfer method to migrate all your important files and settings from your old device. There are several options available, and you can choose the one that suits you best.
Here are three common methods for transferring data to your new iPhone:
- Method 1: Transfer Data Using Quick Start: This method allows you to transfer data directly from your old iPhone to your new one using a wireless connection. Both devices need to be running on iOS 11 or later and should be in close proximity to each other. Quick Start transfers data such as app settings, iCloud Keychain passwords, photos, and more.
- Method 2: Transfer Data Using iCloud: With this method, you can back up your old iPhone to iCloud and then restore the backup onto your new device. This is an effective method for transferring a large amount of data, including photos, videos, contacts, messages, and more. It requires a stable internet connection and sufficient iCloud storage.
- Method 3: Transfer Data Using iTunes: If you prefer to transfer data using a wired connection, you can use iTunes. Connect your old iPhone to your computer, create a backup using iTunes, and then restore the backup onto your new iPhone. This method allows you to transfer various types of data, including apps, music, books, and more.
Each data transfer method has its advantages, so consider your preferences, available resources, and the amount of data you need to transfer when choosing the best method for you.
– Method 1: Transfer Data Using Quick Start
If you’re setting up a new iPhone and you have your old iPhone nearby, one of the quickest and easiest ways to transfer your data is by using the Quick Start feature. This method allows you to transfer your data wirelessly and automatically between your old and new iPhones, making the process seamless and hassle-free.
To use Quick Start, ensure that both your old and new iPhones are running on iOS 11 or later, and that they are in close proximity to each other. Here’s how you can transfer your data using Quick Start:
- Turn on your new iPhone and place it next to your old iPhone.
- A “Quick Start” prompt will appear on your old iPhone. Tap on “Continue” to start the process.
- Using your old iPhone, scan the animation that appears on your new iPhone.
- Follow the on-screen instructions to complete the setup process, including setting up Face ID or Touch ID, and creating a passcode.
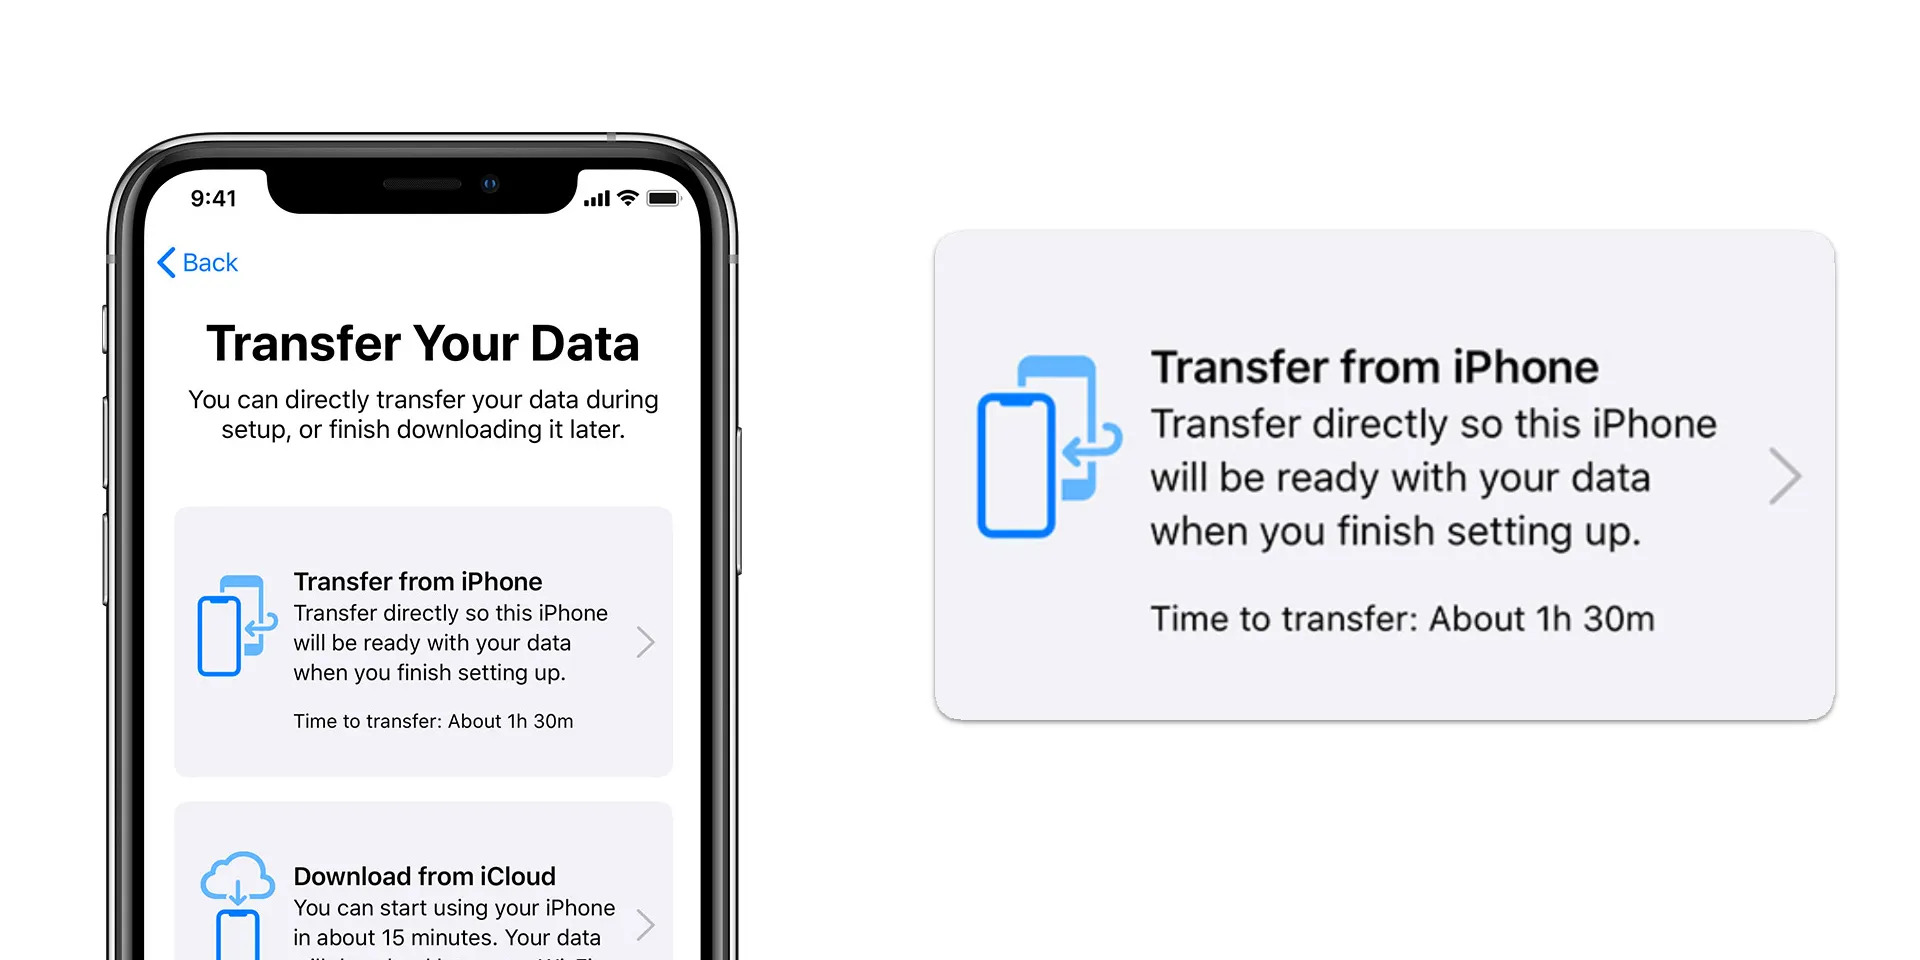
- Select “Transfer from iPhone” to transfer your data from your old iPhone to your new one.
- Once the transfer is complete, your new iPhone will display a message indicating that the process is finished.
By using Quick Start, you can transfer various types of data, including your photos, videos, contacts, messages, apps, and more. It also ensures that your settings, preferences, and iCloud Keychain passwords are seamlessly transferred to your new device.
Quick Start is a convenient and time-saving method for transferring data to your new iPhone, especially if you’re updating from an old iPhone. However, if you prefer other methods or encounter any issues, you can explore alternative options such as transferring data via iCloud or iTunes, or using a third-party tool.
– Method 2: Transfer Data Using iCloud
Another convenient way to transfer data to your new iPhone is by using iCloud. iCloud is a cloud-based storage service provided by Apple, which allows you to securely store and synchronize your data across multiple devices.
Before using iCloud to transfer your data, make sure you have enough iCloud storage space available. You can check your storage status by going to Settings > [Your Name] > iCloud > Manage Storage on your old iPhone.
Here are the steps to transfer data using iCloud:
- On your old iPhone, go to Settings > [Your Name] > iCloud.
- Make sure the toggle for the desired data categories, such as Contacts, Calendars, Photos, etc., is turned on.
- Scroll down and tap on iCloud Backup.
- Tap on Back Up Now to create a backup of your data on iCloud.
- Once the backup is complete, set up your new iPhone.
- Follow the on-screen instructions until you reach the Apps & Data screen.
- Choose the option Restore from iCloud Backup.
- Log in to your iCloud account using your Apple ID and password.
- Select the most recent backup that you just created on your old iPhone.
- Wait for the restore process to complete. This may take some time depending on the size of your backup and your internet connection speed.
- After the restore is finished, your new iPhone will restart, and your data will be transferred from iCloud to your new device.
It’s important to note that using iCloud to transfer data may require a stable and fast internet connection. Additionally, the speed of the data transfer depends on the size of your backup and the speed of your internet connection.
Furthermore, iCloud allows you to selectively choose which data categories to restore, which can be beneficial if you don’t want to transfer everything from your old iPhone to your new one.
Keep in mind: If you have a large amount of data to transfer or a slow internet connection, it might be more efficient to choose another method, such as using iTunes or a third-party tool, to transfer your data.
– Method 3: Transfer Data Using iTunes
If you prefer to transfer your data using a wired connection, you can rely on iTunes. This method allows you to directly connect your old iPhone to your computer and sync its data with your new iPhone. Here’s how you can transfer data using iTunes:
1. Connect your old iPhone to your computer using a lightning cable and launch iTunes if it doesn’t open automatically.
2. Once your device is connected, click on the device icon that appears in the iTunes interface.
3. In the “Summary” tab, you will see the option to “Back Up Now.” Click on it to ensure that all your data is backed up to your computer. This step is crucial to ensure that you have a complete backup before transferring the data to your new iPhone.
4. Wait for the backup process to complete. Make sure not to disconnect your old iPhone during this process.
5. After the backup is finished, disconnect your old iPhone from your computer and connect your new iPhone using the same lightning cable.
6. When prompted, select the option to set up your new iPhone using the backup you created in the previous steps.
7. Follow the on-screen instructions to complete the setup process. Your new iPhone will restore all the data from the iTunes backup, including your contacts, messages, photos, apps, and more.
8. Once the restore process is complete, you can disconnect your new iPhone from the computer and start using it with all your transferred data.
It’s important to note that using iTunes to transfer data requires a computer with iTunes installed. Additionally, make sure you have the latest version of iTunes to avoid any compatibility issues. This method is ideal if you prefer a direct and secure connection to transfer your data without relying on an internet connection.
Step 4: Transfer Data to Your New iPhone
Now that you have set up your new iPhone and selected the data transfer method, it’s time to transfer your data from your old iPhone to the new one. There are several options available depending on the method you chose. Let’s explore the different options:
Option 1: Transfer Data via iCloud
If you chose to transfer your data using iCloud, make sure both your old and new iPhones are connected to Wi-Fi and plugged into a power source. On your old iPhone, go to Settings, tap on your name, and then select iCloud. From there, enable the types of data you want to transfer, such as Contacts, Photos, and Calendars.
Next, on your new iPhone, follow the setup instructions until you reach the Apps & Data screen. Choose the option to Restore from iCloud Backup. Sign in with your Apple ID and select the recent backup that contains the data you want to transfer. The transfer process will begin, and it may take some time depending on the size of your backup and the speed of your internet connection.
Option 2: Transfer Data via iTunes
If you prefer to transfer your data using iTunes, you’ll need a computer with the latest version of iTunes installed. Connect your old iPhone to the computer using a USB cable, and open iTunes. Select your iPhone when it appears in iTunes, and click on the “Back Up Now” button to create a backup of your data.
Once the backup is complete, disconnect your old iPhone and connect your new iPhone to the computer. In iTunes, select your new iPhone, and choose the option to Restore from iTunes Backup. Select the backup you just created, and click on the “Restore” button. The data transfer process will begin, and your new iPhone will restart once the transfer is complete.
Option 3: Transfer Data using a Third-Party Tool
If you’re looking for more flexibility in transferring your data, there are third-party tools available that offer additional features and customization options. These tools allow you to selectively transfer specific types of data, such as messages, files, or app data. Some popular third-party tools include iMazing, AnyTrans, and Dr.Fone. Research and choose a tool that suits your needs, and follow the instructions provided by the tool to transfer your data to your new iPhone.
It’s worth noting that the availability and functionality of third-party tools may vary, so it’s important to carefully read reviews and ensure you’re downloading from a trusted source before proceeding.
Once you have completed the data transfer process, take some time to verify that all your data has been successfully transferred to your new iPhone. Open your Contacts, Photos, Messages, and other apps to confirm that everything is intact. If any data is missing or not transferred correctly, you can retry the transfer process using the same method or explore other options available.
Remember to keep your old iPhone backup for a few days, just in case you need to retrieve any additional data that may not have been initially transferred. Once you are satisfied with the data on your new iPhone, you can safely erase and reset your old iPhone to remove all your personal information.
Transferring data to a new iPhone can be an exciting yet crucial step in ensuring a smooth transition. By following the appropriate data transfer method and verifying your data, you can enjoy all the features and benefits of your new iPhone without missing a beat.
– Option 1: Transfer Data via iCloud
If you’re looking for a seamless way to transfer data to your new iPhone, using iCloud is a fantastic option. iCloud allows you to effortlessly backup and restore your data, ensuring a smooth transition to your new device.
Here are the steps to transfer your data to your new iPhone via iCloud:
- Ensure that both your old and new iPhones are connected to Wi-Fi and plugged into a power source.
- On your old iPhone, go to “Settings” and tap on your Apple ID at the top of the screen.
- Select “iCloud” and then “iCloud Backup”. If the option is not enabled, toggle it on.
- Tap on “Back Up Now” to initiate an immediate backup of your old iPhone’s data to iCloud.
- Once the backup is complete, turn on your new iPhone and follow the on-screen instructions until you reach the “Apps & Data” screen.
- Select the option “Restore from iCloud Backup”.
- Sign in to your iCloud account using your Apple ID and password.
- Choose the recent backup from your old iPhone and wait for the restoration process to complete.
- During the restoration, your new iPhone will download all the apps, settings, and data that were backed up to iCloud.
- Once the process is finished, you’ll be able to use your new iPhone with all your saved data and settings intact.
With the iCloud method, you can transfer a wide range of data, including your contacts, photos, videos, messages, app data, and more. It’s a convenient and reliable way to ensure that all your important information is seamlessly transferred to your new device.
It’s worth noting that the speed of the transfer may depend on the size of your backup and the speed of your internet connection, so it’s best to connect to a fast and stable Wi-Fi network for a smooth experience.
– Option 2: Transfer Data via iTunes
If you prefer to transfer data to your new iPhone using iTunes, you can follow these steps:
- Connect your old iPhone to your computer: Start by connecting your old iPhone to your computer using a USB cable. Launch iTunes if it doesn’t open automatically.
- Create a backup: Once your iPhone is connected, click on the device icon that appears in the top-left corner of the iTunes window. In the Summary tab, under the “Backups” section, click on “This Computer” and then click “Back Up Now.” Wait for the backup to complete before proceeding.
- Disconnect your old iPhone: Once the backup is finished, disconnect your old iPhone from your computer. Keep iTunes open for the next steps.
- Set up your new iPhone: Turn on your new iPhone and follow the on-screen instructions to complete the initial setup. When prompted, select “Restore from iTunes Backup.”
- Connect your new iPhone to your computer: Connect your new iPhone to your computer using a USB cable. iTunes should recognize the new device and display the device icon in the top-left corner of the window.
- Select the backup: Click on the device icon and navigate to the Summary tab. Under the “Backups” section, click on “Restore Backup.” From the list of available backups, choose the most recent one that you created for your old iPhone.
- Transfer data: Click “Restore” and wait for iTunes to transfer the backed-up data to your new iPhone. The process may take some time, depending on the amount of data being transferred.
- Complete the setup: Once the data transfer is complete, your new iPhone will restart. Follow the on-screen instructions to complete the setup, including signing in with your Apple ID, setting up Face ID or Touch ID, and configuring other settings.
Once you have completed these steps, your new iPhone should have all the data and settings from your old iPhone. Make sure to keep your old iPhone and the backup you created in a safe place in case you need to access any additional data in the future.
– Option 3: Transfer Data using a Third-Party Tool
If you prefer not to rely on iCloud or iTunes to transfer data to your new iPhone, you have the option to use a third-party tool. There are various software applications available that can facilitate the data transfer process and offer additional functionalities.
One popular third-party tool is iMobie AnyTrans. This tool allows you to transfer data between different iPhones, including contacts, messages, photos, videos, music, and more. It offers a user-friendly interface and provides a seamless transfer experience. Simply install the AnyTrans software on your computer, connect both your old and new iPhones, and follow the on-screen instructions.
Another reliable option is Dr.Fone – Phone Transfer. This tool enables you to transfer data from one iPhone to another with just a few clicks. It supports a wide range of data types, including contacts, messages, photos, videos, call logs, and even app data. Dr.Fone – Phone Transfer also allows you to selectively transfer specific data types and even merge data from multiple sources.
When using a third-party tool, it’s essential to choose a reputable and reliable software application. Ensure that the tool supports your device models and iOS versions. Additionally, reading reviews and checking ratings can help you make an informed decision.
Before initiating the transfer process, it’s always recommended to back up your data on both devices. This way, you can avoid any potential data loss or compatibility issues. Also, make sure to follow the instructions provided by the third-party tool and perform the transfer in a secure environment.
Using a third-party tool to transfer data to your new iPhone can often provide a faster and more convenient method compared to traditional options. However, keep in mind that some third-party tools may require a subscription or upfront payment. So, consider your budget and requirements before making a choice.
Step 5: Verify and Restore Data on Your New iPhone
Once you have transferred your data to your new iPhone, it’s crucial to verify that everything has been successfully restored. Follow the steps below to ensure a seamless transition:
1. Check your apps: Open each app on your new iPhone to make sure all the data, including settings, preferences, and login information, has been transferred properly. Take note of any missing data or app functionality issues.
2. Review your contacts: Open the “Contacts” app and confirm that all your contacts have been transferred correctly. Check for any missing contacts or duplicates and make any necessary edits or additions.
3. Verify your messages: Open the “Messages” app and check that all your text messages and iMessage conversations have been successfully restored. Ensure that any multimedia messages, such as photos or videos, are intact.
4. Test your photos and videos: Open the “Photos” app and browse through your photo library. Verify that all your photos and videos have been transferred and are visible on your new iPhone. Play a few videos to ensure they are playing correctly.
5. Confirm your music and media: Open the Music app and browse through your library. Make sure all your songs, albums, and playlists are available on your new device. Test playing a few songs to ensure the audio quality is unaffected.
6. Check your email accounts: Open the “Mail” app and verify that all your email accounts and messages have been successfully transferred. Check for any missing emails or issues with syncing.
7. Test your calendar and reminders: Open the “Calendar” and “Reminders” apps to ensure that all your appointments, events, and reminders are present on your new iPhone. Review the dates and times to make sure they are accurate.
8. Verify your notes and documents: Open the “Notes” app and check that all your notes and documents have been properly transferred. Make sure the formatting and content of each note are preserved.
9. Test your other apps: Open any other apps that are important to you and verify that all their data and functionality have been successfully restored. Pay attention to any missing data or compatibility issues.
10. Recheck your settings: Go through the settings on your new iPhone and compare them to your previous device. Make sure all your preferences, such as display settings, notifications, and privacy settings, are correctly set up.
By going through these steps, you can ensure that all your data has been successfully transferred to your new iPhone, and you can start using your device with confidence.
Conclusion
Transferring data to a new iPhone after setup is an essential process to ensure a seamless transition between devices. Whether you are upgrading to a new iPhone or replacing a damaged one, it is crucial to transfer your data, such as contacts, photos, apps, and settings.
Fortunately, with the advancements in technology and the variety of tools available, transferring data has become more straightforward than ever. You can utilize Apple’s built-in features, like iCloud, iTunes, or Quick Start, or use third-party apps like AnyTrans or iMobie PhoneTrans.
Regardless of the method you choose, remember to back up your data before initiating the transfer process to avoid any unforeseen data loss. Take your time to carefully follow the steps, and soon enough, your new iPhone will have all the familiar data and settings you had on your previous device.
So, whether you’re upgrading to the latest iPhone or switching to a different model, rest assured that transferring your data is a manageable task. With a little patience and attention to detail, you can enjoy a seamless transition to your new iPhone without losing any valuable information.
FAQs
1. How can I transfer data to a new iPhone after setup?
After setting up your new iPhone, you have several methods to transfer data. You can use iCloud, iTunes, or the Quick Start feature, depending on your preference and the type of data you want to transfer. Let’s dive into each method in more detail!
2. How do I transfer data using iCloud?
To transfer data using iCloud, make sure you are connected to Wi-Fi and have enough iCloud storage space. On your old iPhone, go to Settings, tap your name, and select iCloud. Enable iCloud Backup and start the backup process. Once the backup is complete, set up your new iPhone and choose “Restore from iCloud Backup” during the setup process. Sign in to your iCloud account and select the backup you created. Your data will begin transferring to your new iPhone.
3. Can I transfer data using iTunes?
Yes, you can transfer data using iTunes. Connect your old iPhone to your computer and open iTunes. Select your device and click on the “Summary” tab. Under the “Backups” section, choose “This Computer” and click on “Back Up Now” to create a backup of your old iPhone. Once the backup is complete, disconnect your old iPhone and connect your new iPhone to the computer. On iTunes, choose “Restore Backup” and select the backup you just created. Your data will be transferred to your new iPhone.
4. What is the Quick Start feature, and how does it work?
The Quick Start feature allows you to transfer data wirelessly from your old iPhone to your new iPhone. Make sure both devices are running iOS 11 or later and placed near each other. On your new iPhone, you will see a prompt to use your Apple ID to set up your new device. Follow the on-screen instructions to establish a secure connection between your old and new iPhone. You can choose to transfer settings, preferences, and Apple Pay information, making the setup process quick and easy.
5. Are there any other options to transfer data?
Aside from iCloud, iTunes, and the Quick Start feature, you can also use third-party applications to transfer data between iPhones. These apps offer additional features and flexibility for transferring specific types of data, such as photos, contacts, messages, and more. Some popular transfer apps include AnyTrans, iMazing, and Dr.Fone. Check the App Store for options that suit your needs and follow their instructions for data transfer.