
So, you've finally decided to upgrade from your trusty iPhone 8 to the sleek and powerful iPhone 12. Congratulations on your new acquisition! But, as you prepare to make the switch, you might be wondering about the best way to transfer all your data from your old iPhone to the new one. Whether it's your contacts, photos, apps, or settings, the process of migrating your data can seem daunting at first. However, with the right guidance, it can be a seamless and stress-free experience. In this article, we'll explore the most effective methods to transfer your data from your iPhone 8 to your new iPhone 12, ensuring that all your valuable information makes the transition effortlessly. Let's dive in and make the transition to your new iPhone as smooth as possible.
Inside This Article
- Step 1: Back Up Your iPhone 8
- Step 2: Set Up Your iPhone 12
- Step 3: Transfer Data Using Quick Start
- Step 4: Transfer Data Using iCloud
- Conclusion
- FAQs
Step 1: Back Up Your iPhone 8
Before transferring data from your iPhone 8 to iPhone 12, it’s crucial to create a backup of your current device to ensure that no data is lost during the transition. Backing up your iPhone 8 will safeguard your photos, videos, contacts, messages, and app data, allowing you to seamlessly transfer everything to your new iPhone 12.
There are two primary methods to back up your iPhone 8: using iCloud or iTunes. If you prefer a wireless and automatic backup, iCloud is the way to go. Simply connect your iPhone 8 to a Wi-Fi network, navigate to Settings, tap your name, select iCloud, and then tap iCloud Backup. Ensure that the iCloud Backup option is enabled, and then tap “Back Up Now” to initiate the backup process. It’s essential to keep your device connected to Wi-Fi and plugged in until the backup is complete.
Alternatively, you can use iTunes to create a backup of your iPhone 8. Connect your device to a computer using a USB cable, launch iTunes, and select your iPhone when it appears in iTunes. Then, click “Back Up Now” to initiate the backup process. This method is ideal for users who prefer local backups and want to keep a copy of their data on their computer.
Step 2: Set Up Your iPhone 12
Once you have backed up your iPhone 8, it’s time to set up your new iPhone 12. Unboxing a new iPhone is always an exciting experience, and the setup process is designed to be straightforward and user-friendly.
When you turn on your iPhone 12 for the first time, you’ll be greeted with the “Hello” screen. Simply swipe up from the bottom of the screen to begin the setup process. Make sure that your iPhone 12 is connected to a stable Wi-Fi network, as this is essential for a smooth setup.
Next, you’ll be prompted to select your language and region. Choose the language that you prefer and the region where you are located. This ensures that your iPhone 12 is tailored to your specific location and language preferences.
After selecting your language and region, you’ll have the option to set up your iPhone 12 manually or use the Quick Start feature. If you have already backed up your iPhone 8 using iCloud or iTunes, you can opt for Quick Start to easily transfer your data to your new device.
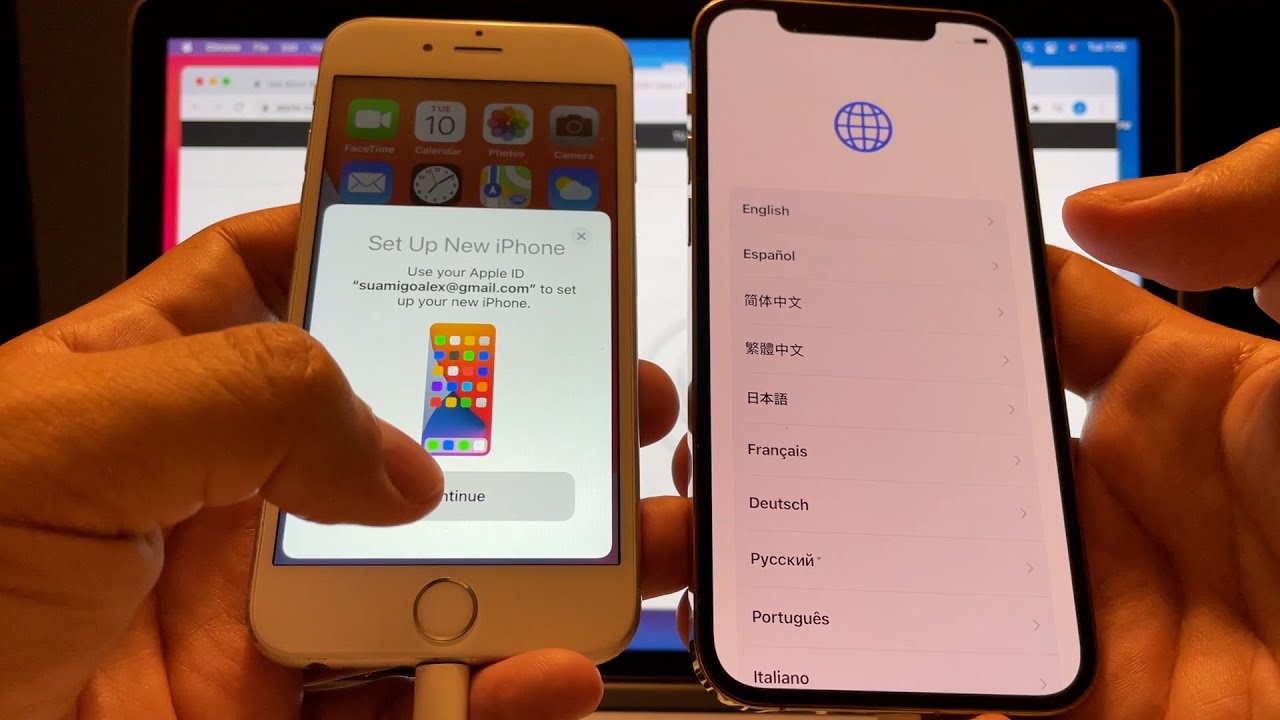
Step 3: Transfer Data Using Quick Start
When upgrading from an iPhone 8 to an iPhone 12, using the Quick Start feature can streamline the data transfer process. This method allows you to transfer data wirelessly and efficiently, ensuring that your new device mirrors the content of your old one.
To initiate the transfer, ensure that both your iPhone 8 and iPhone 12 are running iOS 11 or later. Place the two devices close to each other and follow the on-screen instructions. Quick Start will prompt you to use your Apple ID to sign in to your new device and initiate the transfer.
During the transfer, your iPhone 12 will display a pattern that your iPhone 8’s camera must capture. This step is crucial for establishing a secure connection between the two devices and initiating the data transfer process. Once the pattern is recognized, the transfer will commence, and your new iPhone will begin populating with your data.
Quick Start ensures a seamless transition to your new iPhone 12, transferring your apps, photos, settings, and more. This method significantly reduces the time and effort required to set up your new device, allowing you to enjoy its features and functionalities without delay.
Step 4: Transfer Data Using iCloud
If you prefer a wireless and hassle-free method to transfer data from your iPhone 8 to your new iPhone 12, iCloud is the way to go. This method allows you to seamlessly transfer your data, including photos, contacts, messages, and more, without the need for physical connections or additional hardware.
To initiate the transfer, ensure that both your iPhone 8 and iPhone 12 are connected to a stable Wi-Fi network and plugged into a power source to prevent any interruptions during the process. Additionally, make sure that your iPhone 8 is running on the latest iOS version and that you have enough iCloud storage to accommodate the data you intend to transfer.
Firstly, on your iPhone 8, navigate to Settings, tap on your name, and then select iCloud. From here, ensure that all the data you want to transfer, such as contacts, photos, and app data, is set to sync with iCloud. If you haven’t already done so, enable iCloud Backup by tapping on iCloud Backup and then selecting “Back Up Now” to create a recent backup of your iPhone 8’s data.
Once the backup is complete, grab your new iPhone 12 and turn it on. During the setup process, you’ll reach the “Apps & Data” screen. Here, select “Restore from iCloud Backup” and sign in to your iCloud account using the same credentials as your iPhone 8.
After signing in, choose the most recent backup from the list displayed, and allow your iPhone 12 to complete the restoration process. Depending on the size of your backup and the speed of your internet connection, this may take some time. Once the process is finished, your iPhone 12 will reboot, and you’ll find all your data, settings, and apps transferred from your iPhone 8.
Conclusion
Transferring data from your iPhone 8 to iPhone 12 is a seamless process that ensures you don’t lose any valuable information during the upgrade. Whether you opt for iCloud, iTunes, or the Quick Start feature, it’s essential to back up your data beforehand to safeguard against any unexpected issues. By following the step-by-step instructions and leveraging the power of Apple’s ecosystem, you can effortlessly migrate your photos, contacts, apps, and more to your new iPhone 12. With the advanced technology and user-friendly interfaces of Apple devices, the transition to a new iPhone is a smooth and efficient experience, allowing you to enjoy your new device without missing a beat.
FAQs
Q: Can I transfer data from iPhone 8 to iPhone 12 using iCloud?
Yes, you can transfer data from iPhone 8 to iPhone 12 using iCloud. It allows you to wirelessly transfer your photos, videos, contacts, and other data from one device to another.
Q: Is it possible to transfer data from iPhone 8 to iPhone 12 using iTunes?
Certainly! You can transfer data from iPhone 8 to iPhone 12 using iTunes. By creating a backup of your iPhone 8 and then restoring it to your new iPhone 12, you can seamlessly transfer all your data.
Q: Can I use a third-party app to transfer data from iPhone 8 to iPhone 12?
Absolutely. There are several third-party apps available that facilitate the transfer of data from one iPhone to another. These apps offer a user-friendly interface and allow you to transfer a wide range of data, including photos, videos, contacts, messages, and more.
Q: Will my apps and app data be transferred from iPhone 8 to iPhone 12?
Yes, when you transfer data from iPhone 8 to iPhone 12 using methods such as iCloud, iTunes, or third-party apps, your apps and app data will be transferred along with other content.
Q: Do I need a computer to transfer data from iPhone 8 to iPhone 12?
While using iCloud for the transfer does not require a computer, methods such as using iTunes may involve connecting your iPhones to a computer. However, there are also third-party apps that allow direct transfer between iPhones without the need for a computer.