
Alphabetizing data in Excel is a common task that many users need to perform. Whether you’re dealing with a long list of names, organizing a database, or sorting through data sets, being able to alphabetize the information quickly and efficiently is crucial. However, one concern that often arises is the fear of losing data when rearranging it in alphabetical order.
In this article, we will explore how to alphabetize data in Excel without losing any valuable information. We will dive into different methods and techniques that can help you achieve this task seamlessly. By following these steps, you can ensure that your data remains intact while still being sorted alphabetically, enabling you to maintain organization and accessibility without any worries.
Inside This Article
- Why Alphabetize in Excel?
- How to Alphabetize in Excel Without Losing Data
- Additional Tips and Considerations
- Conclusion
- FAQs
Why Alphabetize in Excel?
Excel is a powerful tool for organizing data, and one of the most common tasks is alphabetizing information. Alphabetizing data in Excel allows you to quickly and easily sort your data in a logical and orderly manner. Whether you’re working on a list of names, a product inventory, or any other type of information, alphabetizing can provide several benefits:
1. Easier Data Analysis: Alphabetizing your data makes it easier to analyze and interpret. When information is sorted in alphabetical order, patterns and trends become more apparent. This can be especially helpful when dealing with large datasets, allowing you to identify and understand the data more efficiently.
2. Enhanced Data Accessibility: Alphabetizing your data makes it more accessible, as it allows you to quickly locate and retrieve specific information. Whether you’re looking for a particular name, product, or any other data point, alphabetizing ensures that everything is well-organized and readily available.
3. Improved Data Presentation: Alphabetizing your data improves the overall visual presentation. When data is presented in a logical and orderly manner, it becomes more aesthetically pleasing and easier to read. This can be particularly useful when creating reports, presentations, or sharing data with others.
4. Efficient Data Manipulation: Alphabetizing data in Excel provides a foundation for performing various data manipulation tasks. Whether you need to filter, merge, or perform calculations on the data, having it in alphabetical order simplifies these tasks and reduces the potential for errors.
5. Consistency and Uniformity: Alphabetizing your data promotes consistency and uniformity across different sets of information. It ensures that similar data points are grouped together and eliminates discrepancies that may arise due to human error or inconsistent data entry.
Regardless of the nature of your data, alphabetizing in Excel can greatly streamline your workflow, enhance data management, and improve overall efficiency. It’s a fundamental skill that can be applied in various scenarios and industries, making it an essential tool for anyone working with data in Excel.
How to Alphabetize in Excel Without Losing Data
Alphabetizing data in Excel is a common task that can help you organize and find information more easily. However, when you sort data in Excel, it can be a bit tricky to do so without losing any valuable information or formatting. In this article, we will guide you through four methods to alphabetize your data in Excel without losing any data or formatting.
1. Using the Sort Function:
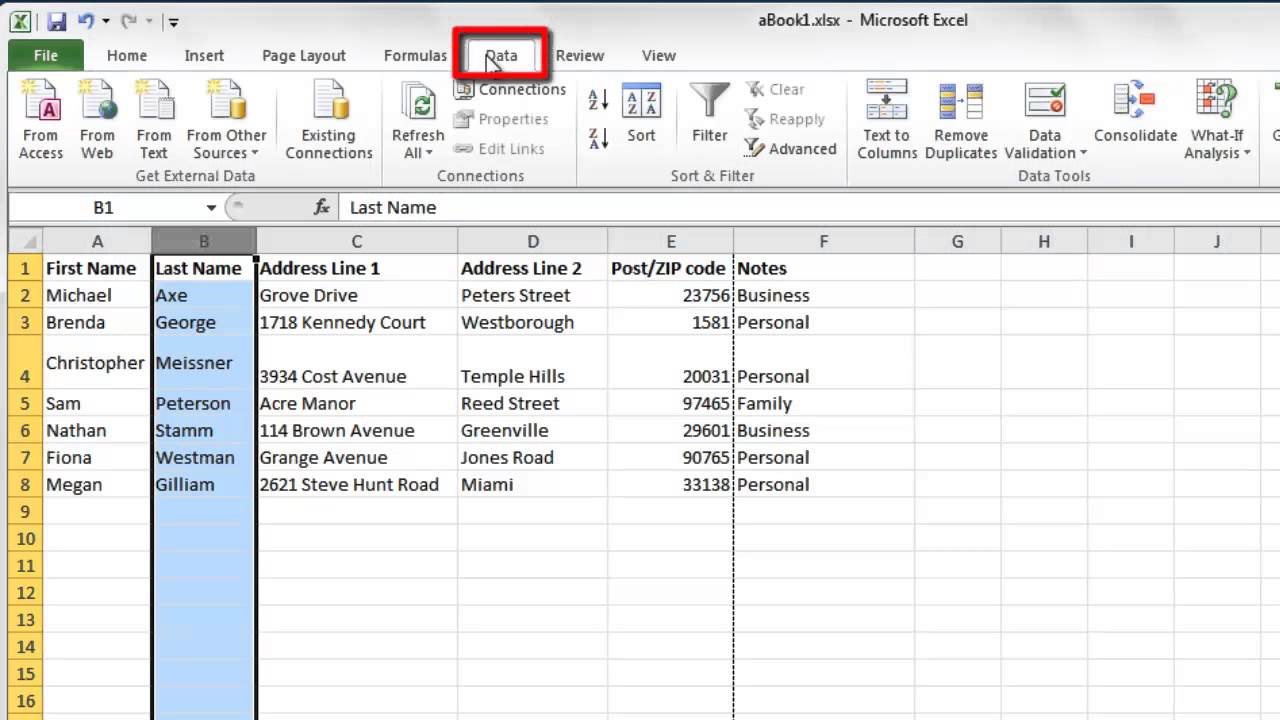
The easiest way to alphabetize data in Excel is by using the built-in Sort function. Simply select the range of data you want to sort, go to the Data tab, and click on the Sort button. From the Sort dialog box, choose the column you want to sort by, select “A to Z” as the sort order, and click OK. This will automatically rearrange your data in alphabetical order, without affecting any other information.
2. Sorting Multiple Columns:
If you have a dataset with multiple columns and you want to alphabetize based on more than one column, Excel allows you to do so. In the Sort dialog box, you can specify primary and secondary sort criteria. This means that you can sort by one column first and then by another column if there are duplicate values in the first column. This feature is helpful when you want to sort by last name and then by first name, for example.
3. Sorting by Custom Criteria:
Sometimes, you may want to sort your data in a specific order that is not purely alphabetical. Excel allows you to define your custom sort order using the “Custom List” feature. To do this, go to the Excel Options menu, click on “Advanced,” and scroll down to the General section. There, you’ll find the “Edit Custom Lists” button. You can create a custom list by entering the values in the order you want and then use it to sort your data accordingly.
4. Preserving Formatting and Data Associations:
One common concern when alphabetizing data in Excel is that the formatting and associations between data may be lost. However, you can avoid this issue by selecting the entire table, including headers and any associated data, before applying the sort. Excel will preserve the formatting and associations, ensuring that the data remains intact and organized correctly after the sorting process.
With these methods, you can easily alphabetize your data in Excel without losing any valuable information or formatting. Remember to select the appropriate method based on your specific requirements and data structure. By organizing your data effectively, you’ll be able to simplify your workflow and access the information you need more efficiently.
Additional Tips and Considerations
When alphabetizing data in Excel, there are a few additional tips and considerations that can help ensure a smooth and accurate sorting process. Here are four important factors to keep in mind:
1. Backing up your data: It’s always a good idea to make a backup of your data before making any significant changes. This precautionary step can save you from potential data loss or accidental modifications. Consider creating a copy of your Excel file or saving a separate version with a different filename.
2. Filtering before alphabetizing: If you have a large dataset and only need to alphabetize a portion of it, using Excel’s filtering feature can save you time and effort. Applying filters to the columns allows you to narrow down the data you want to sort, making the process more efficient.
3. Dealing with mixed data types: When working with mixed data types in Excel, such as numbers, dates, and text, it’s essential to be aware of how Excel interprets and sorts these different data types. Excel follows specific rules for sorting, so ensure that your data is formatted correctly to achieve accurate results. For example, the “Text” data type should be applied to cells containing alphanumeric values or special characters.
4. Avoiding common mistakes: There are a few common mistakes that people often make while alphabetizing data in Excel. These include forgetting to specify the range of cells to sort, skipping the step of selecting the appropriate column(s) for sorting, or accidentally overwriting existing data. Take your time to double-check these details to avoid any potential errors or unintended changes to your data.
By keeping these additional tips and considerations in mind, you can enhance your experience when alphabetizing data in Excel, ensuring accurate and efficient sorting without losing any valuable information.
Conclusion
Alphabetizing data in Excel is a valuable skill that can help you streamline your spreadsheets and find information quickly. By following the steps outlined in this guide, you can alphabetize your data effectively without losing any valuable information.
Remember to select the entire data range, including headers, before applying the alphabetization feature. This will ensure that your data remains intact and that the sorting is accurate. Additionally, make sure to choose the appropriate sorting option, such as sorting by column, row, or specific criteria.
Excel provides several options for customizing the sorting process, including sorting in ascending or descending order, ignoring or considering case sensitivity, and expanding the sorting range to include multiple columns or rows. These tools allow you to tailor the alphabetization according to your specific needs.
By mastering the art of alphabetizing in Excel, you can organize your data effortlessly and improve your overall productivity. So, don’t hesitate to try out different sorting techniques and explore the various customizable options that Excel offers. Happy alphabetizing!
FAQs
Q: Can I alphabetize data in Excel without losing any data?
A: Absolutely! Excel provides a built-in feature that allows you to alphabetize data without losing any information. This feature rearranges the cells in a selected range based on a chosen column, while maintaining the integrity of the data in other columns.
Q: How do I alphabetize data in Excel?
A: To alphabetize data in Excel, follow these steps:
- Select the range of cells you want to alphabetize.
- Go to the “Data” tab in the Excel toolbar.
- Click on the “Sort A to Z” or “Sort Z to A” button, depending on whether you want to sort in ascending or descending order.
- Make sure that the “Expand the selection” option is checked so that all the related data in other columns stays intact.
- Click “OK” and your data will be alphabetized without losing any information.
Q: Can I alphabetize multiple columns in Excel?
A: Yes, Excel allows you to alphabetize multiple columns simultaneously. To do this, follow these steps:
- Select the range of cells that includes all the columns you want to alphabetize.
- Go to the “Data” tab in the Excel toolbar.
- Click on the “Sort” button.
- In the “Sort by” dropdown menu, choose the column that you want to sort first.
- Click “Add Level” to add additional columns to sort by.
- Repeat step 4 and 5 for each additional column you want to include.
- Choose the sorting order (ascending or descending) for each column.
- Make sure that the “Expand the selection” option is checked.
- Click “OK” and your data will be alphabetized based on the multiple columns you specified.
Q: Can I alphabetize data in Excel based on custom rules?
A: Yes, Excel allows you to create custom sorting rules. This is useful when you want to sort data in a specific order, such as sorting months in chronological order rather than alphabetical order. To apply custom sorting rules, follow these steps:
- Select the range of cells you want to sort.
- Go to the “Data” tab in the Excel toolbar.
- Click on the “Sort” button.
- In the “Sort by” dropdown menu, choose the column you want to sort by.
- Click on the “Options” button.
- In the “Sort Options” window, select the desired custom sorting rule from the “Order” dropdown menu.
- Click “OK” and your data will be alphabetized based on the custom rule you specified.
Q: Can I undo the alphabetizing in Excel?
A: Yes, Excel provides an option to undo the sorting and revert your data back to its original order. To undo the alphabetizing in Excel, you can either use the “Undo” button in the toolbar or press the shortcut key “Ctrl + Z” on your keyboard.