
Are you struggling to find the right channel for your Netgear wireless router? Don’t worry, we’ve got you covered! In this article, we will show you step-by-step how to change the channel on your Netgear wireless router. By changing the channel, you can optimize your Wi-Fi signal strength and reduce interference, ensuring a smoother and more reliable internet connection. Whether you’re experiencing slow speeds, dropped connections, or simply want to improve your network performance, understanding how to change the channel on your Netgear router is a valuable skill. So let’s dive in and discover the easy and effective way to change the channel on your Netgear wireless router.
Inside This Article
- Understanding Netgear Wireless Router Channels
- Steps to Change Channel on Netgear Wireless Router
- Troubleshooting Common Channel Change Issues
- Conclusion
- FAQs
Understanding Netgear Wireless Router Channels
When it comes to optimizing your Wi-Fi network, one of the key factors to consider is the channel your wireless router is operating on. A channel is a specific frequency range that your router uses to transmit and receive wireless signals. Netgear wireless routers typically operate on either the 2.4GHz or 5GHz frequency bands and offer multiple channels within each band.
The 2.4GHz band is more commonly used and is susceptible to interference from other devices such as cordless phones and microwave ovens. It offers a larger coverage area but may have slower data transmission speeds. On the other hand, the 5GHz band provides faster speeds but has a shorter range compared to the 2.4GHz band. It is less prone to interference and is ideal for streaming HD videos and online gaming.
Netgear wireless routers allow you to manually select the channel they operate on, giving you the flexibility to find the best channel for your specific environment. By changing the channel, you can potentially reduce congestion and improve the overall performance of your wireless network.
When selecting a channel, it is important to consider the surrounding Wi-Fi networks in your area. If there are many nearby networks using the same channel, it can cause interference and lead to a degraded signal. Netgear routers typically have a feature called “Auto” mode that automatically selects the least congested channel, but you can also manually choose a specific channel for more control.
It is recommended to use a Wi-Fi analyzer tool to check the signal strength and channel usage of nearby networks. This will help you identify the least crowded channels and avoid interference. Once you have identified the best channel, you can then proceed to change it on your Netgear wireless router.
Remember, changing the channel on your Netgear wireless router may require you to reconnect your devices to the new channel. It is also important to note that the steps to change the channel may vary slightly depending on the specific model of your Netgear router, so refer to the user manual or Netgear’s support website for detailed instructions.
By understanding the role of channels in your Netgear wireless router and taking the necessary steps to optimize them, you can ensure a smoother and more reliable Wi-Fi experience for all your connected devices.
Steps to Change Channel on Netgear Wireless Router
Changing the channel on your Netgear wireless router can help improve the performance and stability of your Wi-Fi network. By selecting the right channel, you can minimize interference from other wireless devices and achieve better signal quality. Follow these simple steps to change the channel on your Netgear wireless router:
- Access the Router Settings: Open your web browser and enter the router’s IP address in the address bar. The default IP address for Netgear routers is usually “192.168.1.1” or “192.168.0.1”. Press Enter to access the router’s login page.
- Enter Login Credentials: Enter the username and password for your Netgear router. By default, the username is “admin” and the password is “password” or “1234”. If you have changed these login credentials in the past, use the updated information.
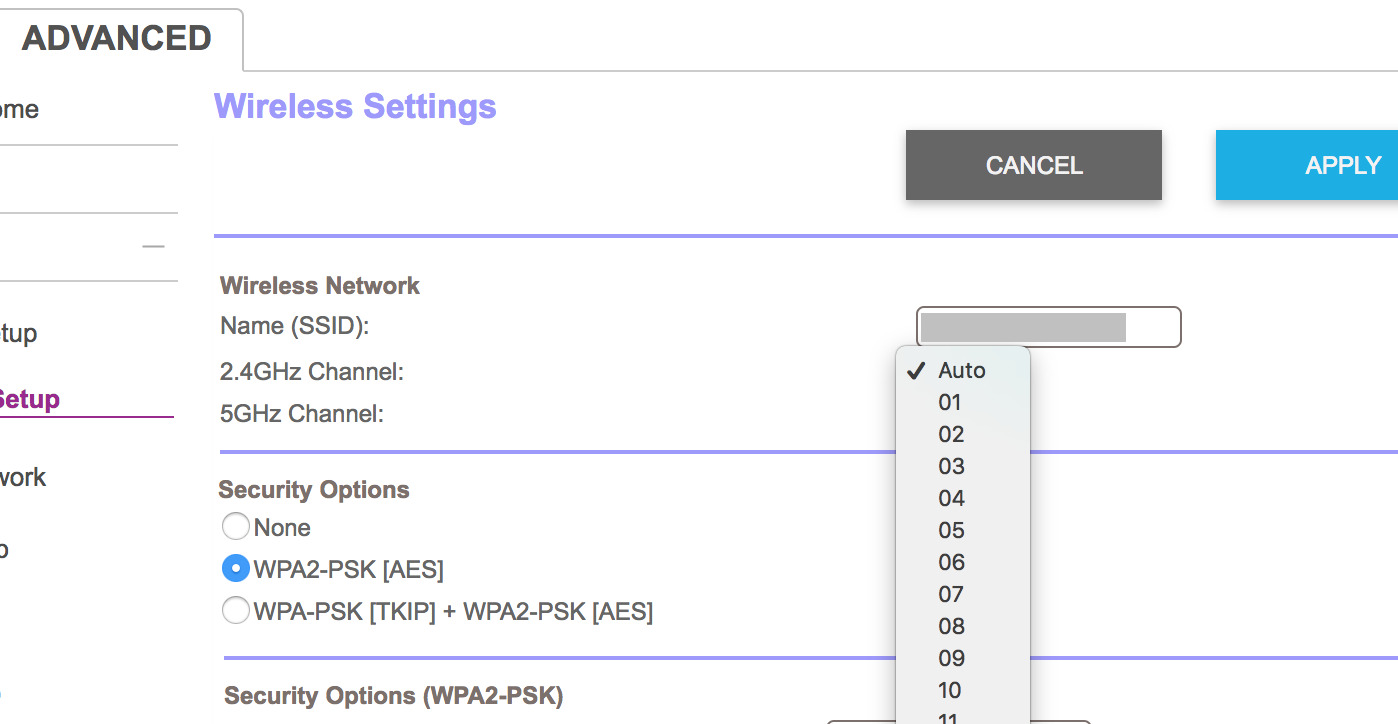
- Navigate to the Wireless Settings: Once logged in, look for the “Wireless” or “Wireless Settings” option in the router’s menu. Click on it to access the wireless settings page.
- Find the Channel Options: In the wireless settings page, you will find an option called “Channel” or “Wireless Channel”. Click on it to view the available channel options.
- Select a New Channel: Look for the drop-down menu that shows the available channels. Choose a different channel from the one currently selected. It is recommended to choose channels 1, 6, or 11, as they are considered to be the most common and interference-free.
- Apply the Changes: Once you have selected the new channel, click on the “Apply” or “Save” button to save the changes. The router will now switch to the new channel configuration.
- Restart the Router: To ensure the changes take effect, it is recommended to restart the router. Simply power off the router, wait for a few seconds, and then power it back on. This will apply the new channel settings.
Congratulations! You have successfully changed the channel on your Netgear wireless router. Your Wi-Fi network should now perform better and experience less interference from other devices.
Troubleshooting Common Channel Change Issues
While changing the channel on your Netgear wireless router can help improve Wi-Fi performance and reduce interference, you may encounter some common issues along the way. Here are a few troubleshooting steps to help you address these problems:
1. Slow or Inconsistent Wi-Fi: If you notice that your Wi-Fi speed has significantly slowed down or that you are experiencing inconsistent connections after changing the channel, consider reverting back to the default channel or trying a different one. Sometimes, the new channel you selected may be congested or incompatible with your devices.
2. Devices Unable to Connect: If you find that certain devices are unable to connect to the network after changing the channel, double-check if the devices support the new channel. Some older devices may only support certain channels. You may need to choose a channel that is compatible with all of your devices.
3. Signal Interference: If you continue to experience poor signal strength or frequent disconnections even after changing the channel, it’s possible that there is interference from other appliances or devices. Move your router away from sources of interference such as cordless phones, baby monitors, microwave ovens, or Bluetooth devices. Additionally, keep your router away from walls or other obstructions that can weaken the signal.
4. Incorrect Configuration: Make sure that you have correctly saved the new channel settings on your Netgear router. Ensure that you have followed the proper steps outlined in the user manual or the Netgear online documentation. Double-check if you have restarted the router after changing the channel for the changes to take effect.
5. Firmware Update: Outdated firmware can sometimes cause issues when changing the channel on your Netgear router. Check for any available firmware updates on the Netgear support website. If an update is available, follow the instructions to download and install the latest firmware version, as this may address any compatibility or stability issues.
6. Reset to Defaults: If none of the above steps resolve your issues, you may consider resetting your Netgear router to its factory defaults. This will bring the router back to its original settings, including the default channel. However, note that resetting the router will erase any custom settings and configurations you have made, so be sure to backup any important information before proceeding.
By following these troubleshooting steps, you can overcome common channel change issues you may encounter with your Netgear wireless router. Remember to experiment with different channels and optimize your Wi-Fi experience for smooth and reliable connectivity.
Conclusion
Changing the channel on your Netgear wireless router can significantly improve your Wi-Fi performance and speed. By selecting a less congested channel, you can minimize interference and enjoy a smoother browsing and streaming experience. The step-by-step instructions provided in this article make it easy for you to change the channel on your Netgear wireless router, regardless of the model you own.
Remember, it’s important to keep track of your Wi-Fi performance and periodically check if changing the channel can enhance your network’s speed and stability. Experimenting with different channels can optimize your Wi-Fi signal and help you make the most out of your wireless connection.
Now that you know how to change the channel on your Netgear wireless router, go ahead and follow the steps to improve your Wi-Fi experience. Say goodbye to slow and unreliable connections and enjoy fast and uninterrupted internet browsing!
FAQs
1. How do I change the channel on my Netgear wireless router?
Changing the channel on your Netgear router is a simple process. Follow these steps:
– Open a web browser and enter the router’s IP address in the address bar. The default IP address for Netgear routers is usually 192.168.1.1, but it can vary, so check the documentation or the bottom of the router for the correct address.
– Enter the router’s username and password. The default credentials are often “admin” for both, but again, they can vary, so refer to the manual or the label on the router.
– Once logged in, look for the wireless settings or Wi-Fi settings section.
– Locate the channel selection option and choose the desired channel from the available options. It is usually labeled as “Channel” or “Wireless Channel.”
– Save the changes and restart your router for the new channel settings to take effect.
2. Why should I change the channel on my Netgear wireless router?
Changing the channel on your Netgear wireless router can help optimize your Wi-Fi performance. If you are experiencing slow or inconsistent internet speeds, changing the channel can reduce interference from other Wi-Fi networks in your vicinity. This interference can result in a weaker signal and slower connection speeds. By selecting a less congested channel, you can potentially improve the stability and speed of your wireless connection.
3. How do I determine the best channel for my Netgear wireless router?
Finding the best channel for your Netgear wireless router involves identifying the least congested channel in your area. To do this, you can use Wi-Fi analyzer tools available on your mobile device or computer. These tools scan the Wi-Fi network signals in your vicinity and display the channel usage. Look for channels with less traffic or interference from other routers. Ideally, you want to choose a channel with the least amount of overlap with other nearby networks.
4. Can changing the channel on my Netgear wireless router improve my gaming experience?
Yes, changing the channel on your Netgear wireless router can potentially improve your gaming experience. By selecting a less crowded channel, you can reduce latency and reduce the chances of experiencing lag or connection drops during online gaming sessions. This can result in a more stable and responsive gaming experience.
5. Is it necessary to restart my Netgear router after changing the channel?
It is essential to restart your Netgear router after changing the channel for the new settings to take effect. Restarting the router allows it to reconfigure and apply the changes. This ensures that the new channel selection is properly implemented, optimizing your wireless connection.