
Setting up a wireless network in Windows 10 is a crucial step in ensuring seamless connectivity for all your devices. Whether you’re a tech-savvy individual or someone new to the world of networking, this guide will walk you through the process of setting up a wireless network on your Windows 10 computer.
With the increasing dependence on wireless connections for everything from web browsing to streaming media, it’s essential to have a reliable and secure network setup. By following the steps outlined in this article, you’ll be able to create a wireless network that provides fast and stable connectivity, allowing you to enjoy a seamless internet experience on your Windows 10 device.
Inside This Article
- Checking Hardware Compatibility
- Gathering Network Information
- Connecting to a Wireless Network
- Troubleshooting Wireless Network Issues
- Conclusion
- FAQs
Checking Hardware Compatibility
Before setting up a wireless network in Windows 10, it is crucial to ensure that your computer and wireless adapter are compatible with the operating system and capable of wireless connectivity. Here are the steps to follow:
1.1 Ensuring your computer and wireless adapter support Windows 10 and wireless connectivity:
The first step is to ensure that both your computer and the wireless adapter are compatible with Windows 10. Check the system requirements for Windows 10 and verify that your computer meets them. Additionally, confirm that your wireless adapter supports Windows 10 and that it is compatible with the necessary wireless network protocols.
1.2 Verifying compatibility with the wireless network specifications:
Wireless networks operate on various specifications, such as 802.11n, 802.11ac, or 802.11ax. It is essential to confirm that your computer’s wireless adapter is compatible with the specific specifications of the wireless network you wish to connect to. This ensures that you will be able to achieve optimal performance and maximize the capabilities of your wireless network.
By checking the hardware compatibility, you can ensure that your computer and wireless adapter are capable of supporting the Windows 10 operating system and are compatible with the required wireless network specifications.
Gathering Network Information
When setting up a wireless network in Windows 10, it’s important to gather all the necessary information to ensure a smooth and secure connection. This includes the network name (SSID) and password, as well as identifying the type of wireless security protocol being used.
The first step is to gather the network name, also known as the Service Set Identifier (SSID). The SSID is the unique identifier for your wireless network and is usually provided by the network administrator or can be found on the router itself. It is important to enter the correct SSID to connect to the desired network.
If your wireless network has a password, you will also need to gather this information. The password, also referred to as the Pre-Shared Key (PSK) or passphrase, is used to authenticate and encrypt the connection. This password is typically created by the network owner and should be kept confidential to ensure the security of your network.
Lastly, it is important to identify the type of wireless security protocol being used on your network. Windows 10 supports three main protocols: WEP, WPA, and WPA2. WEP (Wired Equivalent Privacy) is the oldest and least secure protocol, while WPA (Wi-Fi Protected Access) and WPA2 offer improved security features. Knowing the protocol being used on your network will ensure compatibility and enable you to choose the appropriate security settings during the setup process.
Connecting to a Wireless Network
In order to connect to a wireless network in Windows 10, you need to go through a few simple steps. Here’s how:
Step 1: Accessing the Network & Internet settings in Windows 10
To begin, you’ll need to access the Network & Internet settings on your Windows 10 device. You can do this by clicking on the Start menu and selecting the “Settings” cog icon. From the settings menu, click on “Network & Internet”. This will open a new window with various network-related options.
Step 2: Scanning for available wireless networks
Once you’re in the Network & Internet settings, click on the “Wi-Fi” tab on the left-hand side. On the right-hand side, you’ll find a toggle switch to turn on Wi-Fi if it’s currently off. Once Wi-Fi is enabled, your device will start scanning for available wireless networks in your vicinity. This may take a few moments.
Step 3: Selecting and connecting to your desired network
After the scanning process is complete, you’ll see a list of available wireless networks. Look for your desired network name (or SSID) in the list and click on it. If the network is secured, you’ll be prompted to enter the password. Type in the correct password and click “Connect”.
Congratulations! You’ve successfully connected to a wireless network in Windows 10. Your device will now establish a connection with the network, allowing you to browse the internet and enjoy all the benefits of a wireless connection.
If you encounter any issues during the connection process, make sure that you have entered the correct password and double-check the network name. Additionally, ensure that your wireless adapter is functioning properly and has the latest drivers installed. If problems persist, you can utilize the network troubleshooting tools in Windows 10 to diagnose and resolve any connectivity issues.
Troubleshooting Wireless Network Issues
When it comes to setting up a wireless network in Windows 10, there may be times when you encounter connectivity issues. Fortunately, there are several troubleshooting steps you can take to overcome these problems and get your network up and running smoothly. Here are some common troubleshooting techniques:
1. Checking for software updates and driver compatibility
One of the first things you should do when troubleshooting wireless network issues is to ensure that your Windows 10 operating system and wireless adapter are running the latest software updates. Microsoft regularly releases updates to address bugs and improve performance. Similarly, updating your wireless adapter driver can resolve compatibility issues and enhance network connectivity. To check for updates, simply go to “Settings” > “Update & Security” > “Windows Update” and click on “Check for updates.” If updates are available, install them and restart your computer.
2. Resolving common connectivity issues
If you are experiencing difficulty connecting to your wireless network, there are a few steps you can take to resolve common connectivity issues:
- Ensure that your wireless adapter is turned on and functioning properly. Some laptops have a physical switch or button to enable/disable wireless connectivity.
- Make sure your wireless router is powered on and the network cables are securely plugged in.
- Move closer to your wireless router to ensure that you are within an adequate range for a stable connection.
- Restart your wireless router by unplugging it from the power source for a few seconds and then plugging it back in.
3. Utilizing helpful Windows 10 network troubleshooting tools
Windows 10 provides several built-in network troubleshooting tools that can help diagnose and resolve wireless network issues. Here are a few tools you can use:
- The Network Troubleshooter: This tool can automatically detect and resolve common network problems.
- The Network Reset feature: This tool can reset all your network settings to their default values, which can be helpful if you have made changes that are causing connectivity issues.
- The Device Manager: This tool allows you to manage and troubleshoot your wireless adapter driver and other hardware devices.
By utilizing these Windows 10 network troubleshooting tools, you can effectively identify and resolve wireless network issues, ensuring a seamless and reliable connection for your computer.
Remember, troubleshooting wireless network issues may require some trial and error. Be patient and systematically work through each step to isolate and resolve the problem. If the issue persists, you may need to seek further assistance from technical support or consider contacting your internet service provider for additional troubleshooting and support.
Conclusion
Setting up a wireless network in Windows 10 is a straightforward process that can greatly improve your connectivity and convenience. By following the step-by-step guide provided in this article, you can easily configure and manage your wireless network settings. Whether you are setting up a network at home, in the office, or on-the-go, Windows 10 offers a user-friendly interface that allows you to customize your network according to your needs.
With a wireless network in place, you can enjoy seamless internet access, file sharing, and device connectivity. Remember to secure your network with a strong password and keep your devices updated with the latest software and firmware for optimal performance and security. Now that you have the knowledge and tools to set up your own wireless network in Windows 10, go ahead and enjoy the benefits of a wireless world!
FAQs
1. How do I set up a wireless network in Windows 10?
Setting up a wireless network in Windows 10 is a straightforward process. Follow these steps:
- Click on the Start button and go to Settings.
- In the Settings window, select Network & Internet.
- On the left-hand side, click on Wi-Fi.
- Enable the toggle switch to turn on Wi-Fi.
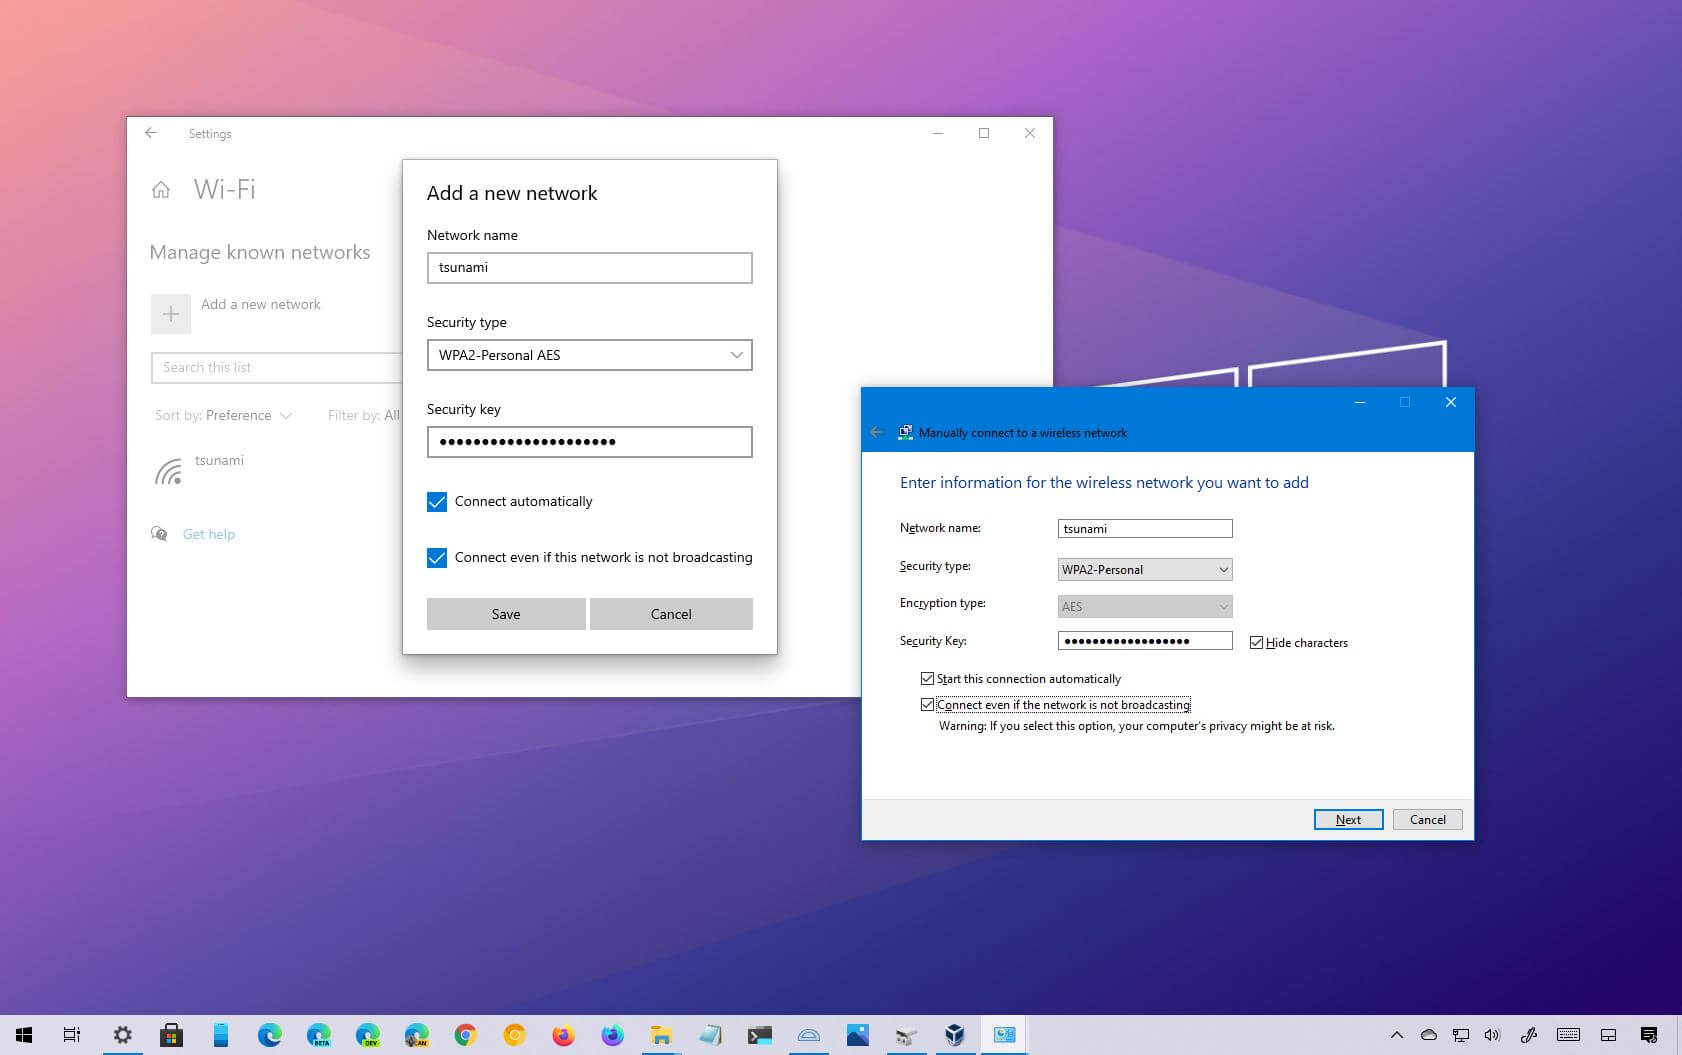
- Click on “Manage known networks.”
- Click on “Add a new network.”
- Enter the name of your network and set the security type.
- Enter the password if required.
- Click on “Connect” and you should be connected to your wireless network in Windows 10.
2. What security measures should I take when setting up a wireless network?
When setting up a wireless network, it is important to prioritize security. Here are a few key measures:
- Enable WPA2 (Wi-Fi Protected Access 2) encryption for your network.
- Set a strong, unique password for your network.
- Disable network name broadcasting to prevent unauthorized access.
- Regularly update the firmware of your router to fix any security vulnerabilities.
- Consider enabling MAC address filtering to only allow specific devices to connect to your network.
- Regularly check and monitor the connected devices list on your router to detect any unauthorized access.
3. How can I troubleshoot wireless network connectivity issues in Windows 10?
If you are facing connectivity issues with your wireless network in Windows 10, try the following troubleshooting steps:
- Restart your router and modem.
- Check if the Wi-Fi adapter is enabled in Windows 10 settings.
- Update the wireless network driver.
- Reset the TCP/IP stack.
- Check if there are any physical obstructions blocking the Wi-Fi signal.
- Try connecting to a different Wi-Fi network to determine if the issue is specific to your network.
- Disable any third-party antivirus or firewall software temporarily to check if they are causing the issue.
4. Can I connect multiple devices to my wireless network in Windows 10?
Absolutely! Windows 10 supports connecting multiple devices to your wireless network. You can connect smartphones, laptops, tablets, smart TVs, and other compatible devices to your network simultaneously.
5. How can I improve the Wi-Fi signal strength in Windows 10?
If you are experiencing weak Wi-Fi signal strength in Windows 10, try these tips to improve it:
- Position your router in a central location in your home.
- Ensure there are no physical obstructions between your router and the devices.
- Minimize interference from other electronic devices, such as cordless phones or microwaves.
- Use a Wi-Fi range extender or mesh network system to extend the coverage area.
- Upgrade your router to a more powerful model with stronger antennas.
- Consider using a Wi-Fi analyzer to identify and change to a less congested channel.