
Mac computers are known for their reliability, sleek design, and powerful performance. Whether you use your Mac for work, entertainment, or both, it’s essential to keep track of your device’s storage to ensure it’s running smoothly and efficiently.
In this comprehensive guide, we’ll explore different methods to check the storage on your Mac. From using built-in tools to third-party applications, you’ll learn how to quickly and accurately assess how much space you have left on your hard drive or solid-state drive (SSD). Plus, we’ll provide some helpful tips on how to manage your storage effectively, so you never have to worry about running out of space.
So, if you’re ready to take control of your Mac’s storage and optimize its performance, let’s dive in and discover the various ways to check how much storage you have left.
Inside This Article
- Understanding Mac Storage
- Checking Available Storage Space
- Managing and Freeing Up Storage Space
- Advanced Storage Options for Macs
- Conclusion
- FAQs
Understanding Mac Storage
When it comes to understanding Mac storage, it’s important to grasp the basics of how your Mac manages and stores data. Macs typically come with a built-in storage drive, such as a solid-state drive (SSD) or a hard disk drive (HDD). This storage drive is responsible for holding all your files, applications, and operating system.
The storage on your Mac is divided into two main categories: system storage and user storage. System storage includes your macOS operating system and other essential system files. User storage, on the other hand, refers to the space allocated for your personal files, such as documents, photos, videos, and applications.
Mac storage capacity is typically measured in gigabytes (GB) or terabytes (TB). For instance, a Mac might come with 256GB, 512GB, or even 1TB of storage space. It’s important to note that the operating system and pre-installed applications will already occupy a portion of that storage, so the actual available storage space may be slightly less.
Within the user storage portion, your files and applications are organized into different categories, such as Documents, Photos, Movies, Music, and Applications. This helps you easily locate and manage your data.
Additionally, macOS uses a file system called Apple File System (APFS) to manage files and optimize storage. APFS employs advanced techniques like data compression, cloning, and snapshots to improve performance and save space.
Understanding how your Mac manages storage is crucial in effectively utilizing the available space and maintaining optimal system performance. Now that you have a basic understanding of Mac storage, let’s discuss how to check the available storage space on your Mac.
Checking Available Storage Space
Keeping track of the available storage space on your Mac is crucial to ensure its optimal performance. By monitoring your storage, you can identify and address any potential issues like limited space or excessive usage. Here are some methods to check the available storage space on your Mac:
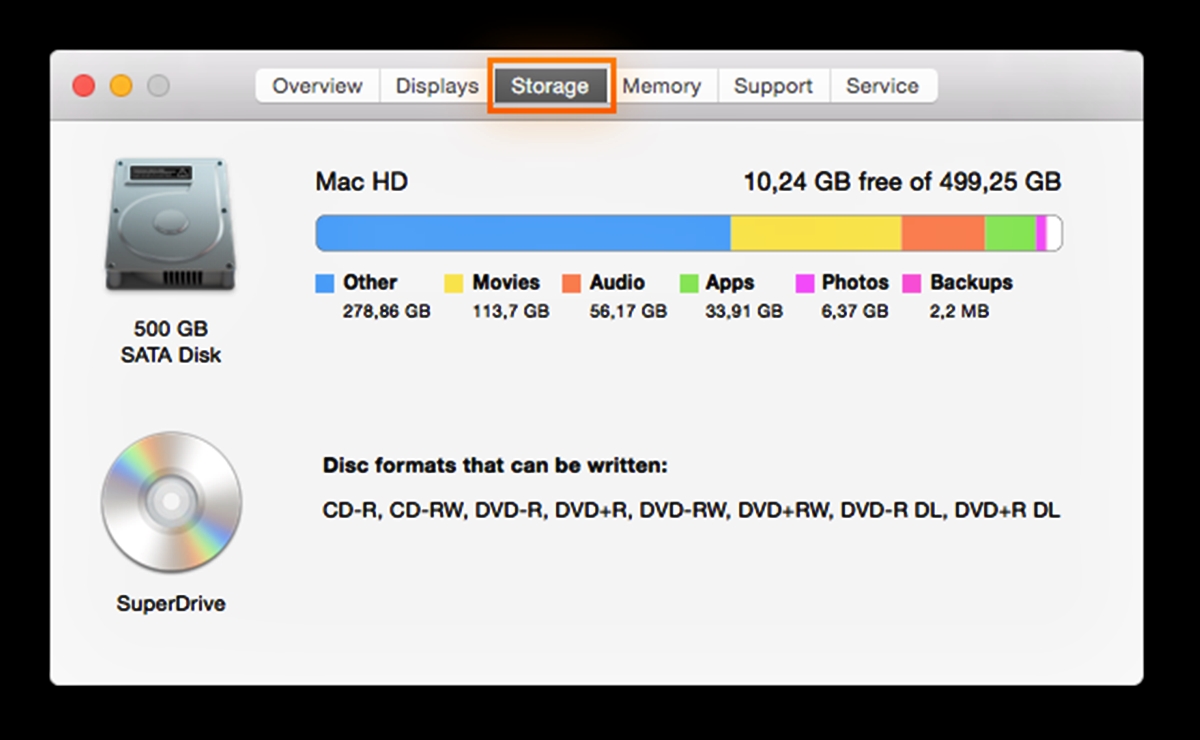
1. Use the Apple Menu: The simplest way to check your Mac’s available storage space is through the Apple menu. Click on the Apple icon in the top-left corner of your screen, then select “About This Mac.” In the pop-up window that appears, click on the “Storage” tab. Here you can see a colorful graph illustrating your storage usage, as well as the amount of available space.
2. Finder’s Get Info: Another method to check storage space is by using Finder. Open a Finder window and select the drive or folder you want to check. Right-click on it and choose “Get Info” or press Command + I. In the information window that appears, you’ll see the available space, as well as details about the used space and file sizes.
3. Storage Management: Macs running macOS Sierra or later versions have a built-in storage management tool. To access it, go to the Apple menu and select “About This Mac,” then click on the “Storage” tab. Now, click on the “Manage” button, and you’ll be taken to the storage management window. Here, you can see recommendations on how to optimize your storage, manage app usage, and delete unused files.
4. Disk Utility: Disk Utility is a powerful tool that not only helps you check the storage space but also allows you to manage and repair your disk. To open Disk Utility, go to the Applications folder in Finder, then open the Utilities folder. Double-click on “Disk Utility” to launch the tool. Select your disk from the left sidebar, and you will see the storage details, including the available space.
5. Third-Party Apps: Various third-party apps, such as DaisyDisk, OmniDiskSweeper, and GrandPerspective, offer more detailed and visual representations of your Mac’s storage. These apps can provide a comprehensive view of your storage usage, allowing you to identify large files or folders that are taking up unnecessary space.
With these methods, you can easily check the available storage space on your Mac, enabling you to stay organized and ensure optimal performance. Regularly monitoring your storage and taking necessary actions to free up space will help your Mac run smoothly and efficiently.
Managing and Freeing Up Storage Space
As you use your Mac, you may find that the storage space starts to fill up quickly. Fortunately, there are several ways to manage and free up storage space on your Mac to ensure optimal performance. Here are some tips to help you out:
1. Remove Unnecessary Files: Start by going through your files and deleting anything you no longer need. This could include old documents, unused applications, or large media files that are taking up space. You can use the Finder to locate and delete these files, or you can use a third-party app like CleanMyMac to help automate the process.
2. Clear Cache and Temporary Files: Over time, your Mac accumulates cache and temporary files that can take up a significant amount of storage space. To clear these files, go to the Finder and press Command+Shift+G to open the “Go to Folder” dialog box. Type “~/Library/Caches” and press Enter. From there, you can manually delete the cache files related to specific applications.
3. Optimize Storage: MacOS offers a built-in feature called “Optimize Storage” that allows you to automatically manage files and free up space. This feature removes TV shows and movies that you have already watched, empties your trash after 30 days, and stores only recent emails and attachments. To enable this feature, go to the Apple menu, select “About This Mac,” and click on “Storage.” Then, click on “Manage” and follow the prompts to optimize your storage.
4. Use iCloud Storage: If you have limited storage space on your Mac, consider using iCloud to store your files. iCloud storage allows you to offload files, photos, and videos from your Mac to the cloud, freeing up valuable space. You can access your iCloud files anytime, anywhere, as long as you have an internet connection.
5. Utilize External Storage: If you have large files or collections of media that you need to keep but don’t access frequently, consider using external storage options like external hard drives or network-attached storage (NAS) devices. By moving these files to external storage, you can free up space on your Mac’s internal drive without sacrificing access to your files.
6. Uninstall Unnecessary Applications: Take a look at the applications installed on your Mac and uninstall any that you no longer use or need. To do this, go to the Finder, click on “Applications” in the sidebar, and then drag the unwanted applications to the Trash. Empty the Trash to completely remove the applications and free up storage space.
7. Consider Storage Upgrades: If you’ve tried all the above methods and still find yourself running out of storage space, it may be time to consider upgrading your Mac’s storage. Depending on your Mac model, you can either replace the internal hard drive with a larger one or add an external SSD drive for additional storage capacity.
By implementing these strategies, you can effectively manage and free up storage space on your Mac, ensuring optimal performance and usability. Remember to regularly check your storage space and take preventive actions to avoid running out of storage in the future.
Advanced Storage Options for Macs
When it comes to managing storage on your Mac, there are several advanced options available that can help optimize and maximize your available space. These options go beyond the basics of checking and managing storage, and provide more advanced features and tools to fine-tune your storage usage.
1. Optimize Storage: Mac OS offers a built-in feature called “Optimize Storage” that automatically offloads rarely used files to iCloud. This means that your Mac will keep only the most frequently accessed files on your local storage, while less frequently used files are stored in iCloud. This can be especially useful if you have limited local storage space but still want easy access to all your files.
2. Empty Trash Automatically: By enabling the “Empty Trash Automatically” feature, your Mac will automatically remove files that have been in the Trash for more than 30 days. This can help prevent unnecessary clutter and free up storage space without you having to manually empty the Trash.
3. Store in iCloud: If you’re running out of local storage space, you can choose to store your files in iCloud instead. By enabling the “Store in iCloud” feature, your Mac will keep a smaller, optimized version of your files on the local storage, while the full-sized files are stored in iCloud. This allows you to access and download the full-sized files whenever you need them, while still saving precious local storage space.
4. External Storage: If you need additional storage space for your Mac, you can connect external hard drives or SSDs. Macs are equipped with USB and Thunderbolt ports, which allow for fast and reliable data transfer. External storage devices are an excellent option for storing large files, such as videos, photos, and music libraries, without using up valuable space on your internal drive.
5. Network Attached Storage (NAS): For more advanced users or those with multiple Macs in a network, setting up a Network Attached Storage (NAS) device can be a great solution. NAS devices are essentially dedicated storage servers that can be accessed by multiple devices on the same network. They offer large storage capacities, data redundancy, and the ability to access files from any device on the network.
6. Third-Party Storage Management Tools: There are also several third-party storage management tools available for Macs. These tools provide more advanced features and options for managing storage space, such as analyzing disk usage, finding duplicate files, and uninstalling unused applications. Examples of popular third-party storage management tools include DaisyDisk, CleanMyMac, and Disk Inventory X.
By taking advantage of these advanced storage options for Macs, you can optimize your storage usage, prevent clutter, and maximize the available space on your Mac. Whether it’s offloading files to iCloud, utilizing external storage, or using third-party tools, these options provide flexibility and convenience for managing your storage needs.
Conclusion
In conclusion, checking the storage on your Mac is a crucial maintenance task that ensures your device is running smoothly and efficiently. By regularly monitoring your storage space, you can identify and free up any unnecessary files or applications, optimizing the performance of your Mac. Whether you use the built-in tools like Storage Management or third-party applications, the process is simple and straightforward. Taking the time to check your storage can prevent slowdowns, crashes, and other performance issues caused by running out of disk space.
By following the steps outlined in this article, you can easily check your Mac’s storage and take appropriate actions to manage your files effectively. Remember, keeping your storage clean and organized not only improves your Mac’s performance but also provides you with a better user experience overall. So, make it a habit to check your storage regularly and ensure you have enough space to store your important files, photos, and applications.
FAQs
Q: How do I check the storage on my Mac?
A: Checking the storage on your Mac is a quick and straightforward process. Simply follow these steps:
1. Click on the Apple menu in the top-left corner of your screen.
2. Select “About This Mac” from the drop-down menu.
3. In the window that appears, click on the “Storage” tab.
4. Here, you’ll be able to see a breakdown of your storage usage, including available space and how much space each category is taking up. Additionally, you can click on the “Manage…” button to get more detailed information and optimize your storage if needed.
Q: What should I do if my Mac is running out of storage?
A: If your Mac is running out of storage, there are several steps you can take to free up space:
1. Delete unnecessary files and folders: Go through your documents, downloads, and other folders to remove any files you no longer need.
2. Empty the Trash: Make sure to empty the Trash bin to permanently delete any files you have discarded.
3. Offload or delete unused applications: Identify and uninstall any applications that you rarely use or no longer need.
4. Utilize cloud storage: Consider moving files to cloud storage services like iCloud, Dropbox, or Google Drive to free up space on your Mac.
5. Use external storage devices: Connect external hard drives or USB flash drives to transfer and store large files.
Remember to always backup important files and documents before deleting anything.
Q: Can I upgrade the storage capacity of my Mac?
A: Yes, depending on the model of your Mac, you may be able to upgrade the storage capacity. However, this is not possible on all Mac computers. For example, some newer MacBook models have the storage soldered onto the main logic board and cannot be upgraded. It is advisable to check the specifications and compatibility of your specific Mac model with an authorized Apple service provider or consult the Apple website for more information about storage upgrade options.
Q: Is there a way to automatically manage storage on my Mac?
A: Yes, macOS provides a built-in feature called “Optimize Storage” that can automatically manage your storage. This feature can be accessed by following these steps:
1. Click on the Apple menu in the top-left corner of your screen.
2. Select “About This Mac” from the drop-down menu.
3. In the window that appears, click on the “Storage” tab.
4. Click on the “Manage…” button.
5. Enable the “Optimize Storage” option.
Once enabled, macOS will automatically store older messages, videos, and other files in the cloud to free up space on your Mac. It will also remove any TV shows or movies you’ve watched from your computer to conserve storage.
Q: How can I check which files are taking up the most space on my Mac?
A: To identify which files are taking up the most space on your Mac, follow these steps:
1. Click on the Apple menu in the top-left corner of your screen.
2. Select “About This Mac” from the drop-down menu.
3. In the window that appears, click on the “Storage” tab.
4. Click on the “Manage…” button.
5. In the Storage Management window, you’ll see a list of categories on the left side. Click on any category to see the files within that category and sort them by size.
6. You can click on a specific file to get more information about it, such as file size, last accessed date, and the option to delete it if needed.