
AirDrop is a popular feature on iPhones and Macs that allows users to wirelessly share files, photos, and documents with ease. It eliminates the need for cables, email attachments, or internet connections, making file sharing a breeze. When you receive an AirDrop file on your iPhone or Mac, you might wonder where it goes and how to access it. In this article, we will explore the question: “Where do AirDrop files go on iPhone and Mac?” We will guide you through the process of locating and managing your AirDrop files on both devices, ensuring that you can quickly find and utilize the files you receive. So, whether you’ve just received an important document or a fun photo from a friend, read on to discover how to find and access your AirDrop files on your iPhone and Mac.
Inside This Article
- Overview
- Understanding AirDrop
- Locating AirDrop Files on iPhone
- Finding AirDrop Files on Mac
- Managing AirDrop Files and Storage
- Conclusion
- FAQs
Overview
AirDrop is a convenient feature available on both iPhone and Mac devices that allows users to easily share files, photos, and other content with nearby devices. Whether you want to send a document to a colleague, share a photo with a friend, or transfer files between your own devices, AirDrop provides a seamless way to do so without the need for cables or third-party apps.
With AirDrop, you can instantly send and receive files wirelessly using Bluetooth and Wi-Fi. It is a secure and private method of sharing, as it creates a direct connection between devices and does not require an internet connection. This makes it ideal for situations where you may not have access to Wi-Fi or limited cellular data.
One of the great advantages of AirDrop is its compatibility across various Apple devices. You can use AirDrop between your iPhone, iPad, iPod touch, and Mac devices, allowing for seamless file sharing within the Apple ecosystem.
In this article, we will explore how to locate AirDrop files on both iPhone and Mac devices, as well as how to manage and organize your AirDrop files and storage.
Understanding AirDrop
AirDrop is a convenient feature available on iPhones and Macs that allows users to easily share files, photos, videos, and more wirelessly. It uses a combination of Wi-Fi and Bluetooth technology to establish a direct peer-to-peer connection between devices, enabling seamless file transfer without the need for emails, messaging apps, or external storage mediums.
This feature is especially useful when you want to quickly share files with friends, colleagues, or family members who are in close proximity. Whether you’re at a business meeting, a social gathering, or simply at home, AirDrop provides a hassle-free and efficient way to share files between compatible devices.
One of the key advantages of AirDrop is its simplicity. It eliminates the need for cables, USB drives, or any other physical media. With just a few taps or clicks, you can instantly send and receive files with other AirDrop-enabled devices. Additionally, AirDrop prioritizes security by using encryption for file transfers, ensuring that only intended recipients can access the shared files.
To use AirDrop, both the sender and receiver need to have AirDrop enabled on their devices and be within a certain range of each other. On iPhones, AirDrop can be accessed through the Control Center, while on Macs, it can be accessed through the Finder. Once enabled, you can choose to receive files from everyone, only contacts, or have AirDrop turned off entirely for added privacy.
Overall, AirDrop is a powerful feature that enhances file sharing capabilities on iPhones and Macs. Its ease of use, security, and wireless nature make it an invaluable tool for transferring files quickly and effortlessly.
Locating AirDrop Files on iPhone
When it comes to finding the AirDrop files you have received on your iPhone, the process is quite straightforward. Once you have accepted the file through AirDrop, it automatically gets saved to the default location on your device.
To locate your AirDrop files on iPhone, follow these simple steps:
Step 1: Start by opening the Files app on your iPhone. This app is a central hub for managing all your files on the device.
Step 2: In the Files app, tap on “Browse” at the bottom, if it’s not already selected. This will take you to the file browser interface.
Step 3: Look for the section named “Locations” and tap on “On My iPhone.” This option allows you to access the files saved directly on your device.
Step 4: Now, navigate through the folders and subfolders to find the AirDrop folder. By default, AirDrop files are saved in a folder named “Downloads.” However, it’s worth noting that you can change the default save location for AirDrop files, so the folder name may vary on your device.
Step 5: Once you locate the AirDrop folder, you will find all the files that you have received via AirDrop. You can tap on any file to open it or perform various actions on the file, such as sharing it or organizing it into different folders.
That’s it! Now you know how to locate AirDrop files on your iPhone. Whether it’s a photo, video, document, or any other file type, you’ll be able to find it easily using the Files app.
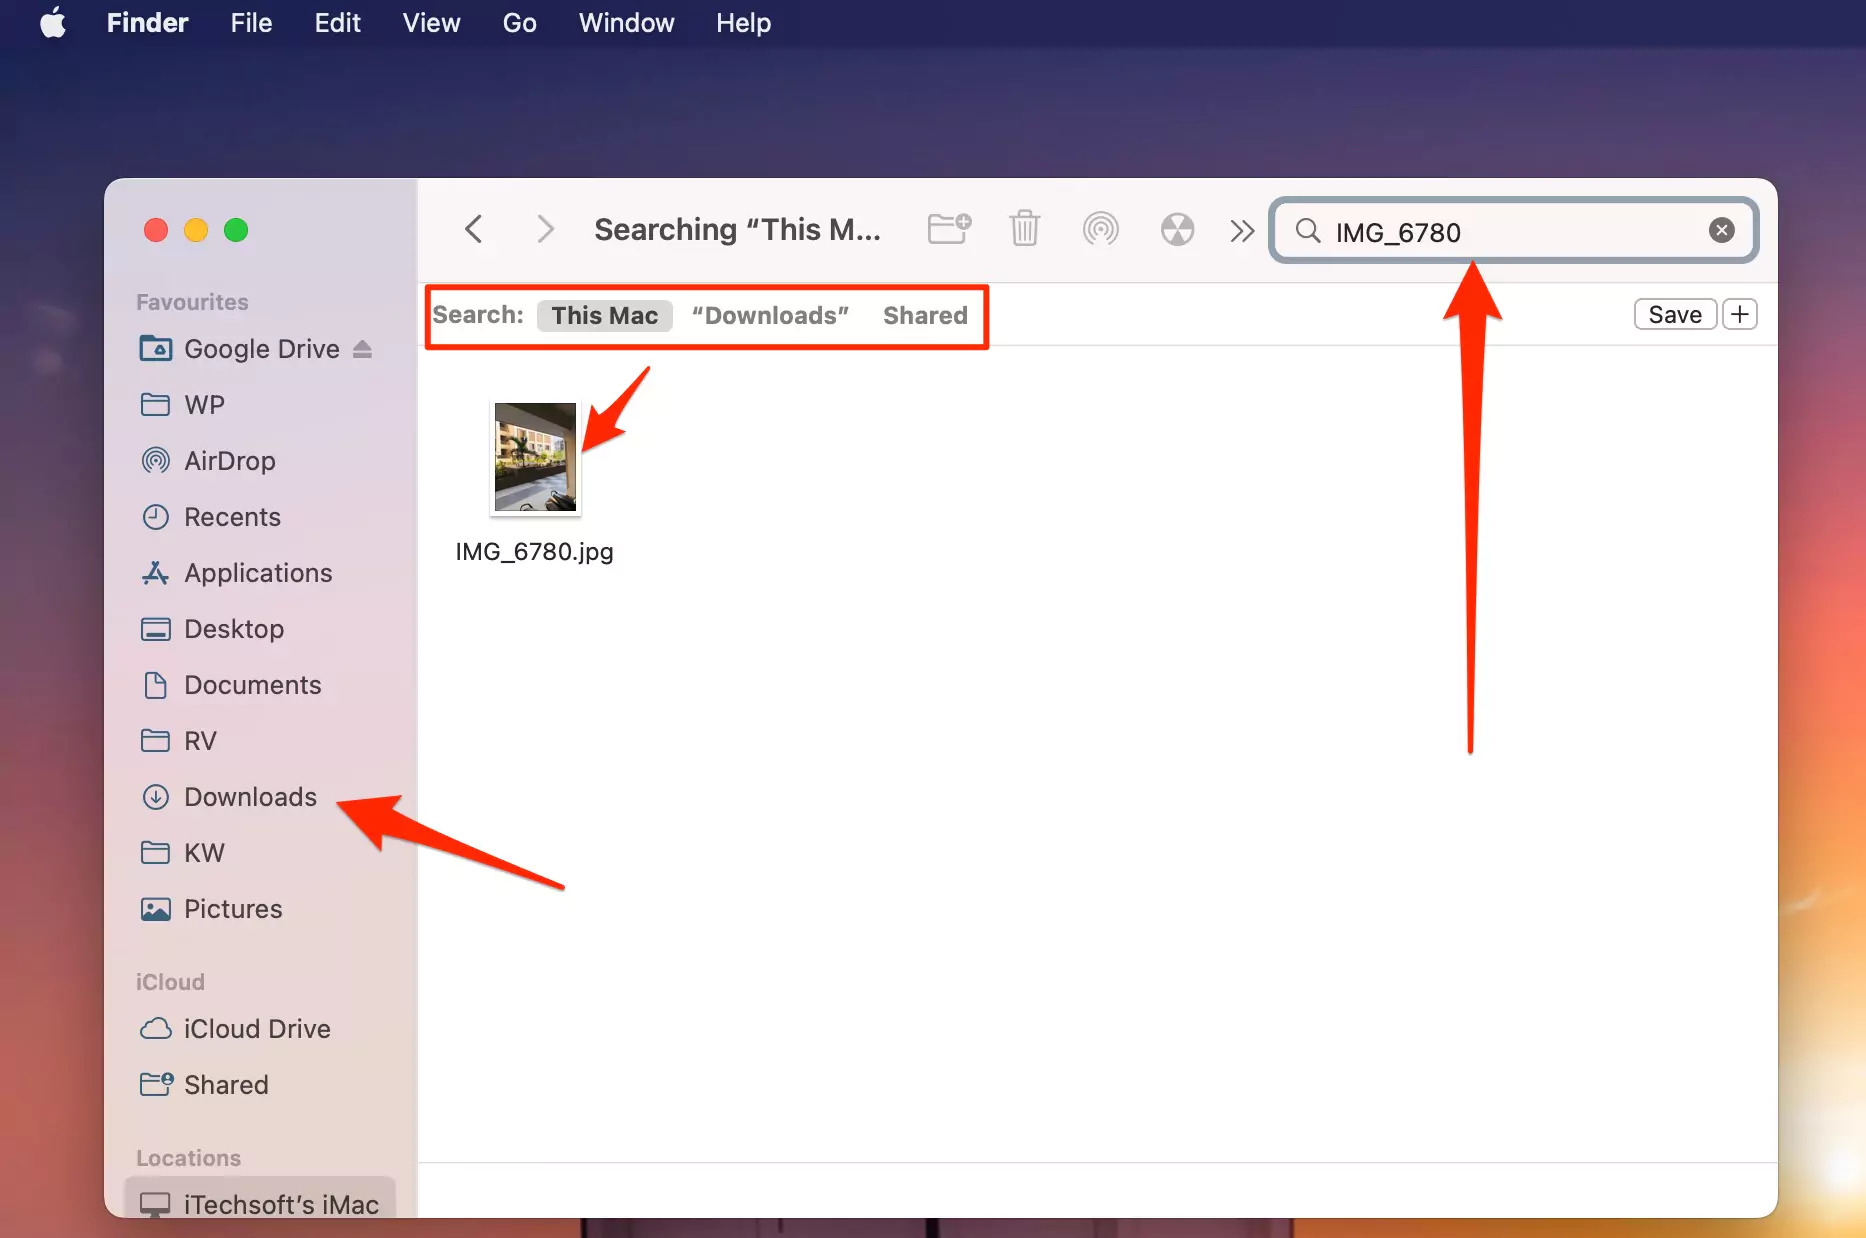
Finding AirDrop Files on Mac
When you receive files via AirDrop on your Mac, you might be wondering where they go. Don’t worry; they are not lost in the digital abyss. In fact, finding AirDrop files on your Mac is incredibly simple.
1. To start, make sure that your Mac is connected to the same Wi-Fi network or is within Bluetooth range of the device that sent you the file.
2. Open the Finder on your Mac by clicking on the Finder icon in the dock or by pressing Command + Space and typing “Finder” in the search bar.
3. Once the Finder is open, look for the “AirDrop” icon in the left sidebar. It should be represented by a blue and white radar-like icon. Click on it.
4. In the AirDrop window that appears, you will see thumbnails of devices that are nearby and available for AirDrop. Look for the device from which you received the file and click on its thumbnail.
5. After clicking on the device’s thumbnail, you will see a list of all the files and documents that were sent to you via AirDrop. These files will be displayed as individual icons or thumbnails, depending on the type of file.
6. To access the AirDrop files, simply click on the file icon or thumbnail. It will open in its respective application or viewer, allowing you to view, edit, or save the file to a different location on your Mac.
7. If you want to save the AirDrop file to a specific location on your Mac, you can drag and drop the file icon from the AirDrop window to the desired folder or directory in the Finder.
8. Additionally, you can also right-click on the file icon in the AirDrop window and select “Open With” to choose a different application to open the file with.
It’s important to note that AirDrop files are typically stored in the Downloads folder on your Mac by default. However, this can be changed in the Finder preferences. To change the default location where AirDrop files are saved, go to Finder ? Preferences ? General, and under “Downloads,” select a different folder.
So, the next time you receive a file via AirDrop on your Mac, you won’t have to search high and low. Follow these steps, and you’ll be able to locate and access your AirDrop files effortlessly.
Managing AirDrop Files and Storage
Once you’ve successfully received files through AirDrop on your iPhone or Mac, it’s essential to know how to manage and organize them effectively. Here are some tips for managing AirDrop files and optimizing storage:
- Review and Organize: Start by reviewing the files you’ve received via AirDrop. Open the respective app associated with each file to ensure it’s in the right place. For example, if you received a photo, open the Photos app; if it’s a document, check the Files app or the relevant document editing app. Organize the files into appropriate folders to keep your device clutter-free and easy to navigate.
- Delete Unwanted Files: It’s common to receive files that you don’t need or want to keep. To free up storage space, go through your AirDrop files and delete any that are no longer required. This will help optimize your device’s storage and ensure you have ample space for new files and applications. On both the iPhone and Mac, you can simply tap and hold on a file to bring up the menu options, including the option to delete the file.
- Backup Important Files: If you receive crucial files through AirDrop, it’s wise to create a backup to prevent any accidental loss. You can use iCloud, Google Drive, Dropbox, or any other cloud storage service to back up your files. Alternatively, you can transfer the files to a computer or external storage device for safekeeping.
- Organize Photos and Videos: Photos and videos received via AirDrop can quickly accumulate and take up significant storage space. Consider creating albums or folders within your Photos app to keep them organized. You can also utilize features like “Favorites” or “Shared Albums” to streamline your photo collection and make it easier to find specific images or videos.
- Use External Storage: If your device is running out of space, you can invest in external storage options like flash drives or external hard drives. These devices allow you to transfer and store AirDrop files externally, freeing up valuable internal storage on your iPhone or Mac.
- Set Automatic Deletion: On both the iPhone and Mac, you have the option to automatically delete AirDrop files after a certain period. This feature helps keep your device clutter-free and ensures that older, unnecessary files are regularly removed. In the settings of each device, you can find the AirDrop settings and adjust the automatic deletion time frame to your preference.
By following these tips, you can effectively manage and optimize your AirDrop files and storage, making it easier to locate and access the files you need while keeping your device organized and running smoothly.
In conclusion, knowing where AirDrop files go on your iPhone and Mac is essential for managing your transfers efficiently. On your iPhone, the received files are stored in the Downloads folder within the Files app, ready for easy access. Meanwhile, on your Mac, the received files automatically go to the Downloads folder, accessible through the Finder.
By understanding the default storage locations, you can locate and organize your AirDrop files effortlessly. Whether it’s important documents, memorable photos, or entertaining videos, knowing where they go ensures you can find and enjoy them without any hassle.
With AirDrop’s convenience and speed, sharing files between devices has never been easier. It’s a feature that enhances productivity and simplifies the way we transfer data. So the next time you send or receive files through AirDrop, you’ll have the peace of mind knowing exactly where to find them on your iPhone and Mac.
FAQs
1. Where do AirDrop files go on iPhone?
When you receive files via AirDrop on your iPhone, they are saved in the designated app for that file type. For example, photos will be saved in the Photos app, documents in the Files app, and music in the Music app. You can easily access these files by opening the respective app and browsing through your media library.
2. How can I find AirDrop files on my Mac?
When you receive files through AirDrop on your Mac, they are usually saved in the Downloads folder by default. You can easily locate this folder by opening a new Finder window and clicking on “Downloads” in the sidebar. However, if you have changed the download location in your settings, the files will be saved in the specified folder instead.
3. Can I customize the destination folder for AirDrop files?
Unfortunately, you cannot directly customize the destination folder for AirDrop files on either iPhone or Mac. The files are automatically saved in the default locations based on their file types. However, you can easily move or copy the files to different folders or locations after receiving them using the file management features of your device.
4. How long do AirDrop files stay on my device?
AirDrop files do not have an expiration date or a time limit for how long they stay on your device. However, it is important to note that storage space on your device is finite. It’s always a good practice to periodically review and delete files that you no longer need to free up storage space.
5. Are AirDrop files accessible offline?
Yes, AirDrop files that have been successfully received and saved on your device can be accessed offline. Once the files are saved to their respective apps or folders, you can open and view them without an active internet connection. This is especially convenient when you need access to important files while you’re on the go or in areas with limited connectivity.