
If you’re a avid reader and own a Kindle, you may find yourself with a constantly growing library of books. While it’s great to have a wide selection at your fingertips, there may come a time when you need to remove books from your Kindle to make room for new ones or simply to declutter your device.
In this comprehensive guide, we’ll walk you through the step-by-step process of removing books from your Kindle. Whether you have a Kindle e-reader or a Kindle app on your smartphone or tablet, we’ve got you covered. We’ll cover all the necessary steps, from deleting individual books to removing entire collections from your device.
By the end of this article, you’ll have all the knowledge and know-how to effortlessly manage your Kindle library and keep it organized, so you can have more enjoyable reading experiences without the clutter.
Inside This Article
- Overview
- Method 1: Removing Books from Kindle Device
- Method 2: Removing Books from Kindle Library
- Method 3: Removing Books from Kindle App
- Method 4: Managing Books on Kindle Cloud
- Conclusion
- FAQs
Overview
Removing books from a Kindle device is a simple process that allows you to manage your e-book collection and free up storage space. Whether you have a physical Kindle device, use the Kindle app on your smartphone or tablet, or access your library through the Kindle Cloud, there are different methods to remove books from each platform. In this article, we will explore various methods to help you seamlessly remove books from your Kindle.
From removing books directly on the Kindle device to managing your library through the Kindle app or the Kindle Cloud, you will have the flexibility to choose the method that suits you best. By learning these different methods, you can easily declutter your collection, organize your digital library, and ensure that you have easy access to the books you truly want to read.
Keep in mind that removing a book from your Kindle does not delete it permanently from your Amazon account. You can always re-download the book in the future if you decide to revisit it. This gives you the freedom to manage your digital library without worry.
Now, let’s dive into the step-by-step methods of removing books from a Kindle device, Kindle library, Kindle app, and Kindle Cloud. Follow along to find the method that works best for your specific needs.
Method 1: Removing Books from Kindle Device
If you want to clear up some space on your Kindle device by removing books that you have already read or no longer need, you can easily do so. Follow these simple steps to remove books from your Kindle device:
Step 1: Turn on your Kindle device and go to the Home screen. Make sure you are on the “Device” tab, which shows all the content stored on your Kindle device.
Step 2: Locate the book you want to remove from your Kindle device. You can scroll through the list of books or use the search function to find a specific book.
Step 3: Once you have found the book you want to remove, press and hold the title until a pop-up menu appears.
Step 4: In the pop-up menu, select the “Remove from Device” option. You may be prompted to confirm the removal.
Step 5: After confirming, the book will be removed from your Kindle device and will no longer be visible in your library. However, if you have purchased the book, it will still be available in your Amazon account’s cloud storage, and you can re-download it at any time.
Keep in mind that removing a book from your Kindle device does not delete it from your Amazon account. It only removes the downloaded copy from your device to free up storage space. To permanently delete a book from your Amazon account, you will need to follow a different process.
Method 2: Removing Books from Kindle Library
If you have a large collection of books in your Kindle library and want to remove specific titles, you can easily do so through the Kindle Library on your device. Follow the steps below to remove books from your Kindle library:
1. Open your Kindle device or app and navigate to the Home screen, which displays all your books.
2. Locate the book you wish to remove from your library. You can either scroll through the list or use the search function to find a specific title.
3. Once you have found the book you want to remove, press and hold the book’s cover or title. This action will bring up a menu of options.
4. On the menu that appears, select the “Remove from Library” or “Delete from Device” option. The wording may vary slightly depending on your device or app version.
5. A confirmation prompt will then appear, asking if you’re sure you want to remove the book. Confirm your decision by selecting “Yes” or “Remove” to proceed.
6. The book will now be removed from your Kindle library. It will no longer be visible on your device or in your library.
It’s important to note that removing a book from your Kindle library does not permanently delete it from your Amazon account. You can always re-download the book for free at a later time if needed.
Removing books from your Kindle library is a great way to make space for new titles or declutter your digital collection. By following these simple steps, you can easily manage your Kindle library and remove unwanted books.
Method 3: Removing Books from Kindle App
If you prefer reading books on your Kindle app instead of a physical device, you may need to remove books from the app to free up storage space or organize your library. Here’s how you can remove books from the Kindle app:
1. Open the Kindle app on your device and ensure that you are logged in with the correct Amazon account.
2. Tap on the “Library” tab located at the bottom of the screen. This will display all the books in your Kindle app library.
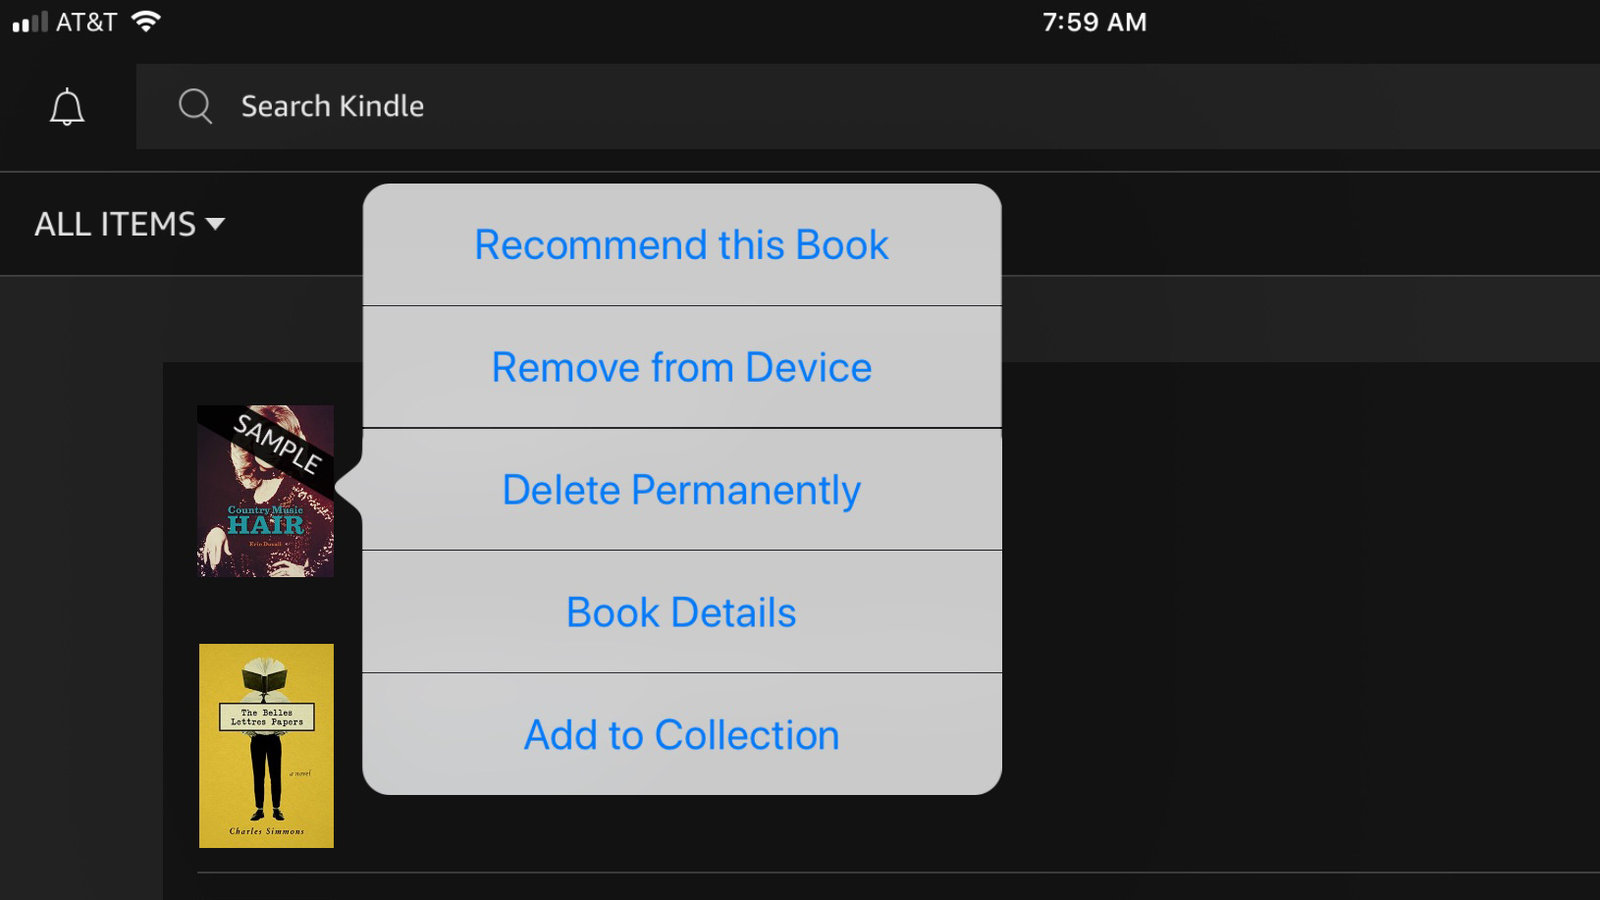
3. Find the book you want to remove and press and hold on its cover. A menu will pop up with several options.
4. Select the “Remove from Device” option from the menu. This will remove the book from your Kindle app, but it will still be available in your Amazon account if you wish to re-download it in the future.
5. If you want to permanently delete the book from your Amazon account, you can select the “Remove from Library” option instead. This will remove the book from both your Kindle app and your Amazon account.
6. After selecting the desired option, the book will be removed from your Kindle app, and you will no longer see it in your library.
It’s worth noting that removing a book from your Kindle app does not delete the book from your Amazon account. You can always access your purchased books in your Amazon account’s “Manage Your Content and Devices” section.
If you have multiple devices connected to your Kindle app, such as a smartphone and a tablet, removing a book from one device will also remove it from all other devices linked to the same Amazon account.
By following these simple steps, you can easily remove books from your Kindle app and keep your digital library organized and clutter-free.
Method 4: Managing Books on Kindle Cloud
Kindle Cloud is a powerful tool that allows you to access your entire Kindle library from any device with an internet connection. Whether you’re using a computer, smartphone, or tablet, Kindle Cloud provides a convenient way to manage and organize your collection of books.
To start managing your books on Kindle Cloud, follow these steps:
- Open a web browser on your device and go to the Kindle Cloud Reader website.
- Sign in to your Amazon account using the same credentials you use for your Kindle device or app.
- Once you’re signed in, you’ll see your entire Kindle library displayed on the screen. This includes all the books you’ve purchased or borrowed.
- To remove a book from Kindle Cloud, simply hover over the book’s cover and click on the three dots that appear in the bottom right corner.
- A menu will pop up with various options. Select “Remove from Cloud” to delete the book from your Kindle Cloud library. Please note that this will permanently remove the book from your Kindle account, so make sure you want to remove it before proceeding.
- If you want to organize your books into collections, you can do so by clicking on the “Collections” tab at the top of the screen. From there, you can create new collections and assign books to them for easy navigation and organization.
- To view your books in a specific collection, simply click on the desired collection on the left-hand side of the screen. This will filter the books displayed to only those in the selected collection.
- If you ever want to restore a previously deleted book, you can do so by going to the “Manage Your Content and Devices” page on the Amazon website. From there, you’ll be able to view all your purchased and borrowed content and choose which books to deliver to your Kindle device, app, or cloud library.
By managing your books on Kindle Cloud, you can keep your digital library organized and easily accessible from anywhere. Whether you need to remove books you no longer want, create collections for better organization, or restore deleted books, Kindle Cloud offers a convenient way to manage your Kindle library in the digital realm.
Remember, maintaining a well-organized Kindle library can enhance your reading experience and make it easier to find and enjoy your favorite titles.
Conclusion
Removing books from a Kindle device is a simple and straightforward process. By following the steps outlined in this guide, you can easily free up space on your Kindle and organize your digital library. Whether you’re looking to remove a single title or multiple books at once, the Kindle’s user-friendly interface makes it convenient to manage your reading collection.
Remember, removing a book from your Kindle doesn’t mean you’re deleting it permanently. The book will still be available for re-download from your Amazon account or the Kindle Cloud if you decide to read it again in the future.
Take some time to regularly clean up your Kindle and remove books you no longer need. This not only ensures better storage management but also helps you discover new titles and keep your reading experience fresh and enjoyable.
So, start decluttering your Kindle today and make way for new adventures in the world of reading!
FAQs
1. How do I remove books from my Kindle?
To remove books from your Kindle, follow these steps:
– Go to your Home screen on your Kindle device
– Tap and hold the title of the book you want to remove
– A menu will pop up with options. Select “Remove from Device”
– Confirm the removal by selecting “Yes”
The book will now be removed from your Kindle device, but it will still be available in your Kindle library for future re-download if desired.
2. Can I remove books from my Kindle without permanently deleting them?
Yes. When you remove a book from your Kindle, it is only removed from the device itself. The book will still be available in your Kindle library and can be re-downloaded to your device at any time. If you want to permanently delete a book from your Kindle library, you can do so by accessing your Amazon account settings.
3. How do I remove multiple books from my Kindle at once?
To remove multiple books from your Kindle at once, follow these steps:
– Go to your Home screen on your Kindle device
– Tap on the three dots icon in the top-right corner
– Select “Remove Multiple Items”
– Tap on the titles of the books you want to remove
– Tap on the “Remove” button at the bottom of the screen
All selected books will now be removed from your Kindle device.
4. Will removing a book from my Kindle delete it from my Amazon account?
No. When you remove a book from your Kindle, it is only removed from the device itself. The book will still be associated with your Amazon account and can be accessed and downloaded again in the future, if desired.
5. Can I remove books from my Kindle app?
Yes. If you are using the Kindle app on a mobile device or computer, you can also remove books from your library. The steps may vary slightly depending on the device, but generally, you can swipe left or tap and hold on the book title to reveal the option to remove it from your device.