
In today’s interconnected world, having a reliable internet connection is essential, whether you’re on the go or working from the comfort of your home. If you’re an iPhone user and own a Mac, you’re in luck! Connecting your iPhone hotspot to your Mac is a seamless process that allows you to share your mobile internet connection and stay connected wherever you are.
Whether you’re traveling, have limited Wi-Fi options, or simply want to conserve data, using your iPhone as a hotspot for your Mac can be incredibly convenient. In this article, we’ll guide you through the easy steps to connect your iPhone hotspot to your Mac, ensuring a smooth and hassle-free experience. So grab your iPhone and Mac and let’s get started!
Inside This Article
- Method 1: Connecting iPhone Hotspot to Mac via Wi-Fi
- Method 2: Connecting iPhone Hotspot to Mac via USB
- Method 3: Connecting iPhone Hotspot to Mac via Bluetooth
- Conclusion
- FAQs
Method 1: Connecting iPhone Hotspot to Mac via Wi-Fi
Connecting your iPhone hotspot to your Mac via Wi-Fi is a convenient and efficient way to share your cellular data connection. By following these simple steps, you’ll be able to enjoy internet access on your Mac in no time.
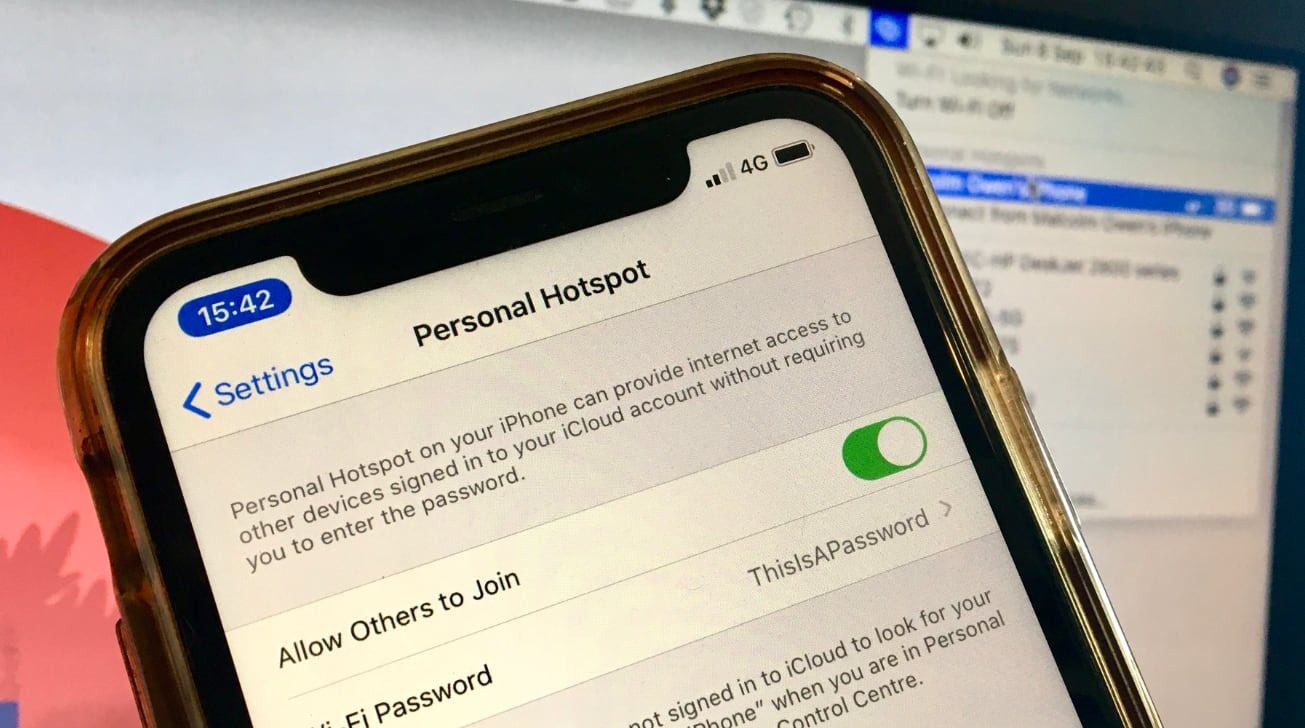
Step 1: Start by ensuring that your iPhone’s personal hotspot feature is turned on. To do this, go to your iPhone’s Settings and tap on “Personal Hotspot”. Toggle the switch to enable it.
Step 2: On your Mac, click on the Wi-Fi icon in the menu bar. From the drop-down menu, select the name of your iPhone hotspot. It should appear in the list of available networks.
Step 3: Enter the Wi-Fi password for your iPhone hotspot if prompted. This is the same password you used when setting up your personal hotspot on your iPhone.
Step 4: Wait for your Mac to connect to your iPhone hotspot. Once connected, you will see the Wi-Fi icon in the menu bar change to a filled-in icon, indicating a successful connection.
Step 5: Congratulations! Your iPhone hotspot is now connected to your Mac via Wi-Fi. You can now browse the internet, stream videos, and use any online services on your Mac using your iPhone’s cellular data.
Using your iPhone hotspot to connect to your Mac via Wi-Fi is incredibly convenient, especially when you’re on the go or don’t have access to a stable Wi-Fi network. It allows you to stay connected and productive no matter where you are.
Please note that using your iPhone hotspot may consume your cellular data, so it’s important to keep track of your data usage to avoid any unexpected charges from your service provider. It’s also a good practice to turn off your personal hotspot when you’re done using it, to preserve your iPhone’s battery life.
Method 2: Connecting iPhone Hotspot to Mac via USB
Connecting your iPhone hotspot to your Mac via USB is a convenient and reliable method to establish a stable internet connection. This method is especially useful when you have a weak Wi-Fi signal or don’t have access to a Wi-Fi network.
Here’s a step-by-step guide to connect your iPhone hotspot to your Mac via USB:
- Make sure you have the latest version of iTunes installed on your Mac. If not, you can download and install it from the Apple website.
- Connect your iPhone to your Mac using a Lightning to USB cable.
- On your iPhone, go to “Settings” and tap on “Personal Hotspot.”
- Toggle the switch to turn on the Personal Hotspot feature.
- On your Mac, open the “Network” settings from the System Preferences.
- In the left-hand pane, you should see your iPhone listed as a new network interface.
- Select your iPhone from the list and click on the “Connect” button.
- Your Mac will now establish a USB connection to your iPhone hotspot.
- You can now enjoy a stable internet connection on your Mac through your iPhone’s hotspot.
It’s important to note that when you connect your iPhone hotspot to your Mac via USB, it will disable the Wi-Fi connection on your iPhone. This means that your iPhone will only provide internet access to your Mac.
This method offers several advantages. Firstly, the USB connection provides a more secure and stable connection compared to Wi-Fi. Secondly, it can be useful in situations where Wi-Fi signals are weak or congested, as USB connections are less prone to interference. Lastly, connecting via USB also helps save battery life on your iPhone as it doesn’t need to transmit Wi-Fi signals.
Method 3: Connecting iPhone Hotspot to Mac via Bluetooth
If you don’t have access to a Wi-Fi network or a USB cable, another option to connect your iPhone hotspot to your Mac is through Bluetooth. While this method may not offer the fastest transfer speed, it can be a convenient solution when you’re on the go and need to get your Mac online.
Before proceeding with the steps to connect your iPhone hotspot to your Mac via Bluetooth, ensure that both your iPhone and Mac have Bluetooth capabilities and are enabled. Follow the steps below to establish a Bluetooth connection:
- On your iPhone, go to “Settings” and tap on “Bluetooth.”
- Toggle the Bluetooth switch to turn it on.
- On your Mac, click on the Apple menu in the top left corner and select “System Preferences.”
- In the System Preferences window, click on “Bluetooth.”
- Make sure Bluetooth is turned on for your Mac.
- On your iPhone, under the “Devices” section, you should see your Mac listed as an available device. Tap on it to connect.
- You may be prompted to enter a passkey or verify a code displayed on both devices. Follow the on-screen instructions to complete the pairing process.
- Once the pairing is successful, your iPhone will be connected to your Mac via Bluetooth.
Now that your iPhone is connected to your Mac via Bluetooth, you can proceed to use your iPhone’s hotspot feature to get your Mac online. On your iPhone, go to “Settings” and tap on “Personal Hotspot.” Toggle the switch to turn on the hotspot functionality. Your Mac will automatically detect and connect to this Bluetooth hotspot.
Keep in mind that using your iPhone’s hotspot feature via Bluetooth may have limitations compared to using Wi-Fi or USB. Bluetooth connections may have slower transfer speeds, and the range may be limited. Additionally, some features like AirDrop may not be available through a Bluetooth connection.
If you encounter any difficulties or connection issues, try disconnecting and reconnecting the Bluetooth connection. You can also try restarting both your iPhone and Mac to resolve any potential software glitches.
Overall, connecting your iPhone hotspot to your Mac via Bluetooth can provide a convenient way to get online when Wi-Fi or USB options are not available. Just remember to monitor your data usage if you have limited or metered data plans to avoid unexpected charges. Enjoy staying connected with your Mac using your iPhone’s hotspot feature!
Connecting your iPhone hotspot to your Mac is a convenient way to get internet access on your computer when you’re on the go. Whether you’re traveling, at a coffee shop, or in an area with no available Wi-Fi, your iPhone can serve as a reliable hotspot.
In this article, we explored the step-by-step process of connecting your iPhone hotspot to your Mac. We discussed how to enable the hotspot on your iPhone, connect your Mac to the hotspot, and troubleshoot any potential issues.
By following these instructions, you can make the most out of your iPhone’s hotspot feature and enjoy seamless internet connectivity on your Mac. Now you can stay productive, stream your favorite shows, and browse the web, even when traditional Wi-Fi networks are out of reach.
So, the next time you find yourself in need of a reliable internet connection for your Mac, don’t forget to utilize your iPhone’s hotspot functionality. It’s a simple and effective solution that keeps you connected wherever you go.
FAQs
Q: Can I connect my iPhone hotspot to a Mac computer?
A: Yes, you can connect your iPhone hotspot to a Mac computer. It allows you to share your iPhone’s cellular data connection with your Mac, giving you internet access.
Q: How do I connect my iPhone hotspot to a Mac?
A: To connect your iPhone hotspot to your Mac, follow these steps:
- Open the “Settings” app on your iPhone.
- Tap on “Personal Hotspot”.
- Toggle the “Personal Hotspot” switch to turn it on.
- On your Mac, go to the “Wi-Fi” menu in the menu bar.
- Select your iPhone’s hotspot network from the list.
- Enter the password if prompted.
Q: What can I do if I can’t connect to my iPhone hotspot on my Mac?
A: If you are unable to connect to your iPhone hotspot on your Mac, try the following troubleshooting steps:
- Make sure you have enabled Personal Hotspot on your iPhone.
- Restart your iPhone and Mac.
- Ensure that you are within the range of your iPhone’s cellular network.
- Check that you are entering the correct password for the hotspot network.
- Disable and re-enable the Wi-Fi on your Mac.
- Reset network settings on your iPhone.
Q: Can I connect multiple devices to my iPhone hotspot on my Mac?
A: Yes, you can connect multiple devices to your iPhone hotspot on your Mac. The number of devices that can connect to your hotspot depends on your iPhone’s carrier and the specific plan you have.
Q: Will connecting my Mac to the iPhone hotspot use up my cellular data?
A: Yes, when you connect your Mac to the iPhone hotspot, it uses your iPhone’s cellular data connection. Any data usage on your Mac will be deducted from your cellular data plan.
Q: Are there any additional charges for using the iPhone hotspot on my Mac?
A: While connecting your Mac to the iPhone hotspot does not incur any additional charges, it uses your iPhone’s cellular data. It’s important to check with your carrier about the data usage and potential charges associated with your cellular data plan.