
Are you struggling to read small text on your iPad? Perhaps you’re finding it difficult to view intricate details in photos or documents. Don’t worry – there’s an easy solution that can help you out. It’s time to take out the magnifier on your iPad! With this handy tool, you can easily enlarge text, images, and anything else you need to see more clearly on your device. Whether you’re dealing with vision issues or just need a little extra assistance, the magnifier can make a world of difference in improving your iPad experience. In this article, we’ll explore where to find and how to utilize the magnifier feature on your iPad, so you can start enjoying a better and more accessible viewing experience!
Inside This Article
- Using the iPad’s built-in Magnifier feature
- Installing third-party magnifier apps
- Connecting an external magnifier to the iPad
- Using accessories for magnification purposes
- Conclusion
- FAQs
Using the iPad’s built-in Magnifier feature
Apple’s iPad comes with a built-in Magnifier feature that allows you to enlarge objects and text for better visibility. Whether you’re struggling to read small print or need to zoom in on details, the Magnifier feature is a handy tool to have at your disposal.
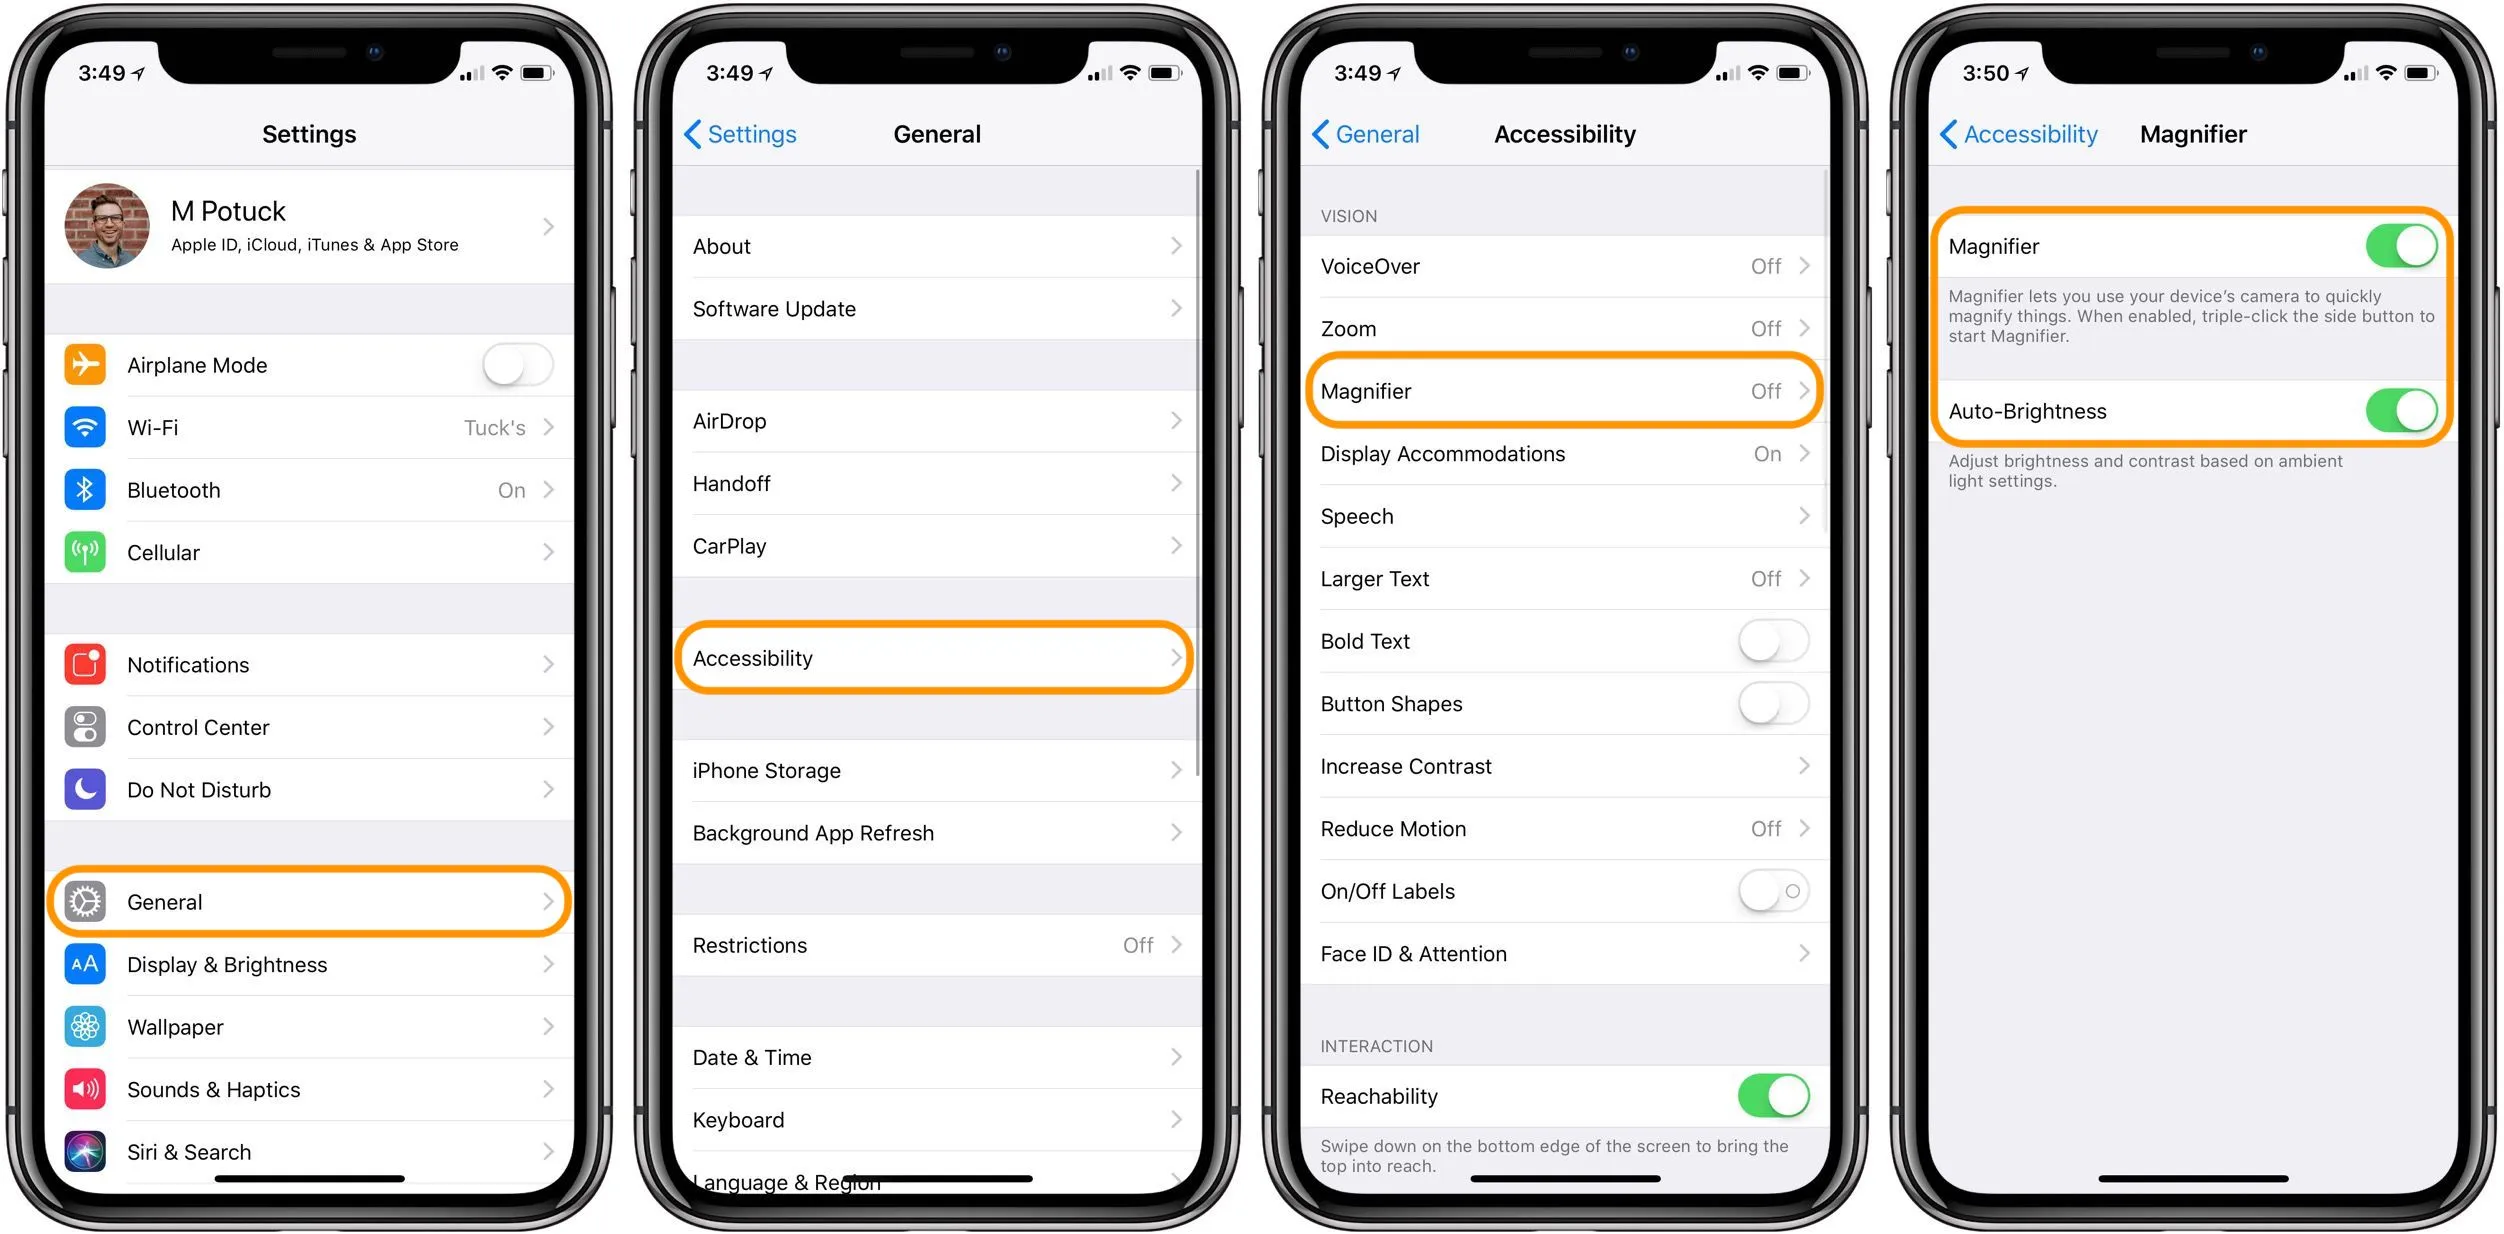
To enable the Magnifier feature on your iPad, follow these simple steps:
- Go to the Settings app on your iPad’s home screen.
- Scroll down and tap on “Accessibility.”
- Under the “Vision” section, tap on “Magnifier.”
- Toggle the switch to turn on the Magnifier feature.
Once the Magnifier is enabled, you can quickly access it by triple-clicking the Home button or the side button on newer iPad models without a Home button.
After activating the Magnifier, you can adjust the magnification level to suit your needs. Simply use the slider provided to increase or decrease the level of magnification. This feature allows you to zoom in on small details and make them easier to see.
Furthermore, the iPad’s Magnifier feature offers additional options to enhance your viewing experience. For example, you can adjust contrast and brightness to optimize the visibility of the magnified image. This can help bring out details and make reading text or examining objects even clearer.
To adjust the contrast and brightness settings of the Magnifier:
- While in the Magnifier, tap on the filter icon located at the bottom of the screen.
- Use the sliders to adjust the contrast and brightness levels until you find the optimal settings.
- Tap on the screen to exit the filter options and return to the magnified view.
The built-in Magnifier feature on iPad gives you the flexibility to quickly and easily magnify objects and text, improving accessibility and usability for those with visual impairments or for any situation where you need to enlarge details on your device.
Installing third-party magnifier apps
When it comes to magnifying content on your iPad, you have the option of using third-party magnifier apps. These apps provide additional features and customization options to enhance the magnification experience. Let’s explore some popular magnifier apps available for iPad.
One popular magnifier app for iPad is “Magnifying Glass + Flashlight. This app offers a simple and intuitive user interface, allowing you to easily magnify objects and text on your iPad screen. It also includes a built-in flashlight feature, making it convenient for low-light situations.
Another top-rated magnifier app is “Vision Assist”. This app offers a wide range of customization options, such as adjustable magnification levels, enhanced contrast, and different color filters. It also includes additional features like freeze frame and image capture, making it useful for capturing and magnifying specific details.
When selecting a magnifier app, it’s important to compare the features and user reviews to find one that suits your specific needs. Some apps may offer additional features like OCR (Optical Character Recognition) that can convert magnified text into readable and editable content.
To download and install a magnifier app on your iPad, follow these simple steps:
- Open the App Store on your iPad.
- Search for the magnifier app you wish to install (for example, “Magnifying Glass + Flashlight”).
- Select the app from the search results.
- Tap the “Get” or “Download” button.
- Authenticate using your Apple ID or Touch ID.
- Wait for the app to download and install on your iPad.
- Once installed, you can find the app on your home screen. Tap on it to launch the magnifier app.
With a wide range of magnifier apps available on the App Store, you can find one that best suits your needs and preferences. Whether you’re looking for a simple magnifying glass or an app with advanced customization options, there’s an option out there for you.
Connecting an external magnifier to the iPad
When it comes to magnifying content on your iPad, there are options beyond the built-in features. Connecting an external magnifier to your iPad can provide even greater magnification capabilities. Let’s explore the different types of external magnifiers that are compatible with the iPad and how to connect and adjust them.
There are various types of external magnifiers available that are compatible with the iPad. One popular option is a handheld digital magnifier, which resembles a portable camera. These devices have a lens and display screen, allowing you to magnify text, images, and objects and view them on the screen. Another option is a clamp-on magnifying lens that can attach to the iPad, providing a larger magnification area.
To connect your external magnifier to the iPad, you have two main options: USB or Bluetooth. Some magnifiers connect directly to the iPad via USB. Simply plug in the USB connector into the charging port on your iPad, and the magnifier will automatically power on and display the magnified content on its screen.
For magnifiers that use Bluetooth technology, you’ll need to pair the magnifier with your iPad. Enable Bluetooth on both devices and follow the pairing instructions provided by the magnifier’s manufacturer. Once paired, select the magnifier as an input source on your iPad, and you’ll be able to view the magnified content on your iPad’s screen.
After connecting the external magnifier to your iPad, you may need to adjust some settings to optimize the magnification experience. Depending on the magnifier’s features, you may be able to adjust the magnification level, change color contrast, or control brightness. Explore the settings menu on your magnifier or refer to the manufacturer’s instructions to customize the magnification settings according to your preferences.
When using the external magnifier, keep in mind that you may need to hold it closer to the content you want to magnify compared to the iPad’s built-in features. Experiment with different distances and positions to find what works best for you.
Whether you choose a handheld digital magnifier or a clamp-on lens, connecting an external magnifier to your iPad can enhance your magnification capabilities and make it easier to view fine details. Remember to choose a magnifier that is compatible with your iPad model and follow the manufacturer’s instructions for successful connection and adjustment of settings.
Using accessories for magnification purposes
When it comes to enhancing the magnification capabilities of your iPad, one option to consider is using accessories such as clip-on magnifying lenses. These lenses are specifically designed to provide additional magnification power, allowing you to view small text, images, or details with greater clarity.
Exploring the options available for clip-on magnifying lenses is key to finding the perfect fit for your needs. You can find a variety of lenses that offer different levels of magnification, ranging from 2x to 10x or more. Some lenses even come with adjustable magnification settings, giving you the flexibility to zoom in or out as needed.
Attaching and adjusting a clip-on magnifying lens on your iPad is relatively simple. These lenses are generally designed to be sleek and lightweight, ensuring they don’t interfere with the overall functionality or aesthetics of your device. They typically attach securely to the camera or screen of your iPad, providing a clear and distortion-free view.
Once attached, you can easily adjust the positioning of the lens to achieve optimal magnification. Some lenses offer a swivel or hinge mechanism, allowing you to tilt or rotate the lens to align it perfectly with the area you want to magnify. This flexibility ensures a comfortable viewing experience without straining your eyes or neck.
By using accessories like clip-on magnifying lenses, you can significantly enhance the magnification capabilities of your iPad. These accessories are portable, making them ideal for use on the go. Whether you’re reading small print, examining intricate designs, or simply need a closer look at something, a magnifying lens can make all the difference.
Conclusion
After exploring the various options available for magnifying text on an iPad, it’s clear that there are multiple ways to enhance readability. Whether you’re using the built-in features like Zoom or Accessibility settings, or opting for third-party apps like Magnifying Glass or Magnifier Flashlight, you can find the perfect solution to suit your needs.
With the ability to adjust magnification levels, apply color filters, and even use your device’s camera as a magnifying tool, you can make text and images more accessible and easier to see. Whether you’re dealing with small font sizes, intricate details, or simply want to make reading more comfortable, these magnification options will come in handy.
With the advancement of technology, even those with visual impairments can enjoy the convenience and functionality of an iPad. So go ahead, take out your magnifier and start exploring the world of text and images with ease on your iPad!
FAQs
Q: Can I use a mobile phone magnifier on my iPad?
A: Yes, you can use a mobile phone magnifier on your iPad. However, it is important to make sure that the magnifier is compatible with your iPad model and size. There are specific magnifiers designed for iPads that offer an optimal viewing experience.
Q: How does a mobile phone magnifier work?
A: A mobile phone magnifier works by enlarging the display on your phone screen, making it easier to read and view content. It typically consists of a magnifying lens that enlarges the image on your screen when you place your phone in the designated slot. Some magnifiers may also come with additional features, such as adjustable brightness or tilt angles, to enhance the viewing experience.
Q: Are mobile phone magnifiers adjustable in terms of magnification?
A: Yes, many mobile phone magnifiers offer adjustable magnification levels. They come with a zoom-in and zoom-out feature, allowing you to customize the magnification based on your preferences and needs. This feature is especially useful for individuals with varying degrees of visual impairment or when reading small text.
Q: Can I use a mobile phone magnifier with a phone case?
A: Yes, you can typically use a mobile phone magnifier with a phone case. However, it is important to ensure that the magnifier and phone case are compatible. Some phone cases may be too thick or bulky, making it difficult to fit inside the magnifier slot or causing the visual quality to be compromised. It is best to choose a magnifier that is designed to accommodate phone cases or opt for a thin and flexible phone case that can easily slide into the slot.
Q: Can a mobile phone magnifier work with any type of phone?
A: Mobile phone magnifiers are designed to be compatible with most smartphones, regardless of the brand or operating system. They are usually adjustable and can accommodate different phone sizes. However, it is recommended to check the specifications of the magnifier to ensure compatibility, especially if you have a phone with an unusually large or small screen.