
If you’re an avid Apple Maps user, you’ve probably relied on its turn-by-turn directions to navigate through unfamiliar places. While the turn-by-turn feature is incredibly convenient, some users may prefer a list of directions instead. This alternative format can make it easier to quickly glance at upcoming steps without having to follow along with a visual map. In this article, we’ll explore how to change turn-by-turn directions on Apple Maps to a list of directions. Whether you’re looking to optimize your navigation experience or simply want a different way of receiving directions, we’ve got you covered. So, let’s dive in and discover how you can easily switch to a list of directions on Apple Maps.
Inside This Article
- How to Change Turn-by-Turn Directions on Apple Maps to a List of Directions
- Enable the “List” View in Apple Maps
- Accessing the “List” View
- Navigating with the List of Directions
- Customizing List View Settings
- Conclusion
- FAQs
How to Change Turn-by-Turn Directions on Apple Maps to a List of Directions
Apple Maps is a widely used navigation app that provides turn-by-turn directions to help you reach your destination. While the turn-by-turn feature is great for providing real-time guidance, some users prefer a list view of directions for a more detailed overview of their route. In this article, we will guide you through the steps to change turn-by-turn directions on Apple Maps to a list of directions.
To enable the list view in Apple Maps, follow these simple steps:
- Launch the Apple Maps app on your iPhone or iPad.
- Enter your destination and start the navigation.
- Swipe up from the bottom of the screen to reveal the route card.
- In the route card, tap on “Steps”.
Once you have accessed the list view, you can navigate through the steps of your journey by scrolling up and down. Each step includes the distance, estimated time, and specific instructions to help you reach your destination. This list view can be particularly useful if you want to have a clear visual representation of your entire route.
Additionally, you can customize the list view settings to further enhance your navigation experience. Here’s how:
- While in the list view, tap on the three dots at the top right corner of the screen.
- From the drop-down menu, select “Settings”.
- In the settings menu, you can toggle various options such as showing traffic, avoiding tolls, and more.
By customizing these settings, you can tailor your navigation experience in Apple Maps to suit your preferences and specific needs.
Changing turn-by-turn directions on Apple Maps to a list of directions provides a more detailed and organized view of your route. Whether you want to have a clearer overview or prefer following the directions step-by-step, Apple Maps offers a versatile navigation experience that caters to different user preferences.
Enable the “List” View in Apple Maps
If you prefer a traditional list of directions instead of the default turn-by-turn navigation in Apple Maps, you can enable the “List” view to easily follow a step-by-step list of directions. With this feature, you can get a clear overview of your route, making it particularly useful when you want to have a quick glance at your upcoming turns without relying solely on the map.
To enable the “List” view in Apple Maps:
- Open the Apple Maps app on your iPhone or iPad.
- Enter your desired destination by tapping on the search bar at the top of the screen and typing in the address or the name of the place you want to go to.
- Once the destination is entered, tap on the “Directions” button located at the top right corner of the screen. This will open the directions interface.
- In the directions interface, you will see two primary options: “Drive” and “Transit.” These options allow you to choose between driving directions or public transit directions. Select the appropriate option based on your preference.
- Below the “Drive” and “Transit” options, you will find a third option labeled “Options.” Tap on “Options.”
- In the “Options” menu, you will see “Alternatives,” “Highways,” and “Tolls” options. Scroll down until you find the “List” option and enable it by tapping on the toggle switch next to it.
Once the “List” view is enabled, Apple Maps will now display the step-by-step directions in a list format, making it easier for you to follow along. You will see the individual maneuvers, street names, and distances for each turn, ensuring you stay on the right path without any confusion.
Now, you can navigate to your destination using the list of directions on Apple Maps, allowing for a more straightforward and customizable navigation experience.
Accessing the “List” View
To access the “List” view in Apple Maps, follow these simple steps:
- Open the Apple Maps app on your iPhone.
- Enter your desired destination in the search bar and tap on the search result.
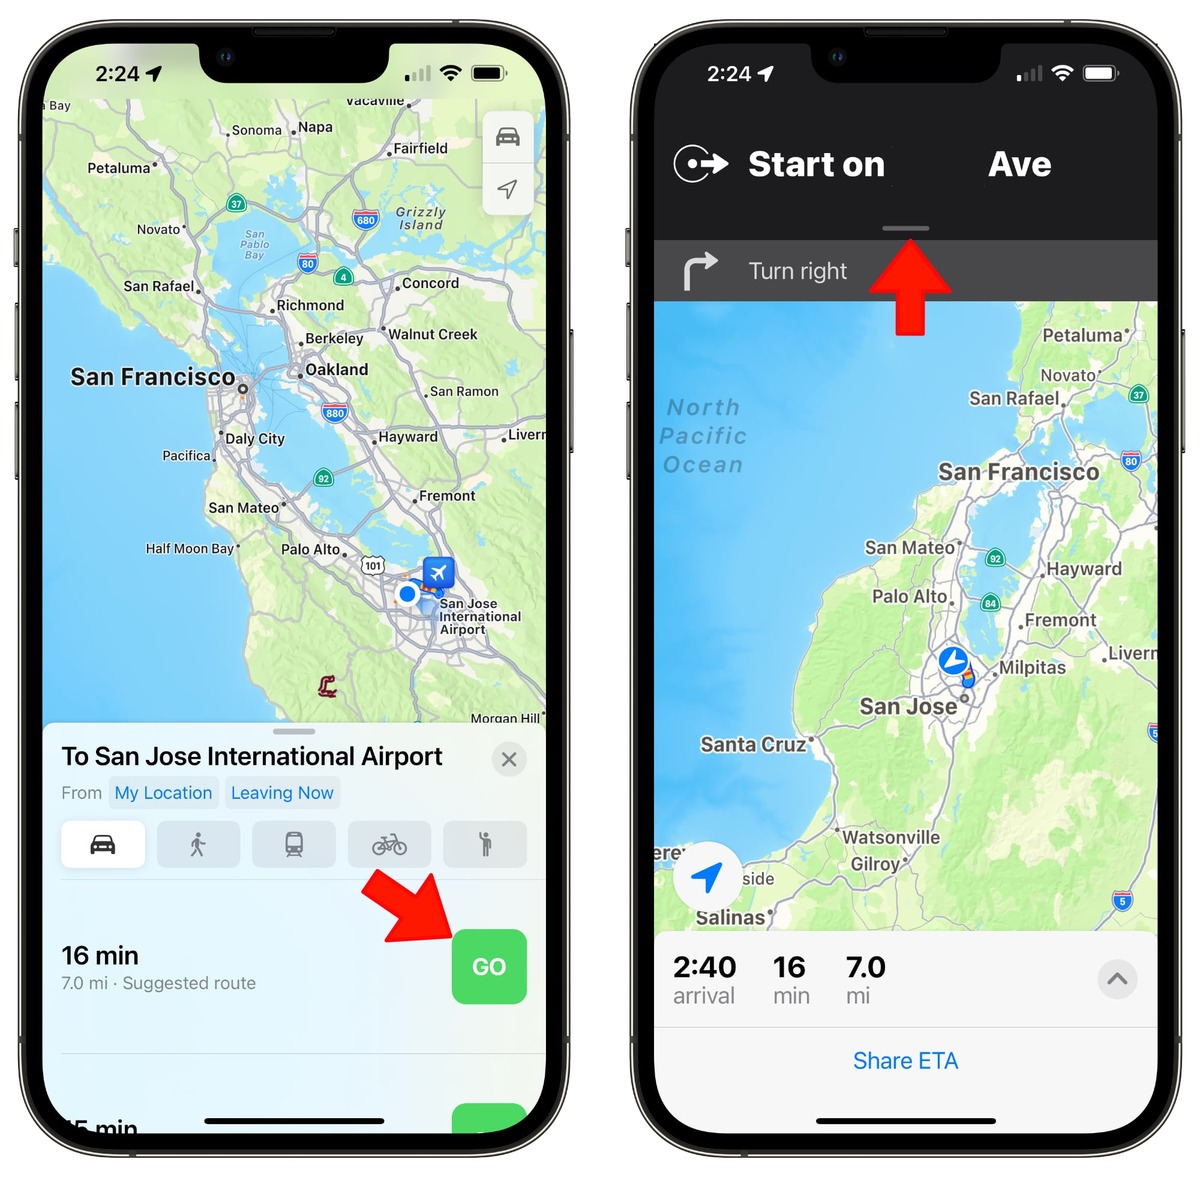
- Once the route appears on the map, look for the “Start” button at the bottom of the screen and tap on it.
- This will initiate turn-by-turn directions mode, but to switch to the “List” view, swipe up from the bottom of the screen.
- As you swipe up, the map will gradually shrink, and you will be presented with a list of the upcoming turns and directions.
By accessing the “List” view, you can have a more detailed and concise overview of your route, making it easier to plan and follow the directions. Whether you prefer a quick glance to see the next turn or a comprehensive list of directions, the “List” view in Apple Maps offers a user-friendly interface for a smoother navigation experience.
Navigating with the List of Directions
Once you have enabled the “List” view in Apple Maps and accessed the directions for your selected route, you can begin navigating with the list of directions. The list view provides a clear and concise breakdown of the steps you need to take to reach your destination.
As you start your journey, Apple Maps will automatically update the directions in real-time, displaying the next step you need to take. The directions will include information like street names, distances, and any relevant landmarks to help you stay on track.
One of the advantages of using the list view is that you can easily preview future steps. By scrolling down the list, you can see the upcoming directions and mentally prepare for what’s ahead. This feature can be especially useful in complex road networks or when you want to anticipate any upcoming turns or merges.
When it’s time to execute a step, Apple Maps will provide you with clear instructions and voice prompts. The app will notify you in advance when it’s time to make a turn, merge onto a highway, or take an exit. The voice prompts offer additional assistance and ensure you never miss a crucial maneuver.
If you happen to miss a turn or deviate from the original route, don’t worry. Apple Maps will quickly recalculate the directions and guide you back on track. The list view will update accordingly, providing new directions based on your current location.
Throughout your navigation, Apple Maps will display your estimated time of arrival (ETA). This allows you to monitor your progress and gauge when you’ll reach your destination. The ETA considers factors such as traffic conditions and any delays along the way, providing you with a realistic time frame.
Whether you’re driving to a new location or exploring a new city on foot, the list view in Apple Maps offers a convenient and reliable way to navigate with turn-by-turn directions. It simplifies the process by breaking down your route into easily digestible steps, allowing you to stay focused on the road and reach your destination hassle-free.
Customizing List View Settings
Apple Maps offers several options for customizing the List View settings to suit your preferences and enhance your navigation experience. Here are some ways you can personalize the List View in Apple Maps:
1. Hide or Show Traffic Information: Apple Maps provides real-time traffic updates to help you avoid congested areas. To customize the List View settings for traffic information, tap on the “i” icon located at the top-right corner of the screen while in List View. Then, toggle the “Traffic” switch to hide or show traffic information.
2. Enable or Disable Satellite View: Satellite View gives you a detailed aerial view of your location. While in List View, tap on the “i” icon and toggle the “Satellite” switch to enable or disable the Satellite View in the List View. This can be helpful when you want to get a visual understanding of your route.
3. Change Distance Units: By default, Apple Maps displays distances in miles. However, if you prefer to see distances in kilometers, you can easily change this setting. From the List View, tap on the “i” icon, and under the “Distances” section, select “Kilometers” to switch to the metric measurement system.
4. Adjust Volume and Voice Settings: To personalize the audio settings for your turn-by-turn directions, go to the List View and tap on the “i” icon. From there, select “Driving & Navigation” and then choose “Navigation Voice Volume.” You can adjust the volume level of the voice prompts to your liking.
5. Customize Voice Guidance Language: In Apple Maps, you have the ability to change the voice guidance language to a preferred language. Go to the List View, tap on the “i” icon, and select “Driving & Navigation.” From there, choose “Navigation Voice Language” and select the desired language from the available options.
6. Enable or Disable Voice Prompts: If you prefer to navigate without voice prompts, you can turn off this feature in the List View settings. Tap on the “i” icon, go to “Driving & Navigation,” and toggle the “Voice Prompts” switch to enable or disable voice prompts during your navigation.
7. Choose Alert Style: Apple Maps offers different alert styles for providing notifications during navigation. To customize this setting, go to the List View, tap on the “i” icon, and select “Driving & Navigation.” From there, choose “Alert Style” and select the preferred style from the available options.
8. Show or Hide Arrival Time: By default, Apple Maps displays the estimated arrival time in the List View. If you prefer not to see the arrival time, you can toggle this setting. Tap on the “i” icon in List View, go to “Driving & Navigation,” and toggle the “Arrival Time” switch to show or hide the arrival time.
By customizing the List View settings in Apple Maps, you can tailor the navigation experience to your preferences and make it more personalized and efficient. Explore these settings to optimize your routing experience and make every journey a smooth and hassle-free one.
Conclusion
Changing turn-by-turn directions on Apple Maps from a map display to a list of directions can greatly enhance the navigation experience for users. By following the simple steps outlined in this article, users can easily make this adjustment on their Apple devices.
Whether you prefer a visual map or a clear list of directions, Apple Maps offers flexibility to meet your navigation needs. The ability to switch between different navigation views allows users to customize their experience and navigate with ease.
So, the next time you find yourself needing directions, remember that you can change the turn-by-turn directions on Apple Maps to a list of directions. Take advantage of this feature, and enjoy a seamless navigation experience that is tailored to your preferences.
FAQs
FAQ 1: How do I change turn-by-turn directions on Apple Maps to a list of directions?
Answer: To change turn-by-turn directions on Apple Maps to a list of directions, follow these steps:
- Open the Apple Maps app on your iPhone or iPad.
- Enter your destination and tap the “Directions” button.
- After the route is displayed, swipe up from the bottom of the screen to reveal the options panel.
- Tap on the “Steps” button to switch from turn-by-turn directions to a list of directions.
FAQ 2: Can I customize the list of directions on Apple Maps?
Answer: Unfortunately, Apple Maps does not currently offer a way to customize the list of directions. However, you can rearrange the order of the steps by tapping and holding on a step, then dragging it to a new position.
FAQ 3: How do I go back to turn-by-turn directions on Apple Maps?
Answer: To switch back to turn-by-turn directions on Apple Maps, simply tap the “Turns” button located in the options panel while viewing the list of directions. This will bring back the turn-by-turn view with the map.
FAQ 4: Can I change the voice for turn-by-turn directions on Apple Maps?
Answer: Yes, you can change the voice for turn-by-turn directions on Apple Maps. To do this, go to the “Settings” app on your iPhone or iPad, then tap “Maps” and select “Navigation & Guidance.” From there, you can choose a different voice under the “Navigation Voice” section.
FAQ 5: Is it possible to get turn-by-turn directions on Apple Maps while using CarPlay?
Answer: Yes, you can get turn-by-turn directions on Apple Maps while using CarPlay. Simply connect your iPhone to your CarPlay-enabled vehicle, then open Apple Maps and enter your destination. The turn-by-turn directions will be displayed on the car’s screen, and you can follow them just like when using Apple Maps on your iPhone.