
Are you planning a trip and need to share your itinerary with friends or family? Look no further than the Apple Maps app on your iPhone! With its user-friendly interface and convenient sharing options, Apple Maps makes it easy to share locations and directions with others.
In this guide, we’ll show you how to share a guide from the Apple Maps app on your iPhone. Whether you’re planning a road trip, giving someone directions, or simply want to share a cool spot you found, this feature will come in handy. With just a few taps, you can share a guide directly from the app to your desired contacts.
So, let’s get started and learn how to share a guide from the Apple Maps app, ensuring that your friends and family stay in the loop for your upcoming adventures!
Inside This Article
- How to Share a Guide from the Apple Maps App on Your iPhone
- Opening the Apple Maps App
- Creating a Guide
- Sharing a Guide
- Editing or Deleting a Guide
- Conclusion
- FAQs
How to Share a Guide from the Apple Maps App on Your iPhone
Do you want to share a guide with your friends or family from the Apple Maps app on your iPhone? Well, you’re in luck! With just a few simple steps, you can easily share a guide and help others navigate their way through various locations. In this guide, we will walk you through the process of creating a guide in the Apple Maps app, and how to share it with others.
Creating a guide in the Apple Maps app is a great way to curate a collection of places you want to recommend to others. To get started, open the Apple Maps app on your iPhone. You can find the app on your home screen or by searching for it in the Spotlight search.
Once you have the app open, tap on the search bar at the top of the screen and enter the name of the place you want to add to your guide. As you type, you will see suggestions based on your search query. Simply tap on the correct suggestion to proceed.
Next, tap on the place card that appears on the screen to view more details about the location. Here, you can see information such as the address, phone number, and reviews. To add the place to your guide, tap the “Add to” button located just below the map.
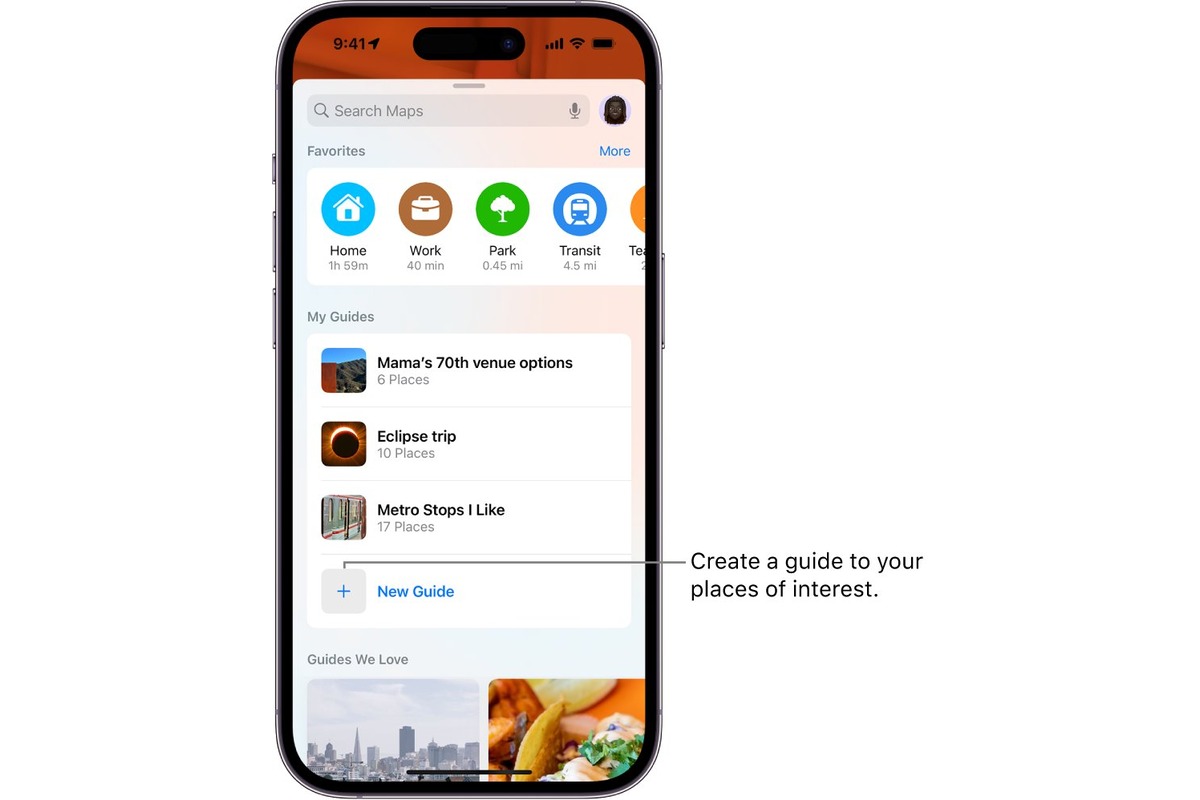
If you already have a guide created, you can select it from the list that appears. Otherwise, tap on the “New Guide” option to create a new one. Give your guide a memorable name that reflects the places you have added or the theme of the guide.
Once you have created and named your guide, you can continue adding more places to it by following the same steps. Explore more locations, tap the place cards, and select “Add to [Your Guide Name]” to include them.
Now that you have created your guide, let’s move on to sharing it with others. Open the Apple Maps app and tap on the “Guides” option located at the bottom of the screen. Here, you will see the list of guides you have created.
Select the guide you want to share by tapping on it. Inside the guide, you will see a list of all the places you have added. You can rearrange the order of the places by tapping and holding on the three horizontal lines and dragging them to the desired position.
To share the guide, tap on the “Share Guide” button located at the bottom of the screen. You will be presented with various sharing options such as messages, email, and social media platforms. Select the desired method and follow the prompts to send the guide to your chosen recipients.
If you ever need to edit or delete a guide, you can do so by opening the Apple Maps app and selecting the “Guides” option at the bottom of the screen. Tap on the guide you want to edit or delete, and then tap on the three dots in the upper-right corner of the screen.
From there, you can choose to edit the guide by adding or removing places, changing the order, or updating the name. Alternatively, you can delete the guide entirely by selecting the “Delete Guide” option.
Sharing a guide from the Apple Maps app on your iPhone is a simple and convenient way to provide recommendations and help others explore new places. Whether you’re planning a trip, sharing local hotspots, or just want to show off your favorite spots, the Apple Maps app has got you covered.
Opening the Apple Maps App
Opening the Apple Maps app on your iPhone is a quick and easy process. With just a few taps, you’ll have access to a wealth of navigational information and features.
To begin, locate the Apple Maps icon on your iPhone’s home screen. It’s a map with a compass needle pointing to the right. Tap on the icon to launch the app.
Once the app opens, you’ll be greeted with a map view displaying your current location. You can pinch or spread your fingers on the screen to zoom in or out respectively, allowing you to navigate with ease.
At the bottom of the screen, you’ll find several options, including Search, Favorites, Recents, and Guides. Tap on the Search icon to search for a specific location or tap on Favorites to access locations you’ve previously saved.
If you’re looking to explore recent locations you’ve visited, tap on the Recents icon. This can be especially useful if you need to retrace your steps or find a place you recently viewed on the map.
Lastly, the Guides option allows you to access curated collections of places and recommendations. This feature enables you to discover new destinations and plan your trips accordingly.
Once you’ve mastered the process of opening the Apple Maps app on your iPhone, you’ll be ready to explore and utilize its many features, making navigation a breeze.
Creating a Guide
Creating a guide in the Apple Maps app on your iPhone is a straightforward process. Whether you want to curate a collection of your favorite restaurants, plan a road trip, or compile a list of must-visit tourist spots, the guide feature allows you to easily organize and share your recommendations with friends and family. Follow these simple steps to create your own guide:
- Launch the Apple Maps app on your iPhone. You can find it on your home screen or by using the search function.
- Tap on the search bar at the top of the screen and enter the location or place you want to include in your guide. You can search for specific addresses, landmarks, or categories like restaurants, parks, or museums.
- Once you find a location you want to add to your guide, tap it to view more details.
- Scroll down on the location’s details page and tap on the “Add to Guide” button.
- If you haven’t created a guide before, you will be prompted to create a new one. Choose a name for your guide that reflects its purpose or theme.
- You can continue adding more locations to your guide by repeating steps 2-5. Feel free to explore different areas or categories to build a comprehensive guide.
- To access your guide, tap the “Guides” tab at the bottom of the screen. Here, you will find all the guides you’ve created.
Creating a guide in the Apple Maps app gives you the flexibility to customize and personalize your recommendations. You can add a variety of locations, categorize them according to your preferences, and even add notes or descriptions to each location. Whether you’re planning a weekend getaway or sharing your favorite local spots, the guide feature in Apple Maps makes it convenient to compile and share your recommendations.
Sharing a Guide
Once you have created a guide in the Apple Maps app on your iPhone, you may want to share it with others. Fortunately, sharing a guide is a straightforward process that allows you to effortlessly share your curated collection of places and destinations.
To share a guide, follow these simple steps:
- Open the Apple Maps app on your iPhone.
- Tap on the “Guides” tab at the bottom of the screen to access your guides.
- Select the guide you want to share by tapping on it.
- Tap on the “Share” button at the top right corner of the screen.
- You will be presented with various sharing options, including AirDrop, Messages, Mail, and more.
- Choose the desired sharing method by tapping on it.
- If you select AirDrop, you can easily send the guide to nearby Apple devices.
- If you choose Messages or Mail, a new message or email will be created with a link to the guide.
- Enter the recipient’s information and add any additional message if desired.
- Finally, tap on the send button to share the guide.
By following these steps, you can quickly share a guide from the Apple Maps app with friends, family, or colleagues who may also find your curated collection of places useful and interesting.
Editing or Deleting a Guide
Once you’ve created a guide in the Apple Maps app on your iPhone, you may find the need to edit or delete it later. Luckily, the app provides easy and straightforward options for making changes or removing a guide altogether.
To edit a guide, follow these steps:
- Open the Apple Maps app on your iPhone.
- Tap on the “Guides” tab at the bottom of the screen.
- Select the guide you want to edit.
- Tap on the “Edit Guide” button.
- Make the necessary changes to the guide’s title, description, or individual locations.
- Once you’ve finished editing, tap on the “Save” button to save your changes.
By following these steps, you can easily update the information within your guide to ensure it remains accurate and helpful to others.
If, on the other hand, you decide that you no longer need a guide and want to delete it, here’s what you can do:
- Open the Apple Maps app on your iPhone.
- Tap on the “Guides” tab at the bottom of the screen.
- Select the guide you wish to delete.
- Tap on the “Delete Guide” option.
- Confirm your decision by tapping on “Delete” again in the confirmation prompt.
Once you confirm the deletion, the guide will be permanently removed from your Apple Maps app. However, please note that this action cannot be undone, so make sure you truly want to delete the guide before proceeding.
With these editing and deletion options, you have full control over the guides you create in the Apple Maps app. Whether you need to make small updates or remove a guide entirely, the process is simple and user-friendly.
In conclusion, sharing a guide from the Apple Maps app on your iPhone is a quick and convenient way to provide directions and recommendations to your friends and family. With just a few taps, you can send a detailed route, favorite locations, or even a custom collection of places directly from the app. Whether you’re planning a road trip, sharing your favorite local spots, or helping someone navigate a new city, the built-in sharing feature of Apple Maps makes it easy to share the information you need with the people who matter most.
FAQs
1. How do I share a guide from the Apple Maps app on my iPhone?
Sharing a guide from the Apple Maps app on your iPhone is simple and straightforward. Just follow these steps:
- Open the Apple Maps app on your iPhone.
- Search for the location or place you want to create a guide for.
- Tap on the location to view more details.
- Scroll down to find the section labeled “Add to a Guide.”
- Tap on “Create a New Guide” or select an existing guide to add the location to.
- Once you have added all the desired locations, tap on the “Share Guide” button.
- Choose the platform or app through which you want to share the guide, such as Messages, Mail, or social media apps.
- Customize any additional settings, such as including a message or selecting specific recipients.
- Finally, tap on the “Send” or “Share” button to send the guide to your chosen recipient(s).
2. Can I share a guide with someone who doesn’t have an iPhone?
Yes, you can share a guide from the Apple Maps app with someone who doesn’t have an iPhone. When you share a guide, you have the option to send it through various platforms and apps, such as text messages, emails, or social media. As long as the recipient can access the chosen platform or app, they will be able to view the guide regardless of their device.
3. Can I edit a guide after sharing it?
No, once you have shared a guide from the Apple Maps app, you can no longer edit it. The guide becomes a static collection of locations, and any changes you make to the guide will not be reflected in the version that you have shared. If you need to make updates or additions to a guide, you will have to create a new guide and share it again.
4. Is there a limit to the number of locations I can add to a guide?
There is no specific limit to the number of locations you can add to a guide on the Apple Maps app. However, it’s important to note that adding too many locations may make the guide overwhelming for others to navigate. It is recommended to keep the guide concise and focused on the most relevant and interesting places.
5. Can I delete a guide once I have shared it?
Unfortunately, you cannot delete a guide from the Apple Maps app once you have shared it. Once a guide is shared, it is available to the recipients permanently. If you wish to remove the guide, you will have to communicate with the recipients and request that they delete it from their devices or accounts.