
Learning how to record Google Meet video calls can make a big difference in your grades or your work output. Nowadays, more and more services and jobs are making the shift to home-based operations. A big part of Google’s Workplace and the G-Suite, Google Meet, is Google’s answer to video conferencing software. Due to its ease of use and versatility, it is no surprise that people want to use it for things like working from home or online learning. Because of this, it is not surprising that people would want to learn how to record Google Meet videos to review or archive them. But how exactly do you do that? This article will teach you how to record meetings on Google Meet, how you can share it with others, and other things you have to keep in mind!
Related: Google Voice for Business – Google Workspace’s VOIP Add-on
Inside This Article
Who Can Record on Google Meet?
Don’t get too excited because not everyone can record meetings on Google Meet. While Google Meet is one of the best free apps to place secure video calls on, it also has a lot of paid features for businesses and organizations that just are signed up to their many different subscription plans. As part of Google’s Google Workspace (formerly G-Suite), a set of productivity and collaboration apps, Google Meet’s integrated recording feature is not part of the free service they generally offer. Instead, the integrated Google video call recording feature is only available to desktop users with accounts linked to specific Google Workspace plans. Aside from that, those wanting to record must also have administrator approval.
Google Workplace Subscriptions with Recording Features
The following are the subscriptions that allow users to use the integrated Google Meet recording function:
- Essentials
- Business Standard and Plus subscriptions
- Enterprise Starter, Essentials, Standard, and Plus subscriptions
- Education Plus (to users with “Staff” or “Student” licenses)
- Teaching and Learning Upgrade Licensees
- Workspace Individual Subscriber
- Google One subscribers with plans of 2 TB or more storage space
Aside from users with these types of subscriptions, you cannot use the in-app recording feature of Google Meet. Do not worry, though, as non-subscribed users that want to record their Google Meet conferences and smartphone users will learn how to record Google Meet without G-Suite in the later sections of this guide.
Google Accounts that Can Record
As we said earlier, those wanting to learn how to record Google Meet sessions should be on the desktop and also have the Google Workspace administrator turn on recording their account. Those wanting to record must also be participating in the meeting and be one of the following:
- The meeting host
- A co-host
- Be in the same organization as the host (if Host Management is turned off)
- Be a teacher or co-teacher (for meetings started through Google Classroom)
- Teachers, staff, and student accounts (on Education Fundamentals, Standard, or Plus subscriptions)
- Be in the same organization as the meeting organizer (for those with Teaching and Learning licenses)
Make sure you are using the correct Google account for the meetings you attend to be able to use the desktop-exclusive Google Meet recording feature. If you have multiple Google accounts, learning how to change your default Google account will make it easier to join video conferences.
Recording Limitations
Before we teach you how to record Google Meet on your phone or desktop, you should know that the integrated record feature does have limitations. The recording you make will have a maximum run-time of eight hours and include the active speaker, what they are presenting, participants’ shared screens, and group chat. However, it will not record other things like live captions, other open windows, and notifications received through Google Meet during the recorded meeting. Make sure that the details you want to save are presented properly in the meeting to ensure that it gets recorded.
How to Record Google Meet Sessions on a Laptop or Desktop
Since you now know the limitations and requirements for it, those wanting to learn how to record Google Meet sessions on laptops and desktops can do the following:
1. Sign in to Google Meet (https://meet.google.com/) and join or start a meeting.
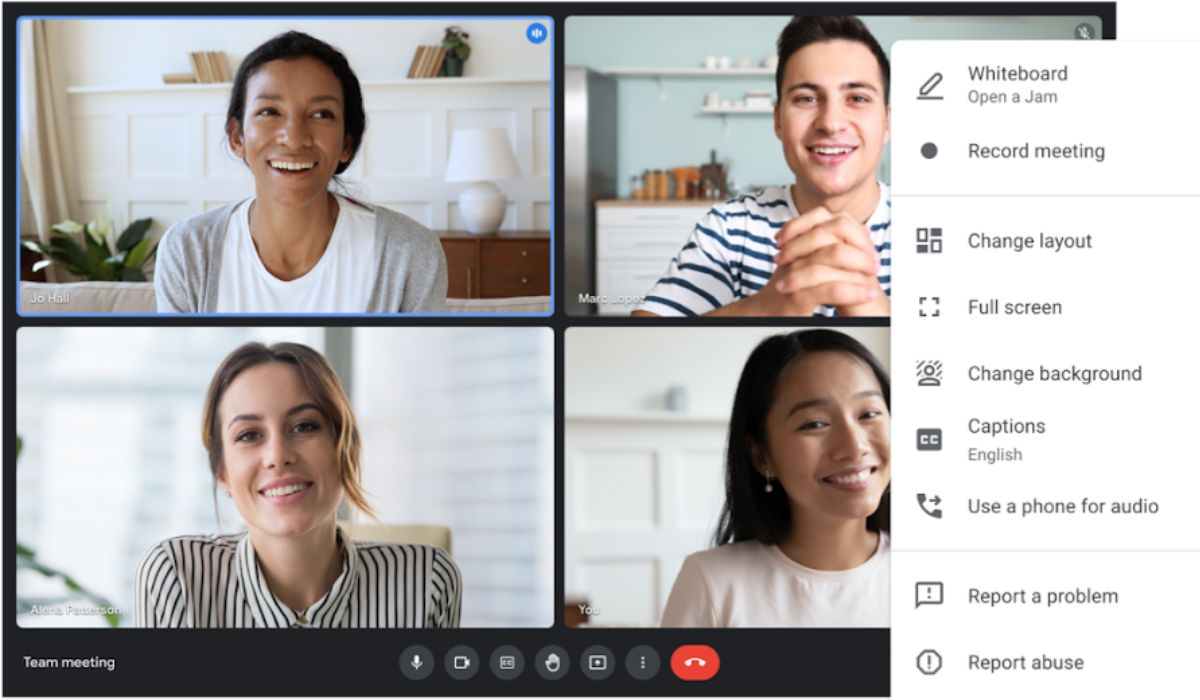
2. Click on the Activities icon (second from the bottom-right) and wait for the menu to open.
3. Click on Recording and wait for the pop-up to open.
4. Select Start after informing and receiving consent from everyone to begin.
5. Once it begins recording, a small red REC recording tab will appear on the upper left portion of the meeting screen to indicate that the meeting is being recorded.
6. To stop recording, click on the Activities icon once again and select Recording.
7. Click Stop Recording and select Stop Recording again on the pop-up screen to end the recording.
8. If the recording was successfully made, you will receive a notification that it was saved to your Google Drive.
Be aware that recording Google Meet conferences without consent from all or one of the participants may be illegal. While Federal law requires only one-party consent regarding phone and video recording laws, your state may have specific laws regarding recording and consent. States like Florida, Maryland, and California require the consent of all parties to be recorded prior to starting the record. Meanwhile, other states may only follow the minimum Federal law.
Before recording, you should also consider the potential violations of privacy laws like the Health Insurance Portability and Accountability Act (HIPAA) in meetings where privileged information is going to be discussed.
Where to Find Recorded Video Calls on Google Meet
After properly recording your meeting, the video file will automatically be saved to your Google Drive account. To find recorded video calls on Google Meet, do the following:
1. Log in to Google Drive (https://drive.google.com/drive/).
2. On the left-hand sidebar, click on My Drive to open your cloud storage.
3. Click and open the Meet Recordings folder to see your recorded Google Meet files. This is an automatically created folder created by Google Drive after saving your first record.
4. The video file/s created will have filenames corresponding to each meeting’s unique identifier followed by its date and time. The meeting’s chat log will be a separate file and also follow the naming convention.
Google Drive’s storage is not the only place you can find your meeting recording. If you are the meeting organizer, an email with a direct link to the recording and the chat transcript will be sent to your Gmail account. Also, if the meeting was scheduled using Google Calendar, you can find copies of the records there as an attachment.
How to Record Google Meet on Mobile
Since Google Meet’s Android and iOS apps do not support or have an integrated recording feature, you have to use third-party apps instead. The newer versions of both Android (Android 11 and up) and iOS (iOS 11 and up) have a native screen recording tool that can capture your screen’s visuals and audio. Here is how to use them to record a Google Meet conference on mobile:
On Android
Note: Due to the many types of Android phones, these steps may slightly differ depending on your Android version and phone model.
1. Log into and participate in your Google Meet conference.
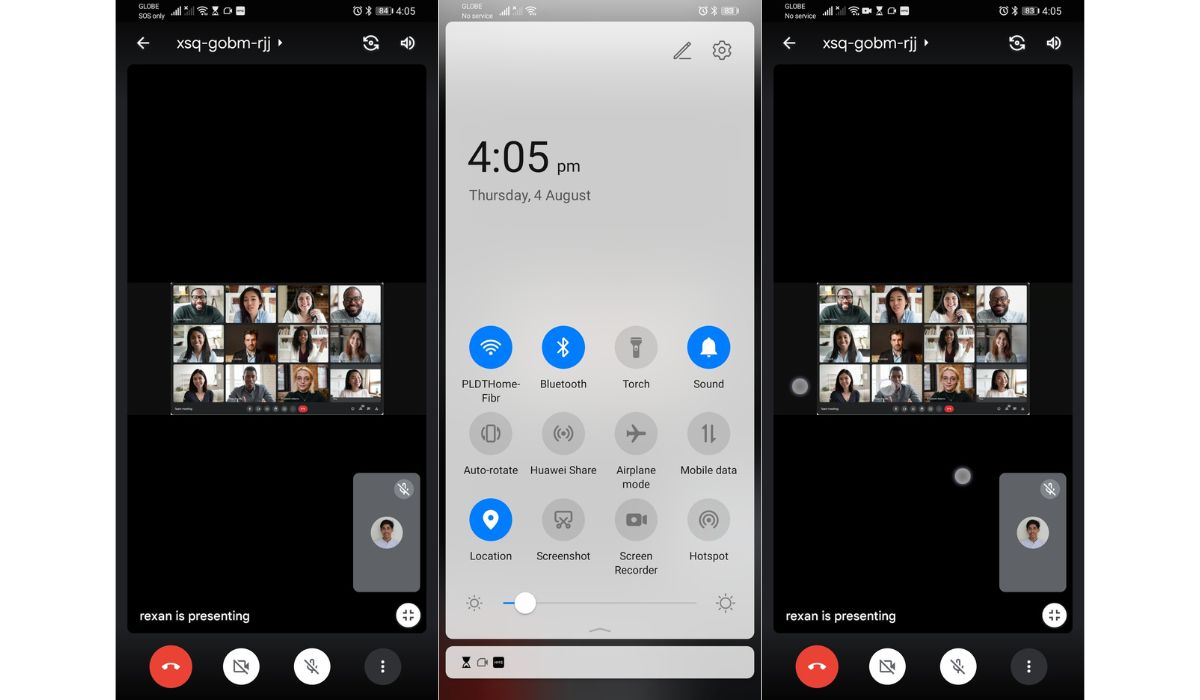
2. Open up your phone’s notification panel (swiping up or down from the top or bottom of the screen, depending on the phone model).
3. In your phone’s quick settings area, look for the screen recorder icon (sometimes called S-Capture, Screen Recorder, or other similar names), then click on it.
4. Select Screen Recording on the movable toolbar that appears and allows all popups asking for permission to record your screen.
5. A small recording icon will appear on your screen when it starts recording but will not appear on the recording itself.
6. Use the pause and stop icons on the recording icon to control it. When done, click on the stop icon to automatically save and exit the Android recording feature.
Related: How to Screen Record on Android
On iOS
1. Make sure your iPhone is running on at least iOS 11.
2. Log onto your Google Meet meeting.
3. Go to your phone’s Settings menu.
4. Find and select Control Center, then click Customize Controls.
5. Look for the Screen Recording entry and tap the plus/minus icon next to it.
6. Open your phone’s Control Center and look for the record icon (big circle with a thin circle around it).
7. Click on the Microphone icon to turn it on and press Start Recording to begin recording. A red status bar should appear at the top of your iOS device.
8. To stop recording, just click on the red status bar and select Stop on the pop-up menu that appears.
How to Record Google Meet FAQs
Before we go, we want to answer a few frequently asked questions about Google Meet and recording meetings using it.
Conclusion
Hopefully, this guide has taught you how to record Google Meet conferences and meetings with or without using the recording feature. That said, Google Meet is not the only video conferencing app out there. Those wondering “which is the Better Video Conferencing Service?” between Google Meet and Zoom might be surprised by the answer.