
Are you looking to transfer your photos from your phone to your computer? Whether you want to free up space on your phone or simply back up your precious memories, transferring photos to your computer is a convenient and secure option. In this article, we will guide you through the process of transferring your photos from your phone to your computer, offering various methods to suit different devices and preferences. From using USB cables to wireless transfers, we will explore step-by-step instructions and provide you with useful tips and tricks along the way. So, let’s dive in and learn how to effortlessly transfer your photos and keep them safely stored on your computer!
Inside This Article
- Method 1: Using a USB Cable
- Method 2: Using Bluetooth
- Method 3: Using a Cloud Storage Service
- Method 4: Using a File Transfer App
- Conclusion
- FAQs
Method 1: Using a USB Cable
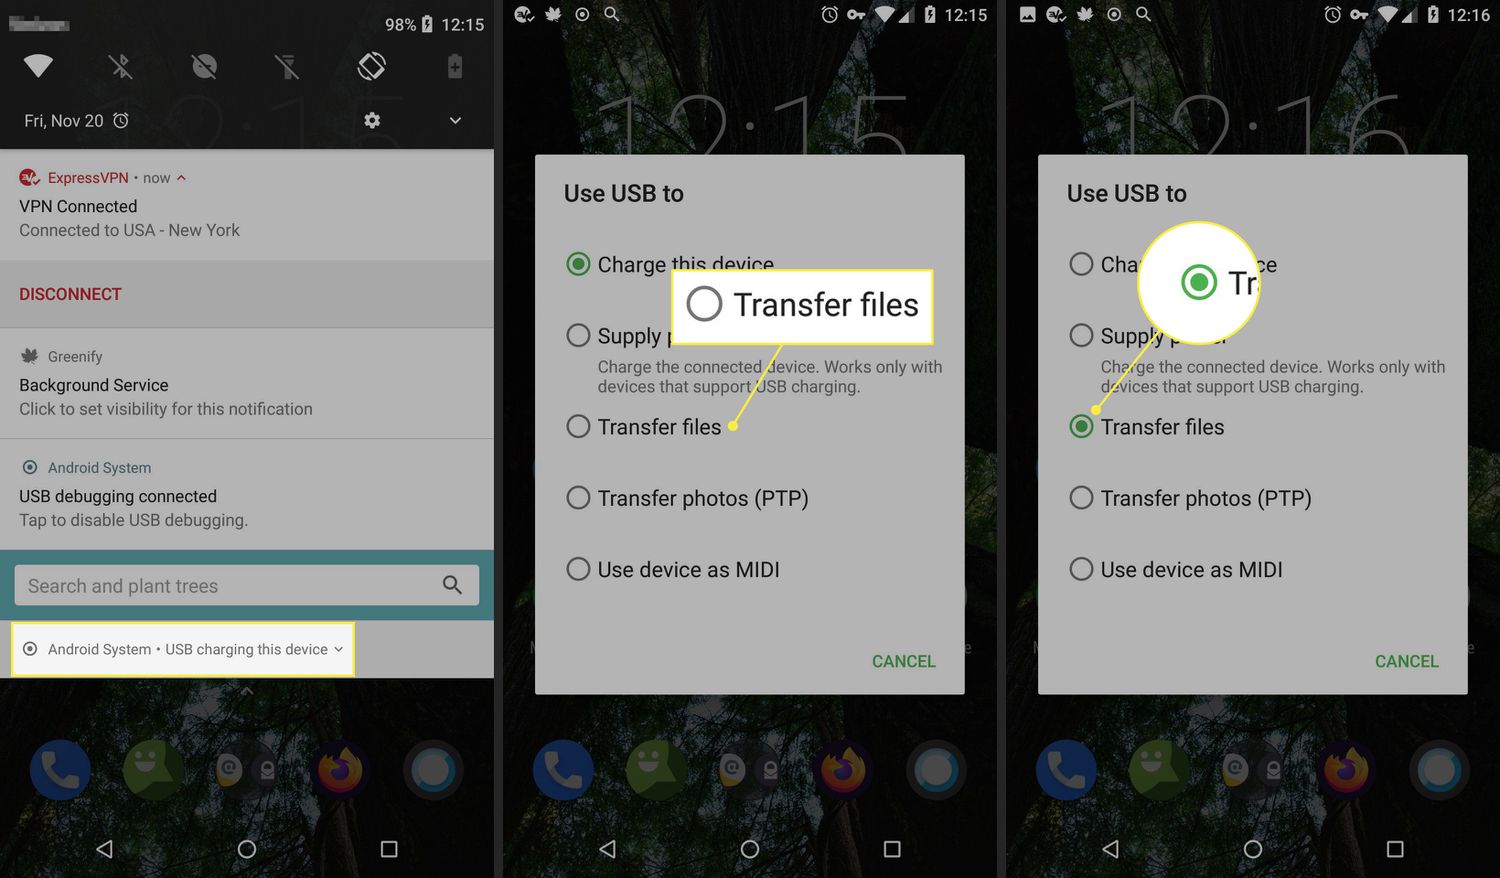
Transferring photos from your phone to your computer using a USB cable is a straightforward and reliable method. It allows for a quick and direct connection between the two devices. Here’s how you can do it:
- First, ensure that your phone is unlocked and awake. Connect one end of the USB cable to your phone and the other end to a USB port on your computer.
- Your computer will detect the connection and may prompt you with options on how to proceed. Select the option that allows you to view files and folders on your phone.
- Next, open the file explorer on your computer and navigate to the “This PC” or “My Computer” section, where you should see your phone listed as a connected device.
- Click on your phone’s icon to open it, and then locate the folder containing your photos. This might be named “DCIM” or “Pictures.”
- Once you have located the folder, you can either copy and paste the entire folder or select individual photos to transfer to your computer. To copy the entire folder, right-click on it and select “Copy.” Then, navigate to the folder on your computer where you want to save the photos, right-click, and select “Paste.”
- If you prefer to transfer individual photos, simply open the desired folder, select the photos you want to transfer by holding down Ctrl or Shift, right-click, and select “Copy.” Then, navigate to the desired location on your computer, right-click, and select “Paste.”
- Wait for the transfer to complete, which may take a few moments depending on the size of the photos and the connection speed between your phone and computer.
- Once the transfer is finished, you can safely disconnect your phone from the USB cable.
Using a USB cable to transfer photos from your phone to your computer is a convenient and reliable method. It allows you to quickly and easily access your photos on a larger screen, edit them, and organize them as needed.
Method 2: Using Bluetooth
If you prefer a wireless method to transfer photos from your phone to your computer, using Bluetooth can be a convenient option. Bluetooth is a wireless technology that allows devices to connect and exchange data over short distances.
To transfer photos using Bluetooth, you will need to ensure that both your phone and computer have Bluetooth capabilities and are paired with each other. Here is a step-by-step guide to transferring photos using Bluetooth:
- On your phone, go to the Settings menu and enable Bluetooth.
- On your computer, access the Bluetooth settings and make sure it is turned on.
- Ensure that your phone and computer are discoverable to each other via Bluetooth.
- On your phone, navigate to the folder where the photos you want to transfer are located.
- Select the photos you wish to transfer and choose the option to share or send them via Bluetooth.
- On your computer, a notification should pop up indicating that a Bluetooth file transfer request has been received. Accept the request to initiate the transfer.
Depending on the size and number of photos you are transferring, the process may take some time. Once the transfer is complete, the photos will be saved to a designated folder on your computer.
It’s important to note that the transfer speed using Bluetooth may be slower compared to other methods, especially when dealing with large files. However, Bluetooth provides a wireless and convenient option for transferring photos without the need for cables or additional software.
Remember to disable Bluetooth after the transfer to conserve battery on both your phone and computer. Additionally, keep in mind that Bluetooth connectivity range is typically limited to a few meters, so ensure that your phone and computer are within close proximity to maintain a stable connection.
Now that you know how to transfer photos from your phone to your computer using Bluetooth, you can easily free up storage space on your phone and have your precious memories accessible on your computer.
Method 3: Using a Cloud Storage Service
Another convenient option to transfer photos from your phone to your computer is by using a cloud storage service. Cloud storage allows you to upload and store your photos in a virtual storage space, accessible from any device with an internet connection. Here’s how you can use a cloud storage service to transfer your photos:
- Create an account: Start by signing up for a cloud storage service like Google Drive, Dropbox, or OneDrive. These services offer free storage space with the option to purchase additional storage if needed.
- Install the app: Once you’ve created an account, download and install the cloud storage app on your phone. Most cloud storage services have apps available for both Android and iOS devices.
- Upload your photos: Open the cloud storage app on your phone and navigate to the folder where your photos are stored. Tap on the photos you want to transfer and then select the option to upload them to the cloud storage service.
- Access from your computer: Now that your photos are uploaded to the cloud storage service, you can access them from your computer. Go to the website of the cloud storage service or download the desktop app on your computer. Sign in with your account details and you’ll be able to view and download your photos.
- Download to your computer: To transfer the photos from the cloud storage service to your computer, simply select the photos you want to download and click on the download button. The photos will be saved to your computer’s local storage, allowing you to access and manage them as needed.
Using a cloud storage service not only provides a secure way to transfer your photos but also offers the convenience of accessing them from any device. Additionally, it saves storage space on your phone, as you can delete the photos from your device once they are safely stored in the cloud. Take advantage of the free storage space offered by various cloud storage services, and easily transfer photos between your phone and computer.
Method 4: Using a File Transfer App
One of the easiest and most efficient ways to transfer photos from your phone to your computer is by using a file transfer app. These apps are specifically designed to make the process seamless and convenient, allowing you to transfer files with just a few taps.
There are several file transfer apps available for both Android and iOS devices, such as SHAREit, Xender, and AirDroid. These apps utilize your phone’s Wi-Fi or Bluetooth capabilities to establish a connection between your phone and computer, enabling you to transfer files wirelessly.
To get started, you’ll need to download the file transfer app on both your phone and computer. Once installed, follow the app’s instructions to set up the connection between the devices. Typically, this involves selecting your phone as the sender and your computer as the receiver.
Once the connection is established, you can simply select the photos you want to transfer from your phone and choose the option to send them to your computer. The app will handle the rest, ensuring that the photos are transferred quickly and securely.
File transfer apps also offer additional features such as the ability to transfer other types of files, like videos, documents, and music. Some apps even allow you to transfer files between multiple devices simultaneously, making it ideal for sharing files with friends or colleagues.
Using a file transfer app eliminates the need for any cables or physical connections, providing a wireless and hassle-free solution to transfer your photos. It’s a great option if you frequently need to transfer files between your phone and computer, as it saves you time and effort.
Furthermore, file transfer apps often have intuitive interfaces and user-friendly features, making the entire process straightforward even for those who are not tech-savvy. Whether you’re a beginner or an experienced user, using a file transfer app is a convenient way to quickly and easily transfer your photos from your phone to your computer.
So, consider downloading a file transfer app on both your phone and computer today and experience the simplicity and efficiency of transferring your photos wirelessly.
Conclusion
Transferring photos from your phone to your computer has never been easier. Whether you prefer to use a USB cable, a cloud storage service, or a dedicated mobile app, there are plenty of options to suit your needs.
By following the steps outlined in this article, you can effortlessly transfer your precious photos and videos to your computer, where you can organize, edit, and back them up. Additionally, transferring photos to your computer frees up valuable storage space on your phone, ensuring that you can continue capturing new memories without limitations.
Remember, when transferring photos, it’s important to choose a method that you’re comfortable with and that meets your specific requirements in terms of speed, convenience, and accessibility. Experiment with different techniques and find the one that works best for you.
So, don’t let those unforgettable moments remain trapped on your phone. Take advantage of the various methods available and start enjoying your photos on the big screen of your computer today!
FAQs
1. Can I transfer photos from my phone to my computer?
Yes, you can transfer photos from your phone to your computer using various methods such as USB cable, cloud storage, or third-party applications.
2. What is the easiest way to transfer photos from phone to computer?
The easiest way to transfer photos from your phone to your computer is by connecting them using a USB cable. Simply plug one end of the cable into your phone and the other end into an available USB port on your computer. Your phone should appear as a storage device, allowing you to access and transfer your photos.
3. Can I transfer photos wirelessly from my phone to my computer?
Yes, you can transfer photos wirelessly from your phone to your computer by using cloud storage services like Google Drive, Dropbox, or iCloud. Upload the photos to the cloud storage from your phone and then access them from your computer by logging into the same cloud storage account.
4. Are there any apps available for transferring photos from phone to computer?
Yes, there are several apps available for transferring photos from phone to computer. Some popular options include AirDroid, Pushbullet, and Snapdrop. These apps allow you to transfer files wirelessly between your phone and computer, making it convenient and quick.
5. Can I transfer photos from my iPhone to my Windows computer?
Yes, you can transfer photos from your iPhone to your Windows computer. Connect your iPhone to your computer using a USB cable, and then open the File Explorer or Photos app on your computer. Your iPhone should appear as a device, and you can access your photos and copy them to your computer.