
Are you tired of running out of storage space on your Android phone due to an endless collection of photos? Perhaps you want to transfer these precious memories to a more secure and portable storage option. One convenient solution is to transfer your photos to a flash drive.
In this article, we will guide you through the process of transferring photos from your Android phone to a flash drive. Whether you want to free up space on your device or simply keep your photos safe and accessible, this step-by-step guide will help you achieve that with ease.
So, let’s grab your Android phone and a trusty flash drive, and let’s get started on preserving those picture-perfect moments!
Inside This Article
- Methods of Transferring Photos to Flash Drive from Android Phone
- Using USB OTG Cable
- Using File Manager App
- Using Google Drive or Cloud Storage Service
- Using a Computer to Transfer Photos
- Conclusion
- FAQs
Methods of Transferring Photos to Flash Drive from Android Phone
Transferring photos from your Android phone to a flash drive can be a convenient way to backup and store your precious memories. Whether you want to free up space on your phone or keep a safe copy of your photos, there are several methods you can use to transfer them to a flash drive. In this article, we will explore four effective methods that allow you to easily transfer your photos from an Android phone to a flash drive.
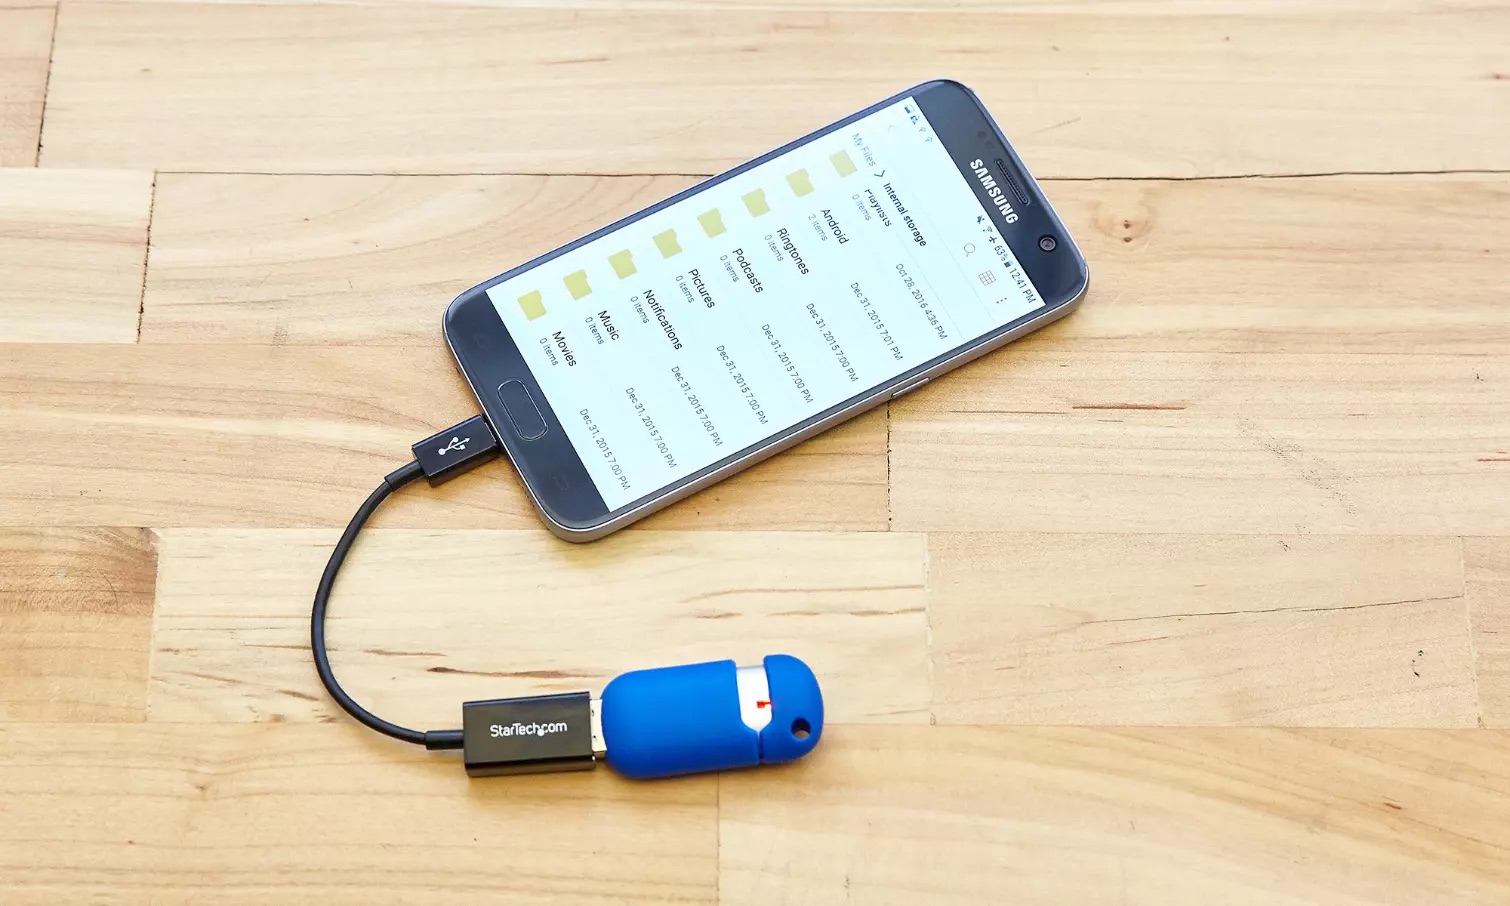
1. Using USB OTG Cable: One of the easiest ways to transfer photos from your Android phone to a flash drive is by using a USB On-The-Go (OTG) cable. This cable allows you to connect your phone directly to the flash drive. Simply plug one end of the OTG cable into your phone’s charging port and the other end into the flash drive. Once connected, you can access your phone’s file system and copy the photos to the flash drive.
2. Using File Manager App: If you don’t have a USB OTG cable, you can still transfer photos to a flash drive using a file manager app. Most Android phones come with a built-in file manager, or you can download a third-party file manager app from the Google Play Store. Open the file manager app, navigate to the folder containing your photos, select the photos you want to transfer, and choose the “Move” or “Copy” option. Then, navigate to the flash drive folder and paste the photos.
3. Using Google Drive or Cloud Storage Service: Another convenient method to transfer photos is by using a cloud storage service like Google Drive. Upload your photos to Google Drive or any other cloud storage service of your choice from your Android phone. Once uploaded, you can access your cloud storage on a computer and download the photos to your flash drive. This method is useful if you have a large number of photos to transfer or if you prefer to keep your files stored securely in the cloud.
4. Using a Computer to Transfer Photos: If you have a computer with a USB port, you can transfer photos from your Android phone to a flash drive using your computer. Connect your phone to the computer using a USB cable. Once connected, your phone will appear as a removable drive on your computer. Open the phone’s storage on the computer, navigate to the photos folder, and select the photos you want to transfer. Finally, drag and drop the selected photos to the flash drive folder.
By using one of these methods, you can easily transfer your photos from your Android phone to a flash drive. Whether it’s through a USB OTG cable, a file manager app, a cloud storage service, or a computer, these methods provide you with flexibility and convenience to safeguard your photos and create additional storage space on your device. Choose the method that suits your needs and preferences, and enjoy a hassle-free photo transfer experience.
Using USB OTG Cable
If you want to quickly transfer photos from your Android phone to a flash drive, using a USB OTG (On-The-Go) cable is a convenient method. This cable allows you to connect your Android phone directly to a flash drive, expanding the storage options for your photos.
To transfer photos using a USB OTG cable, you’ll need the following:
- An Android phone with OTG support
- A USB OTG cable
- A flash drive
Here’s how you can transfer your photos:
- Insert the USB OTG cable into your Android phone’s charging port.
- Connect the flash drive to the other end of the USB OTG cable.
- Open the file manager app on your Android phone.
- Navigate to the folder where your photos are stored.
- Select the photos you want to transfer.
- Tap on the “Copy” or “Move” option.
- Navigate to the flash drive in the file manager app.
- Select the destination folder on the flash drive.
- Tap on the “Paste” option to transfer the photos.
- Wait for the transfer to complete.
- Once the transfer is finished, safely disconnect the flash drive from the USB OTG cable.
Using a USB OTG cable is a quick and efficient way to transfer photos from your Android phone to a flash drive. It eliminates the need for a computer or internet connection, making it a convenient option, especially when you’re on the go.
Using File Manager App
If you prefer a more straightforward approach, you can use a file manager app to transfer photos from your Android phone to a flash drive. File manager apps are designed to help you manage and organize your files, including photos, on your device.
To get started, follow these steps:
- First, download and install a file manager app from the Google Play Store. There are several options available, such as Solid Explorer, ES File Explorer, or Total Commander.
- Open the file manager app on your Android phone.
- Navigate to the “Photos” folder or the specific folder where your photos are located.
- Select the photos you want to transfer to the flash drive. You can either long-press on a photo to select it or use the app’s built-in select feature.
- Once you have selected the photos, tap on the “Share” or “Send” option. This usually appears as an icon with an arrow pointing upwards.
- From the available sharing options, choose “Save to USB” or “Save to Drive” (depending on the specific file manager app you are using).
- Connect your flash drive to the USB port of your Android phone using a USB OTG cable. Make sure the flash drive is properly recognized by your device.
- After the flash drive is detected, select it as the destination for the photos.
- Finally, tap on the “Save” or “Transfer” button to start transferring the selected photos to the flash drive.
Once the transfer is complete, you can safely disconnect the flash drive from your Android phone.
Using a file manager app offers a quick and convenient way to transfer photos from your Android phone to a flash drive. It gives you more control over selecting the specific photos you want to transfer and allows you to organize them within the app before transferring.
Please note that the steps may vary slightly depending on the file manager app you choose to use. However, the general concept remains the same.
Using Google Drive or Cloud Storage Service
If you prefer a wireless and convenient method to transfer photos from your Android phone to a flash drive, using Google Drive or a cloud storage service is a great approach. With the increasing popularity of cloud storage, it has become easier than ever to store and access your files from any device with an internet connection.
Here is a step-by-step guide to transferring photos to a flash drive using Google Drive or a cloud storage service:
- First, ensure that you have a Google account or any other cloud storage service account such as Dropbox, OneDrive, or iCloud, depending on your preference.
- Open the Google Drive app or the respective cloud storage app on your Android phone.
- Upload the photos you want to transfer to the cloud storage service. This can usually be done by tapping the “Add” or “Upload” button within the app and selecting the desired photos from your phone’s gallery.
- Once the photos are uploaded to the cloud storage, you can access them from any device with internet access by logging into your Google Drive or cloud storage account.
- Insert the flash drive into your computer or laptop.
- Open a web browser and go to the cloud storage service’s website.
- Log in to your account and navigate to the location where the photos are stored.
- Select the photos you want to transfer to the flash drive by using the appropriate selection method (such as clicking on each photo or using the select-all option).
- Click on the “Download” or “Export” button (the label may vary depending on the cloud storage service) and choose the flash drive as the destination for the transfer.
- Wait for the transfer to complete, and make sure to safely eject the flash drive from your computer afterwards.
Using Google Drive or a cloud storage service provides the advantage of not requiring any physical connections or cables. It also allows for easy access and sharing of your photos across multiple devices. However, keep in mind that a stable internet connection is necessary for uploading and downloading the photos.
By using this method, you can quickly and conveniently transfer your photos from your Android phone to a flash drive, ensuring that your precious memories are safely stored and easily accessible whenever you need them.
Using a Computer to Transfer Photos
Another effective method to transfer photos from your Android phone to a flash drive is by utilizing a computer. This method allows for a bigger screen and faster transfer speeds, making it ideal for handling large photo libraries.
To get started, follow these steps:
- Connect your Android phone to the computer using a USB cable. Ensure that the phone is unlocked and set to the file transfer mode.
- On your computer, open the File Explorer (Windows) or Finder (Mac).
- Locate your Android device in the list of connected devices. It should appear as a removable storage device.
- Double-click on the device to open it and navigate to the folder where your photos are stored.
- Create a new folder on your flash drive to organize the transferred photos.
- Select the photos you want to transfer by either dragging and dropping them into the new folder on the flash drive or by copying and pasting them.
- Once the transfer is complete, safely eject both your Android device and the flash drive from the computer.
It’s worth noting that transferring photos from your Android phone to a computer also gives you the opportunity to perform additional tasks. For example, you can edit your photos using software like Adobe Photoshop or Lightroom, create backups, or share them on social media platforms directly from your computer.
Overall, using a computer to transfer photos to a flash drive from your Android device provides convenience, speed, and additional flexibility in managing your photo collection.
Conclusion
In conclusion, transferring photos from an Android phone to a flash drive is a simple and convenient process that allows you to backup and access your precious memories on the go. Whether you want to free up storage space on your phone or create a physical archive of your photos, using a flash drive is an excellent option. By following the steps outlined in this article, you can easily transfer your photos to a flash drive and ensure that they are safe and secure. Remember to choose a reliable and compatible flash drive, connect it to your phone using an OTG cable or adapter, and use the appropriate file management or file transfer apps. With a few simple clicks, your cherished photos will be safely stored on a flash drive, ready to be accessed whenever you desire.
FAQs
1. Can I transfer photos from my Android phone to a flash drive?
Yes, you can. Most Android phones have a USB port that allows you to connect a flash drive directly to your device. Additionally, you can use various methods such as USB On-The-Go (OTG) adapters, cloud storage apps, or wireless transfer apps to move photos from your Android phone to a flash drive.
2. How do I connect a flash drive to my Android phone?
To connect a flash drive to your Android phone, you will need a USB On-The-Go (OTG) adapter. First, ensure that your phone supports OTG functionality. Then, plug the OTG adapter into the charging port of your Android device. Finally, connect the flash drive to the OTG adapter, and you will be able to transfer photos and other files between your phone and the flash drive.
3. What are some wireless transfer apps for transferring photos to a flash drive?
There are several wireless transfer apps available for transferring photos from an Android phone to a flash drive. Some popular options include AirDroid, Send Anywhere, and Wi-Fi File Transfer. These apps allow you to transfer files wirelessly over a Wi-Fi network, making it convenient and easy to move photos from your Android phone to a flash drive.
4. Can I use cloud storage apps to transfer photos to a flash drive?
Yes, you can use cloud storage apps to transfer photos from your Android phone to a flash drive. Cloud storage apps such as Google Drive, Dropbox, and Microsoft OneDrive allow you to upload your photos to the cloud and then download them onto your computer or flash drive. This method provides another convenient way to transfer photos without the need for any physical connections.
5. Are there any limitations when transferring photos to a flash drive from an Android phone?
There may be some limitations when transferring photos to a flash drive from an Android phone. The first limitation is the storage capacity of the flash drive itself. Make sure you have enough space on the flash drive to accommodate all the photos you want to transfer. Additionally, some older Android devices may have compatibility issues with certain flash drives or OTG adapters. Ensure that your phone supports OTG functionality and check for any compatibility specifications before making a purchase.