
Are you looking for a way to record your screen on an Android device? Whether you want to create a tutorial, share gameplay moments, or demonstrate a feature, screen recording can be incredibly useful. With the increasing popularity of video content, being able to record your screen is a valuable skill to have. Luckily, Android devices provide various options for screen recording, allowing you to capture and save everything happening on your screen. In this article, we will guide you through the process of recording your screen on an Android device, exploring both built-in and third-party options. So, if you’re ready to start recording your screen like a pro, keep reading to learn all the tricks and techniques!
Inside This Article
- Method 1: Using the Built-in Screen Recorder
- Method 2: Using a Third-Party Screen Recording App
- Method 3: Using a Computer and Android Debug Bridge (ADB)
- Conclusion
- FAQs
Method 1: Using the Built-in Screen Recorder
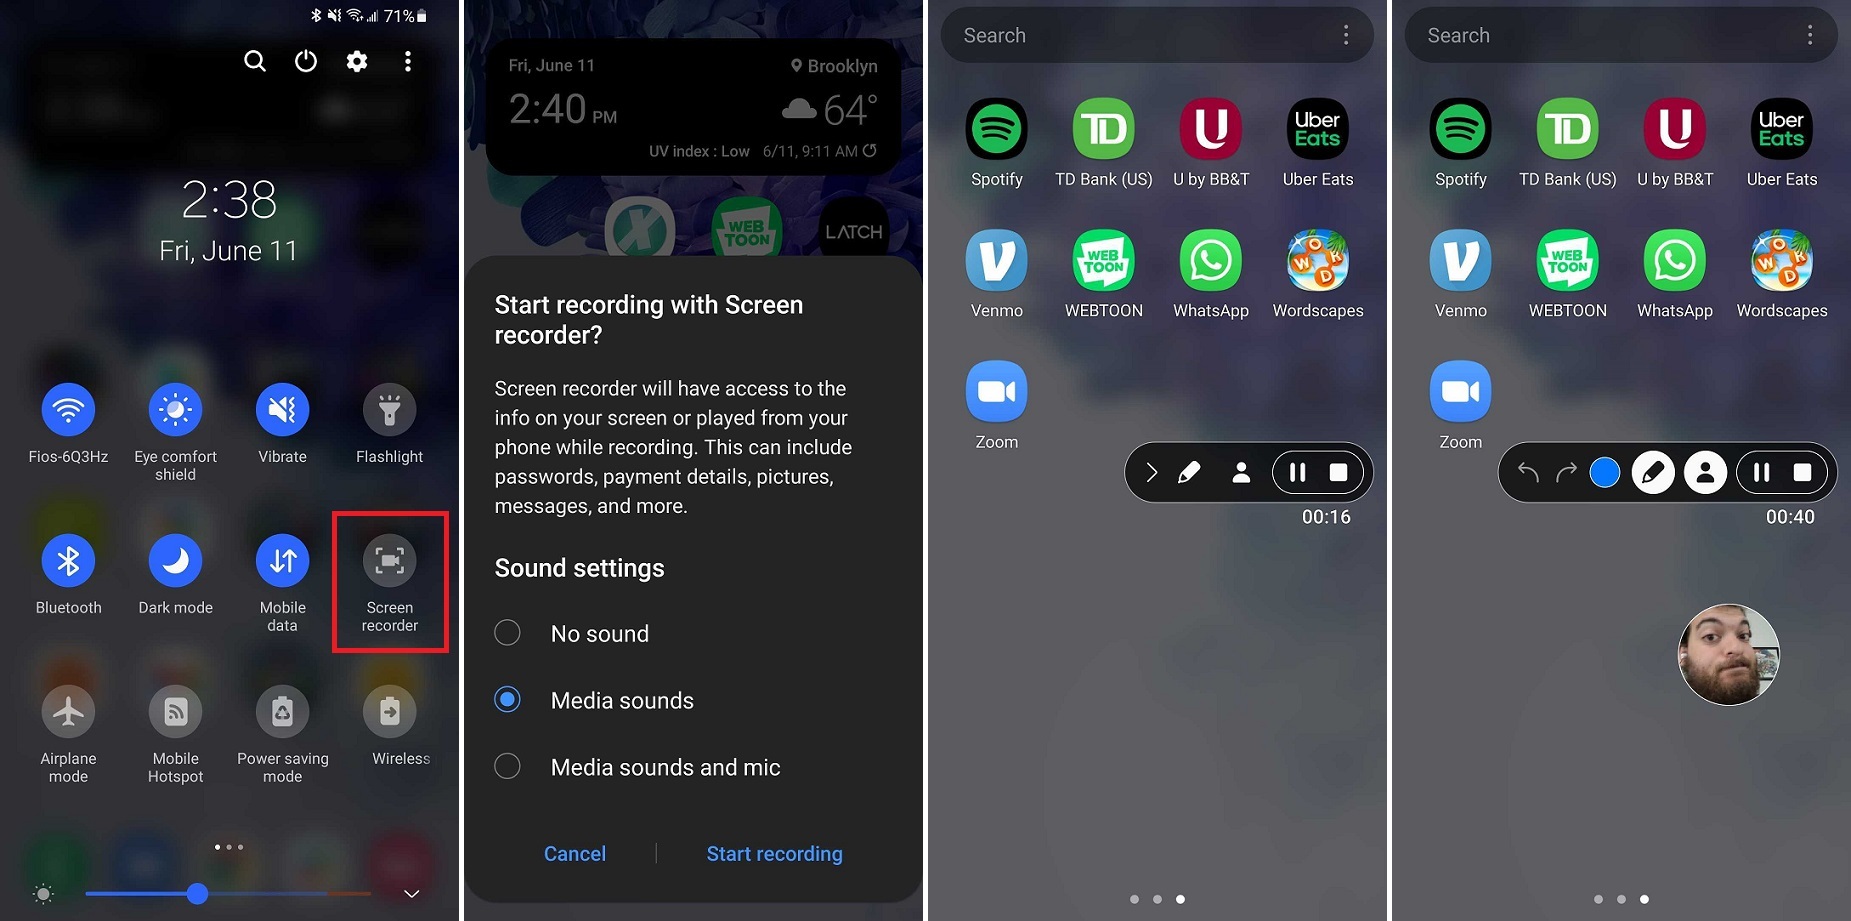
One of the most convenient ways to record your screen on an Android device is by using the built-in screen recording feature. Depending on the Android version and device manufacturer, the location of this feature may vary, but it can usually be found in the quick settings panel or in the device settings.
To access the built-in screen recorder, swipe down from the top of your screen to open the notification shade and look for the screen recording icon. If you don’t see it, you can customize your quick settings panel to add the screen recording option. Alternatively, you can go to the settings app and search for “Screen Recorder.”
Once you’ve located the screen recording feature, simply tap on the icon to start recording. You’ll usually see a countdown indicating that the recording is about to begin. When the countdown ends, your screen recording will start, capturing everything that happens on your Android device.
During the recording, you can perform any actions, open any apps, or navigate through your device as usual. The built-in screen recorder will capture all the audio and visual components of your screen, including any system sounds, microphone input, and even touch gestures if enabled.
To stop the screen recording, you can either tap the screen recording icon in the notification shade or in the quick settings panel, or simply swipe down from the top of the screen and tap on the “Stop” button in the screen recording notification.
Once you’ve stopped the recording, the video file will be saved to your device’s storage, usually in the Gallery or Videos app, depending on your device. You can then access and share the screen recording just like any other video file on your device.
It’s important to note that the availability of the built-in screen recorder may differ depending on the Android version and device manufacturer. Some older devices or customized Android skins may not have this feature. In such cases, you can explore alternative methods such as using third-party screen recording apps or connecting your Android device to a computer and using Android Debug Bridge (ADB).
Method 2: Using a Third-Party Screen Recording App
If you’re looking for alternative options to record your Android screen, using a third-party screen recording app is a great choice. These apps provide additional features and customization options that can enhance your screen recording experience. Here’s how you can do it:
1. Select a Screen Recording App: Start by choosing a reliable screen recording app from the Google Play Store. There are several popular options available, such as AZ Screen Recorder, DU Recorder, and Mobizen Screen Recorder.
2. Install and Open the App: After selecting your preferred app, download and install it on your Android device. Once the installation is complete, open the app to access its main interface.
3. Adjust the Settings: Within the app’s settings, you’ll find various options to customize your screen recording. These options may include recording resolution, frame rate, audio source, and video orientation. Adjust these settings according to your preferences.
4. Start Recording: Once you’ve configured the app’s settings, navigate to the screen or app you wish to record. From the recording app’s interface, tap on the record button to start the screen recording process.
5. Perform the Screen Recording: While the screen recording is in progress, you can freely navigate through your Android device and perform actions on the screen. The app will record everything that happens on the screen, including taps, swipes, and gestures.
6. Stop and Save the Recording: When you’re done recording, simply return to the app’s interface and tap on the stop button. The app will finalize the recording and provide you with options to save and access the recorded file.
7. Edit and Share the Recording: Many screen recording apps offer built-in editing features to trim, crop, or add annotations to your recordings. Take advantage of these tools to enhance your videos before sharing them with others.
Using a third-party screen recording app gives you greater flexibility in capturing your Android screen. Whether you want to create tutorials, record gameplay, or showcase app demo videos, these apps provide the necessary functionality and convenience.
Remember to browse through the features and user reviews of different recording apps to find one that suits your needs. With the right app and a few simple steps, you can effortlessly record your Android screen and share it with others.
Method 3: Using a Computer and Android Debug Bridge (ADB)
If you prefer to record your Android screen using your computer, you can utilize the Android Debug Bridge (ADB) tool. ADB is a command-line tool that allows you to interact with your Android device from a computer. By leveraging ADB, you can easily capture your screen activity and save it as a video file.
Here’s a step-by-step guide on how to use ADB to record your Android screen:
- Make sure you have the necessary software installed on your computer. You will need the Android SDK Platform Tools, which include ADB. You can download the SDK Platform Tools from the official Android website.
- Enable USB debugging on your Android device. To do this, go to the “Developer options” in your device’s settings. If you don’t see the “Developer options” menu, go to “About phone” and tap on the “Build number” multiple times until it says “You are now a developer.” Then go back to the main settings and you should see the “Developer options.”
- Connect your Android device to your computer using a USB cable.
- Open the command prompt or terminal on your computer and navigate to the location where you have the Android SDK Platform Tools installed.
- Enter the command “
adb devices” to check if your device is detected by ADB. You should see your device’s serial number in the list of connected devices. - Once your device is detected, enter the command “
adb shell screenrecord --time-limit [duration] [filename]“. Replace “[duration]” with the time limit for the recording (in seconds), and “[filename]” with the desired name for the video file. For example, if you want to record for 60 seconds and save the video as “myscreenrecord.mp4”, the command would be “adb shell screenrecord --time-limit 60 myscreenrecord.mp4“. - Press the Enter key to start the screen recording. You can now perform any actions on your Android device, and the screen activity will be captured.
- To stop the recording, press Ctrl+C in the command prompt or terminal. The recorded video will be saved in the same location where you ran the ADB command.
Note that the ADB method requires a computer and some technical knowledge. It may not be as convenient as using a built-in screen recorder or third-party apps, but it offers more control and customization options for your screen recordings.
Now that you know how to use ADB to record your Android screen, you can easily capture your gameplay, create tutorials, or simply share your screen activity with others.
Remember to disconnect your Android device from ADB once you’re done recording to ensure the security and privacy of your device.
Conclusion
Recording your screen on Android can be a useful feature for various purposes, such as creating video tutorials, capturing gameplay, or showcasing your app. With the plethora of screen recording apps available on the Google Play Store, you have the flexibility to choose the one that suits your needs and preferences.
Whether you opt for the built-in screen recording feature on newer versions of Android or go for third-party apps, the process is relatively straightforward. Remember to check the compatibility of the app with your specific device and ensure that you have sufficient storage space to save your recordings.
By following the steps outlined in this guide and exploring the different screen recording options available for Android, you can effortlessly record your screen and share your experiences with others. So, go ahead and start capturing your Android screen with confidence!
FAQs
1. How can I record my screen on Android?
Recording your screen on Android is a simple process. There are several apps available on the Google Play Store that can help you achieve this. One popular choice is AZ Screen Recorder, which offers a user-friendly interface and a range of features to tailor your recording experience.
2. Is it possible to record internal audio while screen recording on Android?
Yes, you can record internal audio while screen recording on Android. However, this feature may not be available on all devices or recording apps. Some apps, like AZ Screen Recorder, provide an option to enable internal audio recording, while others may require additional settings or permissions.
3. Can I record my screen without installing any apps?
In recent versions of Android, some devices have an in-built screen recording feature that eliminates the need to install third-party apps. However, this feature can vary across different device manufacturers and models. To check if your Android device has this functionality, swipe down from the top of the screen to access the quick settings panel and look for a “Screen Recording” or similar option.
4. How can I edit my screen recordings on Android?
Once you have recorded your screen on Android, you may want to edit the video before sharing or publishing it. There are various video editing apps available on the Google Play Store, such as Kinemaster, FilmoraGo, or Adobe Premiere Rush. These apps allow you to trim, crop, add effects, and combine multiple clips to create a polished final product.
5. How much storage space does screen recording on Android consume?
The amount of storage space consumed by screen recordings on Android depends on several factors, such as the duration of the recording, resolution, and frame rate. Higher-quality recordings with longer durations will naturally occupy more storage space. Therefore, it is recommended to regularly transfer or back up your screen recordings to a computer or cloud storage service to free up space on your device.