
Are you tired of the same generic ringtone playing every time your phone rings? With Android, you have the flexibility to set specific ringtones for different contacts and personalize your phone even further. Whether you want a unique ringtone for your best friend, a distinctive tone for your partner, or a catchy tune for your favorite family member, Android allows you to tailor your phone’s sounds to match your contacts. Not only does this feature add a touch of personalization, but it also helps you identify who is calling without even looking at the screen. So, let’s dive into how you can set specific ringtones for your contacts on Android and make your phone truly yours.
Inside This Article
- # How To Set Specific Ringtones For Contacts On Android
- Overview
- Step 1: Access the Contacts App
- Step 2: Select a Contact
- Step 3: Edit Contact Details
- Step 4: Set a Specific Ringtone
- Step 5: Save Changes
- Step 6: Test The Ringtone
- Conclusion
- FAQs
# How To Set Specific Ringtones For Contacts On Android
Are you tired of the same old ringtone for every incoming call on your Android phone? Wouldn’t it be great if you could assign specific ringtones to different contacts? With Android, you have the power to customize your phone even further by setting specific ringtones for individual contacts. This allows you to instantly identify who is calling without even looking at your screen. In this article, we will guide you through the process of setting specific ringtones for contacts on Android.
Setting specific ringtones for contacts on Android is a straightforward process. Just follow these simple steps:
Step 1: Access the Contacts App
The first step is to open the Contacts app on your Android device. You can usually find this app in your app drawer or on your home screen. Once you open the app, you will see a list of all your saved contacts.
Step 2: Select a Contact
Scroll through the list or use the search function to locate the contact for whom you want to set a specific ringtone. Tap on the contact’s name to open their details.
Step 3: Edit Contact Details
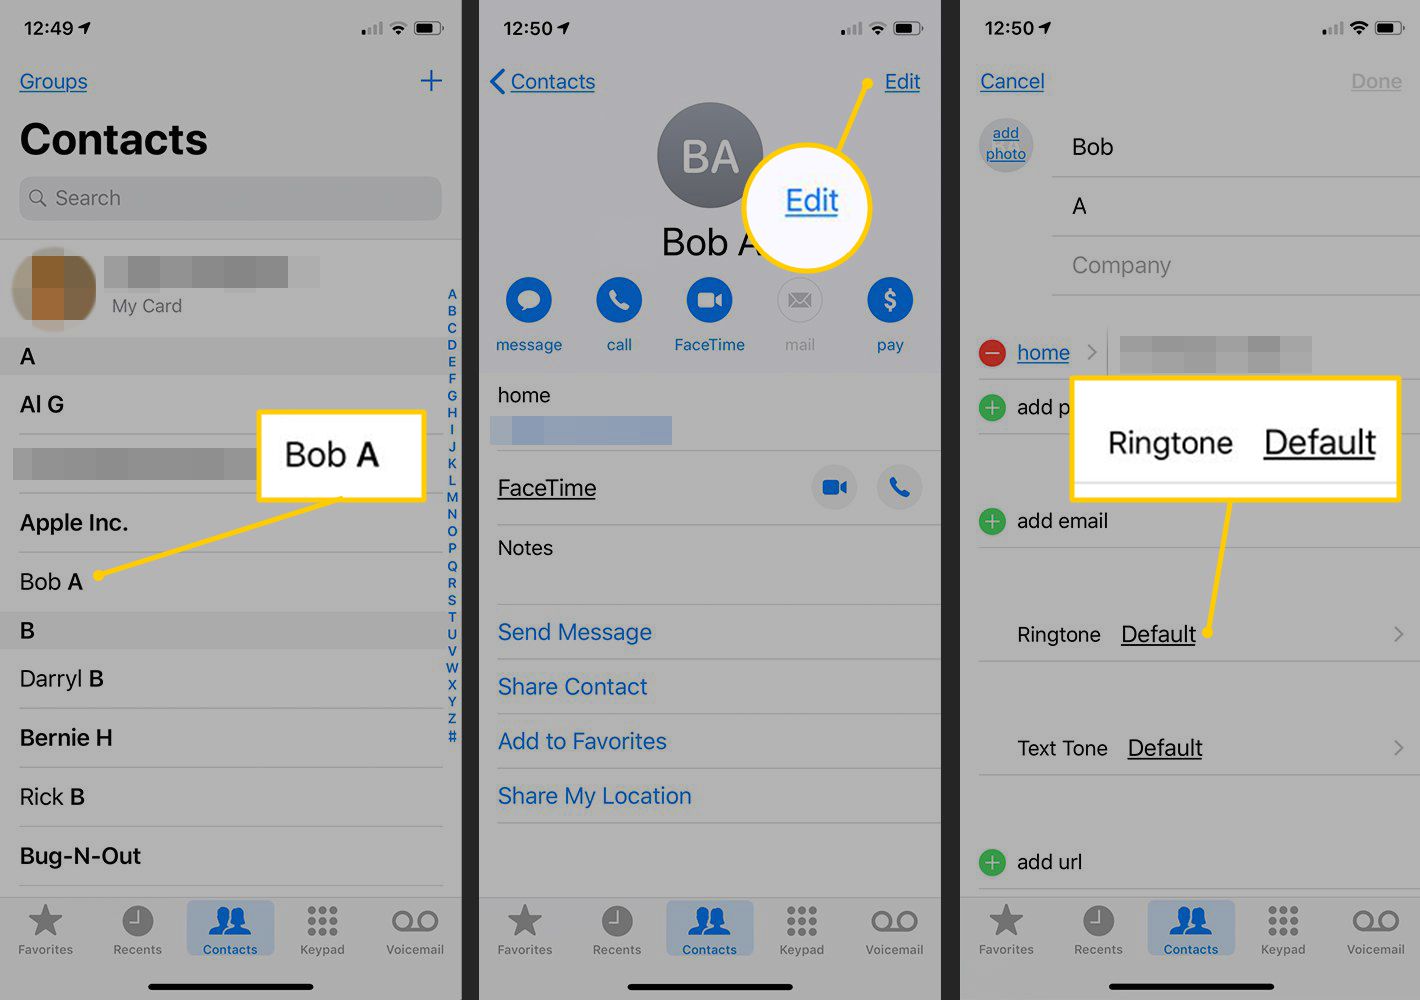
After opening the contact’s details, look for the “Edit” or “Edit Contact” option. This will allow you to make changes to the contact’s information.
Step 4: Set a Specific Ringtone
Within the contact’s edit screen, there should be an option to set a specific ringtone. It may vary depending on your Android device and the version of the operating system you are using. Look for options like “Set Ringtone” or “Ringtone.” Tap on this option to proceed.
Step 5: Save Changes
Once you have selected the desired ringtone for the contact, don’t forget to save the changes you have made. Look for a “Save” or “Done” button in the upper-right corner of the screen. Tap on it to save the changes.
Step 6: Test The Ringtone
Now that you have set a specific ringtone for the contact, it’s time to test it out. Ask a friend or family member to call you using the contact you just edited. If everything has been set up correctly, you should hear the assigned ringtone when the call comes in.
Setting specific ringtones for contacts on Android is a simple way to add a personal touch to your phone and enhance your overall calling experience. Whether it’s assigning a favorite song to a loved one or a unique sound for a business contact, custom ringtones can make your phone more personalized and enjoyable to use.
So, go ahead and start assigning specific ringtones for your contacts on Android. Make every incoming call a little more exciting and distinctive!
Overview
In this day and age, personalization is everything, even when it comes to our cell phones. Android devices offer a plethora of customization options, and one of the ways you can make your phone truly unique is by setting specific ringtones for your contacts. By assigning a distinct ringtone to each contact, you can instantly identify who is calling without even looking at your phone.
Setting specific ringtones for your contacts on Android is a simple process that can be done directly through the Contacts app. In just a few steps, you can customize the sound that plays when a particular contact reaches out. Whether it’s your best friend’s favorite song or a funny sound effect for your significant other, having personalized ringtones adds a touch of fun and familiarity to your Android phone.
If you’re ready to give your contacts their own unique sound, let’s dive into the step-by-step process of setting specific ringtones on Android.
Step 1: Access the Contacts App
To set specific ringtones for contacts on your Android device, the first step is to access the Contacts app. The Contacts app allows you to manage all your saved contacts and customize their settings, including ringtones.
On most Android devices, you can find the Contacts app in the app drawer or on your home screen. Look for the icon that resembles a person’s silhouette or the word “Contacts.” Tap on the icon to open the app.
If you can’t locate the Contacts app on your home screen or app drawer, you can also access it through the Phone or Dialer app. Open the Phone app, which is usually represented by a phone receiver icon. In the app, look for the “Contacts” or “Contacts” tab and tap on it to access your contacts.
Once you have successfully opened the Contacts app, you are ready to move on to the next step: selecting the contact you want to customize.
Step 2: Select a Contact
Once you have accessed the Contacts app on your Android device, the next step is to select the contact that you want to set a specific ringtone for. This selection process allows you to personalize ringtones for specific individuals, making it easier to identify incoming calls from them.
To select a contact, scroll through the list of contacts or use the search bar to quickly locate the desired contact. Once you have found the contact, tap on their name to open their contact details.
When selecting a contact, it’s important to choose the correct entry if there are multiple entries with the same name. This ensures that the ringtone is assigned to the correct contact and not another person with the same name in your contact list.
If you want to set a specific ringtone for a contact that is not saved in your Contacts app, you can manually add the contact by tapping on the “+” or “Add Contact” button, depending on your device.
Once you have selected the contact, you are ready to proceed to the next step of setting a specific ringtone for them.
Step 3: Edit Contact Details
After selecting the desired contact, the next step is to edit the contact details. This will allow you to set a specific ringtone for that contact. Here’s how you can do it:
1. Once you have the contact open, tap on the “Edit” button. This will open up the contact editing options.
2. Look for the “Ringtone” or “Ringtones” option. The exact name of the option may vary depending on your Android device and the version of the operating system you are using.
3. Tap on the “Ringtone” option to access the list of available ringtones on your device.
4. Scroll through the list of ringtones until you find the one you want to set for the specific contact.
5. Once you have selected the desired ringtone, tap on the “Save” button or icon to save the changes you have made to the contact details.
It is important to note that the steps mentioned above are general guidelines. The specific steps may vary slightly depending on your Android device and the version of the operating system you are using. However, the overall process should be similar across most Android devices.
Step 4: Set a Specific Ringtone
Setting a specific ringtone for a contact on your Android device is a great way to personalize your phone and easily identify who is calling you. Here’s how you can set a specific ringtone for a contact:
1. After selecting a contact, tap on the edit icon or the pencil icon to access the contact’s details.
2. Scroll down to find the option for setting a ringtone. This may vary depending on the Android version and the device you are using.
3. Tap on the ringtone option to open the list of available ringtones.
4. Browse through the list to find the desired ringtone for the specific contact. You can listen to the ringtone by tapping on it.
5. Once you have chosen the ringtone, tap on the save or apply button to set it for the contact.
6. Finally, don’t forget to save the changes you made to the contact’s details by tapping on the save button at the top or bottom of the screen.
That’s it! You have successfully set a specific ringtone for a contact on your Android device. Now, whenever that contact calls you, you’ll hear the chosen ringtone, making it easier to identify their calls.
Step 5: Save Changes
After you have selected the specific ringtone for a contact, it’s important to save the changes to ensure that the new ringtone is applied. Saving the changes is a straightforward process:
1. Look for the save or update button located at the top or bottom of the contact details page. This button is typically labeled as “Save” or “Update”. Give it a click to save the changes you made to the contact.
2. If you are editing the contact details within the Contacts app, you may see a small checkmark or a message indicating that the changes have been saved. Depending on your device’s interface, this may appear as a confirmation popup or a green checkmark icon.
3. If you are editing the contact from within a dialer or messaging app, the changes are usually saved automatically when you exit the contact details screen. However, it’s always a good idea to double-check the contact’s details to ensure that the new ringtone has been applied.
By saving the changes, you are ensuring that the specific ringtone you selected for the contact is saved and applied to incoming calls or messages from that contact.
Step 6: Test The Ringtone
Once you have successfully set a specific ringtone for a contact on your Android device, the final step is to test it. Testing the ringtone will ensure that it plays correctly and that you are satisfied with the chosen sound. Follow the simple steps below to test the ringtone:
1. Open the Contacts app on your Android device.
2. Locate the contact for which you set the specific ringtone.
3. Tap on the contact’s name to open their details.
4. Scroll down to the contact’s phone number section.
5. Tap on the phone number for which you set the ringtone.
6. A menu will appear with the options to Call or Message the contact. Tap on the Call option.
7. The phone will initiate a call to the contact’s number. Listen carefully to hear the assigned ringtone playing as the call is connecting.
8. If the ringtone plays as expected, congratulations! You have successfully set and tested the specific ringtone for the contact.
9. If the ringtone didn’t play or if you want to change the ringtone, you can go back to the contact details, follow the steps mentioned earlier to edit the contact, and choose a different ringtone.
Remember that the specific ringtone you set for a contact will only play when that particular contact calls you. All other incoming calls will still use the default ringtone set on your device. So, if you have multiple contacts with specific ringtones set, you can enjoy a personalized caller identification experience.
Testing the ringtone is an important step to ensure that it works as intended. It allows you to preview the sound and make any necessary adjustments before relying on it for incoming calls. So, take a moment to test the ringtone and enjoy the customized experience it brings to your Android device.
Setting specific ringtones for contacts on your Android device is a fun and customizable way to enhance your calling experience. With just a few simple steps, you can assign unique ringtones to important contacts, making it easier to identify incoming calls without even looking at your phone.
Not only does this functionality allow you to personalize your device, but it also adds a practical aspect by enabling you to distinguish between callers more easily. Whether you want to assign a special tune to a loved one, a specific melody for your best friend, or even a unique sound for a work-related contact, Android provides the tools to make it happen.
So, go ahead and explore the options available on your Android device to set specific ringtones for contacts. Have fun customizing your phone and enjoy the benefits of instantly recognizing who’s calling, even before you answer!
FAQs
Here are some frequently asked questions about setting specific ringtones for contacts on Android:
1. Can I set different ringtones for different contacts on my Android phone?
Yes, you can set specific ringtones for individual contacts on your Android phone. This allows you to personalize your device and identify who is calling you without even picking up the phone.
2. How can I set a specific ringtone for a contact on my Android device?
To set a specific ringtone for a contact on your Android device, follow these steps:
a. Open the Contacts or Phone app on your Android phone.
b. Find and select the contact for whom you want to set a specific ringtone.
c. Tap the Edit button or the pencil icon to edit the contact.
d. Scroll down to find the Ringtone or Set ringtone option.
e. Tap on it and select the desired ringtone from the available options.
f. Once you’ve chosen the ringtone, save the contact details. Now, whenever that contact calls you, the specified ringtone will play.
3. Can I use custom ringtones for specific contacts on my Android device?
Absolutely! Aside from the default ringtones, Android allows you to use custom ringtones for specific contacts. You can download ringtones from websites or even use your own audio files as ringtones. Just make sure the audio file is saved on your phone or SD card, and then follow the same steps mentioned earlier to set it as the ringtone for the desired contact.
4. Is it possible to assign different ringtones based on different notification types for a contact?
Yes, it is possible to assign different ringtones for various notification types for a contact on most Android devices. For example, you can set a specific ringtone for calls, another for text messages, and a different tone for email notifications. To do this:
a. Open the Contacts or Phone app on your Android phone.
b. Select the contact and tap the Edit button or the pencil icon.
c. Look for the Notifications or Notification settings option.
d. From there, you can customize the sound or tone for different types of notifications for that contact.
5. What should I do if the option to set a specific ringtone for a contact is not available on my Android device?
If you are unable to find the option to set a specific ringtone for a contact on your Android device, it could be due to different user interfaces on various Android versions or phone models. In such cases, you can try using a third-party contacts app from the Google Play Store. Such apps often have additional features and customization options, including the ability to set specific ringtones for contacts.