
Are you tired of using the default ringtone on your Android phone? Do you want to personalize your phone by setting a custom ringtone that reflects your personality and style? Well, you’ve come to the right place! In this article, we will guide you through the process of setting a ringtone on your Android device.
Android phones offer a wide range of customization options, including the ability to change your ringtone. Whether you want to use a favorite song, a sound effect, or a tone you’ve downloaded, setting a custom ringtone is a quick and easy way to add a personal touch to your phone. So, let’s dive in and discover how you can set the perfect ringtone on your Android device.
Inside This Article
- How To Set Ringtone On Android:
- Method 1: Using the Default Ringtone Settings
- How To Set Ringtone On Android:
- Method 1: Using the Default Ringtone Settings
- Method 2: Using a Ringtone App from the Play Store
- Method 3: Setting a Custom Ringtone from Your Music Library
- Method 4: Using a File Manager App to Set Ringtone
- Conclusion
- FAQs
How To Set Ringtone On Android:
Setting a custom ringtone on your Android device allows you to personalize your phone and make it truly unique. Whether you want to use a pre-installed ringtone or set a custom one from your own files, Android offers various options to help you customize your ringtone settings. In this article, we will walk you through the step-by-step process of setting a ringtone on your Android device.
Overview of Ringtone Settings:
Before we dive into the details, let’s explore the different options available in the ringtone settings on Android. To access the ringtone settings, go to the “Sound” or “Sound & Vibration” section in your device’s settings. Here, you will find options to set the default ringtone, as well as the ringtone for specific contacts, notifications, and alarms.
Using Pre-installed Ringtones:
If you prefer to use a pre-installed ringtone on your Android device, follow these simple steps:
- Go to the “Sound” or “Sound & Vibration” section in your device’s settings.
- Select “Phone ringtone” or “Default ringtone”.
- You will see a list of pre-installed ringtones. Tap on the one you want to use.
- Preview the ringtone to make sure it’s the one you like.
- Once you are satisfied, tap “OK” to set the ringtone as your default or phone ringtone.
Setting Custom Ringtones with Built-in Files:
If you have your own audio files that you want to use as a custom ringtone, you can easily set them using the built-in file manager on your Android device. Here’s how:
- Open the file manager app on your device.
- Navigate to the folder where your audio file is stored.
- Long-press on the file to select it, then tap on the three-dot menu icon.
- Choose the “Set as ringtone” or “Use as phone ringtone” option from the menu.
- The selected audio file will now be set as your default or phone ringtone.
Setting Custom Ringtones with Third-party Apps:
If you want even more customization options for your ringtones, you can explore third-party apps available on the Google Play Store. These apps offer a wide range of ringtones and allow you to set custom ringtones easily. Here’s what you need to do:
- Go to the Google Play Store and search for “ringtone apps.
- Choose a trustworthy and well-rated app from the search results.
- Install the app on your device and follow the instructions to set it up.
- Browse through the app’s collection of ringtones and select the one you want.
- Preview the ringtone and tap on the “Set as ringtone” option to apply it to your device.
With these simple steps, you can easily set a ringtone on your Android device. Whether you choose a pre-installed ringtone or opt for a custom one, make sure it reflects your personal style and preferences. Enjoy the personalization and let your phone’s ringtone make a statement!
Method 1: Using the Default Ringtone Settings
Changing the ringtone on your Android device is a straightforward process, thanks to the built-in ringtone settings. Here’s how you can set a new ringtone using the default settings:
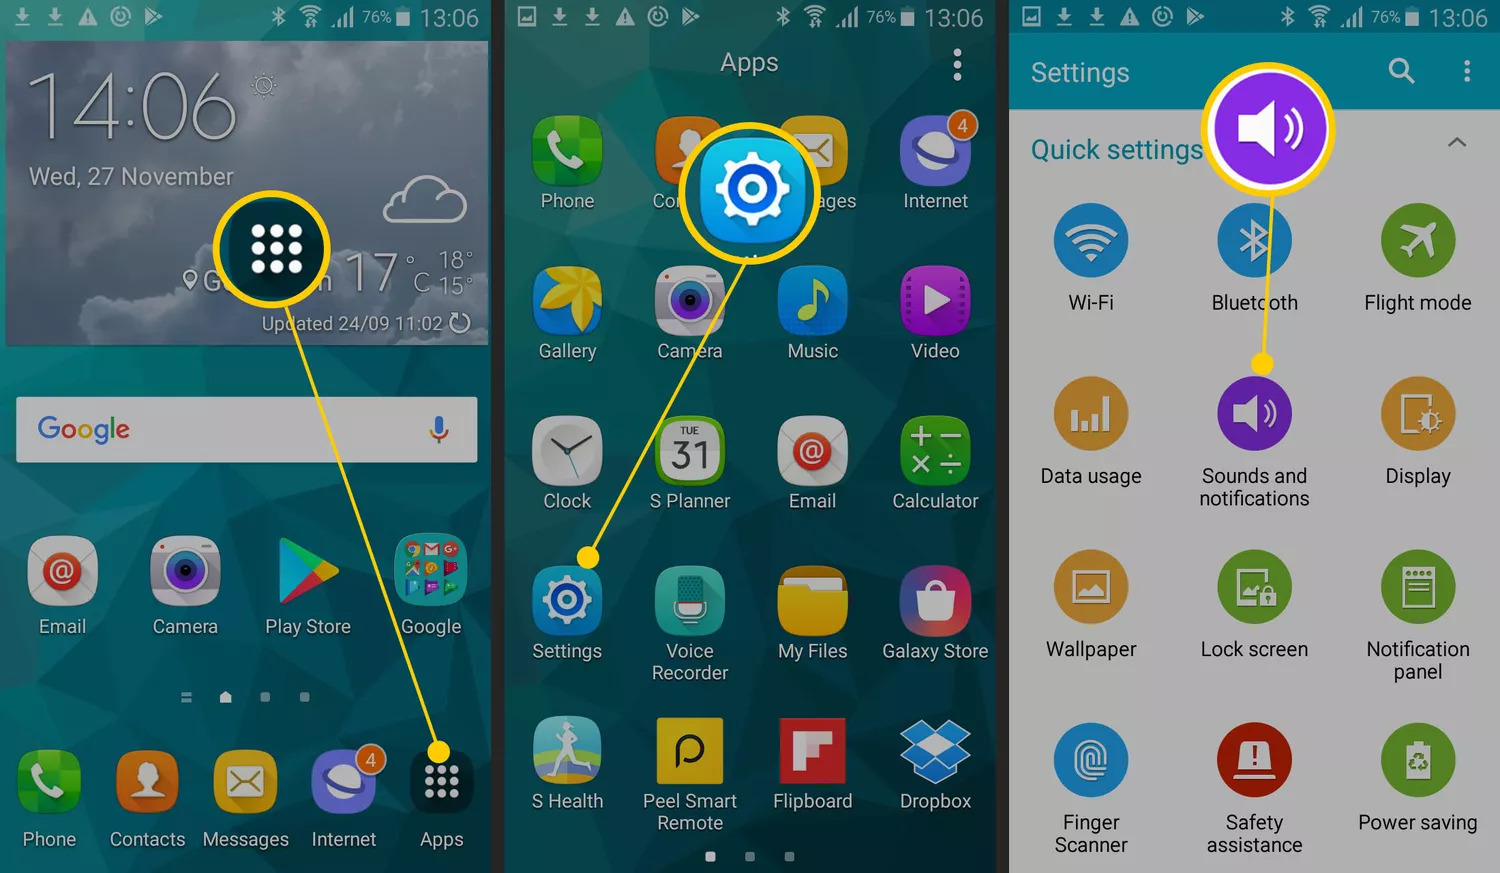
- Open the ‘Settings’ app on your Android device. You can usually find it in the app drawer or by swiping down on the notification panel and tapping the gear icon.
- Scroll down and tap ‘Sound & vibration’ or a similar option, depending on your device’s manufacturer and software version.
- Look for the ‘Ringtone’ or ‘Phone ringtone’ option and tap on it.
- You will see a list of pre-installed ringtones. These are the default options that come with your device. Tap on the ringtone you want to set as your default.
- Once you select a ringtone, you can preview it by tapping the play button next to it.
- If you’re satisfied with your selection, tap the ‘OK’ or ‘Save’ button to apply the new ringtone.
- Now, your selected ringtone will be set as the default sound for incoming calls on your Android device.
It’s worth noting that the exact steps may vary slightly depending on your device’s make and model, as well as the version of Android you’re using. However, most Android phones follow a similar process when it comes to setting ringtones.
Using the pre-installed ringtones is a convenient option, as it doesn’t require any additional software or downloads. However, if you want to set a custom ringtone using your own audio files, you can also do so using the default ringtone settings.
Keep in mind that the default ringtone settings may have limitations in terms of file format and length. If you encounter any issues or restrictions, you can explore alternative methods such as using third-party apps to set custom ringtones on your Android device.
How To Set Ringtone On Android:
Setting a custom ringtone on your Android device can help you personalize your phone and make it stand out. Fortunately, Android offers multiple methods to set ringtones, whether you want to use the default settings or explore third-party apps. In this article, we will guide you through how to set a ringtone on Android using different methods.
Method 1: Using the Default Ringtone Settings
If you want to set a ringtone using the built-in options on your Android device, follow these steps:
- Open the ‘Settings’ app on your Android device.
- Scroll down and tap on ‘Sound’ or ‘Sound and Vibration.’
- Look for the ‘Phone Ringtone’ or ‘Ringtone’ option and tap on it.
- You will see a list of pre-installed ringtones. Browse through the options and select the one you like.
- Once you’ve selected a ringtone, tap on the ‘Apply’ or ‘OK’ button to save the changes.
By following these steps, you can easily set a pre-installed ringtone as your default choice for incoming calls on your Android device.
Method 2: Using a Ringtone App from the Play Store
If you want more flexibility in setting custom ringtones, you can use third-party apps available on the Google Play Store. These apps offer a wide range of ringtones, including popular songs, sound effects, and even the ability to create your own custom ringtones. To set a ringtone using a third-party app, follow these steps:
- Open the Google Play Store on your Android device.
- Search for ‘Ringtone App’ or ‘Ringtones’ in the search bar.
- Explore the different apps available and read reviews to find the one that suits your needs.
- Once you’ve chosen an app, tap on the ‘Install’ button to download and install it on your device.
- Open the ringtone app and browse through the available options.
- When you find a ringtone you like, tap on it to preview and set it as your default ringtone.
- Follow any additional instructions provided by the app to complete the process.
Using a third-party ringtone app gives you access to a wide variety of ringtones, allowing you to express your unique style and preferences.
With these methods, you can easily set a ringtone on your Android device according to your preferences. Whether you choose to use the default settings or explore third-party apps, customizing your ringtone adds a personal touch to your phone and enhances your overall user experience.
Method 3: Setting a Custom Ringtone from Your Music Library
Do you have a favorite song that you would love to use as your ringtone? With an Android device, you can easily set a custom ringtone from your music library. Follow these steps to personalize your ringtone.
- Open the Music app on your Android device. This app is usually pre-installed on most Android devices.
- Navigate to the song that you want to set as your ringtone. You can browse through albums, playlists, or search for the specific song using the search bar.
- Once you have found the song, long-press on it to access the context menu. This menu will provide various options related to the song.
- From the context menu, select the option that says “Set as ringtone” or “Set as phone ringtone”. The wording may slightly vary depending on your device and the version of Android you are using.
- A confirmation message will appear, letting you know that the ringtone has been set successfully. You can also choose to set the ringtone as the default for all incoming calls or assign it to a specific contact.
That’s it! Your custom ringtone has been set from your music library. Now, whenever you receive a call, you will hear your favorite song playing as your ringtone. Remember that not all music files formats are compatible with Android’s ringtone settings.
If you encounter any issues while setting a custom ringtone from your music library, make sure to check the file format of the song. Android supports popular audio file formats like MP3, AAC, and WAV. If your song is in an unsupported format, you can use a third-party audio converter app to convert it to a compatible format before setting it as your ringtone.
By setting a custom ringtone from your music library, you can truly personalize your Android device and make it reflect your unique style. Enjoy hearing your favorite tunes whenever you receive a call!
Method 4: Using a File Manager App to Set Ringtone
Setting a custom ringtone from your music library is a great way to personalize your Android device. However, if you can’t find the specific song or audio file in the default ringtone settings, you can use a file manager app to set it as your ringtone. Here’s how:
- Download a file manager app from the Google Play Store if you don’t have one already. Some popular file manager apps include ES File Explorer, Solid Explorer, and Astro File Manager.
- Launch the file manager app and navigate to the folder where your desired audio file is saved. This can be an internal storage folder or an external SD card if your device supports it.
- Once you’ve located the audio file, long-press on it to bring up a contextual menu. From the menu, select the “Copy” or “Move” option.
- Navigate to the “Notifications” or “Ringtones” folder within the internal storage of your Android device. If these folders don’t exist, you can create them manually.
- Paste the audio file into the “Notifications” or “Ringtones” folder. This will make the file accessible for setting it as a ringtone.
- Now, go to the “Settings” app on your Android device and select the “Sound” or “Sound & vibration” option.
- Scroll down until you find the “Ringtone” or “Phone ringtone” option. Tap on it to open the list of available ringtones.
- Your newly added audio file should appear in the list. Tap on it to set it as your ringtone.
Using a file manager app to set a custom ringtone gives you more flexibility and allows you to select any audio file on your device. Whether it’s a song from your favorite artist, a sound effect, or a recorded voice memo, you can now enjoy a unique and personalized ringtone on your Android device.
Conclusion
Setting a custom ringtone on your Android device is a simple and effective way to personalize your phone. With a wide range of options available, you can choose a ringtone that reflects your personality and style. Whether you want a catchy song, a soothing melody, or a funny sound effect, the process is straightforward and can be done in just a few steps.
In this article, we discussed how to set a ringtone on Android using both built-in options and third-party apps. We explored the different methods to access and customize ringtones, including using ringtone apps, downloading from the internet, and creating your own custom ringtones. By following the step-by-step instructions, you can easily find, set, and enjoy the perfect ringtone for your Android device.
Remember, a unique ringtone can not only add a personal touch to your phone but also help you distinguish your incoming calls from others. So go ahead, explore the endless possibilities, and make your Android phone ring in style!
FAQs
Q: How do I set a ringtone on my Android phone?
A: Setting a ringtone on your Android phone is a simple process. Follow these steps:
1. Go to the “Settings” on your Android device.
2. Scroll down and tap on “Sound” or “Sound & vibration”.
3. Look for the “Phone ringtone” or “Ringtone” option and tap on it.
4. You will be presented with a list of pre-installed ringtones and options to choose from. Tap on the one you prefer.
5. If you want to use a custom ringtone, select the “Add ringtone” or “Choose file” option and browse your device’s storage to select the desired audio file.
6. Once selected, your chosen ringtone will be set as the default for incoming calls.
Q: Can I use my own music as a ringtone on Android?
A: Yes, you can easily use your own music as a ringtone on Android. Follow these steps:
1. Connect your Android device to your computer using a USB cable.
2. On your computer, navigate to the folder where your music files are stored.
3. Copy the desired music file that you want to use as a ringtone.
4. Disconnect your Android device from the computer and open the File Manager app.
5. Locate the folder where you want to store the music file and paste it there.
6. Now, follow the steps mentioned in the previous question to set the music file as your ringtone.
Q: How do I set a specific contact ringtone on Android?
A: If you want to assign a specific ringtone to a contact on your Android phone, here’s what you need to do:
1. Open the “Contacts” app on your Android device.
2. Find and select the contact you want to assign a specific ringtone to.
3. Tap on the “Edit” icon or select “Edit contact”.
4. Scroll down and tap on the “Ringtone” option.
5. Choose a ringtone from the list or select “Add ringtone” to use a custom ringtone.
6. Save the changes, and the selected ringtone will be applied to that specific contact.
Q: Can I set different ringtones for different apps on Android?
A: Unfortunately, the ability to set different ringtones for different apps is not a built-in feature on most Android devices. However, some third-party apps may offer this functionality. You can search for “custom notification sounds” in the Google Play Store to explore apps that provide this feature.
Q: How can I remove or change the default ringtone on Android?
A: If you want to remove or change the default ringtone on your Android phone, follow these steps:
1. Go to the “Settings” on your Android device.
2. Scroll down and tap on “Sound” or “Sound & vibration”.
3. Look for the “Phone ringtone” or “Ringtone” option and tap on it.
4. Select a different ringtone from the list or tap on the “Add ringtone” or “Choose file” option to use a custom ringtone.
5. If you wish to remove the default ringtone completely, select the option that says “None” or “Silent”, depending on your device.
6. Once you have made your choice, the new ringtone will be set as the default for incoming calls.