
Are you tired of the same old default ringtones on your Android smartphone? Well, you’re not alone. Many smartphone users crave a personalized touch when it comes to their ringtones. Luckily, you don’t have to settle for generic sound options anymore.
In this article, we will show you how to make your own custom ringtones for your Android smartphone. Whether you want to use your favorite song, a clip from a movie, or a unique sound effect, we’ve got you covered. With just a few simple steps, you’ll be able to create a one-of-a-kind ringtone that reflects your personality and style.
So, grab your smartphone and follow along as we guide you through the process of making ringtones that will make you stand out from the crowd.
Inside This Article
- # How to Make Ringtones for an Android Smartphone
- Finding the Right Audio Clip
- Trimming the Audio Clip
- Converting the Audio Clip to the Right Format
- Setting the Ringtone on your Android Smartphone
- Conclusion
- FAQs
# How to Make Ringtones for an Android Smartphone
Are you tired of the default ringtones on your Android smartphone? Want to personalize your device with a custom ringtone that reflects your style and personality? Look no further! In this article, we will guide you through the process of creating your own ringtones for an Android smartphone. It’s easier than you think!
The first step in making a custom ringtone is finding the right audio clip. You can choose a song from your music library or even download a sound effect that you like. Make sure the audio clip is in a format that is compatible with your Android device, such as MP3 or WAV.
Once you have chosen the audio clip, the next step is to trim it to the desired length. You don’t want your ringtone to be too long and annoying. Use a reliable audio editing software or app to cut the clip and keep only the part you want. Make sure to listen to the trimmed clip to ensure it sounds perfect.
After trimming the audio clip, you need to convert it to a format that is suitable for an Android smartphone. You can use online converters or dedicated software to convert the clip to the required format, such as MP3. Remember to save the converted file on your computer or smartphone for easy access.
Now that you have your customized ringtone in the right format, it’s time to set it as your default ringtone on your Android smartphone. Go to the Settings app on your device and navigate to the Sound or Audio settings. Look for the option to change the ringtone and select the file you created. Once selected, save the changes, and you’re all set!
Making ringtones for your Android smartphone has never been easier. With these simple steps, you can personalize your device and stand out from the crowd. So go ahead, unleash your creativity, and enjoy a unique and customized ringtone that truly represents who you are!
Finding the Right Audio Clip
When it comes to making ringtones for your Android smartphone, the first step is finding the perfect audio clip. The audio clip you choose should be something that resonates with you and represents your style and personality. Here are some tips to help you find the right audio clip:
1. Explore your music collection: Start by browsing through your music library and see if there are any catchy tracks or songs that you think would make a great ringtone. Look for melodies that are distinctive and instantly recognizable.
2. Search online: If you’re looking for something more personalized, you can try searching online for websites that offer free ringtones. Many websites allow you to download audio clips from popular songs or even offer a wide range of sound effects and unique tones to choose from.
3. Extract from a favorite song: If you have a specific part of a song that you love, you can use a music editing software or mobile app to extract that part and use it as your ringtone. This way, you can have a custom-made ringtone that is unique to you.
4. Record your own sound: Another option is to record your own sound or voice. It could be a funny catchphrase, a memorable quote, or even a snippet of your favorite song sung by you. This personal touch can make your ringtone truly one of a kind.
Once you have found the perfect audio clip, it’s time to move on to the next step: trimming the clip to the desired length.
Trimming the Audio Clip
Once you have found the perfect audio clip for your ringtone, the next step is to trim it to the desired length. Trimming the audio clip allows you to select the specific portion that you want to use as your ringtone, ensuring that it starts and ends exactly where you want it to. This will help create a seamless and captivating ringtone experience on your Android smartphone.
To trim the audio clip, you can make use of various editing tools and applications available on the market. Many Android smartphones also come with built-in audio editing features, making the process even more convenient. Here are the steps to trim an audio clip:
- Open the audio editing tool/application on your Android smartphone.
- Import the audio clip you want to use as your ringtone.
- Locate the specific portion of the clip that you want to use as your ringtone.
- Use the trim function to select the starting and ending points of the clip.
- Preview the trimmed clip to ensure it sounds exactly how you want it.
- If needed, make further adjustments to the trim points until you are satisfied with the result.
- Save the trimmed clip as a new audio file.
It’s important to note that when trimming the audio clip, you should aim for a length that is suitable for a ringtone. Typically, a ringtone lasts for about 30 seconds, although some smartphones allow for longer durations. Keep in mind that longer ringtone durations may consume more storage space on your device.
Once you have successfully trimmed the audio clip, you are one step closer to creating your custom ringtone. The next section will guide you on how to convert the audio clip to the right format for your Android smartphone.
Converting the Audio Clip to the Right Format
Once you have trimmed your audio clip to the desired length, the next step is to convert it to the right format for your Android smartphone. Android devices typically work best with audio files in the MP3 format, so you will need to ensure that your ringtone is converted to this format.
There are several ways you can convert your audio clip to MP3 format. One option is to use an online audio converter, which allows you to upload your file and convert it to MP3 with just a few clicks. Simply search for “online audio converter” in your favorite search engine, choose a reputable converter website, and follow the on-screen instructions to convert your ringtone.
Another option is to use a dedicated audio conversion software. There are many free and paid software programs available that can convert audio files to different formats, including MP3. Some popular choices include Audacity, Freemake Audio Converter, and MediaHuman Audio Converter. Simply download and install the software, import your trimmed audio clip, and choose MP3 as the output format.
If you prefer a more convenient method, you can also convert your audio clip to MP3 format directly on your Android smartphone. There are numerous apps available on the Google Play Store that offer audio conversion functionality. One popular choice is the “MP3 Converter” app, which allows you to convert audio files to MP3 format right from your Android device.
Once you have converted your audio clip to MP3 format, it’s important to save it in a location where your Android smartphone can easily access it. You can either save it in the default ringtone folder on your device or transfer it to a specific folder using a file manager app.
After you have successfully converted and saved your audio clip in MP3 format, you are now ready to set it as your ringtone on your Android smartphone. Refer to the next section for instructions on how to set the ringtone.
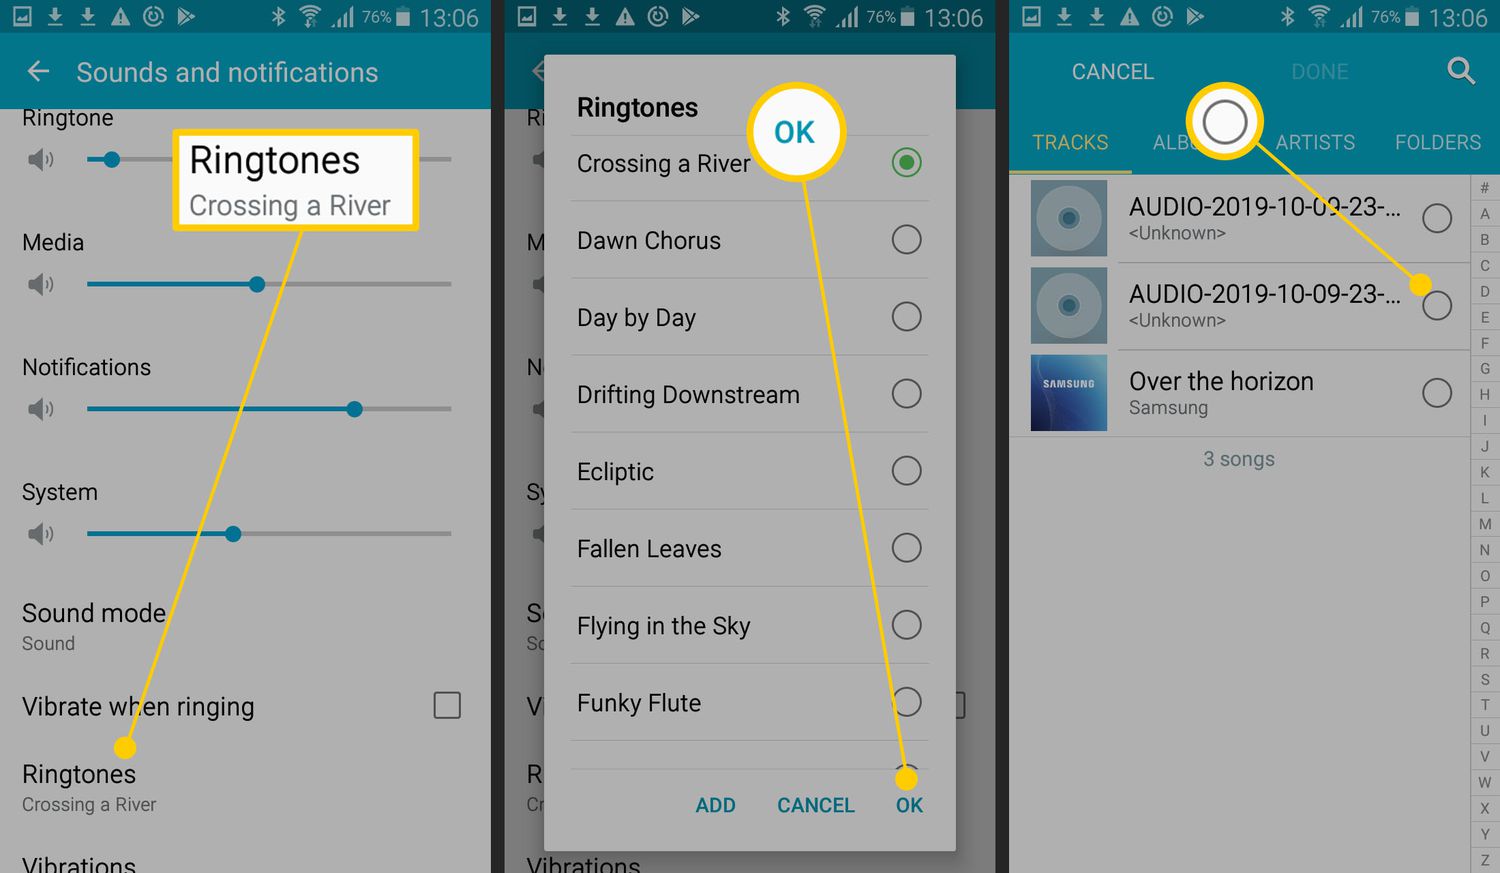
Setting the Ringtone on your Android Smartphone
Once you have successfully trimmed and converted your audio clip into the right format, the final step is setting it as your ringtone on your Android smartphone. Here is a step-by-step guide on how to do it:
- Locate the audio file you want to set as your ringtone. It could be in your phone’s internal storage, an SD card, or a cloud storage service.
- Open the ‘Settings’ app on your Android device. You can usually find it in the app drawer or by swiping down from the top of the screen and tapping the gear icon.
- Scroll down and look for the ‘Sound’ or ‘Sound & Vibration’ option. Tap on it to access the sound settings.
- In the sound settings, you should see various sound-related options. Look for ‘Ringtone’ or ‘Phone ringtone’ and tap on it.
- A list of available ringtones will appear. If you have downloaded or created a custom ringtone, scroll down and select the ‘Add’ or ‘Custom’ option.
- You will be given a list of apps that can handle audio files. Choose your preferred file manager app or use the built-in ‘Files’ or ‘File Manager’ app.
- Navigate to the folder where your audio clip is stored. Tap on the file to select it.
- You may be prompted with additional options, such as selecting a specific part of the audio clip to use as the ringtone. Adjust the selection accordingly, if necessary.
- Once you have made your selection, tap on the ‘Save’ or ‘Done’ button to set the audio clip as your ringtone.
- Exit the settings app and test your new ringtone by having someone call your phone. If everything was done correctly, you should hear your custom ringtone playing.
Setting a custom ringtone on your Android smartphone allows you to personalize your device and stand out from the crowd. Whether it’s your favorite song, a funny sound clip, or a soothing melody, having a unique ringtone can bring some fun and personality to your phone. So go ahead, get creative, and set the perfect ringtone that reflects your style and taste!
Conclusion
Creating custom ringtones for your Android smartphone is a fun and easy way to personalize your device and make it truly yours. By following the steps outlined in this article, you can unlock endless possibilities to set your favorite songs, sound effects, or even recorded audio as your ringtone.
Remember to choose a reliable ringtone maker app that offers a wide variety of editing features and supports different audio file formats. Experiment with different ringtone lengths, fade-in and fade-out effects, and even mix multiple audio tracks to create unique and captivating ringtones.
With just a few simple taps, you can transform your Android smartphone into a device that reflects your personality and style. So, why settle for the default ringtones when you can have your favorite music or sounds playing whenever you receive a call or a message? Start creating your custom ringtones today and enjoy a more personalized smartphone experience!
FAQs
1. Can I make ringtones for my Android smartphone?
Absolutely! Making ringtones for your Android smartphone is simple and easy. With the right tools and a little creativity, you can customize your device with unique and personalized ringtones.
2. What formats are compatible with Android smartphones?
Android smartphones support a wide range of audio formats, including MP3, AAC, WAV, and OGG. These formats provide high-quality sound and are ideal for creating ringtones that sound great on your device.
3. How can I create my own ringtone?
To create your own ringtone, you can use various methods. One popular option is to use a dedicated app such as Ringtone Maker or Zedge, which allows you to select a song or audio file and cut it to the desired length. Alternatively, you can use audio editing software on your computer to customize an audio file and transfer it to your Android smartphone.
4. Can I use any part of a song as a ringtone?
Yes, you can use any part of a song as a ringtone. Most ringtone-making apps or software allow you to select a specific section of a song to create a ringtone. This gives you the flexibility to choose your favorite part or catchy chorus that you want to hear whenever you receive a call or notification.
5. Can I assign different ringtones to different contacts?
Yes, you can assign different ringtones to different contacts on your Android smartphone. This feature allows you to identify who is calling without looking at your phone. Simply go to the contact details, edit the contact, and choose the desired ringtone from the list or browse your device for a custom ringtone.