
Are you tired of the default ringtone on your Android device and looking to add a personal touch? Well, you’re in luck! Adding a ringtone to your Android phone is a simple and fun process that allows you to customize your device to match your unique style and personality.
In this article, we will guide you through the step-by-step process of adding a ringtone to your Android device. Whether you want to use your favorite song, a catchy tune, or a custom sound, we’ve got you covered. So, let’s dive in and give your phone a fresh new sound that will make it stand out from the crowd!
Inside This Article
- Adding a Ringtone to Android
- Method 1: Using the Default Ringtone Option
- Method 2: Using a File Manager App
- Method 3: Using a Ringtone Maker App
- Conclusion
- FAQs
Adding a Ringtone to Android
One of the great things about Android devices is the ability to customize various aspects, including the ringtone. Whether you want to set a catchy tune or use a personalized sound, adding a ringtone to your Android phone is a simple process. In this article, we will explore three different methods to help you add a ringtone to your Android device.
Method 1: Using the Default Ringtone Option
The easiest way to add a ringtone to your Android device is by using the default ringtone option. Here’s how you can do it:
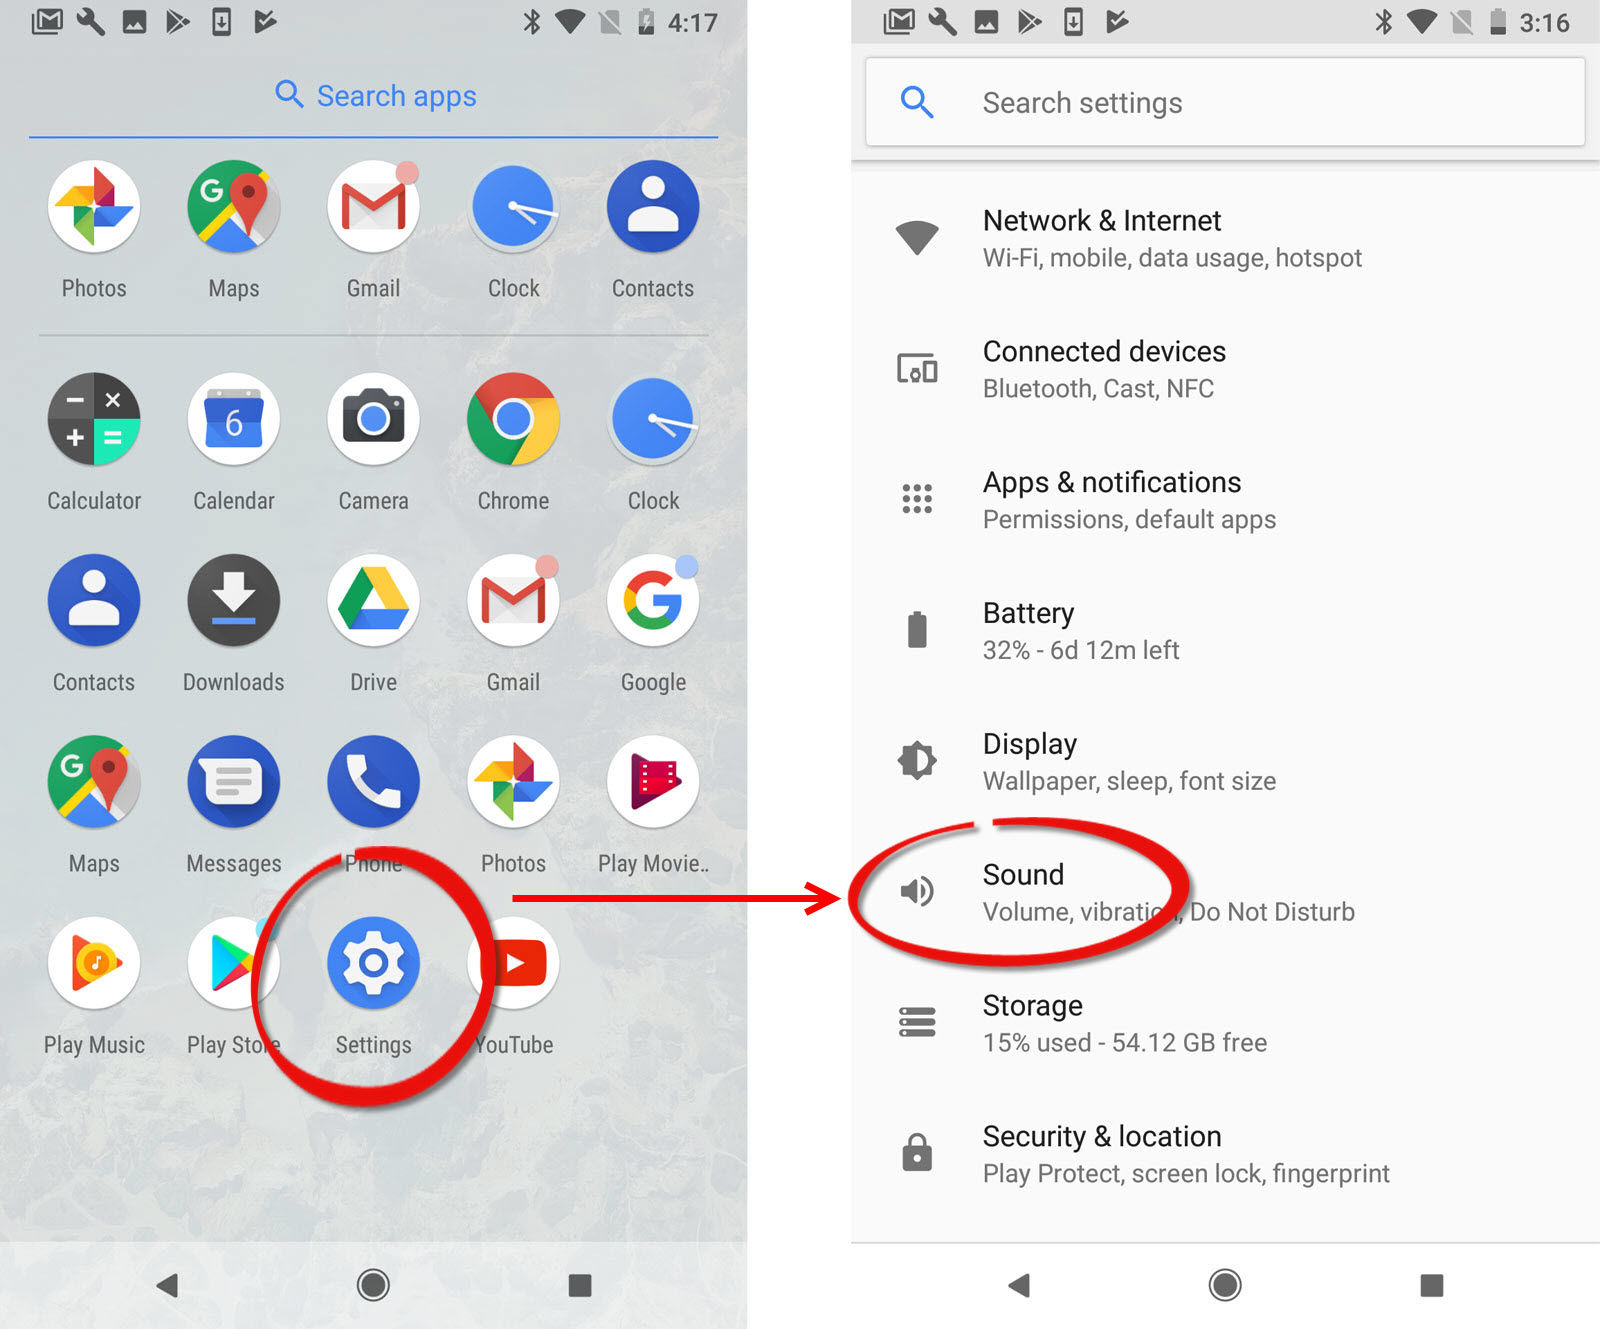
- Go to the “Settings” on your Android device.
- Select “Sound” or “Sound & Vibration” from the menu options.
- Look for the “Phone ringtone” or “Default ringtone” option.
- Tap on it and browse through the available ringtone options.
- Choose the desired ringtone and tap on “OK” or “Apply” to set it as your default ringtone.
That’s it! You have successfully added a ringtone to your Android device using the default ringtone option.
Method 2: Using a File Manager App
If you have a specific sound or music file that you want to use as your ringtone, you can do so by using a file manager app. Follow these steps:
- Download a file manager app from the Google Play Store, such as “Files by Google” or “ES File Explorer”.
- Open the file manager app and navigate to the location where you have saved the desired audio file.
- Long-press on the audio file to select it.
- Tap the options menu (typically represented by three dots or a gear icon).
- Select the “Set as ringtone” or similar option from the menu.
Now, the selected audio file will be set as your ringtone on your Android device.
Method 3: Using a Ringtone Maker App
If you want to personalize your ringtone by creating a custom one, you can use a ringtone maker app. Here’s how:
- Download a ringtone maker app from the Google Play Store, such as “Ringtone Maker” or “MP3 Cutter & Ringtone Maker”.
- Open the ringtone maker app and grant the necessary permissions.
- Choose the audio file you want to use or record a new one using the app.
- Trim the audio file to select the desired section for your ringtone.
- Save the trimmed file and set it as your ringtone on your Android device.
With a ringtone maker app, you can easily create and set personalized ringtones on your Android device.
Adding a ringtone to your Android device is a fun way to customize your phone and make it reflect your personality. Whether you want to use the default ringtone option, a file manager app, or a ringtone maker app, you now have the knowledge to add that perfect ringtone to your Android phone. Enjoy the personalized touch every time your phone rings!
Method 1: Using the Default Ringtone Option
One of the easiest ways to add a ringtone to your Android device is by using the default ringtone option. This method allows you to choose from a selection of pre-installed ringtones or use a custom sound file from your device’s storage.
Here are the steps to add a ringtone using the default ringtone option:
- Open the Settings app on your Android device.
- Scroll down and tap on “Sound” or “Sound & vibration.”
- Look for the “Ringtone” option and tap on it.
- You will see a list of available ringtones. Scroll through the list and select your desired ringtone. If you want to use a custom sound file, tap on the option to “Add ringtone” or “Choose ringtone from internal storage.”
- If you chose a custom sound file, navigate to the location where the file is stored and select it.
- Preview the ringtone by tapping on the play icon next to it. If you are satisfied with your selection, tap on “Save” or “Apply.”
Once you have successfully added the ringtone, it will be set as the default ringtone for incoming calls on your Android device. You can also assign different ringtones to specific contacts by editing their contact information in the Contacts app.
Method 2: Using a File Manager App
If you prefer a more hands-on approach to adding a ringtone to your Android device, you can utilize a file manager app to manually copy the audio file to the appropriate folder. Follow these steps to add a ringtone using a file manager app:
- Start by downloading and installing a file manager app from the Google Play Store. Some popular options include ES File Explorer, Solid Explorer, and Total Commander.
- After installing the app, open it and navigate to the folder on your device where the audio file is located. This could be in your Downloads folder or any other location where you have saved the file.
- Long press on the audio file to select it, then tap on the “Copy” or “Move” option, depending on your file manager app.
- Now, navigate to the folder where your device stores ringtones. This can vary depending on the device and the version of Android you are using, but common locations include the “Ringtones” or “Notifications” folder in the internal storage.
- In the ringtones folder, tap on the “Paste” option to copy the audio file from the previous location to the ringtones folder.
- Once the file is successfully copied, you can close the file manager app.
- Now, go to your device’s Settings and tap on “Sound” or “Sounds & Vibration”, then select “Phone ringtone” or “Default ringtone” depending on your device.
- You should now see the newly copied audio file listed as an option. Tap on it to set it as your ringtone.
- Enjoy your customized ringtone on your Android device!
Using a file manager app gives you more control and flexibility when adding ringtones to your Android device. It allows you to choose any audio file from your device’s storage and copy it to the appropriate folder. With just a few simple steps, you can personalize your device’s ringtone and stand out from the crowd.
Method 3: Using a Ringtone Maker App
If you’re looking for a more personalized and customized ringtone, using a ringtone maker app is the way to go. This method allows you to create your own unique ringtone from any audio file on your Android device.
Here’s a step-by-step guide on how to add a ringtone to your Android using a ringtone maker app:
- First, head over to the Google Play Store and search for a reputable ringtone maker app. There are plenty of options available, such as Ringdroid, MP3 Cutter and Ringtone Maker, and Zedge.
- Once you’ve found the app you want to use, proceed to install it on your Android device.
- Open the ringtone maker app and grant any necessary permissions it may require to access your device’s audio files.
- Next, select the audio file you want to turn into a ringtone. This can be a song, a sound effect, or any other audio file stored on your device.
- Once you’ve chosen the audio file, use the app’s editing tools to trim, cut, and adjust the duration of the selected portion.
- After you’re satisfied with the edits, save the trimmed audio as a ringtone file. The app will usually give you the option to set it as the default ringtone or assign it to a specific contact.
- Lastly, head over to your device’s settings and navigate to the sound and notification settings. From there, you can select the newly created ringtone as your default ringtone or assign it to specific contacts.
Using a ringtone maker app offers a great level of flexibility and allows you to truly personalize your Android device’s ringtone. Experiment with different audio files, get creative with the editing tools, and have fun crafting the perfect ringtone that reflects your unique style.
Adding a new ringtone to your Android device is a simple and straightforward process that allows you to personalize your device and make it truly unique. By following the steps outlined in this article, you can easily customize your Android device with your favorite songs, catchy tunes, or even custom recordings.
Remember, the key to successfully adding a ringtone to your Android device is to ensure that it is in the correct format (e.g., MP3) and saved in the designated folder. Whether you choose to use a third-party app or manually transfer the ringtone, it’s important to keep in mind that different Android devices may have slightly different procedures for adding a ringtone.
Now that you have the knowledge and the tools, go ahead and give your Android device a personal touch by adding a ringtone that truly reflects your style and personality.
FAQs
1. How can I add a ringtone to my Android device?
Adding a custom ringtone to your Android device is a straightforward process. Follow these steps:
- Connect your Android device to your computer using a USB cable.
- Navigate to the internal storage or SD card of your Android device and create a folder named “Ringtones”.
- Find the desired ringtone file on your computer and copy it to the “Ringtones” folder on your Android device.
- Disconnect your Android device from the computer.
- Open the Settings app on your Android device and go to the “Sound” or “Sound & Vibration” section.
- Select “Phone ringtone” or “Ringtone” and browse for the newly added ringtone in the list.
- Choose the ringtone and select “Save” to apply it as your default ringtone.
2. What file format should the ringtone be in?
Android supports various audio file formats for ringtones, including MP3, M4A, OGG, and WAV. MP3 is the most commonly used format and is widely compatible with Android devices. Ensure that your chosen ringtone file is in one of these supported formats for seamless playback on your Android device.
3. Can I use a song from my music library as a ringtone?
Yes, you can use a song from your music library as a ringtone on your Android device. However, you might need to trim the song to create a shorter clip for the ringtone. There are several apps available on the Google Play Store that can help you easily trim and convert songs into ringtone format. Alternatively, you can use a computer software to trim the song and transfer it to your Android device.
4. How do I set a specific ringtone for a contact?
To set a specific ringtone for a contact on your Android device, follow these steps:
- Open the Contacts app on your Android device and navigate to the desired contact.
- Tap on the contact to open their details.
- Select the “Edit” option (usually represented by a pencil icon) to edit the contact.
- Scroll down to find the “Ringtone” or “Set ringtone” option.
- Tap on it and choose the desired ringtone from the list or browse for a custom ringtone.
- Save the changes, and the specific ringtone will be set for that contact.
5. Are there any apps available to download custom ringtones for Android?
Yes, there are several apps available on the Google Play Store that offer a vast collection of custom ringtones for Android devices. Some popular apps include Zedge, Audiko, and Myxer. These apps not only provide a wide range of pre-made ringtones but also allow you to create your own custom ringtones from your music library. Simply search for “ringtones” in the Google Play Store and explore the available options to find the app that suits your preferences.