
Google Pay is a convenient and secure mobile payment app that allows Android users to make purchases and send money with ease. It not only simplifies your payment process but also eliminates the need to carry cash or credit cards. With Google Pay, you can quickly and securely pay for your purchases in stores, online, and even send money to friends and family. Whether you want to split a bill, pay for groceries, or shop online, Google Pay has got you covered. In this article, we will guide you through the process of setting up and using Google Pay on your Android device. From linking your cards to making payments, we will provide you with all the necessary information and tips to make the most out of this convenient payment method.
Inside This Article
- Setting up Google Pay on your Android device
- Adding your payment methods to Google Pay
- Making secure and easy payments with Google Pay
- Managing your transactions and security settings with Google Pay
- Conclusion
- FAQs
Setting up Google Pay on your Android device
If you’re an Android user, you have access to a convenient and secure way to make payments – Google Pay. Setting up Google Pay on your Android device is a straightforward process that can be completed in just a few simple steps. Here’s a step-by-step guide to help you get started:
Step 1: Check compatibility
Before you begin, ensure that your Android device is compatible with Google Pay. The app is compatible with most Android devices running Android 5.0 or higher. You can check if your device is compatible by searching for “Google Pay” on the Google Play Store.
Step 2: Download and install the app
Once you’ve confirmed compatibility, the next step is to download and install the Google Pay app from the Google Play Store. Open the Play Store, search for “Google Pay,” and select the official app from Google Inc. Tap on “Install” to begin the download and installation process.
Step 3: Sign in or set up an account
If you already have a Google account, you can sign in to Google Pay using your existing credentials. If you don’t have an account, you’ll need to set one up. Simply follow the on-screen instructions to create your Google account or sign in to an existing one.
Step 4: Add a payment method
Once you’re signed in, it’s time to add a payment method to Google Pay. You have the option to link your credit or debit card, or you can add a bank account for direct transfers. Tap on “Add a card” or “Add a bank account” and follow the prompts to input the necessary information.
Step 5: Verify your payment method
For security purposes, Google Pay may require you to verify your payment method. This can be done by either receiving a verification code via SMS or by authorizing a small transaction on your linked card. Follow the instructions provided by Google Pay to complete the verification process.
Step 6: Set up Google Pay as your default payment app
Once your payment method is verified, you can set up Google Pay as your default payment app. This will allow you to conveniently use Google Pay for online and in-store payments. To set it as the default, go to your device’s settings, tap on “Apps & notifications,” select “Default apps,” and choose Google Pay as the default payment app.
And that’s it! You’ve successfully set up Google Pay on your Android device. Now you can enjoy the convenience of making quick and secure payments with just a few taps.
Adding your payment methods to Google Pay
Google Pay makes it incredibly convenient to store and use your payment information on your Android device. By adding your payment methods to Google Pay, you can streamline your online transactions and make secure and easy payments. Here’s how you can add your payment methods:
1. Open the Google Pay app on your Android device. If you don’t have it installed, you can download it from the Google Play Store.
2. Sign in to your Google account or create a new one if you don’t have an existing account.
3. Tap on the “Payment methods” option in the app’s navigation menu.
4. Click on the “Add payment method” button to begin adding your payment information.
5. Choose the type of payment method you want to add. Google Pay supports various options, including credit and debit cards, as well as digital wallets like PayPal and Venmo.
6. Follow the on-screen instructions to enter your card details or link your digital wallet. Make sure to double-check the accuracy of the information before proceeding.
7. Once you’ve entered the necessary information, tap on the “Save” button. Google Pay will securely store your payment method for future use.
8. You can repeat this process to add multiple payment methods to your Google Pay account. Having multiple options allows you to choose your preferred payment method for different transactions.
9. To make your default payment method, go back to the “Payment methods” section and find the card or wallet you want to set as default. Tap on it, and select the “Set as default” option.
By adding your payment methods to Google Pay, you can enjoy the convenience of making quick and secure transactions online, without the need to repeatedly enter your payment details. It’s a simple and hassle-free way to manage your payments on your Android device.
Making secure and easy payments with Google Pay
Google Pay has revolutionized the way we make payments, providing a secure and convenient solution for Android users. Whether you’re shopping online, making in-store purchases, or sending money to friends, Google Pay offers a seamless and hassle-free payment experience.
With robust security measures in place, Google Pay ensures your financial information remains safe and protected. By using tokenization, your sensitive card details are never shared with merchants. Instead, a unique virtual account number is generated for each transaction, adding an extra layer of security.
Beyond its security features, Google Pay also brings convenience to the table. Gone are the days of rummaging through your wallet for cash or fishing out your physical cards. With Google Pay, you can store your payment methods digitally on your Android device, eliminating the need to carry multiple cards or remember card details.
Using Google Pay is as simple as a few taps on your Android device. Once you have set up Google Pay and added your payment methods, making a payment is a breeze. When shopping online, look for the Google Pay logo at the checkout. With just a few taps, you can complete your purchase without entering your card details.
But it doesn’t stop there; Google Pay also allows you to make in-store payments. Many merchants now accept contactless payments via NFC technology. When it’s time to pay, simply unlock your Android device and place it near the contactless payment terminal. Your payment will be processed quickly and securely, saving you time and simplifying the checkout process.
Google Pay even lets you send money to friends and family with ease. Whether you’re splitting a bill or repaying a friend, you can send money directly from your Google Pay account. Simply select the recipient, enter the amount, and hit send. It’s fast, convenient, and ensures that you no longer have to deal with the hassle of cash or checks.
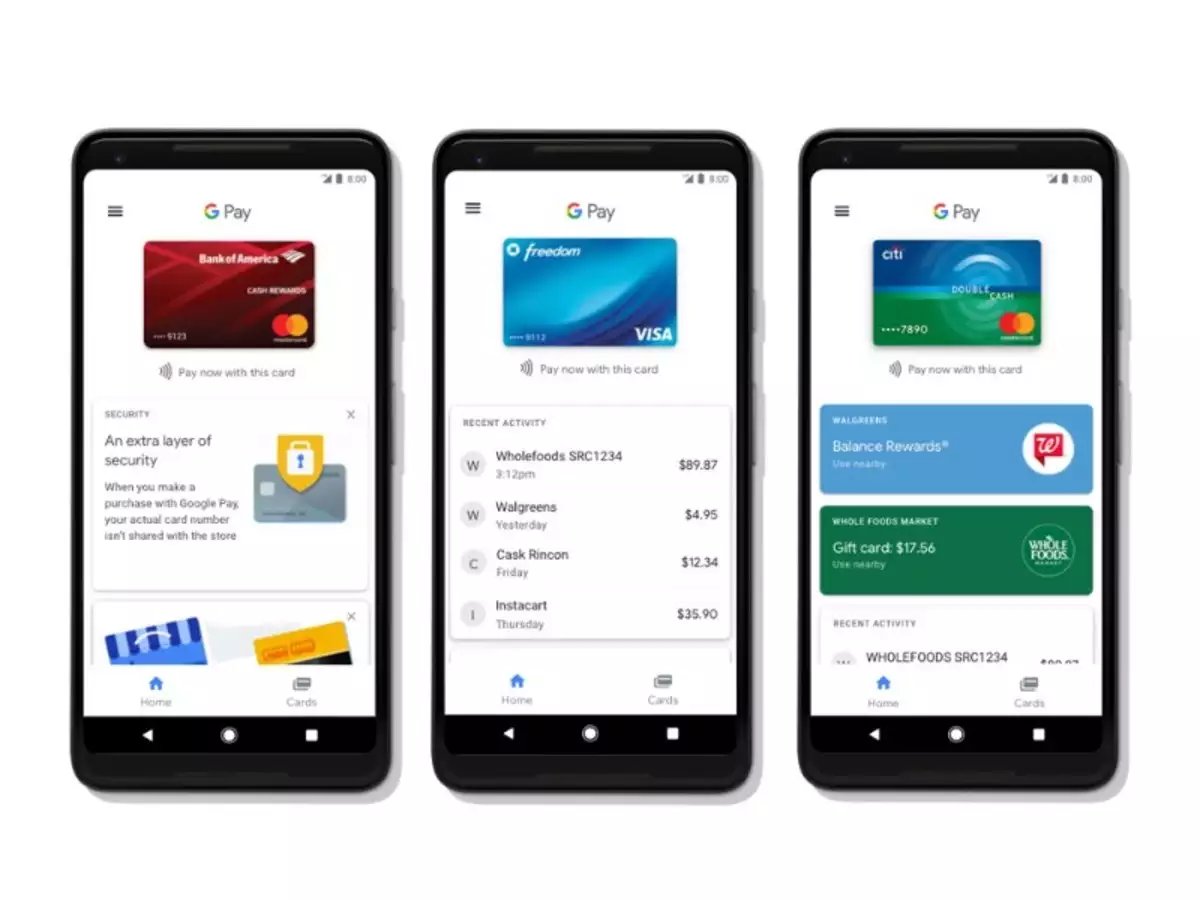
To add an extra layer of convenience, Google Pay also allows you to store loyalty cards, gift cards, and boarding passes digitally. Instead of carrying a wallet filled with physical cards, you can access your loyalty program information or board a flight by simply scanning your digital versions within the Google Pay app.
Managing your transactions and security settings with Google Pay
Once you have set up Google Pay on your Android device and added your payment methods, you can start making secure and convenient transactions. But did you know that you can also manage your transactions and adjust your security settings to further enhance your experience? Here’s how you can take control of your Google Pay usage:
1. Viewing your transaction history: Google Pay keeps a record of all your transactions, making it easy for you to track your expenses. Simply open the app, go to the “Transactions” tab, and you’ll see a list of your recent payments. You can view the details of each transaction, such as the merchant, date, and amount.
2. Managing your payment methods: If you want to add, remove, or edit your payment methods, Google Pay allows you to do so with just a few taps. Head to the “Payment methods” section in the app, where you’ll find options to add new cards, delete old ones, or update the billing details associated with your existing payment methods.
3. Setting up default payment methods: You can save time by setting up a default payment method. This means that when you make a purchase using Google Pay, the app will automatically use your default payment method, saving you from having to manually select it every time. To set up a default payment method, go to the “Payment methods” section and choose the card you want to set as default.
4. Managing notifications and alerts: Google Pay allows you to customize the notifications and alerts you receive. You can choose to receive notifications for successful payments, receive alerts for suspicious activity, and even set a spending limit to help you stay within your budget. To manage your notifications and alerts, go to the app’s settings and select the “Notifications” or “Alerts” option.
5. Protecting your Google Pay account: Security is a top priority when it comes to digital payments. Google Pay offers several security features to keep your account safe. You can enable biometric authentication, such as fingerprint or facial recognition, to add an extra layer of protection. Additionally, you can set up a PIN or password to access your Google Pay app. To modify your security settings, go to the app’s settings and select the “Security” or “Privacy” option.
By managing your transactions and adjusting your security settings, you can make the most out of Google Pay on your Android device. Take advantage of these features to stay organized, secure, and in control of your digital payments.
Overall, Google Pay is a powerful and convenient tool for making payments on your Android device. With its seamless integration with various payment methods and enhanced security features, it provides users with a safe and hassle-free payment experience. Whether you’re shopping online, sending money to friends, or making contactless payments in stores, Google Pay offers a simple and efficient way to handle your transactions.
By following the steps outlined in this article, you can easily set up and start using Google Pay on your Android device. From linking your payment methods to managing your transactions, the app provides a user-friendly interface to navigate through the payment process. So, give it a try and enjoy the convenience of making fast and secure payments with Google Pay on your Android smartphone.
FAQs
1. Can I use Google Pay on any Android device?
Yes, Google Pay is available for use on most Android devices. However, some older or less common devices may not be supported. It is recommended to check the Google Pay website or consult with your device manufacturer to confirm compatibility.
2. How do I set up Google Pay on my Android phone?
To set up Google Pay on your Android phone, follow these steps:
- Download and install the Google Pay app from the Google Play Store.
- Open the app and sign in with your Google account.
- Follow the prompts to add a payment method, such as a credit or debit card.
- Once added, you can start using Google Pay to make secure payments.
3. Is Google Pay secure?
Yes, Google Pay is designed with multiple layers of security to protect your payment information. It uses encryption and tokenization to keep your card details secure during transactions. Additionally, Google Pay requires authentication, such as a PIN, fingerprint, or facial recognition, to authorize payments.
4. Can I use Google Pay to make online purchases?
Yes, you can use Google Pay to make online purchases. Many websites and apps support Google Pay as a payment method. Simply look for the Google Pay logo or the “Buy with GPay” option during checkout and follow the prompts to complete the transaction securely.
5. Can I use Google Pay internationally?
Google Pay is available in multiple countries around the world. However, the availability of certain features and supported banks may vary depending on your location. It is recommended to check the Google Pay website or contact your bank to ensure compatibility and access to Google Pay services while traveling abroad.