
Technically speaking, no iOS device is perfect. This is why your iPhone, iPad, or Apple Watch might suddenly have problems related to firmware or software. The good thing is that there are plenty of hacks and fixes to try, ranging from the easy to the drastic ones. When most Do-It-Yourself solutions fail to restore the device to its working condition, the DFU Mode is your last resort.
What Exactly Is DFU Mode?

DFU Mode means Device Firmware Update. It is a process that changes firmware, adds new features, purges bugs, and enhances security on iOS devices. There are no official instructions from Apple on how to use DFU Mode. People usually learn about it online or from experts who have worked for mobile device companies. Also, DFU Mode has no Apple interface, so you will just see a black screen when it is activated.
To elaborate on firmware, it is the way your gadget’s hardware is programmed to work. For example, the controls for the mobile device’s CPU, display, or flash memory. Additionally, the firmware is different from software. The former is made for hardware while the latter is for user interaction. Apps, widgets, and iOS itself are software, for instance.
DFU Mode Pros
DFU Mode has a couple of advantages despite it being among the drastic methods for troubleshooting iOS devices. Even if you are not an expert in mobile devices, you will find it useful for your iPhone, iPad, or Apple Watch.
1. Solution to Many Problems
The feature is proven to fix several issues for iOS devices. For example, serious cases such as corrupted firmware, problematic or expired iOS, or unfinished rebooting. DFU Mode can also work on less serious issues such as sudden degradation of battery life, button and touchscreen response inaccuracy, and more.
2. DFU Mode Is Better Than Recovery Mode
DFU Mode, although not endorsed by Apple, is seen to be better as compared with the official iPhone Recovery Mode. There are a few reasons why many experts prefer the former over the other recovery and restoration method.
Firstly, it does not need to load iOS to work, so it is unaffected by software corruption. In fact, DFU Mode is fixed, unlike Recovery Mode that updates as iOS does. Secondly, it is the go-to solution when the standard Recovery Mode freezes. Thirdly, it can be used to jailbreak iOS devices, unlike the Recovery Mode. As a result, it gives the gadgets more freedom in terms of features and programs.
3. Software Downgrade Option
DFU Mode, while restoring a device that has a faulty software version, allows it to downgrade iOS effectively. This means versatility in software options versus Recovery Mode. The latter automatically chooses the latest software first as a replacement.
Why downgrade, you ask? The latest iOS does not always mean it is better than the previous one. For instance, the most recent version may harbor many bugs so you might want an older yet stable software instead.
DFU Mode Cons
DFU Mode seems to be the ultimate solution for serious iOS device issues yet it comes at a price. There are a few drawbacks you should know and difficulties to be prepared for before deciding to proceed with the method.
1. Data Deletion
The feature will successfully revive your unresponsive iOS device but you will have to sacrifice your saved data, passcodes, and settings in the process. It clears the said configurations and credentials to make the gadget revert to a fresh state. That being said, you will have to reconfigure your iOS device afterward.
2. Not for Water-Damaged Devices
Apple experts warn against using DFU Mode for an iOS device that got wet or submerged in water. To elaborate, moisture-damaged components might suddenly cause electric shock and stop working while entering DFU Mode. As a result, the gadget gets stuck in that state or might not boot at all.
3. Time Sensitivity
One more drawback of putting your iOS device in DFU Mode is that the process itself is quite complex. In fact, even the pros on the web agree that it is a bit complicated to do during the first few tries. While you only need several buttons to activate it, the presses you need to make are time-sensitive. Otherwise, everything has to be repeated from the start.
This does not mean DFU Mode is impossible to do for someone who is not tech-savvy. You can reduce the number of possible retries if you strictly follow your guide. You’ll get everything you need to know as you read on.
DFU Mode Requirements
DFU Mode cannot be done with just an iPhone, iPad, or Apple Watch itself. This is because the gadget or wearable might be frozen or unresponsive due to the unknown error. You need to prepare the following things to get going:
1. Computer
You can put your iOS device in DFU Mode with the help of a computer. Moreover, it does not necessarily have to be a Mac. This is because you can already install the needed program on a Windows computer. Just make sure your desktop PC or laptop has an Internet connection to download the next requirement.
2. iTunes or Finder
A DFU Mode requirements checklist will not be complete without iTunes. If you are not familiar with what iTunes is, it is more than just a media player and library. It also doubles as a device management app with support for DFU and Recovery Modes. iTunes can be downloaded from the Apple or Microsoft Store.
In case you do not have the app or are unable to get it, you can use Finder instead. Finder is the default file organizer for a Mac. In fact, it immediately launches when the computer is switched on and stays active as you use apps. Furthermore, if you are a macOS Catalina 10.15 or later version user, Finder is the sole program you need for DFU Mode.
3. Lightning to USB Cable
Another must-have for DFU Mode is a Lightning to USB cable. You will be needing it to connect your iPhone or iPad to your computer. For Apple Watches, you have to get an iBus dongle because the wearable does not support a Lightning to USB cable. That dongle is an adapter that can connect the Lightning cable and the wearable’s six-pin diagnostic port.
4. Timer
A timer is an optional requirement. Moreover, you do not have to purchase one if you have this feature on a separate mobile phone. This accessory will help you time your button presses accurately so that your iOS device can enter DFU mode fast and in the least attempts possible.
5. Data Back-up Services
One last requirement worth mentioning and among the most important of all is a data backup method. This can come in the form of a service such as Apple’s iCloud, Google Drive, or OneDrive. While these make use of the cloud, you might also want to have an extra physical backup. An external hard drive is useful for this because you can still recover data offline in case there are problems with cloud storage.
Also Read: How to Backup iPhone to External Hard Drive
How to Put iOS Devices to DFU Mode
Putting iOS devices to DFU Mode can be quite challenging, so you’ll find this guide quite handy. Whether you are using the latest or oldest versions of the iPhone, iPad, or the Apple Watch, there are specific and easy-to-understand instructions for you here. Note that when you put the Apple Watch in DFU Mode, the warranty is void. Also, the wearable becomes vulnerable to water damage.
iPhone 8 and newer series
1. Connect the iPhone and computer through a cable.
2. Run iTunes or Finder afterward.
3. Press the Volume Up button then the Volume Down button.

4. Hold the Side button until the display turns black.
5. Hold the Side and Volume Down buttons.
6. Release the Side button after five seconds without letting go of the Volume Down button.
7. Release the Volume Down button when iTunes or Finder detects your iPhone.
8. Choose Restore from the iTunes or Finder prompt that shows up.
iPhone 7 series
1. Link the iPhone and computer via a cable.
2. Launch iTunes or Finder on your connected PC.
3. Long press on the Sleep/Wake and Volume Down buttons.

4. Release only the Sleep/Wake button after eight seconds.
5. Wait for the black screen and iTunes or Finder to detect the iPhone before releasing the Volume Down button.
6. Click Restore from the iTunes or Finder pop-up window.
iPhone 6 and older series
1. Plug the iPhone into the computer through a cable.
2. Open iTunes or Finder on the computer.
3. Long press on the Home and Sleep/Wake buttons.

4. Release the Sleep/Wake button after eight seconds.
5. Let go of the other button when the iPhone display becomes black.
6. Select Restore when iTunes or Finder asks you what to do with the iPhone.
iPads With Home Button
1. Connect the iPad to the computer via a cable.
2. Run iTunes or Finder on the computer.
3. Hold the Home and Power buttons of the iPad.

4. Wait for the iPad’s display to turn black.
5. Stop pressing the Power button after three seconds.
6. Release the Home button once iTunes or Finder recognizes the iPad.
7. Pick the Restore option from the iTunes or Finder pop-up window.
iPads Without Home Button
1. Switch off the iPad.
2. Link the iPad and computer through a cable.
3. Open iTunes or Finder on the computer.
4. Hold the iPad’s Power button afterward.
5. Do the same for the Volume Down button for 10 seconds while doing step 4.

6. Release the Power button.
7. Stop pressing the Volume Down button after five seconds.
8. Wait for the iPad’s display to go black and the iTunes or Finder device detection prompt.
9. Choose Restore from the pop-up window options iTunes or Finder shows.
Apple Watch
1. Switch off the Apple Watch.
2. Take off the Apple Watch strap.
3. Pry the diagnostic port hole carefully with a needle to open it.
4. Connect the iBus and Lighting to USB cables.
5. Insert the iBus cable end into the Apple Watch’s diagnostic port.
6. Plug the USB end into the computer.
7. Launch iTunes on the computer.
8. Switch on the Apple Watch afterward.
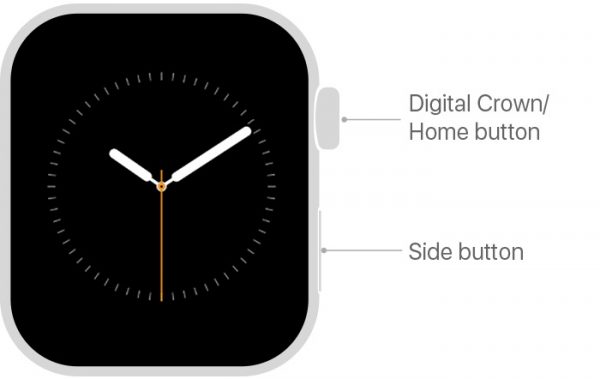
9. Hold the Digital Crown or the rotating button, and the Side button of the Apple Watch for 10 seconds.
10. Let go of the Side button.
11. Release the Digital Crown once iTunes detects the wearable.
12. Select a watchOS firmware file so that iTunes can restore it.
How to Get iOS Devices Out of DFU Mode
Your iOS device gets out of DFU Mode after being restored but there might be instances when you want to exit in the middle of the process. For example, you were just checking what the feature can do and have changed your mind about it. The good thing is that exiting DFU Mode manually is possible. Moreover, the steps are easy to follow per iOS device generation. In fact, it would take you about three steps to get the job done.
iPhone 8 and newer series
1. Click the Volume Up and Down buttons simultaneously.
2. Long press on the Side button afterward.
3. Wait for the Apple logo to be displayed by the iPhone.
iPhone 7 series
1. Press and hold the Side button.
2. Do the same to the Volume Down button without releasing the Side button.
3. Release the buttons after the iPhone displays the Apple logo.
iPhone 6 and older series
1. Hold the Home button.
2. Do the same for the Side button while doing step 1.
3. Wait for the display to show the Apple logo.
iPads With Home Button
1. Hold the Home button.
2. Hold the Sleep/Wake button.
3. Wait for the iPad to force restart before releasing the buttons.
iPads Without Home Button
1. Press the Volume Up button.
2. Do the same for the Volume Down button afterward.
3. Hold the Power button until the iPad force restarts.
Apple Watch
1. Hold the Digital Crown and side buttons for 10 seconds.
2. Wait for the wearable to display the Apple logo.
3. Release both buttons afterward.
What to Do if DFU Mode Gets Stuck or Fails?
Although a rare scenario, your iOS device can be stuck in DFU Mode even after attempting to exit or force restart it. Consequently, it fails to solve the software or firmware problem. Below are a couple of things you can do about the situation:
Use iOS Recovery Apps with DFU Mode Support
There are plenty of iOS recovery apps online that can get your iOS device out of DFU Mode. All you have to do is read about your prospect apps to learn how to use those and check their reviews. Once you’ve decided on one, download and install it on your computer.
An iOS recovery app typically has one or all of the following options you can use for the scenario: Exit DFU or Recovery Mode, System Repair, or Reset Device. Look for any of the following commands from the app’s interface. Also, follow the prompts to get your stuck iOS device out of the failed DFU mode.
Get Help from Apple Support
If you do not want to rely on third-party apps or software to make your iOS device exit DFU Mode, that is fine. The best thing to do after all is to go with an Apple-recommended solution. For this, you can just contact Apple Support.

It is easy to do so nowadays because help services are online all day. You just need a computer that is connected to the web or the official and free Apple Support app on another device. Customer representatives are ready to take your call, give you more solutions or get you an appointment with the nearest Apple Service Center.
Final Word on DFU Mode
DFU Mode is not for everyone. It will be difficult for you if you are new to the method or not a tech-savvy iOS user. On the other hand, it is still worth a try because it is effective for many iPhone, iPad, and Apple Watch software and firmware issues. Moreover, it serves as a better alternative, given that the standard Recovery Mode can fail you at times.