
Are you tired of scrolling through your camera roll to find a specific photo on your iPhone? Well, look no further! In this article, we will show you how to create and share iPhone photo albums with ease. With the ever-increasing storage capacity of modern smartphones, our photo collections can quickly become unmanageable. But fear not, because organizing your photos into albums is a simple and efficient way to stay organized and find your favorite memories in a breeze. We will guide you step-by-step through the process of creating personalized albums, and also demonstrate how you can effortlessly share your albums with friends and family. From family vacations to special events, creating and sharing iPhone photo albums has never been easier. So, let’s dive in and unlock the full potential of your iPhone’s camera roll!
Inside This Article
- Creating an iPhone Photo Album
- Sharing iPhone Photo Albums
- Tips for Managing iPhone Photo Albums
- Conclusion
- FAQs
Creating an iPhone Photo Album
One of the best features of an iPhone is its exceptional camera capability, allowing you to capture stunning photos wherever you go. And with so many amazing memories to immortalize, it’s essential to keep your photos well-organized. Creating a photo album on your iPhone is the perfect solution to neatly categorize and store your cherished moments. Here’s how you can easily create an iPhone photo album:
- Open the Photos app: To begin, locate and launch the Photos app on your iPhone. This app is pre-installed on all iPhones and can be found on your home screen.
- Select the photos: Once you’re in the Photos app, browse through your photo library to select the photos you want to add to the album. You can tap on individual photos to choose them, or use the “Select” option to pick multiple photos at once.
- Tap the Share button: After selecting the desired photos, tap the Share button located at the bottom left corner of the screen. It resembles a square with an upward arrow.
- Choose “Add to Album”: From the list of sharing options that appear, select the “Add to Album” option. This will prompt a new window to appear, showing your existing albums and giving you the option to create a new one.
- Create a new album: If you want to create a new album, tap the “New Album” button. You will be asked to provide a name for the album.
- Add photos to the album: Once you’ve named the album, tap the “Add” button to add the selected photos to the album. The photos will now be organized and accessible under the designated album within the Photos app.
Creating an iPhone photo album is a straightforward process that streamlines your photo library and makes it easier to find and share specific sets of photos. Whether it’s a collection of vacation pictures or a compilation of memories with loved ones, organizing your photos into albums adds a personalized touch to your iPhone experience.
Sharing iPhone Photo Albums
Once you’ve created a beautiful photo album on your iPhone, you’ll likely want to share it with family and friends. Luckily, sharing iPhone photo albums is a straightforward process that allows you to easily showcase your favorite memories. Whether you want to send the album via email, text message, or social media, there are several options available to suit your needs.
One of the easiest ways to share an iPhone photo album is by using the built-in sharing features of the Photos app. Simply open the app and navigate to the album you want to share. Tap on the “Select” button in the top right corner and choose the photos you want to include in the share. Once you’ve made your selection, tap on the share button, which looks like a square with an arrow pointing out of it. From there, you can choose how you want to share the album, such as through iMessage, Mail, or any other compatible app installed on your iPhone.
If you prefer to share your iPhone photo album through a specific app, such as Instagram or Facebook, you can do so directly from the app itself. Open the app, navigate to the album or photos you want to share, and look for the sharing icon, which is usually represented by three dots or an arrow. Tap on the sharing icon, and you will be presented with a list of options for sharing the album. Select the app you want to use, and follow the prompts to post or send the album to your desired recipients.
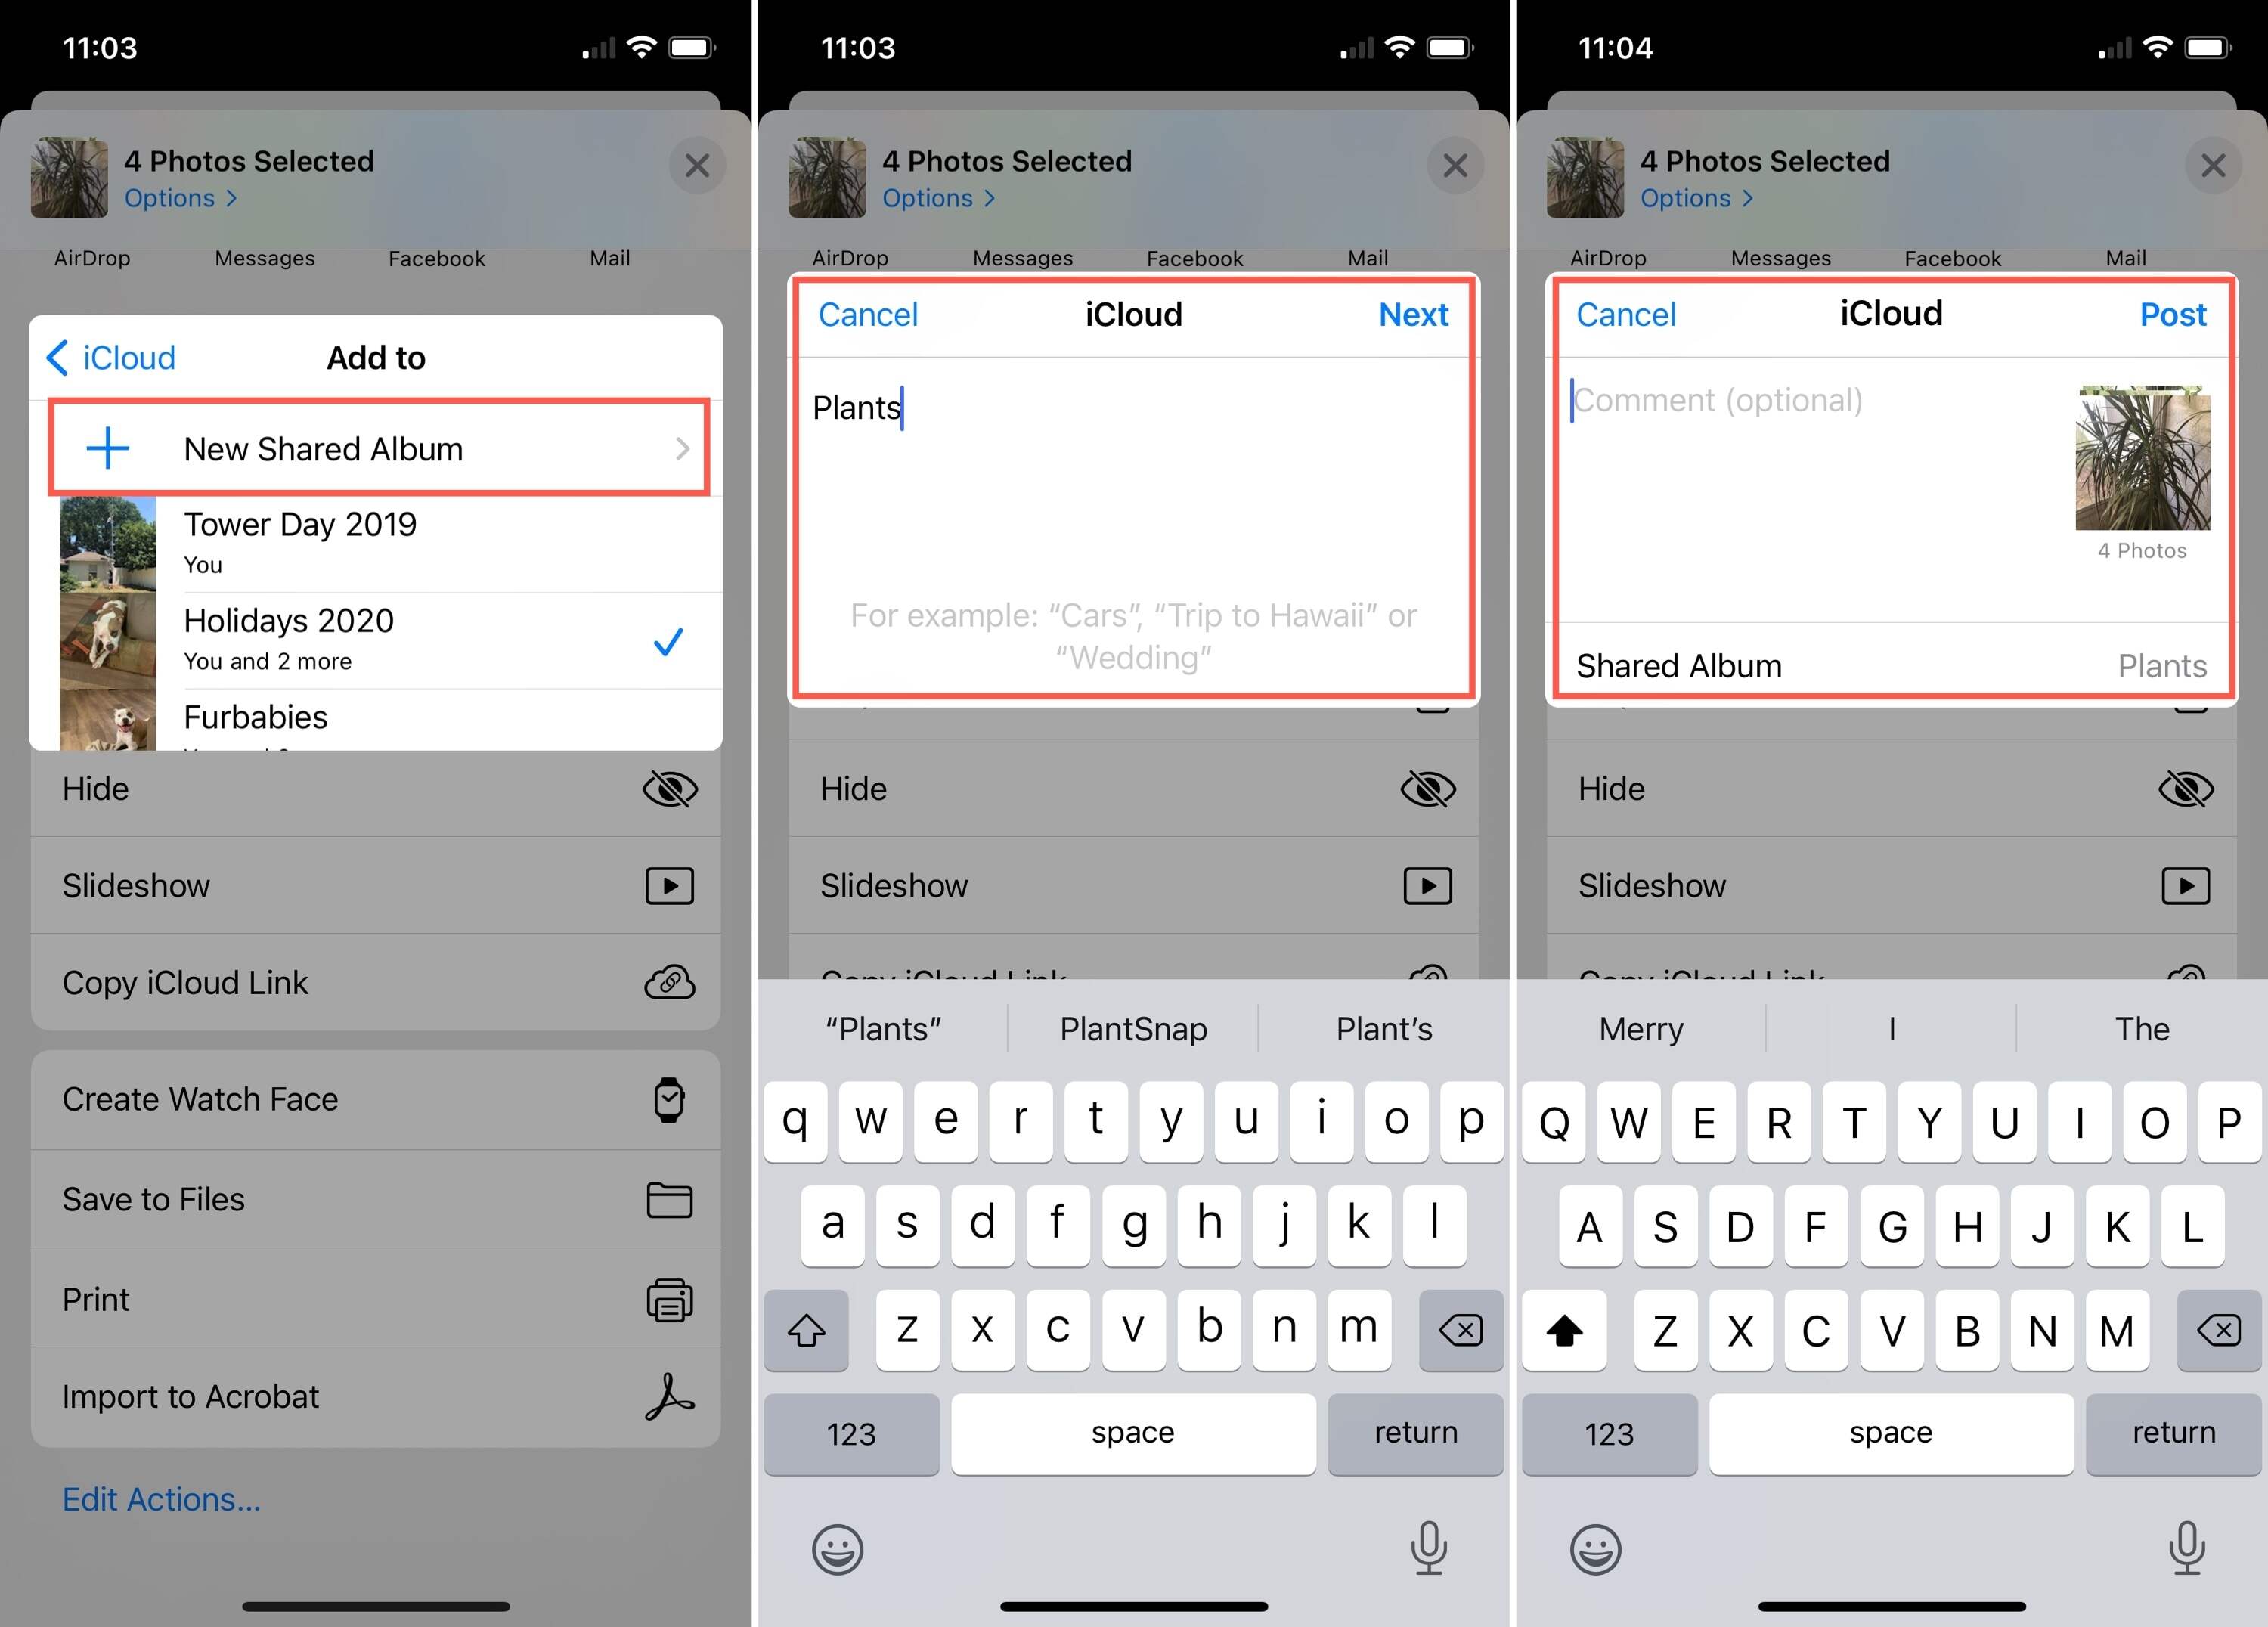
Another option for sharing iPhone photo albums is by creating a shared album in the Photos app. This allows you to invite others to view and contribute to the album, making it a great way to collaborate on a collection of photos. To create a shared album, open the Photos app, go to the “Albums” tab, and tap on the “New Album” button. Give your album a name and select the photos you want to include. After creating the album, tap on the “People” tab, and choose how you want to invite others to view or contribute to the album. You can send invites via iMessage, email, or generate a link that can be shared through any messaging platform or social media.
When sharing iPhone photo albums, it’s important to consider the privacy settings. You may want to adjust the settings to control who can view, comment, or add photos to the shared album. This way, you can ensure that only the intended recipients have access to the album. Additionally, you should be mindful of the size of the album when sharing through messaging or email, as large files may take longer to send or receive.
Sharing iPhone photo albums is a convenient way to showcase your favorite moments with others. Whether you’re sharing through the Photos app, a specific app, or creating a shared album, the process is simple and allows you to easily spread joy and memories with your loved ones.
Tips for Managing iPhone Photo Albums
Managing photo albums on your iPhone can be a breeze if you follow these simple tips and tricks. Whether you’re a photography enthusiast or just someone who loves capturing precious moments, organizing your photos effectively can save you time and make it easier to find and share your favorite memories. Here are some helpful tips to help you manage your iPhone photo albums like a pro:
1. Name Your Albums: Don’t let your photo albums become a chaotic mess of random pictures. Take the time to give each album a descriptive name that reflects its contents. This will make it easier to locate specific photos and create a more organized photo library.
2. Use Folders: If you have a large number of albums, consider creating folders to group related albums together. For example, you could have a folder for vacations, another for family events, and so on. This will further enhance the organization and accessibility of your photo albums.
3. Delete Unwanted Photos: Regularly go through your photo library and delete any unwanted or duplicate photos. This will not only free up storage space on your iPhone but also make it easier to navigate through your albums and find the photos you actually want to see.
4. Utilize the “Favorites” Album: The “Favorites” album is a handy feature that allows you to quickly access your most cherished photos. Simply tap the heart icon beneath a photo to add it to your favorites. This album is a great way to have quick access to your best shots without having to search through all your albums.
5. Take Advantage of Editing Tools: The built-in editing tools in the Photos app can help you enhance and improve your photos. Crop, adjust colors, apply filters, and more to make your pictures stand out. By editing your photos, you can ensure that your albums are filled with visually stunning images.
6. Set up iCloud Photo Library: Enabling iCloud Photo Library allows you to store all your photos and videos in the cloud, freeing up space on your iPhone. This way, you can access your entire photo library from any device, anytime. It’s a convenient way to keep all your memories secure and easily accessible.
7. Back Up Your Photos: While iCloud is a great way to store and access your photos, it’s always a good idea to have an additional backup. Regularly back up your iPhone photos to your computer or an external hard drive to ensure that you never lose any precious memories.
8. Explore Third-Party Apps: The App Store is filled with numerous third-party apps that can help you further manage and organize your photo albums. From advanced editing tools to specialized organization features, these apps offer additional functionality to enhance your photo management experience.
By following these tips, you can take control of your iPhone photo albums and ensure that your precious memories are organized and easily accessible. With a bit of effort and organization, you can transform your photo library into a well-curated collection of beautiful moments that you can enjoy and share with others.
In conclusion, creating and sharing iPhone photo albums is a simple and convenient process that allows you to organize and share your cherished memories with ease. With the built-in Photos app on your iPhone, you can easily create albums, add photos to them, and share them with friends and family through various platforms. Additionally, utilizing third-party apps like Google Photos or Dropbox can provide even more flexibility and options for photo organization and sharing.
By following the steps outlined in this article, you can unleash the full potential of your iPhone’s photo capabilities and enhance your photography experience. So go ahead, organize your photos into albums, share them with your loved ones, and relive those special moments anytime, anywhere. Embrace the power of iPhone photo albums and make your pictures come to life!
FAQs
Q: Can I create photo albums on my iPhone?
Yes, you can create and manage photo albums directly on your iPhone. This allows you to organize your photos into different collections for easy access and sharing.
Q: How do I create a photo album on my iPhone?
To create a photo album on your iPhone, simply open the Photos app and follow these steps:
- Tap on “Albums” at the bottom of the screen.
- Tap on the “+” button to create a new album.
- Enter a name for the album.
- Tap “Save” to create the album.
Q: Can I add photos to an existing album on my iPhone?
Yes, you can add photos to an existing album on your iPhone. Here’s how:
- Open the Photos app and go to the album where you want to add photos.
- Tap on the “+” button to add new photos.
- Select the photos you want to add from your camera roll.
- Tap “Done” to add the selected photos to the album.
Q: How do I share a photo album on my iPhone?
Sharing a photo album on your iPhone is easy. Here’s what you need to do:
- Open the Photos app and go to the album you want to share.
- Tap on the “Select” button and choose the photos you want to share.
- Tap on the “Share” button.
- Select the method you want to use to share the album, such as AirDrop, Messages, or Email.
- Follow the prompts to send the album to your chosen recipients.
Q: Can I delete a photo album on my iPhone?
Yes, you can delete a photo album on your iPhone. Follow these steps:
- Open the Photos app and go to the “Albums” section.
- Swipe left on the album you want to delete.
- Tap on the “Delete” button.
- Confirm the deletion by tapping on “Delete Album”.