
Having enough storage on your iPhone is crucial for storing all your photos, videos, apps, and files. However, sometimes you may find yourself running out of space. The good news is that there is a way to share storage on your iPhone and free up valuable memory.
Sharing storage on your iPhone involves optimizing the space you have by offloading unused apps, deleting unnecessary files, and utilizing cloud storage options. Whether you have an iPhone 12 Pro Max or an older model, understanding how to share storage can make a significant difference in your device’s performance.
In this article, we will explore various methods to effectively share storage on your iPhone, allowing you to maximize the available space and enjoy a seamless user experience. From managing app storage to utilizing iCloud storage, we will guide you through the steps to free up memory and make the most of your iPhone’s storage capacity.
Inside This Article
- Setting up iCloud Storage
- Sharing Files via AirDrop
- Sharing Files using iCloud Drive
- Sharing Photos using Shared Albums
- Conclusion
- FAQs
Setting up iCloud Storage
If you’re looking to share storage on your iPhone, one of the most convenient and efficient options available is iCloud. iCloud storage allows you to store your photos, videos, documents, and other files in the cloud, freeing up valuable space on your device. Setting up iCloud storage is quick and easy, and it offers seamless integration with your iPhone.
To start using iCloud storage, follow these simple steps:
Step 1: Sign in to iCloud
Ensure that you are signed in to your iCloud account on your iPhone. If you don’t have an iCloud account, you can create one by going to “Settings,” tapping your name at the top, and then selecting “iCloud.” Follow the prompts to set up your iCloud account.
Step 2: Enable iCloud Storage
Once you’re signed in to your iCloud account, go to “Settings” and tap on your name. From there, select “iCloud,” and then choose “iCloud Storage.” Toggle the switch to enable iCloud storage on your device.
Step 3: Choose Storage Plan
After enabling iCloud storage, you’ll need to choose a storage plan based on your needs. iCloud offers several options, including 5GB of free storage and various paid plans for additional storage. Select the plan that fits your requirements and budget.
Step 4: Manage iCloud Storage
Once you’ve set up iCloud storage, you can manage your files and data by going to “Settings,” tapping your name, and selecting “iCloud.” From there, you can view and manage your storage usage, delete unnecessary files, and optimize your storage settings.
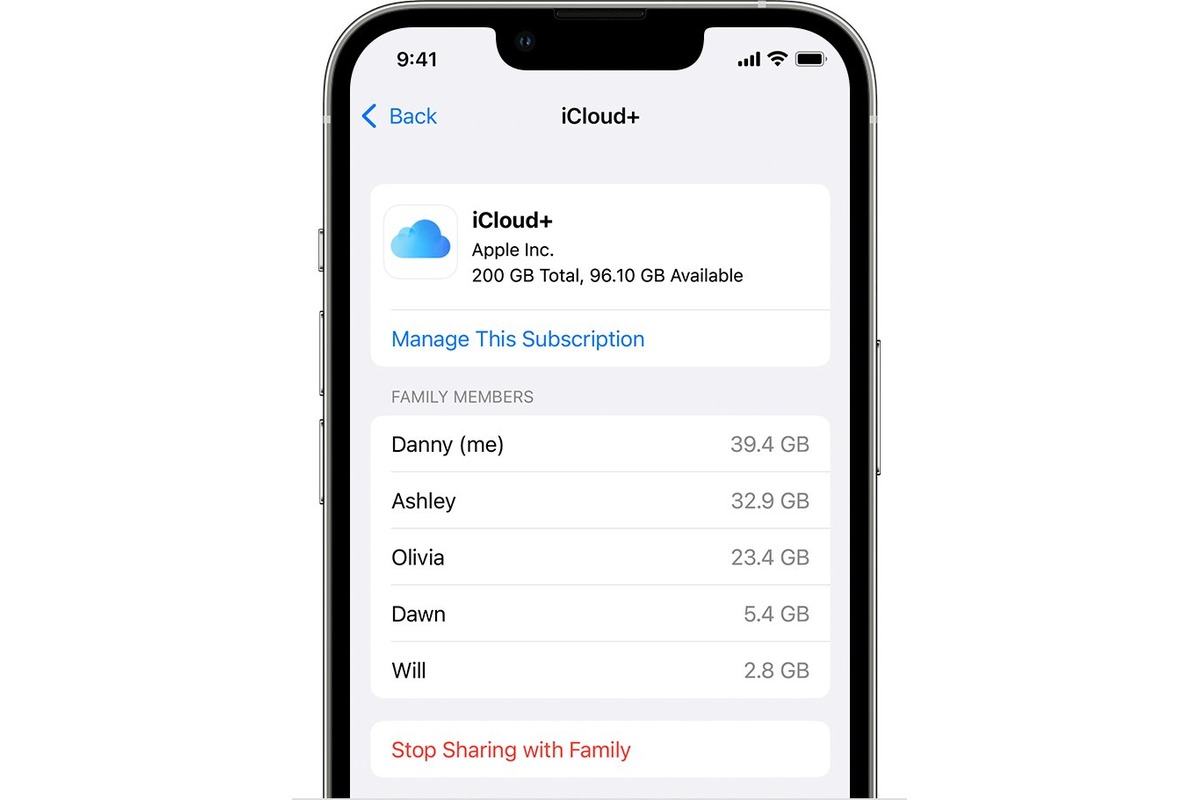
Step 5: Share Storage with Family Members
If you have a Family Sharing plan set up, you can also share your iCloud storage with family members. To do this, go to “Settings,” tap your name, select “Family Sharing,” and then choose “iCloud Storage.” Toggle the switch to enable storage sharing with your family members.
That’s it! You have successfully set up iCloud storage on your iPhone. Now, you can easily store and access your files, share storage with family members, and optimize your device’s storage space.
Sharing Files via AirDrop
Sharing files on your iPhone is incredibly easy with the help of AirDrop. AirDrop is a feature that allows you to wirelessly transfer files between Apple devices. Whether you want to send a photo, a document, or even a song to someone, AirDrop makes it convenient and quick. Follow the steps below to share files via AirDrop:
- Ensure that both your iPhone and the recipient’s device have AirDrop enabled. To do this, swipe up from the bottom of the screen to access the Control Center on both devices.
- Tap on the AirDrop icon, which looks like concentric circles, in the lower-left corner of the Control Center.
- Select the visibility option you prefer: “Contacts Only” or “Everyone.” Choosing “Contacts Only” will restrict AirDrop to only those in your Contacts list, while selecting “Everyone” allows anyone nearby with AirDrop enabled to see and share files with you.
- Open the app or folder that contains the file you want to share.
- Tap and hold the file you wish to share until a menu appears.
- Tap on the Share button, which looks like a square with an arrow pointing upward.
- AirDrop will detect nearby devices with AirDrop enabled. Select the desired device from the list of available options.
- The recipient will be prompted on their device to accept the file. Once they do, the file will be transferred and saved in their device’s appropriate app or location.
AirDrop offers a seamless way to share files between Apple devices, eliminating the need for cables or third-party apps. It’s a valuable tool for transferring files quickly and securely, especially when you’re in close proximity to the recipient.
Sharing Files using iCloud Drive
Sharing files with others is made easy with iCloud Drive on your iPhone. You can easily collaborate on documents, share photos, and even work on projects together. Here’s how you can share files using iCloud Drive:
1. Open the Files app on your iPhone. This app allows you to access all your files stored in iCloud Drive.
2. Locate the file that you want to share. You can navigate through your folders or use the search feature to find the specific file.
3. Once you find the file, tap and hold on it until a menu pops up. Select “Share” from the options.
4. A sharing menu will appear, giving you various options to share the file. You can choose to send it via AirDrop, Messages, Mail, or other compatible apps.
5. Select the desired method of sharing and follow the prompts to send the file to the recipient.
6. If you want to share a link to the file, you can also choose the “Copy Link” option. This will generate a shareable link that you can send to others.
7. The recipient will receive the file or the link, depending on the sharing method you chose. They can then access and download the file on their own devices.
8. If you want to collaborate on a document with someone, you can also invite them to edit the file directly from iCloud Drive. Just select the “Add People” option in the sharing menu and enter the email address or contact of the person you want to invite.
With iCloud Drive, sharing files becomes a seamless and secure process. Whether you’re working on a project with a colleague or sharing memories with friends and family, iCloud Drive makes it easy to collaborate and share files on your iPhone.
Sharing Photos using Shared Albums
Sharing photos with friends and family is a great way to relive memories and stay connected. On your iPhone, you can easily share photos using a feature called Shared Albums. This allows you to create a shared photo album that multiple people can access and add their own photos to.
To create a shared album, follow these steps:
- Open the Photos app on your iPhone.
- Tap on the “Albums” tab at the bottom of the screen.
- Scroll down and tap on “See All” next to the “Shared Albums” section.
- Tap on the “+” button to create a new shared album.
- Give your shared album a name and add the people you want to share it with.
- Tap on “Create” to create the shared album.
Once the shared album is created, you can start adding photos to it. To add photos, follow these steps:
- Open the shared album in the Photos app.
- Tap on the “+” button to add a photo.
- Select the photos you want to add from your photo library.
- Tap on “Done” to add the photos to the shared album.
Anyone who has access to the shared album can view and add their own photos to it. They can also like and comment on the photos within the album, creating a fun and interactive photo-sharing experience.
To access a shared album that someone else has created, follow these steps:
- Open the Photos app on your iPhone.
- Tap on the “Albums” tab at the bottom of the screen.
- Scroll down and tap on the shared album you want to view.
From there, you can view all the photos in the shared album and even add your own if you have permission to do so. It’s a convenient way to collect and share photos from different people in one central location.
Sharing photos using Shared Albums on your iPhone is a simple and effective way to keep memories alive and connect with loved ones. Give it a try and make sharing photos a breeze!
Conclusion
Sharing storage on your iPhone can be a game-changer when it comes to managing your files and maximizing the available space. Whether you need to transfer photos, videos, documents, or apps, the options available to you are varied and convenient.
From using cloud storage services like iCloud and Google Drive to utilizing the Files app or AirDrop, there is no shortage of ways to share and store your data seamlessly. Furthermore, the introduction of external storage devices and the ability to offload unused apps provide even more flexibility in managing your device’s storage.
By taking advantage of these features, you can not only free up space on your iPhone but also ensure that your important files are accessible across multiple devices. So go ahead and explore the different methods for sharing storage on your iPhone and make the most out of your device’s capabilities!
FAQs
1. How can I share storage on my iPhone?
2. Can I share storage with multiple devices?
3. Will sharing storage affect my data and privacy?
4. Do I need to download any additional apps to share storage?
5. Can I limit the amount of storage I share with others?