
Are you an iPhone user who loves capturing precious moments on your device? Adding pictures to an album on your iPhone is a fantastic way to organize and cherish those memories. Whether you want to create a vacation album or sort your photos by year, the process is simple and convenient. In this article, we will guide you step-by-step on how to add pictures to an album on your iPhone, allowing you to effortlessly curate your own personalized collection. Say goodbye to scattered photos and cluttered galleries – with this handy feature, you’ll have all your cherished moments neatly organized at your fingertips. Let’s dive in and explore the wonderful world of iPhone albums!
Inside This Article
- Uploading Pictures to the Photo Albums on iPhone
- Step-by-Step Guide to Adding Pictures to an iPhone Album
- Organizing Pictures in iPhone Albums
- Tips for Managing and Displaying Pictures in iPhone Albums
- Conclusion
- FAQs
Uploading Pictures to the Photo Albums on iPhone
One of the key features of the iPhone is its remarkable camera that allows you to capture stunning photos. But what do you do after taking all those fantastic shots? You can easily organize and manage your photos by uploading them to different albums on your iPhone. In this guide, we’ll walk you through the steps to add pictures to albums on your iPhone, whether it’s creating a new album, adding photos to an existing album, moving photos to a different album, or even deleting photos from an album.
Creating a New Album
If you want to create a new album on your iPhone to organize your photos, here’s how you can do it:
- Open the Photos app on your iPhone.
- Tap on the Albums tab located at the bottom of the screen.
- Scroll to the bottom of the page and tap on the “+” button to create a new album.
- Give your album a name by typing it in the “Title” field.
- Tap on “Save” to create the new album.
Once you have created a new album, you can start adding photos to it.
Adding Photos to an Existing Album
If you already have albums on your iPhone and you want to add photos to one of them, follow these steps:
- Open the Photos app on your iPhone.
- Navigate to the album where you want to add photos.
- Tap on the “Select” button located at the top right corner of the screen.
- Select the photos you want to add to the album by tapping on them.
- Tap on the “Add To” button.
- Choose the album you want to add the selected photos to.
Now your selected photos will be added to the chosen album, keeping your photo library organized.
Moving Photos to a Different Album
If you have mistakenly added a photo to the wrong album or you simply want to rearrange your photos, you can easily move them to a different album. Here’s how:
- Open the Photos app on your iPhone.
- Navigate to the album that contains the photo you want to move.
- Tap on the “Select” button located at the top right corner of the screen.
- Select the photo you want to move by tapping on it.
- Tap on the “Share” button.
- Choose “Add to Album” from the options.
- Select the album where you want to move the photo.
Now the photo will be moved from its current album to the new album, allowing you to keep everything organized and in the right place.
Deleting Photos from an Album
If you no longer want certain photos in an album, you can easily remove them. Here’s how:
- Open the Photos app on your iPhone.
- Navigate to the album that contains the photo you want to delete.
- Tap on the “Select” button located at the top right corner of the screen.
- Select the photo(s) you want to delete by tapping on them.
- Tap on the “Delete” button.
- Confirm the deletion by tapping on “Delete” again.
The selected photos will be removed from the album but will still be available in your Camera Roll or other albums.
By following these simple steps, you can easily create albums, add photos, rearrange them, and delete unwanted ones on your iPhone. This will help you keep your photo library organized and ensure that your precious memories are easily accessible whenever you need them.
Step-by-Step Guide to Adding Pictures to an iPhone Album
Do you want to keep your iPhone photos organized in albums? Adding pictures to albums on your iPhone is a great way to categorize your photos and make them easily accessible. In this step-by-step guide, we will show you how to add pictures to an album on your iPhone. Let’s get started!
Step 1: Launch the Photos App
To begin, unlock your iPhone and locate the Photos app on your home screen. Tap on the Photos app icon to open it.
Step 2: Select the Photos You Want to Add
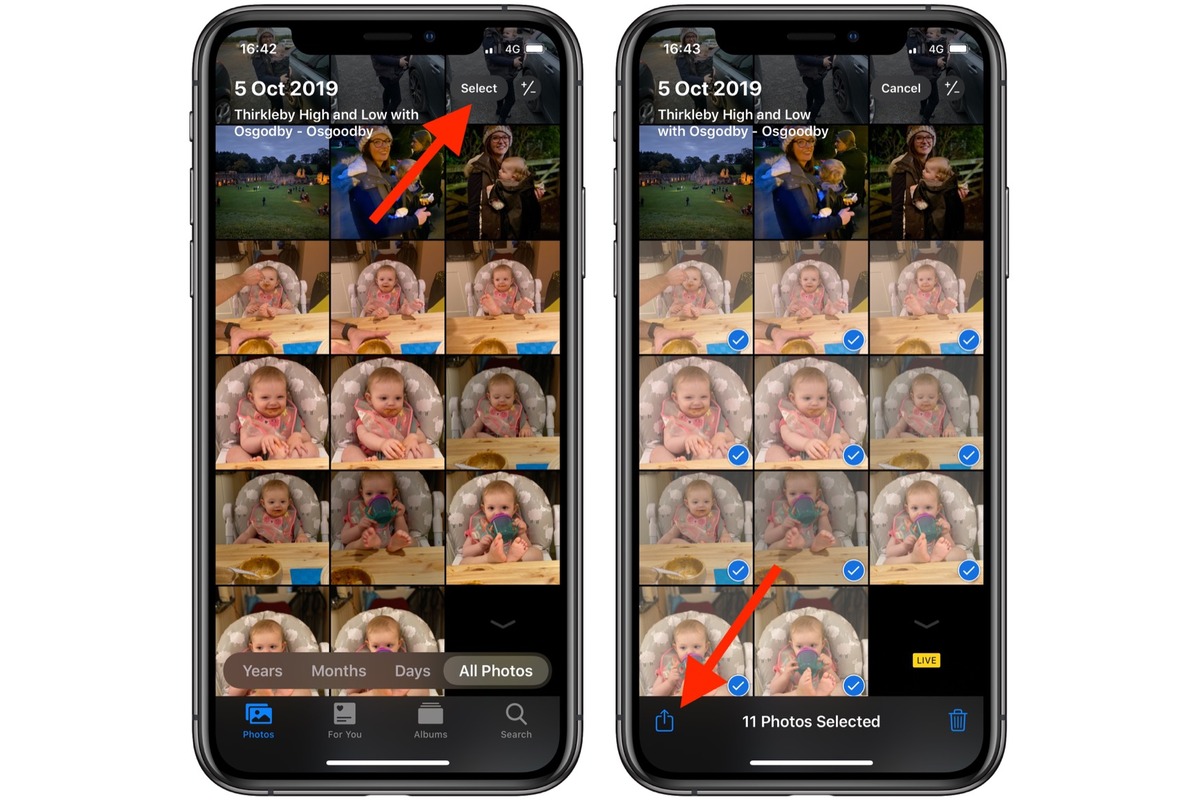
Once the Photos app is open, navigate to the “Photos” tab at the bottom of the screen. Here you will see all of the photos in your iPhone’s camera roll. Tap on the “Select” button in the top-right corner of the screen.
Step 3: Choose the Photos to Add to an Album
After tapping on the “Select” button, you can now choose the photos you want to add to an album. Tap on each photo to select it. You will see a blue checkmark appear on the selected photos.
Step 4: Tap on the Share Button
Once you have selected the photos you want to add, tap on the share button located at the bottom-left corner of the screen. It is represented by a square with an upward arrow.
Step 5: Select “Add to Album”
After tapping on the share button, a menu of sharing options will appear. Scroll through the options and locate “Add to Album”. Tap on it to continue.
Step 6: Choose an Existing Album or Create a New One
At this point, you can select an existing album to add your photos to, or you can choose to create a new album. To add your photos to an existing album, tap on the album name. To create a new album, tap on “New Album” and give it a name.
Step 7: Confirm the Addition
After selecting the album, you will be taken back to the sharing menu. Tap on “Done” in the top-right corner to confirm the addition of your photos to the album.
Step 8: Check the Album
Finally, go back to the main screen of the Photos app and navigate to the “Albums” tab at the bottom. Find the album you added the photos to and tap on it to see your newly organized pictures.
Congratulations! You have successfully added pictures to an album on your iPhone. Now you can easily find and view your photos in a specific album whenever you want.
Organizing Pictures in iPhone Albums
Organizing your pictures in albums on your iPhone is a great way to keep your photos neat, organized, and easily accessible. Whether you want to group your photos by event, create a collection of your favorite memories, or categorize them in any other way, the iPhone provides a user-friendly interface that allows you to create and manage albums effortlessly.
Here are a few simple steps to help you organize your pictures in albums on your iPhone:
- Create a New Album: To create a new album, open the Photos app on your iPhone and tap on the “Albums” tab at the bottom of the screen. Then, tap on the “+” symbol in the top-left corner and enter a name for your new album. Once the album is created, you can start adding photos to it.
- Adding Photos to an Existing Album: To add photos to an existing album, go to the album where you want to add the photos. Tap on the “Select” button in the top-right corner and choose the photos you want to add. Once selected, tap on the “Add” button to include them in the album.
- Moving Photos to a Different Album: If you want to move photos from one album to another, open the album containing the photos you wish to move. Tap on the “Select” button, choose the photos you want to move, and then tap on the “Move” option. Select the destination album and tap on “Move Photos” to relocate them.
- Deleting Photos from an Album: If you no longer want specific photos in an album, go to the album and tap on the “Select” button. Choose the photos you want to remove and tap on the trash can icon to delete them. Be aware that deleting a photo from an album will not delete it from your overall photo library.
By organizing your pictures in albums on your iPhone, you can easily find and showcase your favorite photos with just a few taps. Whether you want to share them with friends and family or simply enjoy a stroll down memory lane, the ability to organize your photos in albums makes it all the more convenient and enjoyable.
Tips for Managing and Displaying Pictures in iPhone Albums
Organizing and displaying your pictures on your iPhone can be a breeze with the help of albums. Whether you want to create a new album, add photos to an existing album, move photos to a different album, or delete photos from an album, the iPhone provides a user-friendly interface to accomplish these tasks. Below are some helpful tips for managing and displaying pictures in iPhone albums.
Create a New Album: To create a new album on your iPhone, open the Photos app and tap on the “Albums” tab at the bottom of the screen. Then, tap on the “+” icon located in the top-left corner. Give your album a name and tap “Save.” You can now start adding photos to your newly created album.
Add Photos to an Existing Album: To add photos to an existing album, navigate to the album where you want to add the photos. Tap on the “+” icon to enter the selection mode. Choose the photos you want to add by tapping on them. Once selected, tap on the “Add” button in the bottom-right corner. The selected photos will now be added to the chosen album.
Move Photos to a Different Album: If you want to move photos from one album to another, go to the source album where the photos are currently located. Tap on the “Select” button at the top-right corner to enter the selection mode. Choose the photos you want to move by tapping on them. Once selected, tap on the “Share” icon located at the bottom-left corner. From the sharing options, select “Add to Album” and choose the destination album where you want the photos to be moved.
Delete Photos from an Album: To remove photos from an album, open the album and tap on the photo you want to delete. In the photo view, tap on the trash bin icon at the bottom-right corner. Confirm the deletion by tapping on “Delete Photo.” The selected photo will be removed from the album, but it will remain in the “All Photos” folder.
With these tips, you can efficiently manage and display your pictures in iPhone albums. Enjoy organizing and showcasing your favorite moments right at your fingertips.
Conclusion
In conclusion, adding pictures to an album on your iPhone is a simple and convenient way to organize and cherish your precious memories. With just a few steps, you can create personalized albums, organize your photos, and easily access them whenever you want.
By utilizing the built-in Photos app on your iPhone, you can create, customize, and manage your photo albums effortlessly. Whether you want to create a themed album for a special event or categorize your pictures based on different criteria, the options are endless.
Remember to take advantage of features like sorting, adding captions, and syncing your albums across devices to ensure your photo collection remains organized and accessible no matter where you are.
So, get started with organizing your photo collection today and relive your favorite moments with just the touch of a button!
FAQs
Q: How do I add pictures to an album on my iPhone?
A: To add pictures to an album on your iPhone, follow these steps:
- Open the Photos app on your iPhone.
- Navigate to the album where you want to add the pictures.
- Tap on the “+” or “Add” button to create a new album or select an existing one.
- Choose the pictures you want to add to the album. You can select multiple pictures by tapping on them.
- Tap on the “Done” button to confirm and add the selected pictures to the album.
Q: Can I add pictures to multiple albums on my iPhone at the same time?
A: No, you cannot add pictures to multiple albums at the same time on your iPhone. You need to add pictures to each album individually. However, you can copy or move pictures from one album to another after they have been added.
Q: Can I create new albums directly from the Photos app on my iPhone?
A: Yes, you can create new albums directly from the Photos app on your iPhone. When adding pictures to an album, you have the option to create a new album and name it. Simply tap on the “+” or “Add” button and choose the “New Album” option to create a new album on your iPhone.
Q: Can I delete pictures from an album without deleting them from the Photos app?
A: Yes, you can delete pictures from an album without deleting them from the Photos app on your iPhone. When viewing an album, tap on the “Select” button, then choose the pictures you want to delete, and tap on the trash can icon. This will remove the pictures from the album while keeping them in the main Photos app.
Q: How do I rearrange pictures within an album on my iPhone?
A: To rearrange pictures within an album on your iPhone, follow these steps:
- Open the Photos app on your iPhone and navigate to the album.
- Tap on the “Select” button.
- Choose the pictures you want to rearrange.
- Once selected, tap and hold on one of the pictures and drag it to the desired position within the album. The other selected pictures will move accordingly.
- Release your finger to set the new order of the pictures.