
Are you tired of photos with a distracting background taking away from the main subject? Do you want to create professional-looking images with a beautifully blurred background, even if you’re using your mobile phone? Look no further than Adobe Lightroom Mobile! In this comprehensive guide, we will take you through the step-by-step process of blurring the background in Lightroom Mobile, allowing you to elevate the visual impact of your photos. Whether you’re a beginner or an experienced photographer, our easy-to-follow instructions will help you achieve stunning results. With just a few taps on your mobile device, you’ll be able to transform ordinary photos into captivating works of art. Say goodbye to busy backgrounds and hello to beautifully blurred images that draw the viewer’s attention to the subject. Let’s dive in and unlock the power of blur in Lightroom Mobile!
Inside This Article
- Getting Started with Lightroom Mobile
- Understanding the Basics of Background Blur
- Method 1: Using the Depth Tool
- Method 2: Applying a Graduated Filter
- Method 3: Utilizing the Radial Filter
- Method 4: Applying the Blur Tool
- Conclusion
- FAQs
Getting Started with Lightroom Mobile
Lightroom Mobile is a powerful photo editing app that allows you to edit and enhance your photos on the go. Whether you’re a professional photographer or just a hobbyist, this mobile version of the popular Adobe software is a great tool to have in your arsenal. With its user-friendly interface and robust editing features, Lightroom Mobile makes it easy to enhance your images and create stunning visual effects.
The first step in getting started with Lightroom Mobile is to download the app onto your mobile device. It is available for both iOS and Android platforms, and can be found in the respective app stores. Once you have downloaded and installed the app, open it up and sign in with your Adobe ID. If you don’t have an Adobe ID, you can create one for free.
After signing in, you’ll be greeted with the home screen of Lightroom Mobile. This is where you can organize and access your photo library. To import photos into Lightroom Mobile, simply tap on the “+” icon at the bottom of the screen and select the photos you want to import from your device’s gallery. Alternatively, you can sync your photos from Lightroom Classic or Lightroom Desktop using the Adobe Creative Cloud.
Once your photos are imported, you can begin editing them in Lightroom Mobile. The app offers a wide range of editing tools and features, including exposure adjustments, color correction, cropping, and more. To start editing a photo, simply tap on the photo thumbnail and then tap on the “Edit” button at the bottom of the screen.
One of the key features of Lightroom Mobile is its ability to sync edits across all devices. This means that any edits you make on your mobile device will automatically sync to your other devices, such as your computer or tablet. This allows for a seamless editing workflow, allowing you to work on your photos wherever you are.
In addition to editing, Lightroom Mobile also offers a variety of preset filters that you can apply to your photos with just a tap. These presets can instantly transform the look and feel of your images and give them a professional touch. You can also create and save your own presets to use on future photos.
Once you are happy with your edits, you can export your photos from Lightroom Mobile. The app offers several export options, including saving to your device’s gallery, sharing directly to social media platforms, or exporting to Adobe Creative Cloud for further editing in Lightroom Classic or Lightroom Desktop.
Getting started with Lightroom Mobile is just the tip of the iceberg. The app offers a wealth of advanced features and editing capabilities that can help you take your photography to the next level. With practice and experimentation, you’ll soon be able to master the art of photo editing on your mobile device.
Understanding the Basics of Background Blur
Background blur is a popular photography technique that helps to create a sense of depth and focus on the subject. It adds a professional and artistic touch to your photos by separating the subject from the background and drawing attention to the main element of the composition.
The concept behind background blur is to intentionally blur the areas of the photo that are not in focus. By doing so, you can emphasize the subject and make it stand out from the background. This technique is commonly used in portrait photography to create a shallow depth of field and create a pleasing bokeh effect.
There are several factors that affect the background blur in your photos. One of the key factors is the aperture of your camera or lens. When you use a wide aperture (small f-number), it will result in a shallower depth of field and a more pronounced background blur. On the other hand, a narrow aperture (large f-number) will increase the depth of field and reduce the background blur.
The distance between the subject and the background also plays a significant role in background blur. The closer the subject is to the camera and the farther the background, the more prominent the background blur will be. This is because the wider the distance between the subject and the background, the more the background will appear out of focus.
Another factor to consider is the focal length of your lens. Generally, using a longer focal length will result in a more pleasing background blur. Telephoto lenses are commonly preferred for portrait photography because they create a compressed perspective and provide a beautiful bokeh effect.
In addition to these factors, the type of lens and camera you use can also influence the background blur. Prime lenses with a wide maximum aperture and lenses specifically designed for portrait photography tend to produce better background blur compared to kit lenses.
It’s important to note that background blur can be achieved not only with professional cameras but also with smartphone cameras. Innovative editing tools available in mobile apps like Lightroom can help you achieve stunning background blur effects even if you don’t have a high-end camera.
Now that you have a basic understanding of the factors that contribute to background blur, let’s delve into the different methods you can use to blur the background in Lightroom Mobile.
Method 1: Using the Depth Tool
One of the easiest ways to blur the background in Lightroom Mobile is by using the Depth tool. This tool takes advantage of the depth information captured by newer smartphones with dual lenses or depth sensors. It allows you to apply a realistic and natural-looking background blur effect.
To start, open your desired photo in Lightroom Mobile and tap on the Edit button at the bottom of the screen. Once in the editing interface, scroll to the right and select the Effects tab. Here, you’ll find the Depth tool.
Tap on the Depth tool, and Lightroom Mobile will analyze the depth information in your photo. You will see a Depth Range slider that allows you to control the amount of background blur you want to apply. Moving the slider to the right will increase the blur, while moving it to the left will decrease it.
It’s important to note that the effectiveness of the Depth tool depends on the quality of the depth information captured by your smartphone. If your phone does not have a dual-camera setup or depth sensor, this method may not be available or may not produce the desired results.
Once you have achieved the desired background blur effect, you can further refine the image by adjusting other settings such as contrast, exposure, and saturation. This will help ensure a cohesive and visually appealing final image.
After you are satisfied with the edits, don’t forget to save your image either to the device or sync it with your Adobe Creative Cloud account for easy access across all your devices.
Using the Depth tool in Lightroom Mobile is a simple and effective way to blur the background in your photos. It allows you to create a professional and artistic look without the need for complex editing techniques or expensive equipment.
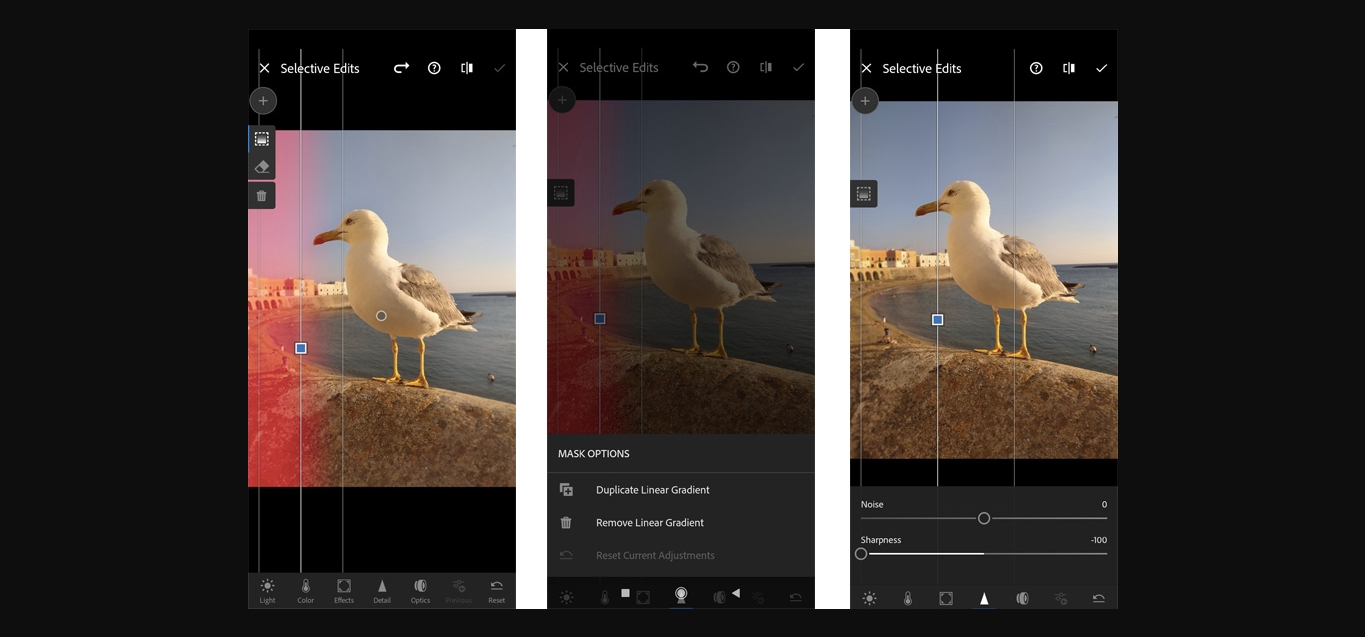
Method 2: Applying a Graduated Filter
One of the effective methods to blur the background in Lightroom Mobile is by using the Graduated Filter tool. This tool allows you to apply selective adjustments to specific areas of your photo, including blurring the background. Here’s how you can use the Graduated Filter tool to achieve a beautiful blurred background:
1. Open your desired photo in Lightroom Mobile and navigate to the Edit mode.
2. At the bottom of the editing options, you’ll find the “Graduated Filter” icon. Tap on it to activate the tool.
3. By default, the Graduated Filter tool will have certain adjustments applied to it. To create the background blur effect, you need to reset these adjustments by tapping on the “Reset” icon.
4. Once the adjustments are reset, you’ll notice two lines appear on your photo. These lines represent the area where the filter will be applied. You can adjust the length and angle of the lines by dragging them with your finger.
5. To create a more pronounced blur effect, you can increase the “Feather” slider. This will create a smoother transition between the blurred and non-blurred areas.
6. Now, it’s time to adjust the settings to achieve the desired blur effect. You can play around with the “Exposure,” “Contrast,” and “Clarity” sliders to fine-tune the blur effect. Experiment with these settings until you achieve the desired result.
7. If you want to further enhance the blur effect, you can also play around with other adjustment options like “Saturation,” “Highlights,” and “Shadows.” These adjustments will help you create a more visually appealing background blur effect.
8. Once you’re satisfied with the result, tap on the checkmark icon to apply the Graduated Filter adjustments to your photo.
9. Finally, don’t forget to save your edited photo by tapping on the “Save” or “Export” option, depending on your preferences.
The Graduated Filter tool in Lightroom Mobile gives you the flexibility to selectively blur the background of your photos, resulting in a professional and visually captivating image. With a few simple adjustments, you can create stunning background blur effects and make your subject stand out.
Method 3: Utilizing the Radial Filter
One of the most effective ways to blur the background in Lightroom Mobile is by utilizing the Radial Filter tool. This tool allows you to create a circular or elliptical mask over a specific area of your image, isolating it from the rest. By adjusting the settings of the Radial Filter, you can blur the background and create a beautiful depth of field effect.
To get started, open your image in Lightroom Mobile and navigate to the Edit menu. From there, select the Radial Filter tool, which is represented by an icon resembling a circle. Once selected, you can choose the shape and size of the filter by dragging the handles or adjusting the sliders.
Next, position the Radial Filter over the area you want to keep in focus, typically the subject of your image. You can resize and reposition the filter to ensure it covers the desired area perfectly.
Now comes the fun part! In the Radial Filter settings, you will find various adjustments that can help you achieve the desired blur effect. The most important setting is the Feather option. Increasing the feather value will create a smoother transition between the focused area and the background, resulting in a more natural-looking blur.
Additionally, you can play around with the Exposure, Clarity, and Sharpness sliders to further enhance the overall look of your image. These adjustments allow you to fine-tune the contrast and details within the focused area, ensuring it stands out even more against the blurred background.
Once you are satisfied with the settings, click on the Done button to apply the radial blur filter to your image. You can still make adjustments afterwards by selecting the filter and modifying its settings.
Keep in mind that the Radial Filter tool is highly versatile and can be used for various creative purposes. For example, you can create multiple radial filters to blur different parts of the image, or even invert the filter to keep the background in focus while blurring the subject. Don’t be afraid to experiment and let your creativity shine!
With the Radial Filter tool in Lightroom Mobile, achieving a stunning background blur effect has never been easier. Whether you want to add a touch of professionalism to your portraits or create a dreamy atmosphere in your landscape shots, this method allows you to effortlessly transform your images into works of art.
Method 4: Applying the Blur Tool
Another effective way to blur the background in Lightroom Mobile is by using the Blur Tool. This tool allows you to selectively blur specific areas of your photo, creating a beautiful bokeh effect that can help draw attention to your subject.
Here’s how you can use the Blur Tool:
- Open your photo in Lightroom Mobile and switch to the Edit mode.
- Tap on the Adjustment Tools icon at the bottom of the screen.
- Scroll through the tool options and select the Blur Tool.
- Adjust the size of the brush by dragging the Size slider. Smaller brush sizes are ideal for more precise blurring.
- Use your finger or stylus to paint over the areas of the photo that you want to blur. Typically, these areas are the background or any distractions you want to de-emphasize.
- After painting over the areas, you can fine-tune the blur effect by adjusting the Blur Amount slider. Increase the slider value for a stronger blur effect, or decrease it for a softer blur.
- Continue refining the blur effect until you are satisfied with the result.
- Once you’re done, tap on the checkmark icon to apply the changes.
The Blur Tool in Lightroom Mobile offers a lot of flexibility and control in blurring specific areas of your photo. It allows you to customize the blur effect by adjusting the brush size and blur amount, giving you the freedom to achieve the desired level of background blur.
Remember, the key to using the Blur Tool effectively is to be precise and selective in applying the blur. Take your time and experiment with different brush sizes and blur amounts to achieve the desired aesthetic impact.
Now that you know how to use the Blur Tool in Lightroom Mobile, you can confidently create stunning images with a beautifully blurred background, adding depth and visual interest to your photos.
Conclusion
The ability to blur the background in Lightroom Mobile is a valuable tool for photographers who want to add depth and emphasis to their photos. With just a few simple steps, you can transform an ordinary image into a beautiful and professional-looking masterpiece.
By using the selective editing and adjustment tools in Lightroom Mobile, you can easily isolate your subject and blur the background to create a captivating visual impact. Whether you’re capturing portraits, landscapes, or any other type of photography, this technique can greatly enhance the overall composition of your images.
Remember to experiment with different levels of blur and find the right balance to achieve the desired effect. With practice and patience, you’ll be able to master the art of background blurring in Lightroom Mobile and take your photography skills to new heights.
So go ahead, give it a try and see the difference it can make in your photos. Start blurring backgrounds today and let your creativity shine!
FAQs
Q: Can I blur the background in Lightroom Mobile?
A: Yes, Lightroom Mobile provides various tools and features that allow you to easily blur the background of your photos.
Q: What is the advantage of blurring the background in Lightroom Mobile?
A: Blurring the background in Lightroom Mobile can help to create a more professional and visually appealing photo. By separating the subject from the background, you can draw more attention to the main subject and create a sense of depth and separation.
Q: Does blurring the background affect the image quality?
A: Blurring the background in Lightroom Mobile does not negatively affect the overall image quality. Lightroom Mobile uses advanced algorithms to maintain the sharpness and detail of the subject, while selectively blurring the background.
Q: Can I adjust the amount of blur in Lightroom Mobile?
A: Yes, Lightroom Mobile allows you to control the amount of blur applied to the background. You can easily adjust the strength of the blur effect using the Gradient and Radial Mask tools, giving you full control over the final result.
Q: Can I blur the background of any type of photo in Lightroom Mobile?
A: Yes, Lightroom Mobile can be used to blur the background of any type of photo. Whether it’s a portrait, landscape, or still life, the blurring tools in Lightroom Mobile can be applied to enhance the composition and focus on the main subject.