
If you’re an avid mobile photographer or a professional photo editor, you’re likely familiar with the powerful editing capabilities of Lightroom Mobile. This popular app, developed by Adobe, offers a wide range of tools and features to enhance your photos directly from your mobile device. One common task that often arises during the editing process is the need to remove unwanted objects or blemishes from your images. Whether it’s a distracting person in the background or a random object that spoils the composition, knowing how to remove these elements can greatly improve the overall quality of your photos. In this article, we will guide you through the process of removing objects in Lightroom Mobile, providing you with step-by-step instructions and handy tips to achieve seamless edits and stunning visuals.
Inside This Article
- # How To Remove Object In Lightroom Mobile
- Overview
- Step 1: Open the Lightroom Mobile App
- Step 2: Import an Image
- Step 3: Select the Healing Brush Tool
- Step 4: Zoom In to the Object
- Step 5: Remove the Object Using the Healing Brush
- Step 6: Fine-tune the Edits
- Step 7: Save and Export the Edited Image
- Troubleshooting Common Issues
- Conclusion
- FAQs
# How To Remove Object In Lightroom Mobile
Lightroom Mobile is a powerful photo editing app that allows you to make professional-level edits right from your mobile device. One of the standout features of Lightroom Mobile is the ability to remove unwanted objects from your photos with just a few simple steps. Whether it’s a stray person in the background or an annoying street sign, you can easily erase these distractions and enhance the overall composition of your image. In this article, we will guide you through the process of removing objects in Lightroom Mobile, so you can take your mobile photo editing skills to the next level.
Before we dive into the steps, make sure you have the latest version of Lightroom Mobile installed on your device. Now, let’s get started!
Step 1: Open the Lightroom Mobile App
To begin the object removal process, open the Lightroom Mobile app on your device. If you don’t have it installed, you can download it from the App Store (for iOS users) or Google Play Store (for Android users).
Step 2: Import an Image
Once you have the app open, import the image that you would like to edit. You can choose to import a photo from your device’s camera roll or take a new photo directly within the app.
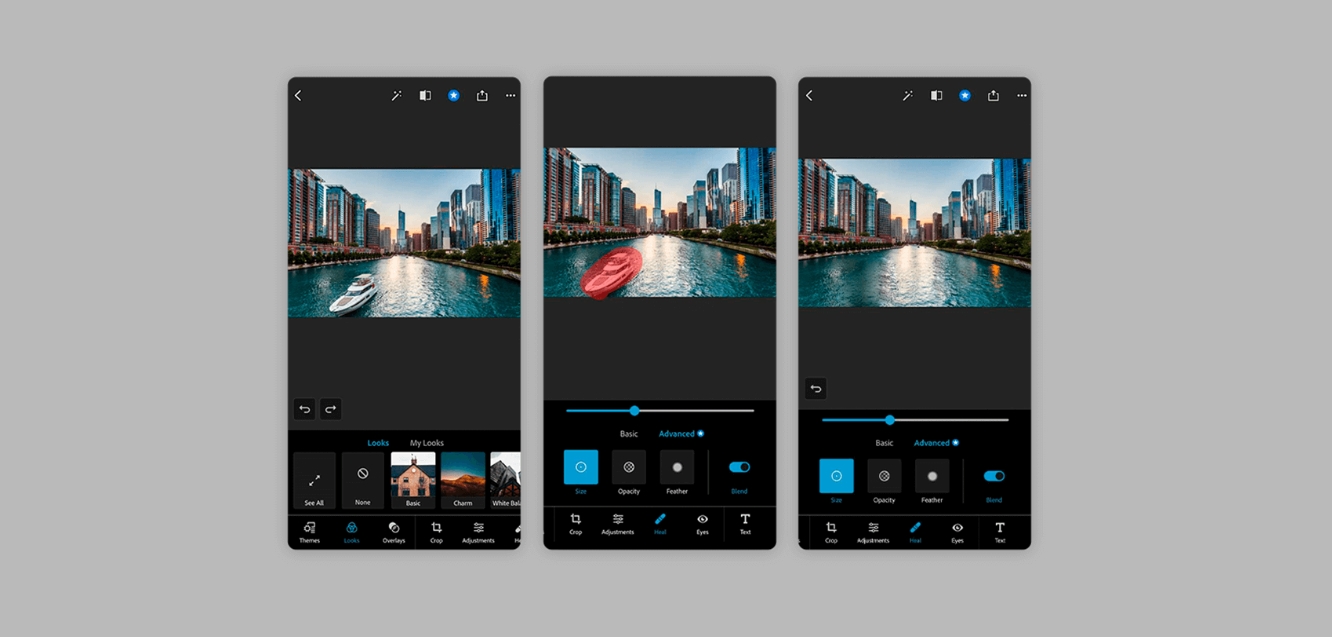
Step 3: Select the Healing Brush Tool
After importing the image, tap on the “Edit” button at the bottom of the screen. This will open up the editing tools panel. From the options available, select the Healing Brush tool. This tool is specifically designed for object removal and works by blending surrounding pixels to seamlessly remove the unwanted object.
Step 4: Zoom In to the Object
To get a better view of the object you want to remove, use the pinch-to-zoom gesture to zoom in on the area. This will allow you to see the fine details and make more precise edits.
Step 5: Remove the Object Using the Healing Brush
Now it’s time to start removing the unwanted object. With the Healing Brush tool selected, simply brush over the object you want to remove. Lightroom Mobile will automatically analyze the surrounding pixels and intelligently fill in the area to seamlessly remove the object. Continue brushing over the entire object until it is completely gone.
Step 6: Fine-tune the Edits
After removing the object, you may need to fine-tune the edits to ensure a natural-looking result. To do this, you can adjust the size of the brush tool and brush softly around the edges of the edited area to blend it in with the rest of the image. This will help to create a smooth transition and make the object removal less noticeable.
Step 7: Save and Export the Edited Image
Once you are satisfied with the object removal and overall edits, it’s time to save and export your edited image. Tap on the “Done” button at the top right corner of the screen to exit the editing mode. Lightroom Mobile will automatically save your edits and you can choose to export the image to your camera roll or share it directly to social media platforms.
Troubleshooting Common Issues
If you encounter any issues during the object removal process, here are a few troubleshooting tips:
- Make sure you have a stable internet connection as the object removal feature requires cloud-based processing.
- If the Healing Brush tool is not working as expected, try adjusting the brush size or changing the brush hardness for better control.
- If the object you want to remove is too complex or has intricate details, consider using other photo editing tools in Lightroom Mobile, such as the Clone Stamp tool or the Content-Aware Fill feature.
With Lightroom Mobile’s powerful object removal capabilities, you can easily clean up your photos and create stunning compositions. Remember to experiment with different editing techniques and practice regularly to enhance your skills. Happy editing!
Overview
In today’s digital age, smartphone photography has become increasingly popular. With advancements in technology, mobile photography enthusiasts have the power to capture stunning images right from the palm of their hands. One popular app that has revolutionized the world of mobile photography is Lightroom Mobile. This powerful app offers a wide range of editing tools to enhance the overall quality of your photos. One such feature is the ability to remove unwanted objects from your images, allowing you to achieve that picture-perfect shot.
Removing objects in Lightroom Mobile is a simple process that can make a significant difference in your photographs. Whether it’s a stray branch, a distracting sign, or even an unsightly blemish, the app’s advanced editing tools can effortlessly eliminate these distractions, resulting in a visually pleasing image.
In this article, we will guide you through the steps to remove objects in Lightroom Mobile. So grab your smartphone and let’s get started on enhancing your mobile photography skills.
Step 1: Open the Lightroom Mobile App
The first step in removing objects in Lightroom Mobile is to open the app on your mobile device. If you haven’t installed it yet, you can find it in your device’s app store. Lightroom Mobile is available for both iOS and Android.
Once you have the app installed, locate the Lightroom Mobile icon on your home screen or app drawer and tap on it to open the application. If you have previously used the app, it may open to the last project or image you were working on. Otherwise, you will see the app’s home screen.
Lightroom Mobile offers a range of powerful editing tools, including the ability to remove unwanted objects from your photos. By following the steps outlined in this guide, you’ll be able to seamlessly erase any distractions and enhance the overall composition of your images.
Now that you have the Lightroom Mobile app open, you’re ready to move on to the next step: importing an image.
Step 2: Import an Image
Once you have opened the Lightroom Mobile app, the next step is to import an image for editing. Follow these simple steps to import an image into Lightroom Mobile:
1. Tap on the “+” icon located at the bottom center of the screen. This will open the import options.
2. Choose the source from which you want to import the image. Lightroom Mobile allows you to import images from various sources such as your device’s camera roll, Lightroom cloud storage, or any connected cloud services like Google Drive or Dropbox.
3. Browse through the directories or albums to locate the image you want to import. Tap on the image to select it.
4. After selecting the image, you can choose to import it as it is or apply any preset filters or adjustments at this stage. Lightroom Mobile offers a range of pre-set filters and editing tools to enhance your image.
5. Tap on the “Import” button to bring the selected image into Lightroom Mobile for editing.
Once you have imported the image, it will be available in your Lightroom Mobile library, ready for you to start editing. With Lightroom Mobile’s powerful editing tools, you can easily transform your images into stunning works of art.
Step 3: Select the Healing Brush Tool
Once you have imported an image into Lightroom Mobile, it’s time to start removing the object. To do this, you need to select the Healing Brush Tool, which is a powerful tool for removing unwanted elements from your photos.
To access the Healing Brush Tool, tap on the toolbar at the bottom of the screen and then select the Healing Brush icon. It resembles a bandage and is usually located next to the Crop tool. Once you’ve selected the Healing Brush Tool, you’re ready to begin removing the object.
Before you start using the Healing Brush Tool, it’s important to understand how it works. The tool works by sampling pixels from a neighboring area and blending them seamlessly with the area you want to remove. It effectively replaces the object with pixels from a similar surrounding area, making it appear as if the object was never there in the first place.
To use the Healing Brush Tool, simply tap and drag over the object you want to remove. Lightroom Mobile will automatically sample the pixels from the surrounding area and blend them to remove the object. You can adjust the size of the brush using the slider at the bottom of the screen to ensure precise editing.
It’s important to be patient and take your time when using the Healing Brush Tool. If you rush the process, it can result in less accurate edits. Take care to select a suitable area to sample from and ensure that the replacement pixels blend seamlessly with the surrounding areas.
If you make a mistake while using the Healing Brush Tool, you can use the Undo button located at the top of the screen to revert back to the previous state. This allows you to correct any errors and refine your edits until you are satisfied with the result.
Remember, practice makes perfect, so don’t be discouraged if you don’t get it right the first time. Experiment with different brush sizes and sampling areas to achieve the desired effect. With time and practice, you’ll become more proficient in using the Healing Brush Tool to remove objects in Lightroom Mobile.
Step 4: Zoom In to the Object
Once you have selected the Healing Brush tool in Lightroom Mobile, the next step is to zoom in to the object you want to remove. Zooming in allows you to get a closer look at the details of the area you will be working on, ensuring precision in your edits.
To zoom in, you can use the pinch-to-zoom gesture on your mobile device screen. Place two fingers on the screen and spread them apart to zoom in. Alternatively, you can also double-tap on the area you want to zoom in on, and Lightroom Mobile will automatically adjust the zoom level for you.
By zooming in, you will be able to clearly see the imperfections and unwanted elements of the object you want to remove. It provides you with a better perspective and makes it easier to make accurate edits.
Make sure to zoom in enough so that you can see the intricate details of the object, but not so much that it becomes pixelated or difficult to work with. Finding the right balance is key to achieving the best results.
Once you have successfully zoomed in, you are ready to proceed to the next step: removing the object using the Healing Brush tool.
Step 5: Remove the Object Using the Healing Brush
Now that you have zoomed in and identified the unwanted object in your image, it’s time to remove it using the powerful Healing Brush tool in Lightroom Mobile. The Healing Brush is designed to seamlessly blend the surrounding pixels with the area you want to remove, creating a smooth and natural-looking result.
To access the Healing Brush, tap on the brushes icon located in the toolbar at the bottom of the screen. Then, select the Healing Brush tool from the list of available options.
Once you have selected the Healing Brush, you can adjust its size and feathering by using the sliders at the bottom of the screen. This allows you to precisely control the area you want to remove and the softness of the blending effect.
To begin the removal process, position the Healing Brush tool over the unwanted object and carefully paint over it with your finger or stylus. As you paint, you will notice that Lightroom Mobile intelligently analyzes the surrounding pixels and automatically blends them with the area you are covering.
If you accidentally remove too much or need to make adjustments, don’t worry! Lightroom Mobile offers an undo button at the top left corner of the screen. Simply tap on it to revert any unwanted changes and continue refining your edits.
Continue using the Healing Brush tool to remove the object completely. Make sure to take your time and be patient, especially when dealing with complex or intricate areas. The key is to make small strokes and blend the pixels gradually for a seamless result.
Remember to zoom out occasionally to see the overall effect and ensure that the image looks natural and balanced. If necessary, you can always go back and make additional adjustments using the Healing Brush tool or other editing features in Lightroom Mobile.
Once you are satisfied with the removal, tap on the checkmark icon at the top right corner of the screen to apply the edits and finalize the image. Lightroom Mobile will automatically save a new copy of the edited photo, leaving the original intact. You can also export the image to your camera roll or share it directly from the app to showcase your creative achievement.
Removing unwanted objects from your photos has never been easier thanks to Lightroom Mobile’s powerful Healing Brush tool. With a little practice and patience, you’ll be able to seamlessly erase distractions and enhance the visual impact of your images.
Step 6: Fine-tune the Edits
After removing the object using the Healing Brush tool in Lightroom Mobile, you may find that some areas of the image require further adjustment to seamlessly blend the changes. Fine-tuning the edits ensures that the edited area matches the surrounding elements, creating a natural and polished appearance.
Here are some techniques to help you refine and enhance the edited area:
- Adjust the brush size: If you need to make more precise edits or cover a larger area, you can modify the brush size within the Healing Brush tool. Increase the brush size for larger objects or decrease it for smaller details.
- Refine the brush hardness: The hardness of the brush determines the edge sharpness of your edits. A softer brush creates a smoother transition between the edited area and the surrounding elements, while a harder brush provides a sharper edge. Experiment with different levels of hardness to achieve the desired result.
- Use feathering: Feathering allows you to soften the edges of the edited area, making it blend more seamlessly with the rest of the image. By adjusting the feathering level, you can achieve a more natural appearance without a noticeable transition between the edited and untouched areas.
- Adjust the opacity: If you find that the edited area appears too obvious or stands out in the image, you can reduce the opacity of the Healing Brush tool. Lowering the opacity allows for a more subtle and gradual blending of the edits with the surrounding elements.
- Apply additional adjustments: Fine-tuning the edits involves more than just the Healing Brush tool. You can further enhance the image by making adjustments to the overall exposure, color temperature, contrast, or other settings within Lightroom Mobile. These additional adjustments help ensure that the edited area seamlessly integrates into the entire image composition.
Remember, the goal of fine-tuning the edits is to make the changes imperceptible to the viewer’s eye. Take your time to carefully assess the image and make small adjustments as needed until the edited area seamlessly blends with the rest of the photograph.
Step 7: Save and Export the Edited Image
Once you have finished editing and retouching your image in Lightroom Mobile, it’s time to save and export the final version. Follow these simple steps to ensure you can access and share your edited image wherever you need it.
1. After making your desired adjustments, tap on the checkmark icon in the top-right corner of the screen to apply the edits and exit the editing mode.
2. A pop-up window will appear, giving you options for saving and exporting. Tap on the “Save to Camera Roll” option to save the edited image directly to your device’s photo gallery. This allows you to access it through other apps or share it on social media platforms.
3. If you prefer to export the edited image in a specific file format or resolution, tap on the “Export” option instead. This will give you further customization options.
4. In the “Export Location” section, you can choose where you want to save the exported image. Select “Camera Roll” to save it directly to your device’s gallery or choose a specific folder if you have a preferred storage location.
5. For file format and quality settings, tap on the “File Type” option. Lightroom Mobile offers various file formats, including JPEG and TIFF. You can also adjust the file quality to balance size and image integrity.
6. If you want to add copyright or location information to the exported image, tap on the “Metadata” option. Toggle the switches on or off depending on your preferences.
7. Once you have chosen your export settings, tap on the “Export” button at the top-right corner of the screen.
8. Lightroom Mobile will start processing the image with the selected export settings. The length of this process will depend on the size and complexity of the edits you made as well as the format and quality settings you chose.
9. After the export process is complete, you will receive a confirmation message. Tap on “OK” to close the notification.
10. Congratulations! Your edited image is now saved and exported. You can find it in your device’s photo gallery or the designated folder you selected during the export process.
By following these steps, you can easily save and export your edited images from Lightroom Mobile, making them readily available for sharing or printing.
Troubleshooting Common Issues
While using the Lightroom Mobile app to remove objects from your photos, you may encounter some common issues that can affect your editing process. Here are a few troubleshooting tips to help you resolve these issues and achieve the desired results:
1. Blurry or Pixelated Edits: If you notice that your edited object appears blurry or pixelated, try adjusting the size and hardness of the Healing Brush tool. A smaller brush size with a softer edge can often provide more precise and seamless results.
2. Unwanted Color Changes: Sometimes, removing an object can cause slight color shifts or discrepancies in your image. To address this, use the Healing Brush tool in combination with the Color panel located in the Lightroom Mobile app. This allows you to precisely match the color and tone of the surrounding area.
3. Visible Clone Stamps: In some instances, you may notice visible clone-stamp marks or repetitive patterns after using the Healing Brush tool. This can occur when the sampled area is too small or lacks diversity. To overcome this issue, try enlarging your sample area or selecting multiple sample points to blend seamlessly with the surrounding pixels.
4. Difficulty Selecting Small Objects: When dealing with intricate or small objects, it can be challenging to select them accurately using the Healing Brush tool. In such cases, zoom in on the image and use short, precise strokes to ensure precision. You can also make use of the Pinch-to-Zoom gesture on your device for better control.
5. Transparent Areas: Removing large objects with complex backgrounds can sometimes result in transparent areas or gaps in your image. To fix this, try using the Healing Brush tool to blend the edges and fill in any missing details or textures. Additionally, you can use the Clone Stamp tool to manually recreate the missing portions.
6. App Crashes: If you experience frequent app crashes while editing or saving your image, ensure that your device has sufficient memory and storage space. Closing other unnecessary applications running in the background can also help prevent crashes and improve performance.
By following these troubleshooting tips and experimenting with different techniques, you can overcome common issues and achieve professional-looking results when removing objects in Lightroom Mobile.
Removing objects in Lightroom Mobile is a powerful tool that can take your photo editing skills to the next level. Whether you want to remove unwanted elements from your images or enhance the composition, Lightroom Mobile provides a user-friendly interface and robust editing features to help you achieve your desired results.
By following the step-by-step process outlined in this article, you can effectively remove objects from your photos with precision and ease. From using the Spot Removal tool to clone or heal areas of your image, to utilizing advanced techniques like content-aware fill, Lightroom Mobile offers a range of options to suit your editing needs.
Remember, practice makes perfect. The more you experiment with object removal in Lightroom Mobile, the more proficient you will become. So, go ahead and give it a try. Unleash your creativity and watch your photos transform into stunning works of art.
FAQs
1. Can I remove an object in Lightroom Mobile?
Yes, you can remove objects in Lightroom Mobile using the healing brush tool. This tool allows you to seamlessly remove unwanted objects or blemishes from your photos. Simply select the healing brush tool, brush over the object you want to remove, and Lightroom will intelligently blend the surrounding pixels to fill in the area.
2. Is removing objects in Lightroom Mobile easy?
Removing objects in Lightroom Mobile can be relatively easy, especially if the object you want to remove is small or has a simple background. However, for more complex objects or intricate backgrounds, it may require more precision and patience to achieve a seamless result. Practice and experimentation will help you master the technique over time.
3. Can I undo object removal in Lightroom Mobile?
Yes, Lightroom Mobile allows you to easily undo object removals. If you make a mistake or aren’t satisfied with the result, simply tap on the “Undo” button at the top of the screen or use the shortcut (Ctrl+Z on Windows or Command+Z on Mac) to revert the changes. This feature ensures that you have the flexibility to correct any errors or make adjustments as needed.
4. Will removing an object affect the overall quality of my photo?
In most cases, removing small or moderate-sized objects in Lightroom Mobile will have minimal impact on the overall quality of your photo. The healing brush tool is designed to intelligently blend pixels and preserve the visual integrity of the image, ensuring that the removed object seamlessly blends with the surrounding pixels. However, it’s important to use the tool judiciously and avoid over-editing, as excessive manipulation may result in noticeable alterations to the image.
5. Can I remove objects from RAW files using Lightroom Mobile?
Yes, you can remove objects from RAW files using Lightroom Mobile. The healing brush tool works effectively on both RAW and JPEG files, allowing you to make object removals without compromising the quality or integrity of your RAW image. This flexibility ensures that you can achieve professional-level edits on your mobile device, even with RAW files.