
Are you an avid photographer who loves using Adobe Lightroom Mobile to edit your photos on the go? If so, you may be wondering how to export your edited photos from Lightroom Mobile so you can share them with the world or print them out for display. Fortunately, exporting photos from Lightroom Mobile is a straightforward process that allows you to save your edited images in various formats and sizes. In this article, we will guide you through the step-by-step process of exporting your photos from Lightroom Mobile, whether you’re using the app on your mobile device or the desktop version. So, grab your camera and let’s dive into the world of exporting photos from Lightroom Mobile!
Inside This Article
- Step 1: Selecting Photos – Choosing the photos to export – Using filters and collections for better organization
- Step 2: Adjusting Export Settings – Selecting the desired file format and resolution – Adjusting image quality and size settings
- Step 3: Choosing Export Destination – Saving photos to the device’s gallery – Exporting to cloud storage or external drives
- Step 4: Exporting Photos – Reviewing export settings before finalizing – Executing the export process
- Troubleshooting Tips- Common issues encountered during export- How to resolve export errors or failures
- Conclusion
- FAQs
Step 1: Selecting Photos – Choosing the photos to export – Using filters and collections for better organization
When it comes to exporting photos from Lightroom Mobile, the first step is to carefully choose which photos you want to export. This is an essential part of the process as it determines the final selection of images that will be transferred from your mobile device to another destination.
One effective way to narrow down your choices is by utilizing the powerful filtering capabilities of Lightroom Mobile. With a wide range of filter options available, you can easily sort and select photos based on criteria such as date, rating, keywords, and more. This feature saves you valuable time by allowing you to quickly pinpoint the images that meet your specific export requirements.
Another helpful feature of Lightroom Mobile is the ability to create collections. Collections are like virtual folders where you can group and organize your images. By creating collections and adding selected photos to them, you can easily manage and export specific sets of photos according to your needs.
For example, let’s say you have a collection called “Vacation 2021” and within that collection, you have various sub-collections labeled with the names of different locations you visited. By organizing your photos in this manner, you can easily export a specific collection or even multiple sub-collections at once, instead of manually selecting individual photos.
Using filters and collections in Lightroom Mobile not only simplifies the photo selection process, but it also offers a more organized way of managing your images. By developing a systematic approach to organizing your photos and utilizing these powerful features, you can optimize your workflow and efficiently export the desired photos with ease.
Step 2: Adjusting Export Settings – Selecting the desired file format and resolution – Adjusting image quality and size settings
Once you have selected the photos you want to export in Lightroom Mobile, the next step is to adjust the export settings to ensure that your exported images are of the highest quality and suitable for their intended purpose. This involves selecting the appropriate file format, resolution, image quality, and size settings. Let’s dive into each aspect in detail:
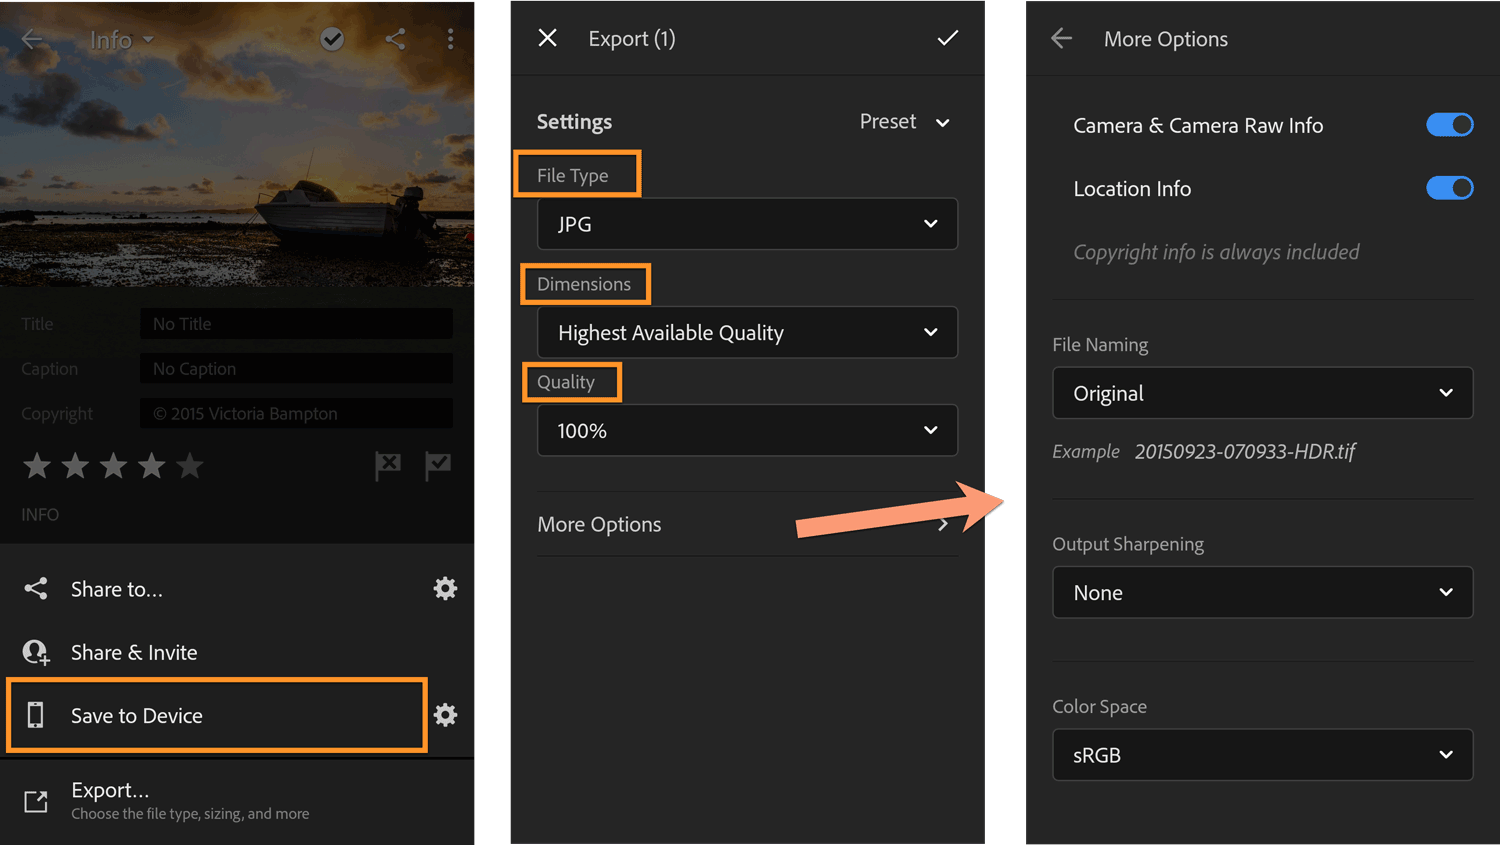
Selecting the desired file format: Lightroom Mobile offers several file formats to choose from when exporting your photos. The most commonly used formats include JPEG, PNG, and TIFF. Each format has its own advantages and considerations. JPEG is the most widely compatible format, ideal for sharing images online and printing. PNG is suitable for images that require transparency or lossless compression. TIFF is a high-quality format often used for professional printing and archiving. Consider the purpose of your exported photos and choose the file format accordingly.
Adjusting the resolution: The resolution determines how many pixels are present in an image. Higher resolution results in more detail and clarity but also increases the file size. When adjusting the resolution, you need to consider the intended use of the exported photos. For online sharing, a resolution of 72 pixels per inch (ppi) is typically sufficient. However, for printing, a higher resolution, such as 300 ppi, is recommended to ensure sharpness and quality.
Setting the image quality: The image quality setting determines the amount of compression applied to the exported photos. Higher quality settings result in less compression and better image fidelity but also increase the file size. Lightroom Mobile typically offers a quality slider or a percentage value to adjust the image quality. It is important to strike the right balance between file size and image quality, ensuring that the exported photos retain their visual integrity.
Adjusting the image size: In addition to resolution and image quality, you may also need to adjust the physical size of the exported photos. Lightroom Mobile allows you to specify the dimensions or percentage scale of the images. This is particularly useful when you have specific size requirements for the photos, such as when preparing images for social media profiles or websites. Be mindful of the aspect ratio and maintain the proportions of the original photos to avoid distortion.
By carefully selecting the desired file format, adjusting the resolution, image quality, and size settings, you can ensure that your exported photos from Lightroom Mobile meet your specific requirements. Remember to consider the purpose of your photos and strike the right balance between visual quality and file size to optimize the overall output.
Step 3: Choosing Export Destination – Saving photos to the device’s gallery – Exporting to cloud storage or external drives
Once you have selected the photos you want to export and adjusted the export settings, the next step is to choose the export destination for your photos. Lightroom Mobile provides you with multiple options, including saving the photos to your device’s gallery or exporting them to cloud storage or external drives. Let’s explore these options in more detail:
Saving photos to the device’s gallery: If you prefer to have your exported photos readily accessible on your mobile device, you can choose to save them directly to your device’s gallery. This allows you to easily view and share the exported photos using other apps or directly from your device’s media library. Simply select the “Save to Gallery” option in the export settings, and Lightroom Mobile will take care of saving the photos to the designated location in your device’s gallery.
Exporting to cloud storage: Lightroom Mobile seamlessly integrates with popular cloud storage platforms like Adobe Creative Cloud, Google Drive, Dropbox, and more. This enables you to export your photos directly to your preferred cloud storage service. By exporting to the cloud, you not only free up space on your device but also ensure that your photos are backed up and accessible from any device with an internet connection. Simply select the desired cloud storage option in the export settings, and Lightroom Mobile will handle the rest, making sure your photos are safely stored in the cloud.
Exporting to external drives: For those who prefer to have their photos stored on external drives or memory cards, Lightroom Mobile offers the option to export directly to these devices. This is particularly useful when you need to transfer photos to another device or backup your image files. Simply connect your external drive or insert your memory card into your device, then select the respective drive or card as your export destination in the export settings. Lightroom Mobile will take care of transferring the exported photos to the external device, providing you with a quick and convenient way to store and transport your images.
Whether you choose to save your photos to the device’s gallery, export to cloud storage, or export to external drives, Lightroom Mobile offers the flexibility and convenience to cater to your specific needs. You can even mix and match these export destinations depending on the situation or your workflow. Take advantage of Lightroom Mobile’s versatile export options to ensure your photos are stored securely and easily accessible whenever and wherever you need them.
Step 4: Exporting Photos – Reviewing export settings before finalizing – Executing the export process
Now that you have selected the photos and adjusted the export settings, it’s time to review everything before finalizing the export and executing the process. Taking a few moments to double-check your export settings ensures that your photos are exported exactly as you want them.
First, go through the export settings one more time to make sure everything is set according to your preferences. Pay attention to the file format, resolution, image quality, and size settings. This is your last chance to make any adjustments before the photos are exported.
Next, take a closer look at the export destination. If you’re saving the photos to your device’s gallery, make sure there is enough storage space available. If you’re exporting to cloud storage or external drives, ensure that you have the proper access and enough remaining storage capacity.
Remember to also consider any additional settings or options available in the export process. Lightroom Mobile may provide you with the ability to add watermarks, apply custom presets, rename the exported files, or even apply specific color profiles. Review these options and choose the ones that best suit your needs.
Once you have carefully reviewed all the export settings and options, it’s time to execute the export process. Click on the export button or command, often represented by an arrow pointing out of a box or similar icon. Depending on the number of photos and their size, the export process may take some time, so be patient and allow it to complete.
While the export is in progress, avoid making any changes to the settings or closing the Lightroom Mobile app. Doing so may interrupt the export and potentially cause errors or missing files. Just sit back and let the app do its magic.
Once the export process is complete, you will usually receive a notification or confirmation message. Take a moment to verify that all the exported photos are in the designated location and that they match your intended settings. If everything looks good, congratulations! You have successfully exported your photos from Lightroom Mobile.
However, if you encounter any issues or notice any discrepancies, refer to the troubleshooting tips section to troubleshoot and resolve common export errors or failures.
So, take the time to review your settings one last time, click that export button, and let Lightroom Mobile work its magic. Soon enough, you’ll have your beautifully exported photos ready to be shared, printed, or enjoyed in any way you desire.
Troubleshooting Tips- Common issues encountered during export- How to resolve export errors or failures
Exporting photos from Lightroom Mobile is a convenient and efficient way to share your images with others or save them for future use. However, like any software application, it is not immune to occasional issues or errors that may arise during the export process. In this section, we will discuss some common problems that users encounter and provide tips on how to resolve them.
1. File format compatibility issues: One common issue that may occur during export is when the chosen file format is not compatible with the destination device or platform. Make sure to select a widely supported format, such as JPEG or PNG, to ensure compatibility across different devices and software.
2. Export errors due to insufficient storage space: If you are trying to export a large number of high-resolution photos and encounter an error indicating insufficient storage space, it may be time to clear some space on your device. Delete unnecessary files or transfer them to a separate storage device to free up space for the export process.
3. Exporting to the wrong destination: Sometimes, users unintentionally select the wrong destination folder or drive during the export process. Before clicking the export button, double-check the destination settings to ensure that you are saving the photos to the correct location.
4. Incomplete exports: Occasionally, the export process may be interrupted, resulting in incomplete exports. To resolve this, try exporting the photos again, making sure that there are no interruptions or connectivity issues. You can also select a smaller number of photos to export at a time to reduce the chances of an incomplete export.
5. Exporting photos with incorrect settings: Another issue that users may encounter is exporting photos with incorrect settings, such as low image quality or incorrect dimensions. Always double-check the export settings, including the resolution, image quality, and file size, to ensure that they match your intended requirements.
6. Network connectivity issues: If you are exporting photos directly to cloud storage or an external drive, ensure that you have a stable and reliable internet connection. Poor network connectivity can lead to errors or interruptions during the export process. If possible, try exporting the photos using a wired connection for a more stable data transfer.
7. Corrupted files after export: In rare cases, files may become corrupted during the export process. To minimize the chances of this happening, it is recommended to close any other applications or processes that may be running in the background before initiating the export. This can help ensure a smooth export without any data corruption.
If you encounter any of these issues during the export process, following these troubleshooting tips should help resolve them. Remember to double-check your settings, ensure sufficient storage space, and maintain a stable network connection. By addressing these common problems, you can ensure a successful and error-free export of your photos from Lightroom Mobile.
In conclusion, exporting photos from Lightroom Mobile is a simple and convenient process that allows you to easily share and use your images across different platforms. Whether you need to send them to a client, post them on social media, or store them in a backup location, Lightroom Mobile provides the necessary tools to export your photos in high quality and suitable formats. By following the steps outlined in this article, you can confidently export your photos with ease and enjoy the flexibility and versatility that Lightroom Mobile offers. So, start harnessing the power of Lightroom Mobile to showcase your creativity and bring your images to life.
FAQs
1. Can I export photos from Lightroom Mobile?
Yes, you can export photos from Lightroom Mobile. Lightroom Mobile offers various export options to meet your needs. Whether you want to share your photos on social media, print them, or save them to your device, Lightroom Mobile allows you to export your edited images effortlessly.
2. How can I export photos from Lightroom Mobile to my device?
To export photos from Lightroom Mobile to your device, follow these steps:
- Open Lightroom Mobile and select the image you want to export.
- Tap the Share icon located at the top right corner of the screen.
- Choose the “Save to Device” option.
- Customize the settings according to your preference, such as file format and quality.
- Tap the “Save” button to export the photo to your device’s camera roll or gallery.
3. Can I export photos from Lightroom Mobile with specific file settings?
Yes, Lightroom Mobile allows you to export photos with specific file settings. When exporting, you have the option to choose the file format (such as JPEG or DNG), the resolution, and the quality of the photo. This gives you control over the final output and ensures that the exported image matches your desired specifications.
4. Are there any limitations when exporting photos from Lightroom Mobile?
While Lightroom Mobile offers a range of export options, there are some limitations to be aware of. One limitation is the inability to export photos in RAW format directly from Lightroom Mobile. Additionally, the export options may vary depending on the device you are using and the version of Lightroom Mobile installed. It is recommended to check for any specific limitations based on your device and software version.
5. Can I export photos from Lightroom Mobile to social media platforms?
Yes, Lightroom Mobile provides easy integration with various social media platforms. You can directly export your photos from Lightroom Mobile to platforms like Instagram, Facebook, or Twitter. Simply select your desired photo, tap the Share icon, and choose the social media platform you want to share it on. Lightroom Mobile will resize the image to fit the platform’s requirements, ensuring it looks great when shared with your followers.