
Are you frustrated with having blurry photos on your mobile phone? Don’t worry, because there’s a solution that can help you unblur those pictures and make them look sharp and clear. Lightroom Mobile, a popular photo editing app, can be your secret weapon for bringing your blurry images back to life.
In this article, we’ll guide you through the process of unblurring a photo in Lightroom Mobile, step by step. Whether it’s a cherished memory or a professional shot, you’ll learn how to enhance the clarity of your photos and make them visually stunning.
With Lightroom Mobile’s powerful editing tools and intuitive interface, you’ll be able to remove the blurriness and bring out the hidden details in your photos. So get your mobile phone ready, and let’s dive into the world of unblurring photos in Lightroom Mobile!
Inside This Article
- Understanding Blurry Photos
- Using Lightroom Mobile to Unblur Photos
- Techniques for Unblurring Photos in Lightroom Mobile
- Conclusion
- FAQs
Understanding Blurry Photos
Blurry photos can be quite frustrating, especially when you capture precious moments or stunning landscapes. Understanding the reasons behind blurry photos is essential in order to effectively unblur them. Let’s explore some common causes of blurry photos:
1. Camera Shake: One of the most common causes of blurry photos is camera shake. When you handhold your camera and press the shutter button, any slight movement of your hand can result in blurriness.
2. Incorrect Focus: If your camera is not properly focused on the subject, the resulting photo may appear blurry. It’s important to ensure that your camera’s autofocus is properly calibrated and that you focus on the intended subject.
3. Motion Blur: Fast-moving subjects or camera movement during a long exposure can result in motion blur. This can happen when photographing sports events or capturing images in low light conditions.
4. Shutter Speed: Using a slow shutter speed without proper stabilization can lead to blurry photos. It’s important to use a fast enough shutter speed to freeze the motion and prevent blurring caused by subject movement.
5. Lens Issues: Dirty or smudged lenses can contribute to blurry photos. It’s essential to regularly clean your camera lenses to ensure optimal image quality.
By understanding these common causes of blurry photos, you can take the necessary steps to prevent them. However, if you already have a blurry photo, don’t worry! There are techniques you can use to unblur them, and one effective tool for this is Lightroom Mobile.
Using Lightroom Mobile to Unblur Photos
Lightroom Mobile is a powerful tool that offers a range of features for editing and enhancing your photos directly on your mobile device. If you have a blurry photo that you want to sharpen and improve, Lightroom Mobile can help you achieve professional-looking results. Here are some techniques you can use to unblur photos in Lightroom Mobile:
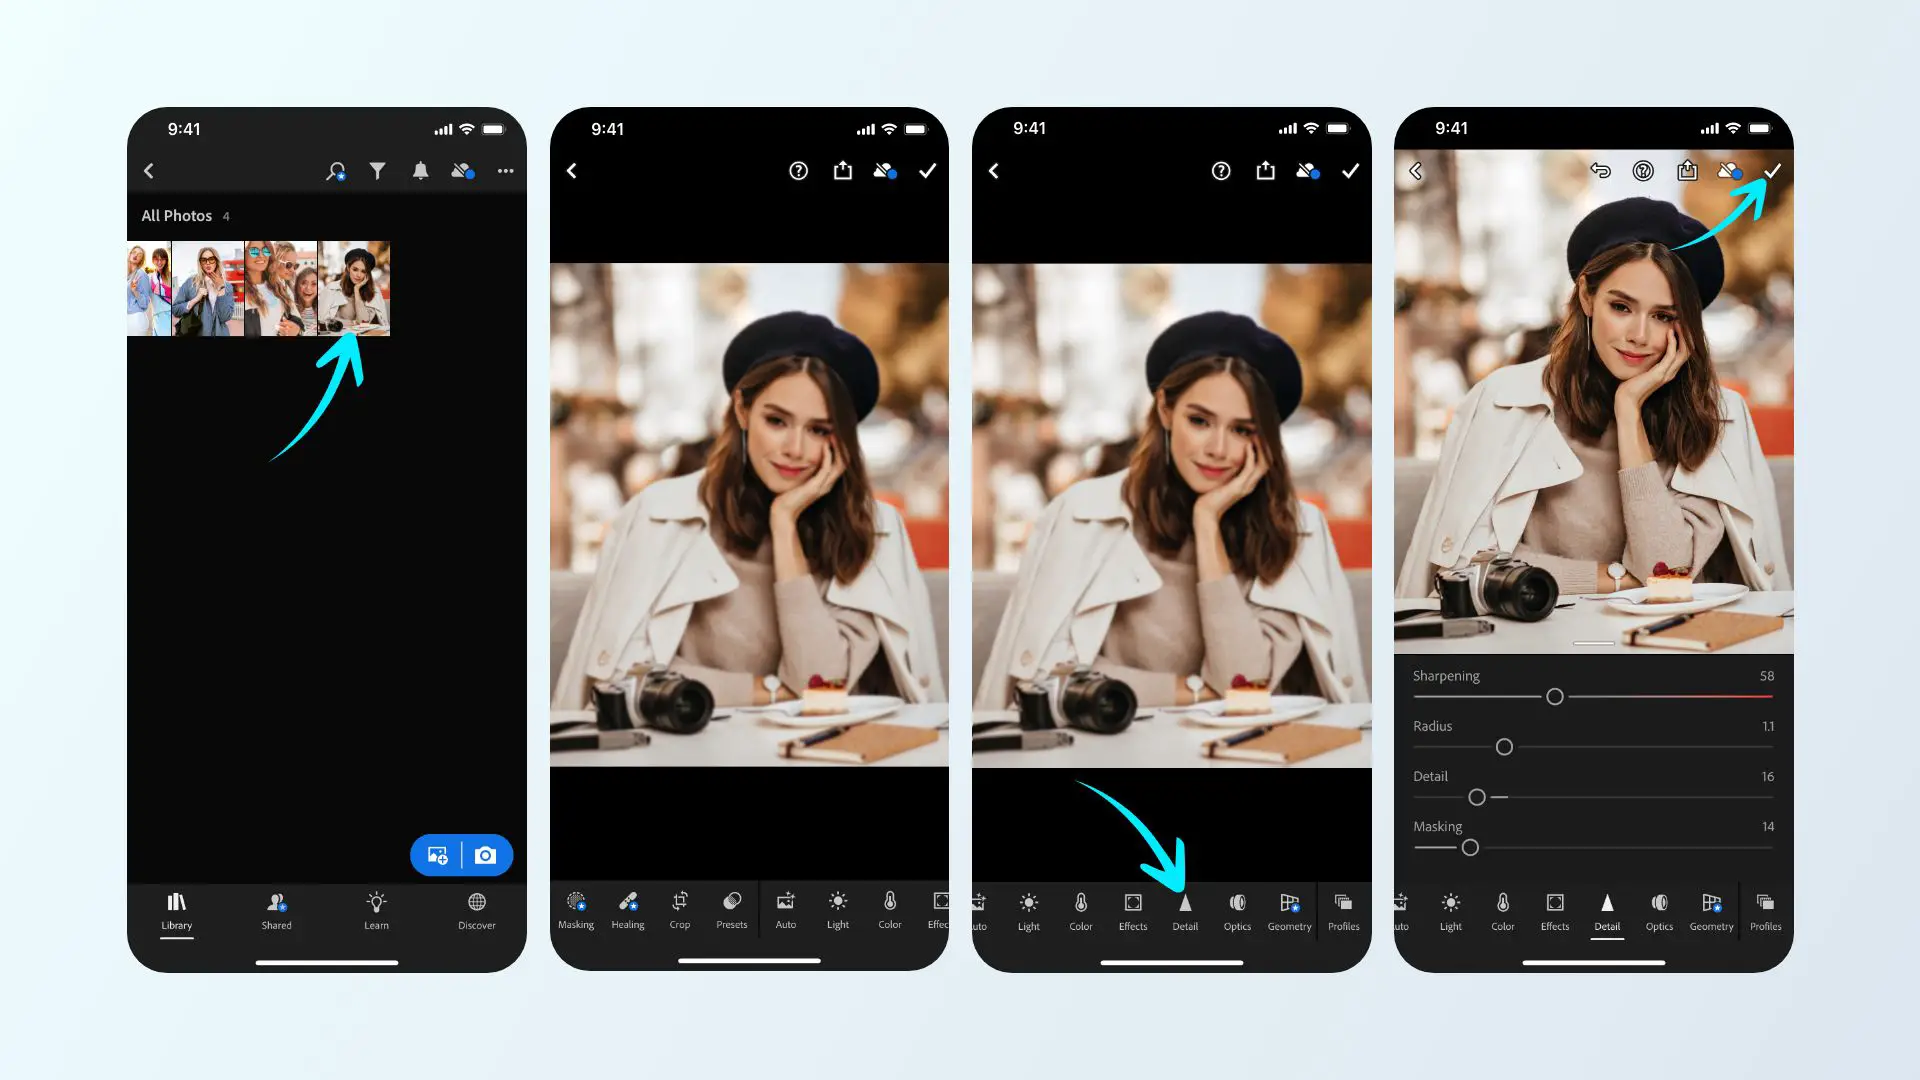
1. Adjusting the Sharpening Tool: One of the easiest ways to unblur a photo is by adjusting the Sharpening tool in Lightroom Mobile. Simply open the photo in Lightroom Mobile, go to the Detail panel, and increase the amount of sharpening until you achieve the desired level of clarity. Be careful not to over-sharpen, as this can introduce artifacts and make the image look unnatural.
2. Using the Dehaze Tool: The Dehaze tool in Lightroom Mobile can help reduce haze or blurriness in your photos. It works by analyzing the contrast and adjusting the tone and color of the image. To use this tool, go to the Effects panel and adjust the Dehaze slider to remove the blur and enhance the details in your photo.
3. Applying Local Adjustments: Lightroom Mobile allows you to apply local adjustments to specific areas of your photo. This can be useful when you want to sharpen specific parts of the image while keeping the rest relatively soft. To do this, select the Brush tool, increase the Clarity setting, and paint over the areas you want to sharpen. You can also adjust the size and feathering of the brush for more precise control.
4. Using Presets: Lightroom Mobile offers a wide range of presets that can instantly enhance your photos, including options for sharpening and clarity. Try applying different presets to see which one works best for your blurry photo. You can also customize the preset settings to achieve your desired level of sharpness and clarity.
5. Using the Noise Reduction Tool: Sometimes, a blurry photo can also have noise or graininess. Lightroom Mobile allows you to reduce noise while sharpening the image. In the Detail panel, adjust the Luminance and Color sliders under the Noise Reduction section to minimize noise while preserving the details.
By using these techniques in Lightroom Mobile, you can effectively unblur your photos and enhance their overall quality. Remember to experiment with different settings and adjustments to achieve the desired results.
Techniques for Unblurring Photos in Lightroom Mobile
Lightroom Mobile is a powerful editing tool that can help you rescue blurry photos and bring them back to life. Whether you captured a cherished moment that turned out blurry or received a blurry photo from someone else, Lightroom Mobile offers various techniques to help you unblur your photos. In this article, we will explore some effective methods for unblurring photos using Lightroom Mobile.
1. Sharpening Tool: The Sharpening tool in Lightroom Mobile enhances the clarity and sharpness of your images. To unblur a photo, simply open the image in Lightroom Mobile and navigate to the Develop module. Locate the Details panel and adjust the Sharpening sliders to increase the sharpness. Start with the Amount slider and gradually adjust the Radius and Detail sliders until you achieve the desired level of sharpness.
2. Clarity Tool: The Clarity tool is another powerful feature in Lightroom Mobile that can help improve the sharpness and details in your photos. To unblur a photo using the Clarity tool, open the image in Lightroom Mobile and go to the Develop module. Find the Presence panel and adjust the Clarity slider to increase the overall clarity. Be cautious not to overdo it, as too much clarity can result in unnatural-looking images.
3. Adjustment Brush: The Adjustment Brush in Lightroom Mobile allows you to selectively apply edits to specific areas of your photo. This tool can be particularly useful for unblurring specific parts of an image. To use the Adjustment Brush, open the image in Lightroom Mobile and navigate to the Develop module. Select the Adjustment Brush tool and adjust the sliders for Sharpness or Clarity. Then, carefully brush over the areas you want to unblur. You can adjust the brush size and feathering for more precise control.
4. Spot Healing Tool: The Spot Healing tool in Lightroom Mobile is primarily used for removing blemishes or unwanted objects from photos. However, it can also be used to reduce the appearance of blurriness in certain areas. To utilize this tool for unblurring, open the image in Lightroom Mobile and switch to the Develop module. Select the Spot Healing tool and adjust the brush size to match the area you want to unblur. Simply brush over the blurry area, and Lightroom Mobile will automatically analyze the surrounding details and attempt to make the area appear sharper.
5. Sharpening Presets: Lightroom Mobile provides a range of sharpening presets that can quickly enhance the sharpness of your photos. To access these presets, open the image in Lightroom Mobile and go to the Develop module. Navigate to the Presets panel and explore the various sharpening presets available. Apply the preset that best suits your photo and make additional adjustments if necessary.
By using these techniques in Lightroom Mobile, you can effectively unblur your photos and make them appear sharper and more detailed. Experiment with different methods and settings to find the best approach for each specific photo.
Conclusion
In conclusion, learning how to unblur a photo in Lightroom Mobile is a valuable skill for any photographer. With the powerful editing capabilities and user-friendly interface of Lightroom Mobile, you can easily enhance the clarity and sharpness of your photos on the go. By following the step-by-step process we’ve discussed, you can effectively unblur your photos and make them look professional and visually stunning.
Remember, practice makes perfect when it comes to photo editing. Don’t be afraid to experiment and try different techniques to achieve the desired results. And always keep in mind the importance of capturing sharp and clear images from the start, as it will significantly reduce the need for excessive post-processing. So, get out there, capture breathtaking moments, and unlock the full potential of your photos with Lightroom Mobile!
FAQs
Q: Is it possible to unblur a photo in Lightroom Mobile?
A: Yes, it is possible to unblur a photo in Lightroom Mobile using various tools and techniques available in the app. With the right adjustments and enhancements, you can significantly improve the overall sharpness and clarity of your blurred photos.
Q: What tools can I use to unblur a photo in Lightroom Mobile?
A: Lightroom Mobile offers several tools that can help you unblur a photo. The Sharpening tool allows you to enhance the fine details and increase the overall clarity of the image. Additionally, the Clarity tool can help you bring out more definition and texture in your photo.
Q: How do I use the Sharpening tool in Lightroom Mobile?
A: To use the Sharpening tool in Lightroom Mobile, open the photo you want to unblur and navigate to the “Detail” panel. Adjust the “Amount” slider to increase the sharpness, be careful not to overdo it as it can introduce noise. You can also adjust the “Radius” and “Detail” sliders to fine-tune the sharpening effect.
Q: Can I unblur a photo in Lightroom Mobile if it is severely blurred?
A: While Lightroom Mobile can help improve the sharpness of a slightly blurred photo, severe blurring may not be easily corrected. In such cases, it is best to rely on professional software or consult with a skilled photo editor who can utilize advanced techniques to salvage the image.
Q: Are there any other tips for unblurring a photo in Lightroom Mobile?
A: Yes, here are a few additional tips:
- Use the Adjustment Brush tool to selectively sharpen specific areas of the photo.
- Experiment with the Clarity and Texture sliders to bring out more details.
- Consider using the Dehaze tool if the blurriness is caused by atmospheric conditions or haze.
- Don’t be afraid to apply multiple adjustments and fine-tune them to achieve the desired effect.