
Are you tired of your photos looking flat and unimpressive? Do you want to add a professional touch to your iPhone photos by blurring the background? Well, you’re in luck! In this article, we will guide you through the process of blurring the background on a photo using your iPhone. Whether you’re capturing breathtaking landscapes, stunning portraits, or vibrant still life, adding a beautiful blur effect to the background can make your subject stand out and give your images that extra wow factor. With the advancements in iPhone camera technology, achieving a blurred background has become easier than ever. So, grab your iPhone and let’s dive into the world of capturing stunning photos with a blurred background right from the palm of your hand.
Inside This Article
- How to Blur Background on Photo on iPhone
- Method 1: Using Portrait Mode
- Method 2: Using Third-Party Apps
- Method 3: Using Editing Tools
- Conclusion
- FAQs
How to Blur Background on Photo on iPhone
Have you ever taken a photo with your iPhone and wished you could blur the background to make the subject stand out? Well, you’re in luck! With the advancement of technology, you can easily achieve this effect using your iPhone. In this article, we will show you three different methods to blur the background on a photo using your iPhone.
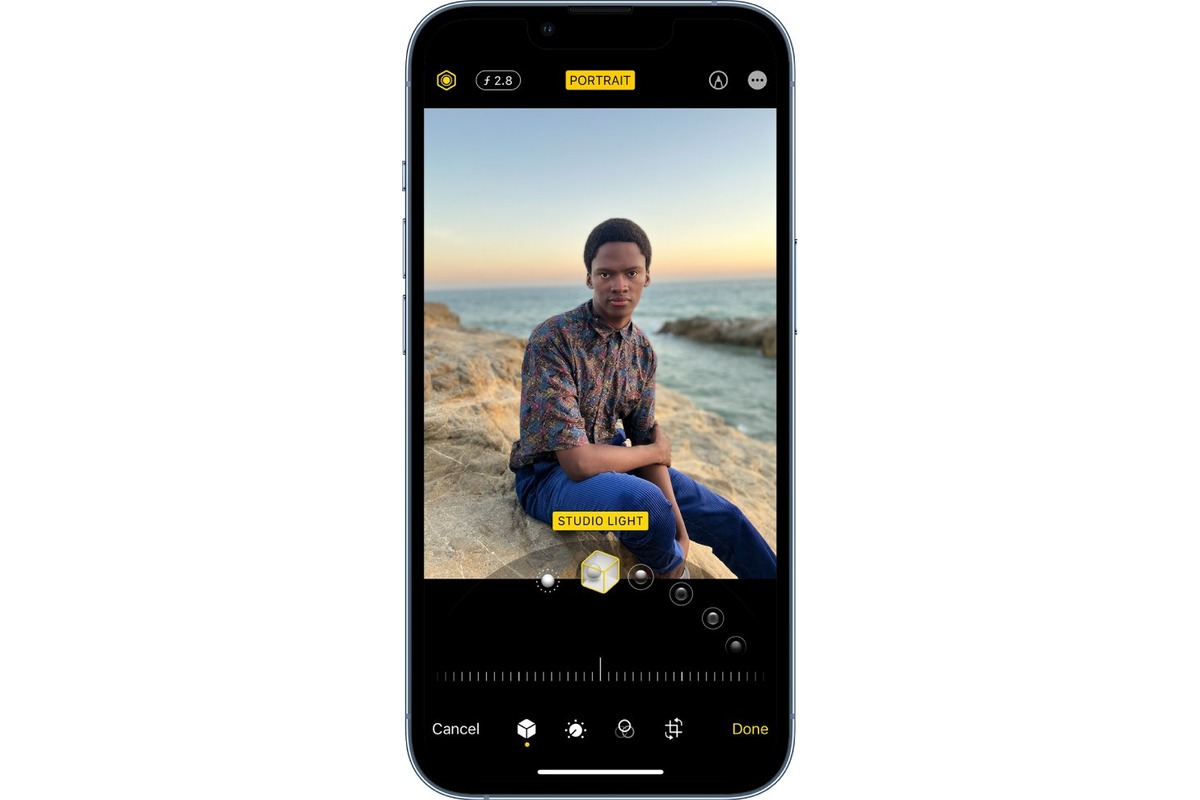
Method 1: Using Portrait Mode
If you have an iPhone model that supports Portrait mode, you’re in for a treat. This feature utilizes the dual-camera system to create a depth effect, blurring the background and focusing on the subject. To use Portrait mode, follow these steps:
- Open the Camera app on your iPhone.
- Swipe right and select the “Portrait” mode.
- Compose your shot and tap the shutter button.
- After taking the photo, you can adjust the intensity of the blur effect using the editing options in the Photos app.
Method 2: Using Third-Party Apps
If your iPhone doesn’t support Portrait mode or you want more control over the blurring effect, you can turn to third-party apps. There are numerous apps available on the App Store that allow you to edit your photos and blur the background. Some popular options include Snapseed, Adobe Photoshop Express, and AfterFocus. Simply download the app of your choice, open the photo, and use the blur tool to selectively blur the background.
Method 3: Using Editing Tools
If you prefer not to use third-party apps, fear not! The built-in editing tools in the Photos app offer a variety of options to help you blur the background of your photos. Follow these steps to blur the background using the editing tools:
- Open the photo you want to edit in the Photos app.
- Tap on the “Edit” button.
- Tap on the “Adjust” icon (it looks like a dial).
- Scroll down and tap on the “Blur” option.
- Adjust the intensity of the blur effect by using the slider.
- Tap “Done” to save your edited photo.
With these three methods at your disposal, you can easily blur the background of your photos and create stunning effects. Whether you prefer the convenience of Portrait mode, the versatility of third-party apps, or the simplicity of the built-in editing tools, you have the power to make your subject truly stand out.
So, unleash your creativity and experiment with different techniques to blur the background and transform your iPhone photos into works of art.
Method 1: Using Portrait Mode
One of the easiest and most effective ways to blur the background on a photo on your iPhone is by using the built-in Portrait mode. This feature is available on newer iPhone models such as the iPhone X, iPhone XS, iPhone XR, and iPhone 11 series.
To use Portrait mode, follow these steps:
- Open the Camera app on your iPhone and select the “Portrait” mode.
- Aim your camera at the subject you want to capture. Portrait mode works best when the subject is relatively close to the camera.
- Ensure that your subject is well-lit and stands out from the background.
- Tap the capture button to take the photo. The camera will analyze the scene and apply a depth effect, blurring the background and creating a professional-looking image.
Portrait mode uses the dual-camera system on compatible iPhone models to create a depth map of the scene. This allows the camera to distinguish between the subject and the background, enabling the blur effect.
After taking a photo in Portrait mode, you can further adjust the level of background blur using the built-in editing tools in the Photos app. Simply open the photo, tap “Edit,” and adjust the Depth slider to increase or decrease the blurriness.
Keep in mind that Portrait mode may not be available on older iPhone models or on certain camera modes, such as wide-angle or front-facing cameras. If that’s the case, you can try one of the alternative methods mentioned in the following sections.
Method 2: Using Third-Party Apps
If you’re looking for more control and flexibility in blurring the background of your photos on your iPhone, using third-party apps is a great option. There are several apps available on the App Store that offer advanced editing features, including powerful blur effects. Here are a few popular apps you can try:
- Snapseed: Developed by Google, Snapseed is a highly rated photo editing app that allows you to adjust various aspects of your images, including blurring the background. With the selective focus tool, you can easily create a beautiful shallow depth of field effect and make your subject stand out.
- VSCO: Known for its stunning filters and artistic editing capabilities, VSCO is a favorite among photographers and Instagram enthusiasts. It also offers a blur tool that lets you soften the background of your photos, adding a touch of professional polish.
- AfterFocus: Designed specifically for creating realistic depth of field effects, AfterFocus is a powerful app that mimics the bokeh effect typically achieved with DSLR cameras. You can choose between various aperture shapes and adjust the intensity of the blur to achieve the desired result.
Using these apps is simple and intuitive. After installing the app of your choice, you can import the photo you want to edit and use the app’s built-in blur tool to apply the effect. Depending on the app, you may have additional options to fine-tune the blur, such as adjusting the size, strength, and feathering of the blur. Once you’re satisfied with the result, you can save the edited photo to your iPhone’s camera roll or share it directly on social media.
Keep in mind that while third-party apps offer more advanced editing features, they may come with in-app purchases or subscription models for accessing premium features. It’s worth exploring the options and reading user reviews to find the app that suits your needs and budget.
So don’t fret if your iPhone’s native camera app doesn’t provide the blur effect you desire. With the help of third-party apps, you can unleash your creativity and achieve stunning background blurs on your photos.
Method 3: Using Editing Tools
If you don’t have the latest iPhone with Portrait Mode, don’t worry. You can still achieve a blurred background effect on your photos using various editing tools available on your iPhone.
One popular editing tool is the built-in Photos app on iPhone. Here’s how you can use it to blur the background of your photos:
- Open the Photos app and select the photo you want to edit.
- Tap on the “Edit” button at the top right corner of the screen.
- Tap on the three-dot icon (More Options) at the bottom right corner of the screen.
- Select “Markup” from the options.
- In the Markup editor, tap on the “+” icon at the top right corner of the screen.
- Choose “Blur” from the menu that appears.
- Drag the circular slider to adjust the intensity of the blur effect.
- Tap “Done” to save the changes.
- Finally, tap “Done” again to exit the editing mode.
Another editing tool you can use is the popular third-party app called Snapseed. Here’s how to blur the background using Snapseed:
- Download and install the Snapseed app from the App Store if you haven’t already.
- Open the app and select the photo you want to edit.
- Tap on the “Edit” button at the bottom of the screen.
- Tap on the “Selective” tool.
- Tap on the area of the photo that you want to keep in focus.
- Increase the “Structure” and “Sharpness” sliders to enhance the details of the selected area.
- Decrease the “Blur” slider to add a blur effect to the background.
- Tap “Apply” to save the changes.
- Finally, tap the checkmark icon at the bottom of the screen to apply the changes and save the edited photo.
These editing tools provide you with the flexibility to blur the background of your photos even if your iPhone doesn’t have the Portrait Mode feature. Experiment with different intensity levels and adjustments to achieve the desired blur effect.
Remember, practice makes perfect, so don’t be afraid to try different editing techniques and explore other photo editing apps to enhance your photography skills.
Conclusion
Blurry background photos can add a professional and artistic touch to your iPhone photography. With the right tools and techniques, you can easily achieve this effect and make your subject stand out. Whether you’re capturing portraits, nature shots, or even food photography, the ability to blur the background can elevate your images to the next level.
By following the step-by-step instructions mentioned above, you can blur the background of your photos on iPhone using different methods, such as using the Portrait mode, using third-party apps, or using editing tools. Experiment, practice, and have fun with different subjects and settings to create unique and visually stunning images.
Remember, mastering the art of blurring the background on your iPhone takes time and practice. Don’t be afraid to explore different techniques, experiment with settings, and embrace your creativity. With patience and persistence, you’ll soon be capturing professional-looking photos with beautifully blurred backgrounds.
FAQs
1. Can I blur the background of a photo on my iPhone?
Yes, you can easily blur the background of a photo on your iPhone using the built-in editing tools in the Photos app. It allows you to create a depth-of-field effect, commonly known as “Portrait mode,” to blur the background and focus on the subject.
2. How do I access the editing tools in the Photos app?
To access the editing tools in the Photos app, open the photo you want to edit and tap the “Edit” button located at the top-right corner of the screen. This will bring up the editing interface where you can adjust various aspects of the photo, including blurring the background.
3. What is the process for blurring the background of a photo in the Photos app?
After accessing the editing interface in the Photos app, tap on the “Depth” or “Portrait” option, depending on your iPhone model. This will automatically detect the subject and blur the background. You can further customize the intensity of the blur by using the control sliders provided.
4. Are there any third-party apps available for blurring the background on iPhone?
Yes, there are several third-party apps available on the App Store that offer more advanced features for blurring the background of photos on your iPhone. Some popular apps include “AfterFocus,” “Snapseed,” and “TouchRetouch.” These apps provide additional tools and functionalities to enhance the blurring effect.
5. Can I blur the background of existing photos or only while capturing them?
While the built-in depth-of-field effect is primarily designed for capturing photos in real-time, some third-party apps allow you to blur the backgrounds of existing photos as well. Simply import the photo into the app and use the available tools to blur the background to your liking.