
Are you tired of the same old ringtone on your iPhone? Well, you’re in luck! In this article, we’ll show you how to change the ringtone on your iPhone in a few simple steps. Whether you want to personalize your phone with a catchy tune or set a specific ringtone for different callers, we’ve got you covered. By following our step-by-step guide, you’ll be able to give your iPhone a fresh and unique sound that matches your style and preferences. So, let’s dive in and discover how you can change your ringtone on your iPhone and make sure you never miss an important call again!
Inside This Article
- Overview
- Method 1: Changing the Ringtone in Settings
- Method 2: Changing the Ringtone using the GarageBand App
- Method 3: Changing the Ringtone using iTunes
- Method 4: Changing the Ringtone using a Third-Party App
- Conclusion
- FAQs
Overview
Changing the ringtone on your iPhone is a great way to personalize your device and add a touch of personality to incoming calls. With the advancement of technology, it has become easier than ever to customize the ringtone on your iPhone. This article will guide you through different methods to change the ringtone on your iPhone in 2023. Whether you want to use the built-in settings, a third-party app, or even create your own ringtone using GarageBand, we have you covered.
In the following sections, we will explore four different methods to change the ringtone on your iPhone. Method 1 will focus on changing the ringtone using the settings of your device. Method 2 will introduce how to create and set custom ringtones using the GarageBand app. Method 3 will explain how to change the ringtone using iTunes, and finally, Method 4 will introduce a third-party app alternative.
Whether you prefer a classic chime or a trendy pop song as your ringtone, this article will provide you with step-by-step instructions to help you customize your iPhone’s ringtone to suit your style. So, let’s dive into the different methods and find the perfect ringtone for your iPhone!
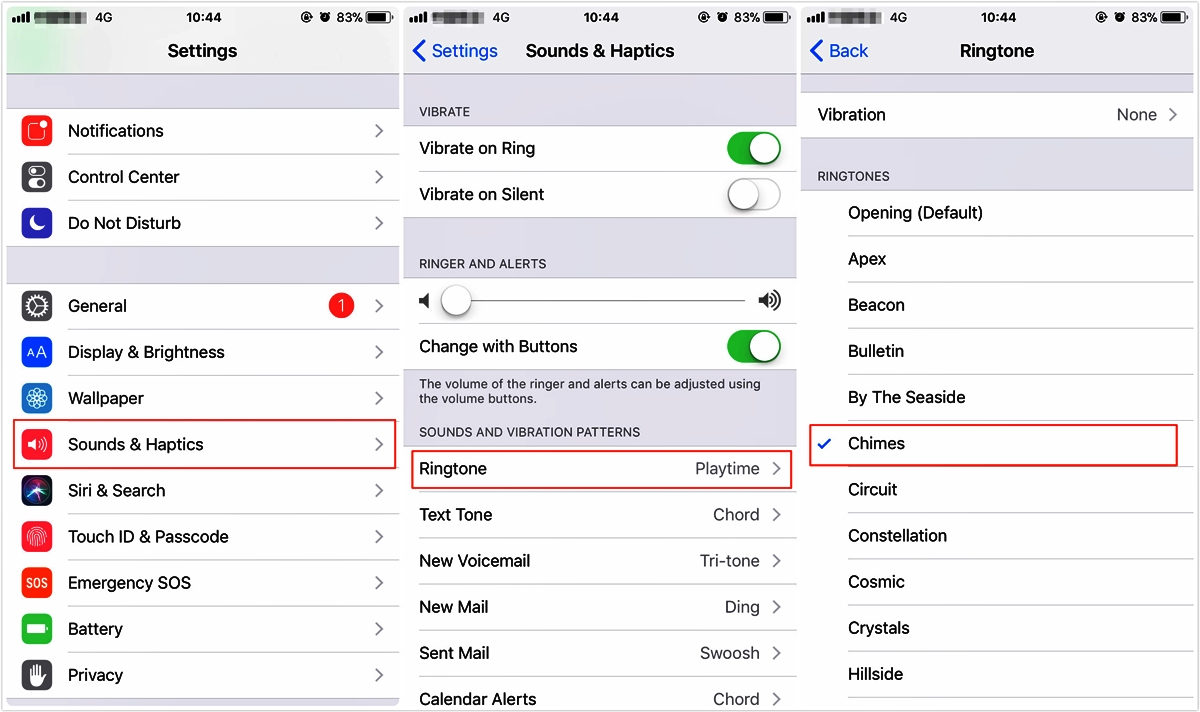
Method 1: Changing the Ringtone in Settings
One of the easiest ways to change the ringtone on your iPhone is by using the Settings app. Here’s how you can do it:
Step 1: Open the “Settings” app on your iPhone.
Step 2: Scroll down and tap on “Sounds & Haptics” or “Sounds” depending on your iPhone model.
Step 3: Under the “Sounds and Vibration Patterns” section, tap on “Ringtone”.
Step 4: You will see a list of available ringtones. Tap on the one you want to set as your ringtone.
Step 5: To preview the ringtone, tap on the play button next to the selected ringtone.
Step 6: Once you have chosen your desired ringtone, simply exit the Settings app. Your new ringtone will be saved and applied to incoming calls.
It’s that simple! Now you can enjoy a new ringtone on your iPhone without the need for any additional apps or downloads.
Note: If you want to customize your ringtone further, you can also tap on “Download All Purchased Tones” to access any previously purchased ringtones from the iTunes Store. Additionally, you can tap on “Ringtone” under the “Sounds and Vibration Patterns” section to set a specific ringtone for individual contacts.
Method 2: Changing the Ringtone using the GarageBand App
If you’re looking for a fun and creative way to change the ringtone on your iPhone, you can use the GarageBand app. GarageBand is a powerful app that allows you to create and edit music on your iOS device. But did you know that you can also use it to make custom ringtones?
To get started, make sure you have the GarageBand app installed on your iPhone. If you don’t have it, you can download it for free from the App Store.
Once you have GarageBand installed, follow these steps to create a custom ringtone:
- Open the GarageBand app on your iPhone and tap on the “+” button located at the top right corner of the screen.
- Select “Audio Recorder” to create a new project.
- Tap on the “Tracks View” button, which looks like a horizontal line with a music note on top, to access the instrument options.
- Choose the instrument you want to use for your ringtone. You can select from a wide range of instruments like piano, guitar, drums, and more.
- Tap on the red record button to start recording your custom ringtone. You can play the instrument or make any sound you like.
- When you’re done recording, tap on the square stop button to stop the recording.
- To trim your ringtone, tap on the audio waveform and select the scissor icon. Drag the handles to select the portion of the recording you want to use as the ringtone.
- Once you’ve trimmed the ringtone, tap on the downward arrow icon to access the sharing options.
- Select “Ringtone” from the sharing options menu.
- Give your ringtone a name and tap on “Export” to save it to your iPhone’s ringtone library.
That’s it! You’ve successfully created a custom ringtone using the GarageBand app. Now all you have to do is go to your iPhone’s Settings, select “Sounds & Haptics,” and choose your newly created ringtone from the list of available options.
The GarageBand app provides a fun and creative way to personalize your iPhone’s ringtone. You can experiment with different instruments and sounds to make a ringtone that truly reflects your style and personality. So why settle for the default ringtones when you can create your own unique tones using GarageBand?
Remember to have fun and let your creativity flow as you explore the possibilities of customizing your iPhone’s ringtone with the GarageBand app!
Method 3: Changing the Ringtone using iTunes
One of the traditional methods to change the ringtone on your iPhone is by using iTunes. iTunes is a media management software developed by Apple, primarily used for managing and syncing media between computers and iOS devices.
Here’s a step-by-step guide on how to change your iPhone’s ringtone using iTunes:
- Connect your iPhone to your computer using a USB cable. Launch iTunes if it doesn’t open automatically.
- In iTunes, click on the device icon located near the top-left corner of the window. This will take you to the Summary tab of your iPhone’s settings.
- On the Summary tab, scroll down to the “Options” section and click on the “Sync with this iPhone over Wi-Fi” checkbox if you want to enable wireless syncing. This step is optional.
- In the left sidebar of iTunes, click on “Tones” under your iPhone’s name. If you don’t see “Tones,” you may need to enable it by going to “Edit” > “Preferences” > “General” (Windows) or “iTunes” > “Preferences” > “General” (Mac), and checking the “Tones” box.
- Select the ringtone file that you want to use from your computer and drag it onto the “Tones” section in iTunes. You can also click on “File” > “Add File to Library” and choose the ringtone file from your computer.
- Click on the “Sync” button at the bottom-right corner of the iTunes window to sync the ringtone to your iPhone. This will transfer the ringtone file from your computer to your iPhone’s “Tones” section.
- Once the sync is complete, go to your iPhone’s Settings > Sounds & Haptics, and select “Ringtone.”
- From the list of available ringtones, you should now see the newly added ringtone. Simply tap on it to set it as your iPhone’s ringtone.
That’s it! You have successfully changed your iPhone’s ringtone using iTunes. Now you can enjoy a personalized ringtone whenever you receive a call or message on your iPhone.
Method 4: Changing the Ringtone using a Third-Party App
Are you looking to personalize your iPhone’s ringtone beyond what is available in the default options? You’re in luck! In addition to the built-in settings and GarageBand app, there are several third-party apps available that can help you customize your ringtone. These apps provide a wide range of tones and easy-to-use features, allowing you to create a unique and personalized ringtone. Let’s explore how you can change your ringtone using a third-party app.
Step 1: Browse the App Store
The first step is to browse the App Store on your iPhone and search for “ringtone maker” or “ringtone creator.” You will find a variety of apps that offer this functionality. Take some time to read reviews and check the ratings to make an informed decision about which app to download.
Step 2: Download and Install the App
Once you’ve chosen an app, tap the “Get” button to download and install it on your iPhone. The installation process should only take a few moments, depending on your internet connection speed.
Step 3: Launch the App
After the app has finished downloading and installing, navigate to your home screen and locate the app’s icon. Tap on the icon to launch the app.
Step 4: Select a Song or Sound File
Once you’re in the app, you will have the option to select a song or sound file from your iPhone’s library. The third-party app will provide you with instructions on how to do this. You can choose a song that is already on your device or import one from another source.
Step 5: Edit and Customize
After selecting a song or sound file, you will have the ability to edit and customize it within the app. This can include trimming the song, adjusting the volume levels, applying effects, and adding fade ins or fade outs. The app will provide you with all the necessary tools to create your desired ringtone.
Step 6: Save and Set as Ringtone
Once you are satisfied with the edits and customizations, the app will allow you to save the file as a ringtone. Follow the instructions within the app to complete this step.
Step 7: Set the Ringtone on your iPhone
Now that you have created your customized ringtone, it’s time to set it as the default ringtone on your iPhone. Go to your iPhone’s Settings, then select “Sounds & Haptics” or “Sounds & Vibration Patterns,” depending on your iOS version. From there, tap on “Ringtone” and select your newly created tone from the list. Voila! Your new ringtone is set.
Using a third-party app to change your iPhone’s ringtone gives you the flexibility to create a unique and personalized sound that reflects your style and preferences. With a multitude of apps available in the App Store, you can easily find one that suits your needs. So, go ahead, embark on the journey of customizing your iPhone’s ringtone and make it truly your own!
Conclusion
In conclusion, changing the ringtone on your iPhone is a simple and easy process that allows you to personalize your device and add a touch of your own style. Whether you want to set a favorite song as your ringtone or choose from the wide selection of built-in sounds, the options are endless. By following the steps outlined in this guide, you can customize your iPhone’s ringtone to suit your preferences and make it truly unique.
Remember to consider the file format compatibility, duration, and volume of the ringtone to ensure a seamless experience. Additionally, keep in mind that you can always revert to the default ringtone if you ever want to change it back.
So go ahead and let your personality shine through your iPhone’s ringtone. Stand out from the crowd and enjoy the sound that brings a smile to your face every time your phone rings. Happy ringtone customization!
FAQs
1. How do I change the ringtone on my iPhone?
Changing the ringtone on your iPhone is a simple process. Here’s how you can do it:
- Open the Settings app on your iPhone.
- Scroll down and tap on “Sounds & Haptics”.
- Under the “Sound and Vibration Patterns” section, tap on “Ringtone” to access the list of available ringtones.
- Select the desired ringtone from the list.
- Once you have chosen the new ringtone, exit the Settings app and the changes will be applied automatically.
2. Can I set a custom ringtone on my iPhone?
Yes, you can set a custom ringtone on your iPhone. While the default ringtones provided by Apple are great, setting a custom ringtone adds a personal touch to your device. To set a custom ringtone, you can follow these steps:
- First, you need to have the audio file that you want to use as your ringtone. This can be a song, a sound effect, or even a recording.
- Connect your iPhone to your computer and launch iTunes (or Finder on macOS Catalina or later).
- Drag and drop your audio file into the iTunes or Finder window. The file will be added to your library.
- Once the file is added, select it in the library and go to the “Options” tab.
- Specify the start and stop time for your ringtone (typically within 30 seconds).
- Right-click on the file and choose “Create AAC Version”.
- A new file with the same name will appear in your iTunes or Finder window.
- Change the file extension from .m4a to .m4r (for macOS, you might need to enable file extensions first).
- Drag the .m4r file to your desktop or any other folder.
- Disconnect your iPhone from the computer and connect it to your Mac.
- Open the Finder window, locate your iPhone under the “Locations” section, and select it.
- Click on the “Tones” tab and drag the .m4r file from your desktop or folder into the “Tones” section of the Finder window.
- Now, go back to your iPhone and navigate to Settings > Sounds & Haptics > Ringtone.
- Your custom ringtone should appear in the list. Tap on it to set it as your ringtone.
3. Can I download additional ringtones for my iPhone?
Yes, you can download additional ringtones for your iPhone. There are various ways to do this, including:
- Using the iTunes Store: You can browse and purchase ringtones directly from the iTunes Store app on your iPhone. Simply search for the desired ringtone and follow the prompts to download and set it as your ringtone.
- Using third-party apps: There are several apps available on the App Store that offer a wide range of ringtones to choose from. You can download these apps, browse through their collections, and select the ringtone you like. Once downloaded, the app will guide you on how to set the ringtone on your iPhone.
- Using websites: There are websites that allow you to download free ringtones for your iPhone. Simply search for “free iPhone ringtones” in your preferred search engine, visit a reputable website, and follow the instructions to download and install the ringtone on your device.
4. Can I assign different ringtones to different contacts on my iPhone?
Yes, you can assign different ringtones to different contacts on your iPhone. This feature allows you to easily identify who is calling without even looking at your phone. To assign a specific ringtone to a contact, follow these steps:
- Open the Contacts app on your iPhone.
- Select the contact you want to assign a unique ringtone to.
- Tap on “Edit” in the top-right corner of the screen.
- Scroll down and tap on the “Ringtone” option.
- Choose the desired ringtone for that contact.
- Tap on “Done” to save the changes.
5. Can I change the vibration pattern for calls on my iPhone?
Yes, you can change the vibration pattern for calls on your iPhone. This allows you to customize the vibration feedback for different types of calls or contacts. To change the vibration pattern for calls, follow these steps:
- Open the Settings app on your iPhone.
- Scroll down and tap on “Sounds & Haptics”.
- Under the “Sound and Vibration Patterns” section, tap on “Ringtone”.
- Below the list of ringtones, you’ll see the “Vibration” option. Tap on it.
- Choose “Create New Vibration” to create a custom vibration pattern, or select from the pre-existing patterns.
- Follow the on-screen instructions to create or select the desired vibration pattern.
- Once you’ve chosen or created the vibration pattern, tap on “Save” to apply it to your calls.