
Are you wondering how to change your home address on your iPhone? Whether you’ve moved to a new location or want to update your address information for improved accuracy and convenience, changing your home address on your iPhone is a straightforward process. By updating your address, you can ensure that location-based services, navigation apps, and delivery services have the most up-to-date information. In this article, we’ll guide you through the steps to change your home address on your iPhone, ensuring that your device reflects your current location accurately. So, whether you’ve recently relocated or simply want to keep your iPhone settings up-to-date, read on to discover how to easily update your home address on your iPhone.
Inside This Article
- Steps to Change Your Home Address on iPhone
- Open the Settings app – Guide on how to locate and open the Settings app on iPhone
- Tap on “Privacy” – Instructions on accessing the Privacy settings within the Settings app
- Select “Location Services”- How to navigate to the Location Services section within Privacy settings
- Choose “System Services” – Step-by-step process to find and select the System Services option
- Tap on “Significant Locations”- Instructions on locating and accessing the Significant Locations feature
- Authenticate with your passcode or Face ID/Touch ID- How to verify your identity to access the Significant Locations feature
- Scroll down and select “Home” – Guide on finding the Home option within the Significant Locations menu
- Edit your home address – Instructions on updating the existing home address or entering a new one
- Save the changes – Final steps to save your updated home address on iPhone
- Conclusion
- FAQs
Steps to Change Your Home Address on iPhone
If you’ve recently moved or need to update your home address on your iPhone, don’t worry! Apple makes it easy to change your home address so that it accurately reflects your current residence. Follow these simple steps to update your home address on your iPhone:
- Open the Settings app
- Tap on “Privacy”
- Select “Location Services”
- Choose “System Services”
- Tap on “Significant Locations”
- Authenticate with your passcode or Face ID/Touch ID
- Scroll down and select “Home”
- Edit your home address
- Save the changes
Let’s take a closer look at each step:
1. Open the Settings app: Locate the Settings app on your iPhone’s home screen and tap on it to open.
2. Tap on “Privacy”: Within the Settings app, scroll down and tap on the “Privacy” option to access the privacy settings.
3. Select “Location Services”: In the Privacy settings, find and tap on the “Location Services” option to manage the location services on your iPhone.
4. Choose “System Services”: Within the Location Services menu, locate and tap on the “System Services” option that helps your iPhone determine your location accurately.
5. Tap on “Significant Locations”: Scroll down in the System Services menu and find the “Significant Locations” option. Tap on it to access the significant locations feature.
6. Authenticate with your passcode or Face ID/Touch ID: To protect your privacy, Apple requires you to authenticate with your passcode, Face ID, or Touch ID to gain access to your significant locations.
7. Scroll down and select “Home”: In the Significant Locations menu, scroll down until you locate the “Home” option. Tap on it to proceed.
8. Edit your home address: On the Home screen, you will see your current home address. Tap on the “Edit” button next to it to make changes or enter a new home address.
9. Save the changes: After editing or entering your new home address, tap on the “Save” button to update your home address on your iPhone.
Once you have completed these steps, your home address on your iPhone will be updated, and it will accurately reflect your current residence. It’s important to keep your home address up to date for various apps and services that rely on location information, such as navigation apps or weather apps.
Now you’ve successfully changed your home address on your iPhone. Enjoy using your updated address features!
Open the Settings app – Guide on how to locate and open the Settings app on iPhone
Changing your home address on your iPhone is a simple process that starts with opening the Settings app. The Settings app is the centralized location where you can customize various aspects of your iPhone’s functionalities and preferences. To begin, follow the steps below:
- Unlock your iPhone by entering your passcode or using Face ID/Touch ID.
- Locate the Settings app on your home screen. The Settings app icon resembles a gear, and it is usually found on the first page of your home screen or in your app library. If you can’t find it, you can swipe down on your home screen and use the search bar at the top of the screen to search for “Settings.”
- Tap on the Settings app icon to open the app.
Once you have successfully opened the Settings app, you are ready to proceed with changing your home address on your iPhone.
Tap on “Privacy” – Instructions on accessing the Privacy settings within the Settings app
Changing your home address on your iPhone is a simple process that starts with accessing the Privacy settings within the Settings app. Follow these steps to locate and tap on “Privacy”:
- Unlock your iPhone by entering your passcode or using Face ID/Touch ID.
- Locate the Settings app on your home screen. It is represented by a gear-shaped icon.
- Tap on the Settings app to open it.
- Scroll down through the list of options until you find the “Privacy” option. It is represented by a hand icon.
- Tap on the “Privacy” option to access the privacy settings.
By following these steps, you will successfully navigate to the Privacy settings within the Settings app. The next step in changing your home address on your iPhone involves selecting the “Location Services” option, which will be covered in the next section.
Select “Location Services”- How to navigate to the Location Services section within Privacy settings
To change your home address on iPhone, you need to access the Location Services feature within the Privacy settings. Follow the steps below to navigate to the Location Services section:
1. Start by unlocking your iPhone and opening the Settings app. You can easily locate the Settings app on your home screen; it has a grey icon with gears.
2. Once you have opened the Settings app, scroll down until you find the “Privacy” option. It is represented by a hand-shaped icon and is typically located towards the top of the list.
3. Tap on “Privacy” to access the privacy settings. This will open a new menu with various privacy-related options.
4. In the privacy settings menu, you need to find and select the “Location Services” option. Scroll through the list of available options until you see the “Location Services” label.
5. Tap on “Location Services” to enter the Location Services section. Here, you can manage and customize the location settings for various apps and services on your iPhone.
Now that you have successfully navigated to the Location Services section within the Privacy settings, you can proceed with changing your home address. Follow the further steps mentioned in this article to update your home address on iPhone.
Choose “System Services” – Step-by-step process to find and select the System Services option
Changing the home address on your iPhone requires accessing the System Services option within the Privacy settings. Follow the steps below to locate and select System Services:
1. Open the Settings app on your iPhone. Look for the app with the gear icon and tap on it.
2. Scroll down and tap on “Privacy.” It’s usually located in the third group of options.
3. In the Privacy settings, find and select “Location Services.” It’s the first option in the list.
4. Within the Location Services menu, scroll down and choose “System Services.” It’s located towards the bottom of the menu.
5. You will now see a list of various system services that use location data. This is where you can fine-tune your iPhone’s location settings based on your preferences.
By selecting “System Services,” you gain access to advanced location-related features and settings, including the ability to change your home address.
It’s important to note that changing your home address in the System Services menu may affect other apps and services on your iPhone that rely on location data. Be mindful of the potential impact before making any modifications.
To proceed with updating your home address, continue following the remaining steps outlined in the previous sections.
Once you have successfully selected “System Services,” you are well on your way to changing your home address on your iPhone. The next steps will guide you through the process of editing and saving your updated information.
Tap on “Significant Locations”- Instructions on locating and accessing the Significant Locations feature
One of the useful features on your iPhone is the Significant Locations feature, which keeps track of the places you frequently visit. This feature can be helpful for various reasons, such as providing personalized location-based suggestions and improving the accuracy of location services on your device. To access and manage your Significant Locations, follow the steps below:
1. Open the Settings app on your iPhone. You can find the Settings app icon on your home screen. It looks like a gear.
2. Once you have opened the Settings app, scroll down and look for the “Privacy” option. Tap on it to access the privacy settings.
3. In the Privacy settings, locate and tap on “Location Services.” This will bring you to the location settings for your device.
4. Within the Location Services settings, scroll down until you find “System Services.” Tap on it to access the system-level location services.
5. Among the system services, you will see “Significant Locations.” Tap on it to enter the Significant Locations menu.
6. To access your Significant Locations data, you will need to authenticate with your passcode or using Face ID/Touch ID, depending on your iPhone model.
7. Once you have successfully authenticated, you will see a list of the significant locations your iPhone has recorded. You can tap on each location to view more details and see the specific dates and times of your visits.
8. In the Significant Locations menu, you can also enable or disable the feature entirely by toggling the switch at the top. If you disable the feature, your iPhone will no longer track and store significant locations.
9. If you want to delete specific significant locations from your iPhone, you can swipe left on the location entry and tap on the “Delete” button that appears. This will remove that particular location from your history.
10. Finally, if you wish to clear all your Significant Locations data completely, you can tap on the “Clear History” option at the bottom of the Significant Locations menu.
By following these steps, you can easily locate and access the Significant Locations feature on your iPhone. Remember that this feature can provide helpful insights and recommendations, but it’s also important to consider your privacy preferences and manage your location data accordingly.
Authenticate with your passcode or Face ID/Touch ID- How to verify your identity to access the Significant Locations feature
Once you have accessed the “Significant Locations” menu, the next step is to authenticate your identity. Apple takes privacy and security seriously, so it requires your passcode or biometric authentication, such as Face ID or Touch ID, to access this sensitive location information.
To proceed, you will need to enter your passcode or use your biometric data, depending on the authentication method you have set up on your iPhone. This serves as an added layer of protection, ensuring that only you can view and modify your significant locations.
If you have set up Face ID, simply look at the front-facing camera on your iPhone, and it will scan your face to authenticate your identity. Alternatively, if you have chosen to use Touch ID, place your registered finger on the Touch ID sensor located on the Home button or the power button, depending on your iPhone model.
Once your identity has been verified, you will be granted access to the significant locations stored on your iPhone. This includes your home address, as well as other frequently visited locations that have been recorded by your device.
It is important to note that the passcode or biometric authentication is required every time you want to access and make changes to your significant locations. This ensures that only authorized users can view and modify this sensitive information, keeping your personal data secure and private.
By following these authentication steps, you can confidently proceed to edit your home address or update any other information related to your significant locations on your iPhone.
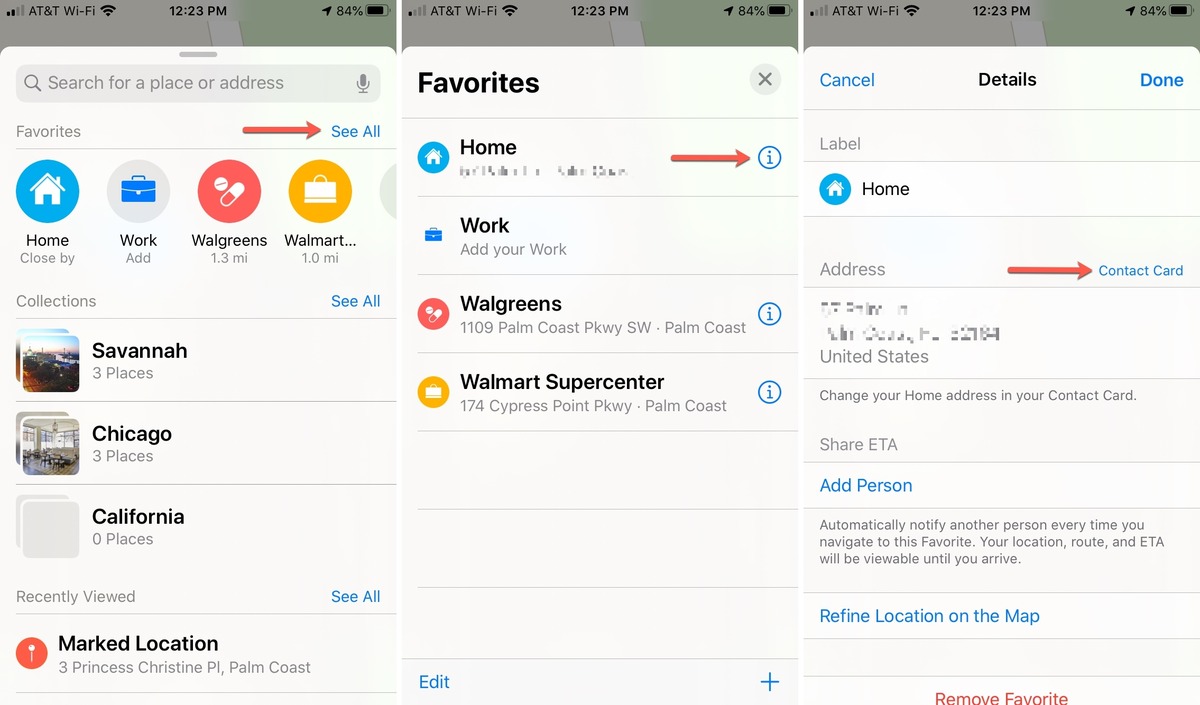
Scroll down and select “Home” – Guide on finding the Home option within the Significant Locations menu
After accessing the Significant Locations feature in the System Services settings, the next step is to scroll down and locate the “Home” option. This option allows you to specify your home address on your iPhone.
Scrolling down can be done by swiping your finger upwards on the screen, or by using the scroll bar on the right-hand side of the menu. Take your time to navigate through the list of significant locations until you spot the “Home” option.
Keep in mind that the location names may not be explicitly labeled as “Home.” Instead, you may see familiar addresses or names associated with your residence. Look for addresses that correspond to your home address or any labels that you have assigned as your home location.
Once you have identified the “Home” option or an address that represents your home location, tap on it to proceed to the next step.
It is worth mentioning that if you have not yet set a home address on your iPhone, the “Home” option may not appear. In this case, you can manually set your home address by selecting the “+ Add Address” option or a similar button, depending on your iPhone model and software version.
Remember that having your home address set on your iPhone can enable certain features like personalized location-based suggestions and improved accuracy in applications that utilize location services.
Edit your home address – Instructions on updating the existing home address or entering a new one
Changing your home address on your iPhone is a simple process that can be done in just a few steps. Whether you have moved to a new location or simply want to update the address associated with your device, follow these instructions to edit your home address on your iPhone.
To begin, open the Settings app on your iPhone. This can be found on your home screen, represented by a gear-shaped icon.
Next, scroll down and tap on “Privacy” from the list of available options. This will open the Privacy settings menu.
Within the Privacy settings menu, locate and select “Location Services”. This option controls the location settings for your device.
Now, you will see a list of apps and services that have access to your location. Scroll to the bottom and choose “System Services”.
In the System Services menu, you will find various options related to location services. Scroll down again and tap on “Significant Locations”.
As a security measure, you will be prompted to authenticate with your passcode or Face ID/Touch ID. Enter the required information to proceed.
Once you have successfully authenticated, you will see a list of significant locations that your iPhone has recorded. Scroll down and select “Home” from the list.
Now, you can edit your home address. You have the option to update the existing address by tapping on it and making the necessary changes. If you wish to enter a new address, tap on “Add Address”.
Enter your new home address manually or use the search option to find and select it from the available suggestions.
After entering or updating your home address, tap on “Save” to save the changes.
That’s it! Your home address has been successfully edited on your iPhone. This updated address will be used for various location-based services and apps on your device.
Save the changes – Final steps to save your updated home address on iPhone
Once you have entered or modified your home address on your iPhone, the final step is to save the changes. Saving the updated address ensures that your device has the most accurate location data for various apps and services.
To save the changes to your home address on your iPhone, follow these simple steps:
- After entering or modifying your home address, look for the “Save” button or option on the screen. The location of this button may vary depending on the iOS version that you are using.
- Tap on the “Save” button to store your updated home address on your iPhone. This action will confirm and apply the changes you made.
- Once you have saved your updated home address, you can exit the settings and continue using your iPhone as usual.
It’s important to note that saving your home address ensures that location-based services, such as navigation apps or weather forecasts, accurately reflect your current location and provide relevant information based on your address. Additionally, having an updated home address on your device can also improve the accuracy of location-based reminders and notifications.
If you ever need to change your home address again in the future, you can simply follow the steps outlined in this guide to update it accordingly. Keeping your home address up-to-date on your iPhone is essential for smooth and accurate functionality of location-based services.
By following these final steps and saving your updated home address on your iPhone, you can ensure that your device has the correct location information, enhancing the overall user experience.
Changing your home address on your iPhone is a simple and straightforward process that can be done in just a few steps. By updating your home address, you ensure accurate location information for various apps and services on your device. Whether you have moved to a new home or simply need to correct your existing home address, following these instructions will allow you to keep your iPhone up-to-date with the correct information.
With the convenience and power of modern smartphones, it’s essential to have accurate location information for various apps, such as maps, weather, and location-based reminders. By following the steps outlined in this article, you can easily modify your home address on your iPhone and ensure that your device provides you with the most relevant and accurate information tailored to your current location.
Keep in mind that the process may vary slightly depending on the iOS version you are using. However, regardless of the specific steps, the concept remains the same. Updating your home address on your iPhone can help you make the most of your device’s location-based features and ensure a seamless user experience.
FAQs
Q: Can I change my home address on my iPhone?
Yes, you can change your home address on your iPhone. It is a simple process that can be done through the device’s settings.
Q: Why would I need to change my home address on my iPhone?
There are a few reasons why you might need to change your home address on your iPhone. It could be because you have moved to a new location and want your iPhone to reflect your current address for location-based services. It could also be because you want to update your emergency contact information in case of any unforeseen events.
Q: How do I change my home address on my iPhone?
To change your home address on your iPhone, follow these steps:
- Open the “Settings” app on your iPhone.
- Scroll down and tap on “Privacy.”
- Tap on “Location Services.”
- Scroll down and tap on “System Services.”
- Tap on “Significant Locations.”
- If prompted, authenticate with your passcode, Touch ID, or Face ID.
- Scroll down and tap on the home address listed under “Significant Locations.”
- Enter your new home address and tap on “Done.”
Q: Will changing my home address on my iPhone affect any other settings or apps?
Changing your home address on your iPhone should not directly affect any other settings or apps. However, certain location-based services, such as weather, traffic, and navigation apps, may use your home address to provide personalized information. So, you may need to update your address in these apps manually if they do not automatically sync with the iPhone’s system address.
Q: Can I change my home address back to the original one?
Yes, you can change your home address back to the original one if needed. Simply follow the same steps mentioned earlier and enter your original home address in the designated field. Remember to tap on “Done” to save the changes.