
Welcome to our comprehensive guide on how to clear history on the iPhone 13! With the increasing amount of personal data stored on our smartphones, it is essential to know how to manage our privacy effectively. Clearing your browsing history, search queries, and app usage data can help protect your privacy and free up storage space on your iPhone 13. In this article, we will walk you through the step-by-step process of clearing history on your iPhone 13, covering Safari browsing history, app usage history, and more. Whether you want to maintain your privacy, improve device performance, or simply start with a clean slate, we’ve got you covered. So, let’s dive in and learn how to clear history on your iPhone 13!
Inside This Article
- Why Clear History on iPhone 13?- Importance of clearing browsing history- Benefits of clearing search history and cookies
- Clearing Safari Browsing History on iPhone 13 – Step-by-step guide to clearing browsing history – Tips for clearing individual website data
- Clearing App Usage History on iPhone 13- How to delete app usage history- Managing and removing app data
- Clearing Call Log and Messages on iPhone 13- Instructions for erasing call history- Steps to delete text messages and iMessages
- Clearing Location History on iPhone 13- Managing and clearing location data- Privacy settings for location tracking
- Clearing Siri and Dictation History on iPhone 13
- Conclusion
- FAQs
Why Clear History on iPhone 13?- Importance of clearing browsing history- Benefits of clearing search history and cookies
Clearing history on your iPhone 13 is an essential practice for maintaining privacy and optimizing the device’s performance. Whether it is your browsing history, search history, or cookies, clearing these records regularly has several important benefits.
Importance of Clearing Browsing History:
When you use Safari or any other web browser on your iPhone 13, it keeps a record of the websites you visit. While this browsing history can be useful for quick access to frequently visited sites, it can also compromise your privacy. Clearing your browsing history helps safeguard your sensitive information, such as login credentials, personal data, and browsing habits, from being accessed by others.
Moreover, clearing your browsing history can improve the performance of your iPhone 13. Over time, a large browsing history can consume valuable storage space and impact the speed and responsiveness of your device. By regularly clearing your browsing history, you can free up storage space and ensure a smoother browsing experience.
Benefits of Clearing Search History and Cookies:
In addition to clearing your browsing history, it is also important to clear your search history and cookies. When you use search engines like Google or Bing, they store your search queries and create a profile based on your search history. This can lead to targeted advertisements and personalized search results.
By clearing your search history, you can prevent search engines from obtaining extensive data about your preferences and online activities. This helps maintain your anonymity and reduces the risk of your information being used for targeted marketing or data tracking.
Cookies, on the other hand, are small files that websites store on your device to remember your preferences and provide personalized experiences. While cookies can be useful, they can also be used to track your browsing behavior and collect data about your online activities.
Clearing cookies regularly helps protect your privacy and ensures that you are not being tracked across different websites. It also helps to avoid potential compatibility issues, as outdated or corrupted cookies can sometimes disrupt the functionality of websites and applications.
Clearing Safari Browsing History on iPhone 13 – Step-by-step guide to clearing browsing history – Tips for clearing individual website data
Clearing your Safari browsing history on your iPhone 13 is a simple and effective way to maintain your privacy and optimize the performance of your device. Whether you want to remove your entire browsing history or just clear individual website data, here is a comprehensive step-by-step guide to help you through the process:
1. Open the Safari app on your iPhone 13. It’s the compass icon located on your home screen.
2. Tap on the bookmarks icon at the bottom of the screen. It looks like an open book.
3. At the top of the screen, tap on the “History” tab. It’s represented by a clock icon.
4. You will now see a list of all your browsing history. To clear your entire history, tap on the “Clear” button at the bottom right corner of the screen.
5. A pop-up will appear with options to clear your history for the last hour, today, or today and yesterday. Select the option that suits your needs.
6. To clear individual website data, swipe left on the respective website from the history list.
7. Tap on the “Delete” button that appears to the right of the website name to remove it from your browsing history.
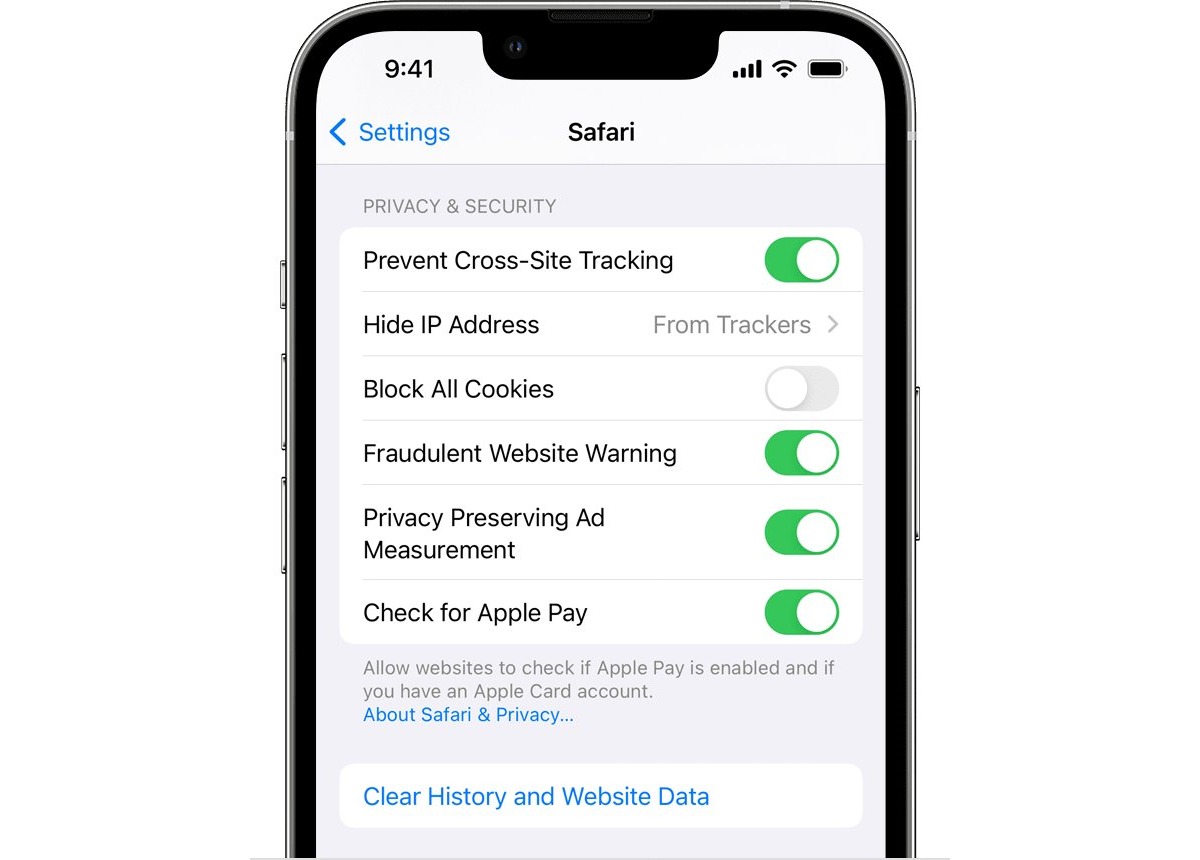
8. If you want to clear all website data, including cookies and cache, go back to the Safari settings by tapping on the back arrow at the top left of the screen.
9. Scroll down and tap on “Clear History and Website Data” option.
10. A confirmation pop-up will appear, asking if you want to delete your browsing history and remove all website data. Tap on “Clear History and Data” to proceed.
Following these steps will ensure a clean browsing history and help protect your privacy. Now you can enjoy a smoother and faster browsing experience on your iPhone 13.
Tips for Clearing Individual Website Data:
– Clearing individual website data is particularly useful if you want to remove specific websites from your browsing history without deleting everything.
– To quickly access the website data deletion option, you can also tap and hold on a website from the history list and select “Remove from History” from the menu that appears.
– If you want to clear all website data for a specific website, including cookies and cache, you can do so by going to the iPhone Settings, selecting “Safari,” and then tapping on “Advanced” and “Website Data.” From there, you can search for the website and swipe left to delete its data.
By regularly clearing your browsing history and individual website data on your iPhone 13, you can maintain privacy, free up storage space, and ensure a smooth browsing experience.
Clearing App Usage History on iPhone 13- How to delete app usage history- Managing and removing app data
As you use various apps on your iPhone 13, they store your usage history to provide a more personalized experience. While this can be useful, you may also want to clear app usage history for privacy reasons or to free up storage space. Here’s how to delete app usage history and manage app data on your iPhone 13.
To delete app usage history on your iPhone 13, follow these steps:
- Open the “Settings” app on your iPhone 13.
- Scroll down and tap on “General”.
- Tap on “iPhone Storage” or “Storage & iCloud Usage.”
- Under the “Storage” section, tap on “Manage Storage.”
- You will see a list of all the apps installed on your iPhone 13. Tap on the app for which you want to delete the usage history.
- You will now see the app storage details, including the amount of space it occupies on your iPhone. Tap on “Delete App” to remove the app from your iPhone and delete its usage history.
Managing and removing app data on your iPhone 13 can also help in clearing app usage history. Follow these additional steps:
- To manage app data, go back to the “Settings” app and tap on “General.”
- Tap on “iPhone Storage” or “Storage & iCloud Usage.”
- Under the “Storage” section, tap on “Manage Storage.”
- Scroll down and locate the app for which you want to manage the data.
- Tapping on the app will display the app storage details. Here, you can choose to offload the app, which removes the app but keeps its data, or you can tap on “Delete App” to remove the app and its data completely from your iPhone 13.
It’s important to note that clearing app usage history and managing app data will remove the associated information from your device. However, if you reinstall the app in the future, it may start collecting usage data again.
By clearing app usage history and managing app data on your iPhone 13, you can help protect your privacy and free up valuable storage space on your device.
Clearing Call Log and Messages on iPhone 13- Instructions for erasing call history- Steps to delete text messages and iMessages
Clearing call logs and messages on your iPhone 13 is an essential task to maintain privacy and free up storage space. Whether you want to erase your call history or delete specific text messages and iMessages, your iPhone 13 provides easy-to-follow instructions. In this section, we will guide you through the process of clearing your call log and messages on your iPhone 13.
Instructions for Erasing Call History
To clear your call log on the iPhone 13, follow these simple steps:
- Open the “Phone” app on your iPhone 13.
- Tap on the “Recents” tab at the bottom of the screen to view your call history.
- Swipe left on a specific call log to reveal the “Delete” button.
- Tap on “Delete” to remove the individual call log, or tap on “Clear All” to delete the entire call history.
By following these steps, you can easily clear your call log and remove any unwanted or sensitive call records from your iPhone 13.
Steps to Delete Text Messages and iMessages
If you want to delete specific text messages or iMessages on your iPhone 13, here’s what you need to do:
- Launch the “Messages” app on your iPhone 13.
- Navigate to the conversation or thread that contains the messages you want to delete.
- Long-press on the message you want to delete until a pop-up menu appears. If you want to delete multiple messages, you can tap on “Edit” in the top-right corner and select the messages you want to remove.
- In the pop-up menu, tap on “More…”
- Select the messages you want to delete by tapping on the circles next to them.
- Finally, tap on the trash can icon at the bottom-left corner of the screen to delete the selected messages.
By following these steps, you can easily delete specific text messages and iMessages from your iPhone 13, keeping your messages organized and your device clutter-free.
Remember, clearing your call log and deleting text messages and iMessages are effective ways to maintain your privacy and manage your storage space on the iPhone 13. Make sure to regularly perform these actions to ensure your device is optimized for performance and security.
Clearing Location History on iPhone 13- Managing and clearing location data- Privacy settings for location tracking
One of the features that make the iPhone 13 so popular is its ability to track your location. However, you may have concerns about your privacy and want to clear your location history from your device. Fortunately, managing and clearing location data on your iPhone 13 is a simple process.
To clear your location history on iPhone 13, follow these steps:
- Open the Settings app on your iPhone 13.
- Scroll down and tap on “Privacy.”
- Select “Location Services.”
- Scroll down and tap on “System Services.”
- Finally, tap on “Significant Locations.”
Within the “Significant Locations” menu, you will find a list of all the places you have visited while using your iPhone 13. To clear this history, simply tap on “Clear History” at the bottom of the screen. You may be prompted to enter your passcode or use Touch ID or Face ID for authentication.
By clearing your location history, you erase any trace of the places you have been while using your iPhone 13. This can be useful for maintaining your privacy or simply starting fresh with a clean slate.
Additionally, if you want to manage how your iPhone 13 tracks your location, you can adjust the privacy settings for location tracking. Here’s how:
- Open the Settings app on your iPhone 13.
- Scroll down and tap on “Privacy.”
- Select “Location Services.”
Within the “Location Services” menu, you will see a list of apps that have requested access to your location. You can choose to enable or disable location services for individual apps by tapping on the app and selecting one of the provided options: “Never,” “While Using the App,” or “Always.”
It’s important to note that disabling location services for certain apps may limit their functionality or prevent them from providing helpful location-based features. Therefore, consider your preferences and the app’s purpose before making any changes.
By managing your location settings, you have greater control over how your iPhone 13 uses and tracks your location data. This can help you strike a balance between privacy and convenience.
Clearing Siri and Dictation History on iPhone 13
Siri and Dictation are powerful features on the iPhone 13 that allow you to interact with your device using voice commands. While these features undoubtedly offer convenience, they also collect and store voice recordings on your device. If you value your privacy or simply want to clear out any stored voice data, you may want to consider clearing Siri and Dictation history on your iPhone 13. Here are the steps to do it:
Steps to delete Siri and dictation data:
- Open the Settings app on your iPhone 13.
- Scroll down and tap on “Siri & Search.”
- Tap on “Siri & Dictation History.”
- You will be presented with two options: “Delete Siri & Dictation History” and “Don’t Store Siri & Dictation History.” Choose the option that suits your preferences.
- If you select “Delete Siri & Dictation History,” you will be prompted to confirm the deletion. Tap on “Delete Siri & Dictation History” again to confirm.
- Your Siri and Dictation history will now be deleted from your iPhone 13.
By following these steps, you can ensure that any stored voice recordings associated with Siri and Dictation are removed from your device. This can help protect your privacy and give you peace of mind.
Privacy settings for voice recordings:
In addition to clearing Siri and Dictation history, you may also want to review and manage the privacy settings related to voice recordings on your iPhone 13. Here’s how:
- Go to the Settings app on your iPhone 13.
- Scroll down and tap on “Privacy.”
- Tap on “Microphone.”
- You will see a list of apps that have requested access to your microphone. You can enable or disable microphone access for individual apps by toggling the switch next to each app.
- Review the permissions for each app and adjust them according to your preferences.
By managing the privacy settings for voice recordings, you can have control over which apps have access to your microphone and ensure that your voice data is only shared with apps you trust.
Clearing the history on your iPhone 13 is a simple yet important task to maintain privacy and optimize device performance. By following the steps outlined in this guide, you can easily delete your browsing history, call logs, and other data stored on your device.
Regularly clearing your history not only frees up valuable storage space but also helps protect your personal information from unauthorized access. Whether you want to wipe away a specific search or start fresh with a clean browsing history, the process is quick and straightforward.
Remember to exercise caution when deleting your history, as it cannot be undone. Take a moment to review the items you are deleting to ensure you are not accidentally removing any important information. By staying vigilant, you can maintain a clutter-free and secure iPhone 13 experience.
Conclusion
FAQs
1. How do I clear history on my iPhone 13?
To clear history on your iPhone 13, follow these steps:
- Go to the “Settings” app on your iPhone 13.
- Scroll down and tap on “Safari” (or the browser you use).
- Scroll down and tap on “Clear History and Website Data”.
- Confirm your choice by tapping on “Clear History and Data” in the pop-up window.
- All your browsing history, cookies, and website data will be cleared from your iPhone 13.
2. Will clearing history on my iPhone 13 delete saved passwords?
No, clearing the browsing history on your iPhone 13 will not delete saved passwords. Saved passwords are stored separately in your iPhone’s Keychain, and they will remain intact even after clearing your browsing history.
3. Does clearing history on my iPhone 13 affect my bookmarks?
No, clearing the browsing history on your iPhone 13 does not affect your bookmarks. Bookmarks are saved separately from your browsing history, and they will remain intact even after clearing your history. So, you won’t lose any of your saved bookmarks by clearing your browsing history.
4. How often should I clear history on my iPhone 13?
The frequency of clearing your browsing history on your iPhone 13 depends on your personal preferences and requirements. If you value your privacy and want to keep your browsing history confidential, you may choose to clear it regularly, such as once a week or once a month. However, if you don’t have privacy concerns, clearing your browsing history occasionally or when you encounter any browsing issues should suffice.
5. Does clearing history on my iPhone 13 free up storage space?
Clearing your browsing history on your iPhone 13 does free up a small amount of storage space. When you clear your history, the cache and temporary files associated with it are also cleared, which can help in optimizing the storage on your device. However, the amount of space reclaimed by clearing history is generally minimal, and if you are looking to free up significant storage space, it is recommended to delete unused apps, old messages, or media files.