
As we continue to rely on our iPhones for various tasks throughout the day, it’s not uncommon for our search history to accumulate. Whether it’s browsing the web, using search engines, or exploring apps, our iPhones store a record of our searches. However, there may come a time when you want to clear this history for privacy reasons or to free up storage space on your device.
In this article, we will guide you through the process of clearing your search history on the latest iPhone model, the iPhone 14. We will provide you with step-by-step instructions to ensure that your search history is completely erased from your device. From Safari to app history, we’ve got you covered!
So, if you’re ready to regain your privacy and keep your iPhone running smoothly, let’s dive into the methods to clear search history on your iPhone 14!
Inside This Article
- Ways to Clear Search History on iPhone 14
- # 1. Clearing Search History in Safari
- # 2. Clearing Search History in Chrome
- # 3. Clearing Search History in App Store
- Clearing Search History in Settings
- Additional Tips and Considerations
- Conclusion
- FAQs
Ways to Clear Search History on iPhone 14
Clearing your search history on your iPhone 14 is a simple process that can help protect your privacy and free up storage space. Whether you want to clear your search history in Safari, Chrome, the App Store, or your device’s settings, there are multiple ways to achieve this. In this article, we’ll explore four different methods to clear your search history on iPhone 14.
1. Clearing Search History in Safari: Safari is the default web browser on your iPhone 14, and if you regularly use it to search the web, clearing your search history can be important. To do this, open Safari and tap on the bookmark icon at the bottom. Then, select the history tab and tap on “Clear” at the bottom of the screen. You can choose to clear your history for the last hour, today, today and yesterday, or all history.
2. Clearing Search History in Chrome: If you prefer using Google Chrome as your web browser, you can also clear your search history within the app. Open Chrome on your iPhone 14 and tap on the three dots in the bottom right corner to access the menu. From there, select “History” and tap on “Clear Browsing Data.” You can choose to clear your browsing history, cookies, and site data.
3. Clearing Search History in the App Store: Your iPhone 14 keeps track of your search history in the App Store as well. To clear this history, open the App Store and tap on your profile picture in the top right corner. From there, choose “Purchased” and scroll down to find the “Clear” button next to “Recent Searches.” Tap on it to remove your search history in the App Store.
4. Clearing Search History in Settings: In addition to clearing your search history in specific apps, you can also clear all search history on your iPhone 14 using the device’s settings. Go to the Settings app, scroll down and tap on “Safari” or “Chrome,” depending on your preferred browser. From there, you can find an option to clear your history and website data.
Remember that clearing your search history will remove the information from your device, but it may still be stored on servers or in other devices if you’re signed in with your account. Additionally, clearing your search history will not affect personalized search suggestions or autofill information.
By following these methods, you can easily clear your search history on iPhone 14 and ensure your browsing behavior remains private. Regularly clearing your search history can also help optimize your device’s performance and free up storage space. Enjoy a clean and efficient browsing experience on your iPhone 14!
# 1. Clearing Search History in Safari
If you use Safari as your primary web browser on your iPhone 14, clearing your search history is a straightforward process. Follow these simple steps to ensure your browsing history is wiped clean:
- Launch the Safari app on your iPhone 14.
- Tap on the bookmarks icon at the bottom of the screen, represented by an open book.
- Next, tap on the clock icon located at the top of the screen to access your browsing history.
- Scroll through the list of websites you have visited until you find the section labeled “History.”
- To clear your entire search history, tap on the “Clear” button at the bottom right corner of the screen.
- You will be presented with different options: “Clear the Last Hour,” “Clear Today,” “Clear Today and Yesterday,” or “Clear All History.” Choose the appropriate option based on how much history you want to delete.
- Confirm your decision by tapping on “Clear History” when prompted.
By following these steps, you will effectively clear your search history in Safari on your iPhone 14, ensuring your browsing activities remain private and secure.
# 2. Clearing Search History in Chrome
If you frequently use the Google Chrome browser on your iPhone 14, it’s important to know how to clear your search history for privacy reasons or to free up some storage space. Luckily, clearing your search history in Chrome is a simple process. Just follow the steps below:
1. Open the Google Chrome app on your iPhone 14.
2. Tap on the three dots at the bottom right corner of the screen to open the menu.
3. From the menu, select “Settings”.
4. In the Settings menu, scroll down and select “Privacy”.
5. Next, tap on “Clear Browsing Data”.
6. You will be presented with a list of options to clear. Make sure the “Browsing History” option is checked.
7. Optionally, you can also choose to clear other data like cookies, cached images, and site data by checking the corresponding boxes.
8. Once you’ve selected the data you want to clear, tap on “Clear Browsing Data” at the bottom of the screen.
9. A confirmation dialog will appear. Tap on “Clear Browsing Data” again to confirm.
10. Chrome will now begin clearing your search history and other selected data. Once it’s done, the confirmation dialog will disappear, and you’ll have a clean Chrome browsing history on your iPhone 14.
Remember, clearing your search history in Chrome is necessary if you want to maintain your privacy and keep your browsing activities confidential. This is especially important if you share your device with others or want to avoid being targeted with personalized ads based on your search history.
Additionally, clearing your search history can help improve the performance and speed of the Chrome browser on your iPhone 14. Removing unnecessary browsing data can free up storage space and make your browsing experience faster and smoother.
Now that you know how to clear your search history in Chrome on your iPhone 14, you can keep your browsing activities private and enjoy a clutter-free browsing experience. So, go ahead and clear away!
# 3. Clearing Search History in App Store
If you use the App Store on your iPhone 14 frequently, it’s likely that you’ve searched for various apps at some point. To ensure your privacy and keep your search history confidential, it’s essential to know how to clear your search history in the App Store.
To clear your search history in the App Store on your iPhone 14, follow these steps:
- Open the App Store on your iPhone 14. You can find the App Store icon on your home screen.
- Tap on the “Search” tab located in the bottom-right corner of the screen.
- In the search bar at the top, you’ll see a list of recent search terms below the suggested search results. Tap on the “Clear” button next to the search terms.
- A confirmation pop-up will appear, asking if you want to clear your search history. Tap on “Clear” to confirm.
Once you’ve followed these steps, your search history in the App Store will be cleared, and no one will be able to see what apps you’ve searched for in the past.
Clearing your search history in the App Store is a good practice, especially if you share your iPhone 14 with others or want to keep your app browsing habits private.
It’s important to note that clearing your search history in the App Store will not affect your downloaded apps or purchase history. It only removes the search terms you’ve entered into the search bar.
By regularly clearing your search history, you can maintain your privacy and enjoy a clutter-free search experience in the App Store on your iPhone 14. It’s a simple yet effective way to keep your app browsing activities confidential.
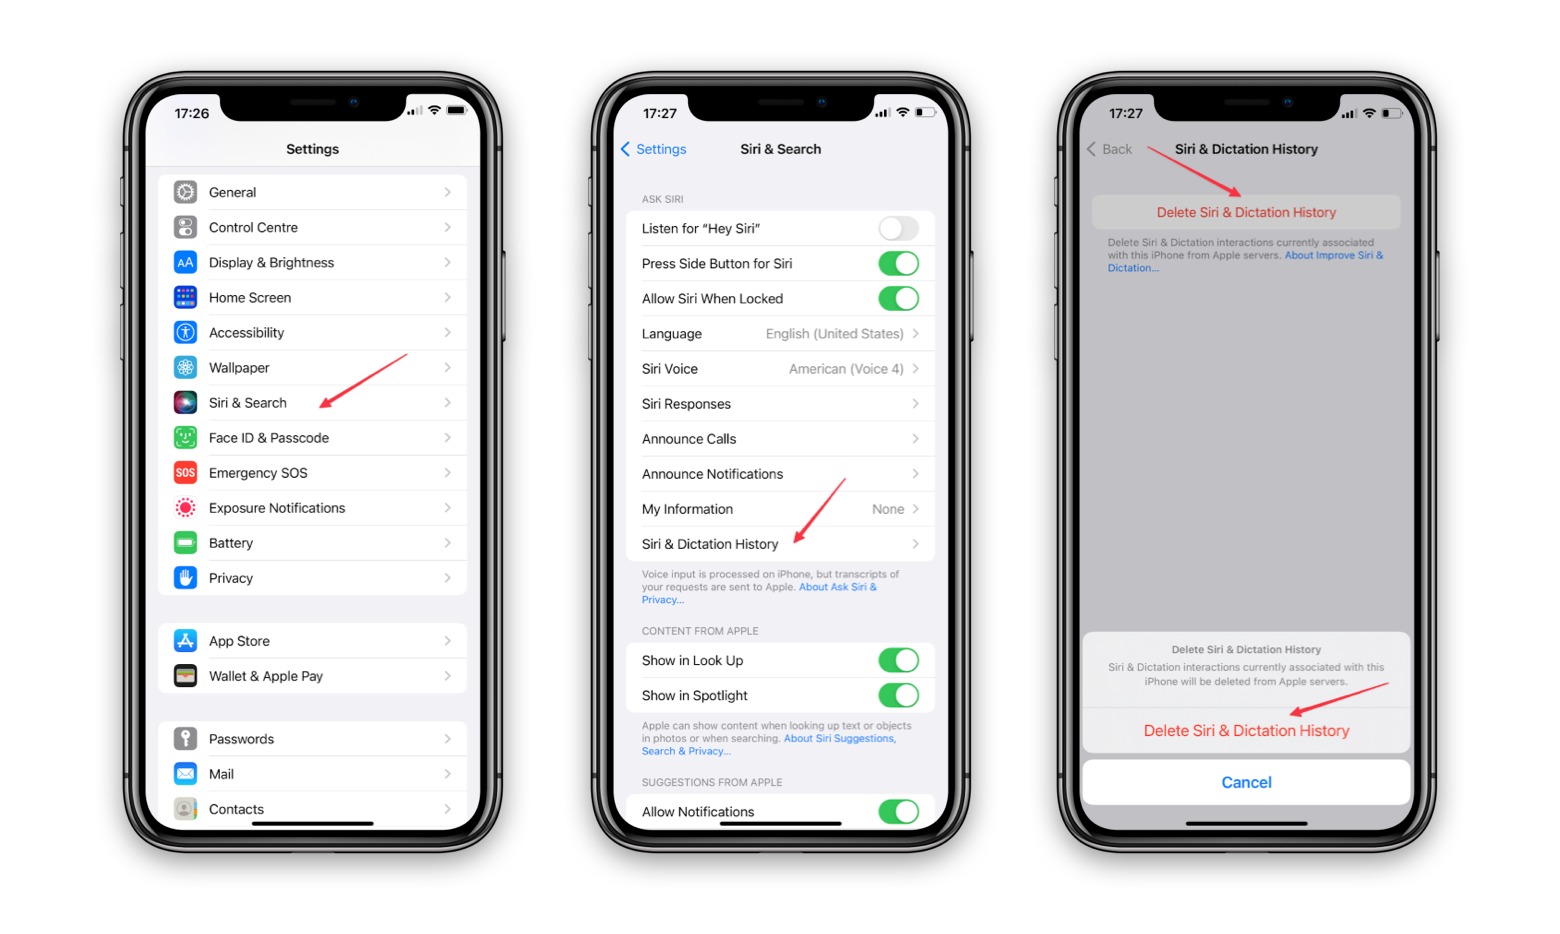
Clearing Search History in Settings
Clearing search history in the Settings app on your iPhone 14 is a straightforward process. Follow these steps to remove your search history:
- Open the Settings app on your iPhone 14.
- Scroll down and tap on “Safari” or “Chrome” depending on the browser you use.
- In the Safari/Chrome settings, scroll down and find the “Clear History and Website Data” option. Tap on it.
- A confirmation prompt will appear on the screen. Confirm the action by tapping on “Clear History and Data”.
- Wait for a few moments while your iPhone clears the search history and website data.
Once you have completed these steps, your search history in the Safari/Chrome browser on your iPhone 14 will be cleared. This includes both the search terms you entered and the websites you visited.
It’s important to note that clearing your search history in the Settings app only removes the history within the Safari/Chrome browser. If you use other browsers or apps to search the web, you may need to clear their history separately.
Additionally, clearing your search history does not affect your saved bookmarks, passwords, or autofill data. These settings are separate from your browsing history and can be managed in the respective sections of the Safari/Chrome settings.
By regularly clearing your search history, you can maintain your privacy and keep your iPhone 14 free from unnecessary storage clutter.
Additional Tips and Considerations
When it comes to clearing search history on your iPhone 14, there are a few additional tips and considerations to keep in mind. These will help you maintain your privacy and ensure a smooth browsing experience. Let’s take a look:
1. Enable Private Browsing: Consider using the private browsing mode on your web browser. This mode prevents your browsing history, cookies, and other data from being saved on your device. It’s a great option when you want to keep your searches private and secure.
2. Use a VPN: A VPN (Virtual Private Network) is an excellent tool for protecting your privacy online. It encrypts your internet connection and masks your IP address, making it difficult for anyone to track your online activities. Using a VPN can also help you bypass geographical restrictions and access content that may be blocked in your region.
3. Clear Cache and Cookies: In addition to clearing your search history, regularly clearing your cache and cookies can help improve your iPhone’s performance. Cached files and cookies can accumulate over time and take up storage space. Clearing them will free up space and ensure your device runs smoothly.
4. Manage App Permissions: It’s essential to review the permissions granted to various apps on your iPhone. Some apps may collect and store your browsing data, including search history. By managing app permissions and restricting access to unnecessary data, you can have better control over your privacy.
5. Regular Software Updates: Keeping your iPhone’s operating system up to date is crucial for security and privacy. Software updates often include patches for vulnerabilities and bug fixes, which can help protect your device from potential threats and maintain the integrity of your privacy settings.
6. Utilize Screen Time: If you share your iPhone with others, especially children, utilizing the Screen Time feature can be beneficial. This feature allows you to set restrictions and limits on various activities, including web browsing. By setting restrictions, you can prevent search history from being saved or accessed on your device.
7. Be Mindful of AutoFill: AutoFill can be a convenient feature, but it can also save your search history and other personal information. Be cautious when using AutoFill and consider disabling it for sensitive data to maintain your privacy.
By following these additional tips and considerations, you can enhance the privacy of your iPhone 14 and enjoy a more secure online experience. Remember to regularly clear your search history and take proactive steps to protect your data.
Conclusion
In conclusion, knowing how to clear the search history on your iPhone is an essential skill that can help protect your privacy and free up valuable storage space. With the advancements in technology, it has become easier than ever to browse the web and access information on our mobile devices. However, this convenience comes with a trade-off – the accumulation of search history data.
By following the methods outlined in this article, you can quickly and easily clear your search history on the iPhone 14, ensuring that your personal information remains secure. Whether you prefer the manual approach through Safari settings or the more efficient method using third-party applications, there is a solution for every user.
Remember, regularly clearing your search history is a good habit to adopt, as it not only safeguards your privacy but also improves the performance of your device. So, take the necessary steps to clear your search history and enjoy a cleaner, more secure browsing experience on your iPhone 14.
FAQs
1. How do I clear search history on my iPhone 14?
2. Is clearing search history on iPhone 14 the same as clearing browsing history?
3. Will clearing search history on iPhone 14 affect my saved passwords?
4. Can I selectively clear search history on my iPhone 14?
5. Does clearing search history on iPhone 14 improve performance or battery life?