
In today’s digital age, capturing moments through photos has become an essential part of our lives. And with the advancement of technology, our smartphones have become our go-to devices for snapping pictures on the go. Amongst the many features that smartphones offer, cropping a photo is one of the most commonly used ones. If you’re an iPhone user looking to enhance your photography skills, learning how to crop photos on your device can make a significant difference in the final results.
In this article, we will guide you step by step on how to crop photos on your iPhone, ensuring that you can frame your images perfectly and create captivating compositions. Whether you want to remove unwanted elements from a photo or focus on a specific subject, the cropping tool on your iPhone provides the flexibility to achieve the desired effect.
Inside This Article
- The Importance of Cropping Photos on iPhone
- Step 1: Open the Photos App
- Step 2: Select the Photo to Crop
- Step 3: Tap “Edit” in the Top Right Corner
- Step 4: Tap the Crop Icon at the Bottom
- Step 5: Adjust the Crop Area
- Step 6: Apply the Crop
- Step 7: Save and Share the Cropped Photo
- Conclusion
- FAQs
The Importance of Cropping Photos on iPhone
In this digital era, where smartphones have become an indispensable part of our lives, capturing and sharing photos has become easier than ever. With the advent of high-quality cameras on iPhones, anyone can take stunning pictures at any given moment. However, not every photo is perfect right out of the camera. That’s where the importance of cropping comes into play.
Cropping a photo on your iPhone allows you to remove unnecessary elements, adjust the composition, and focus on the main subject. It helps in eliminating distractions and creating a more visually appealing image. Whether you want to enhance a landscape, highlight a person, or eliminate unwanted objects from the frame, cropping can significantly improve the overall quality of your photo.
One of the key advantages of cropping photos on your iPhone is the convenience it offers. With the Photos app readily available on your device, you can quickly access and edit your photos without the need for additional software or equipment. It makes the process of cropping hassle-free and accessible to everyone, regardless of their level of expertise.
Cropping also enables you to create custom compositions for various purposes. For instance, you may want to crop a photo for a social media post, where specific image dimensions are required. By adjusting the size and aspect ratio, you can ensure that your photo fits perfectly within the allotted space, making it more visually appealing on platforms like Instagram or Facebook.
Besides improving the composition and fitting images into different formats, cropping can also help in emphasizing details and enhancing the storytelling aspect of your photos. By zooming in and cropping tightly around the subject, you can highlight intricate details that might have been lost in a wide-angle shot. This can add depth and visual interest to your photos, creating a stronger connection with the viewer.
Furthermore, cropping can also fix minor flaws or imperfections in your photos. Whether it’s eliminating red-eye, removing blemishes, or straightening a slightly crooked horizon, cropping allows you to make precise adjustments to enhance the overall look of your image. It empowers you with the ability to turn an average photo into a stunning masterpiece.
Step 1: Open the Photos App
One of the first steps to cropping a photo on your iPhone is to open the Photos app. This app is pre-installed on all iPhones and is the default location for storing and organizing your pictures. To open the app, simply locate the “Photos” icon on your home screen and tap on it.
Once you tap on the Photos icon, the app will launch, showing you the main screen which displays all your photo albums and collections. From here, you can navigate through your photo library to find the specific image you want to crop.
The Photos app on your iPhone provides you with a user-friendly interface, making it easy to browse and manage your photos. Whether you have taken the photo with your iPhone’s camera or have saved it from other sources, the app allows you to access all your images in one place.
If you have organized your photos into albums, you can select the desired album to find the photo you wish to crop. Alternatively, you can select the “Photos” tab to view your entire photo library, sorted by date.
Now that you have opened the Photos app and located the photo you want to crop, you can move on to the next step of the process.
Step 2: Select the Photo to Crop
Once you have opened the Photos app on your iPhone, it’s time to choose the photo you want to crop. The Photos app displays all the photos in your Camera Roll or Albums. You can simply scroll through the thumbnails to find the photo you wish to crop.
To make the selection process even easier, you can use the Search function at the top of the screen to quickly locate a specific photo by entering keywords or dates associated with it. You can also browse through different albums or tap on the “Photos” tab at the bottom of the screen to view all your photos in one place.
Once you have found the photo you want to crop, tap on it to open it in full screen mode. This will enable you to see the entire photo and make precise adjustments during the cropping process.
It’s worth noting that the Photos app also allows you to edit Live Photos, burst photos, and even videos. So, if you have one of these types of media, you can still follow the cropping process to trim or crop them as needed.
Step 3: Tap “Edit” in the Top Right Corner
Once you have selected the photo you want to crop, you will need to tap on the “Edit” option located in the top right corner of the screen. This will open up a suite of editing tools that will allow you to make adjustments to your photo, including cropping.
The “Edit” option is represented by a pair of overlapping sliders. When you tap on it, the photo will open in Edit mode, displaying various editing options at the bottom of the screen.
The Edit mode provides you with a range of tools that you can use to enhance your photo, such as brightness adjustment, filters, and red-eye correction. However, for the purpose of cropping, you will focus specifically on the cropping tool.
By tapping on “Edit,” you are one step closer to achieving the desired composition and framing of your photo. Let’s move on to the next step to learn how to adjust the crop size and aspect ratio.
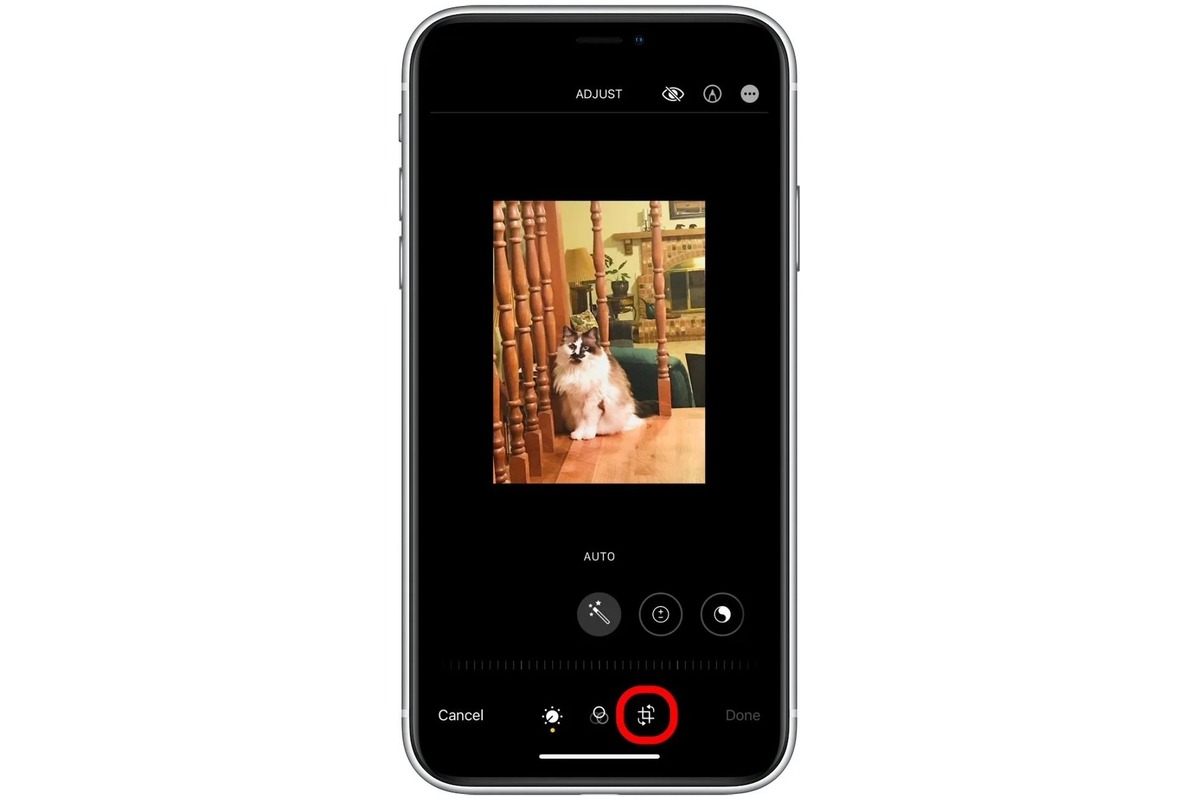
Step 4: Tap the Crop Icon at the Bottom
Once you have selected the photo you want to crop, the next step is to tap the crop icon located at the bottom of the screen. This icon is shaped like a square with diagonal lines cutting through it, representing a cropping tool.
By tapping on the crop icon, you will enter the editing mode specifically designed for cropping photos. This mode allows you to resize and reshape the photo according to your preferences.
Keep in mind that the position of the crop icon may vary depending on the version of the iOS you are using. However, it is typically located at the bottom of the screen, making it easily accessible for users.
Once you tap on the crop icon, you will notice that the photo will be surrounded by a bounding box with handles at each corner. These handles enable you to adjust the size and shape of the crop area.
Now that you have successfully reached the cropping mode, you are ready to proceed to the next step and start adjusting the crop size and aspect ratio to get the desired result.
Step 5: Adjust the Crop Area
After selecting the desired aspect ratio, it’s time to fine-tune the crop area to ensure the perfect composition.
iPhone provides an intuitive way to adjust the crop area. Simply use your fingers to pinch in or out on the screen to zoom in or out of the photo. This enables you to focus on specific details or include more of the surrounding elements in the crop.
Additionally, you can also use the handles on the corners and sides of the crop box. By dragging these handles, you can resize the crop area and precisely select the portion of the photo you want to include.
Moreover, you can rotate the crop area by placing two fingers on the screen and twisting them in a clockwise or counterclockwise motion. This allows you to straighten the horizon or make adjustments for a better composition.
Take your time to experiment with different adjustments and view the changes in real time. The responsive nature of the iPhone interface makes it easy to see how your crop area affects the final image.
Remember, the goal is to create a visually appealing composition that highlights the subject of the photo and tells the story you want to convey.
Once you are satisfied with the adjustments you have made, you can proceed to the next step and save your cropped photo.
Step 6: Apply the Crop
After adjusting the crop size and aspect ratio, it’s time to apply the crop to your photo on your iPhone. Once you are satisfied with the desired portion of the image that you want to keep, follow these steps:
1. Tap on the “Apply” or “Done” button located in the top right corner of the screen. This will finalize the crop and save the changes made to your photo.
2. Your cropped photo will now replace the original version in your Photos app. The cropped image will be automatically saved in your photo library, allowing you to access it whenever needed.
3. If you are not satisfied with the crop and wish to revert to the original photo, simply tap on the “Revert” or “Cancel” button instead. This will discard the changes and revert your photo back to its original state.
4. Keep in mind that applying the crop is a non-destructive edit, meaning that the original photo remains untouched. The cropped version is created as a separate image file, allowing you to preserve the integrity of your original photo.
5. After applying the crop, you can further enhance your photo by using other editing features available in the Photos app. These features include adjusting brightness, contrast, filters, and more, providing you with additional options to enhance the visual appeal of your cropped image.
By following these steps, you can easily apply the desired crop to your photo on your iPhone and create stunning compositions that highlight the best elements of your image.
Step 7: Save and Share the Cropped Photo
Once you are satisfied with the cropping of your photo on iPhone, it’s time to save and share your masterpiece. Here’s how you can do it:
1. Tap on the “Done” button located at the bottom right corner of the screen. This will apply the crop to your photo.
2. Now, you have two options. You can either save the cropped photo as a new separate image or replace the original photo with the cropped version. To save as a new image, tap on “Save as New Photo.” To replace the original, tap on “Save Changes.”
3. If you choose to save the cropped photo as a new image, you will see a confirmation message that the photo has been saved. You can give it a new name if you prefer.
4. To share the cropped photo, tap on the “Share” button located at the bottom left corner of the screen. This will open a menu with various sharing options.
5. From the sharing menu, you can choose to share the cropped photo via messages, email, social media platforms, or any other compatible app installed on your iPhone. Simply select the desired sharing option and follow the prompts to complete the sharing process.
6. Congratulations! You have successfully saved and shared your cropped photo on iPhone.
Remember, cropping a photo can be a great way to enhance its composition, remove unwanted elements, or focus on a specific subject. Experiment with different cropping techniques to bring out the best in your photos.
That concludes our step-by-step guide on how to crop a photo on iPhone. We hope you found it helpful and that you’re now ready to take your photo editing skills to the next level. Happy cropping!
In conclusion, cropping photos on an iPhone is a simple and effective way to enhance your images and create stunning compositions. The built-in Photos app offers a powerful set of editing tools, including the cropping feature, that allow you to easily adjust the framing of your photos. Whether you want to remove unwanted elements, emphasize a specific subject, or create a more balanced composition, cropping can help you achieve your desired result.
FAQs
Q: What is the benefit of cropping a photo on iPhone?
A: Cropping a photo on iPhone allows you to remove unwanted elements, improve composition, focus on the main subject, and create visually pleasing images.
Q: How do I crop a photo on iPhone?
A: To crop a photo on iPhone, open the Photos app, select the photo you want to crop, tap on the “Edit” button, then tap the crop icon (which looks like a square with arrows on each corner). Drag the handles to adjust the crop frame, and tap “Done” when you’re satisfied with the result.
Q: Can I maintain the original image size after cropping?
A: Yes, you can choose to maintain the original image size by selecting the “Original” option in the crop menu. This ensures that the cropped photo retains the same dimensions as the original.
Q: Are there any additional editing tools available for further enhancing the cropped photo?
A: Absolutely! After cropping, you can explore the various editing tools within the Photos app to further enhance your photo. These tools include adjustments to lighting, color, filters, and much more.
Q: Can I undo a crop if I’m not satisfied with the result?
A: Yes, if you are not satisfied with the cropped photo, you can simply tap on the “Edit” button again, select the crop icon, and choose the option to revert to the original composition. This will undo the crop and bring back the full version of the photo.