
Are you looking for a way to erase text messages on your iPhone? Whether you want to free up storage space, protect your privacy, or simply tidy up your message history, knowing how to delete messages on your iPhone is essential. Text messages can contain sensitive personal information, and it’s important to have control over what gets stored on your device.
In this article, we will guide you through the process of erasing text messages from your iPhone. We will explore the built-in message deletion options as well as provide alternative methods to permanently remove your messages. By the end of this article, you will have the knowledge and tools to easily manage and delete text messages on your iPhone. Let’s get started!
Inside This Article
- Method 1: Manually Deleting Text Messages
- Method 2: Delete Text Messages in Bulk
- Method 3: Use Third-Party Apps to Erase Text Messages
- Method 4: Erase Text Messages Permanently with Factory Reset
- Conclusion
- FAQs
Method 1: Manually Deleting Text Messages
Text messages can quickly accumulate on your iPhone, taking up valuable storage space. If you want to free up some space and declutter your messages, you can manually delete them. Follow these simple steps:
Step 1: Open the Messages app
Locate and open the Messages app on your iPhone. This app typically has a green icon with a white speech bubble.
Step 2: Select the conversation you want to delete messages from
Scroll through your conversations and tap on the one from which you wish to delete messages. This will open up the conversation thread.
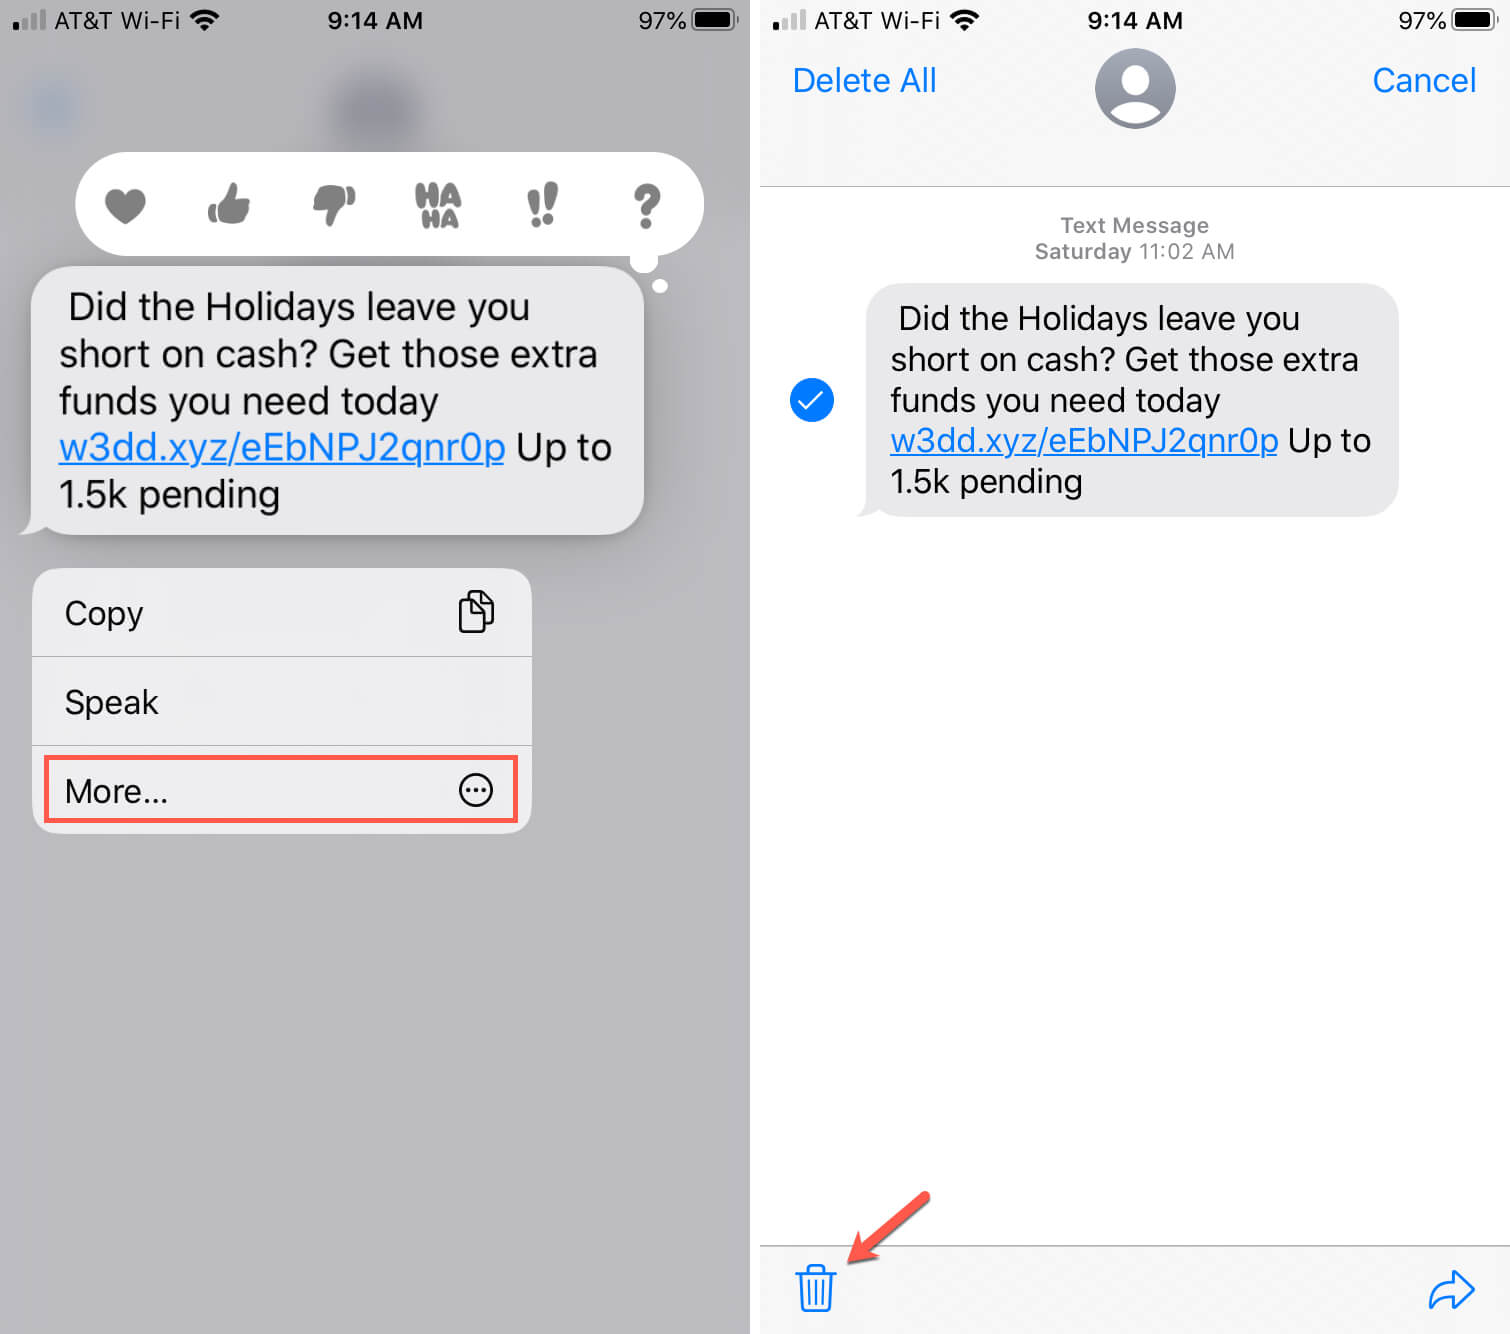
Step 3: Tap and hold the message you want to delete
Touch and hold the specific message that you want to delete. This will trigger a pop-up menu with various options.
Step 4: Tap “More” and select the additional messages you want to delete
From the pop-up menu, tap on “More”. This will allow you to select multiple messages to delete. Simply tap on the additional messages you want to delete. They will be marked with a red checkmark.
Step 5: Tap the trash bin icon to delete the selected messages
Once you have selected all the messages you want to delete, tap on the trash bin icon located at the bottom left corner of the screen. Confirm your action by selecting “Delete Message”. The selected messages will be permanently removed from your iPhone.
Repeat these steps for any other conversations you wish to clear of text messages. By manually deleting your messages, you can efficiently clean up your iPhone’s message storage and keep it organized.
Method 2: Delete Text Messages in Bulk
Deleting text messages individually can be time-consuming, especially when you want to clear out a large number of messages all at once. Thankfully, there is a simple method to delete text messages in bulk on your iPhone. Here’s how:
Step 1: Open the Settings app
To begin, locate and open the Settings app on your iPhone. It can be easily identified by the gear icon.
Step 2: Scroll down and tap on “Messages”
Once you’re within the Settings app, scroll down until you find the “Messages” option. Tap on it to access the messaging settings.
Step 3: Tap on “Keep Messages”
Within the Messages settings, you’ll see an option labeled “Keep Messages.” Tap on it to proceed to the next step.
Step 4: Choose the desired time period
On this screen, you’ll be presented with different time periods to choose from – 30 days, 1 year, or Forever. Select the time period that suits your needs.
Step 5: Confirm the deletion by tapping “Delete” in the pop-up window
After selecting the desired time period, a pop-up window will appear, asking if you want to delete all messages older than the selected time period. Confirm the deletion by tapping on “Delete.”
Once you’ve completed these steps, all text messages older than the chosen time period will be automatically deleted from your iPhone, freeing up valuable storage space.
This method is especially useful for those who want to declutter their message inbox quickly. However, it’s essential to note that once the messages are deleted, they cannot be recovered. Therefore, double-check your selections before confirming the deletion.
Method 3: Use Third-Party Apps to Erase Text Messages
When it comes to securely erasing text messages on your iPhone, using a reliable third-party app can be an effective solution. These apps are specifically designed to ensure that your personal data, including text messages, are completely erased from your device.
Follow these simple steps to use a third-party app to erase text messages on your iPhone:
Step 1: Install and Launch a Reliable Data Erasing App
Start by installing a trusted data erasing app from the App Store. There are plenty of options to choose from, such as “Secure Eraser” or “iShredder.” Once installed, open the app on your iPhone.
Step 2: Connect Your iPhone to the Computer
Connect your iPhone to your computer using a USB cable. Make sure you have the latest version of iTunes installed on your computer before proceeding.
Step 3: Select the Option to Erase Text Messages
Once your iPhone is connected, the data erasing app should detect your device. Look for the option to erase text messages or similar terms within the app’s interface. Select that option to proceed.
Step 4: Follow the Instructions Provided by the App
The app will provide clear instructions on how to carry out the text message erasing process. Carefully follow these instructions to ensure a smooth and secure deletion of your messages.
Step 5: Wait for the Process to Complete and Verify the Messages Are Erased
Once the erasing process starts, it may take a few minutes to complete, depending on the number of messages on your device. Wait for the app to finish erasing the text messages, and then check your iPhone to verify that the messages have been securely deleted.
Using a reputable third-party app to erase text messages ensures that your personal information remains private and protected. It offers an extra layer of security to ensure that all traces of your messages are fully removed from your iPhone.
Method 4: Erase Text Messages Permanently with Factory Reset
Step 1: Before proceeding with a factory reset, it is crucial to backup your iPhone data to avoid losing any important information. Connect your iPhone to your computer and initiate the backup process using iTunes or iCloud. This backup will enable you to restore your device later if necessary.
Step 2: Once your data is safely backed up, open the Settings app on your iPhone. The app icon resembles a gear and can be found on your home screen.
Step 3: In the Settings menu, scroll down and tap on “General.” This option is usually located towards the top of the list of settings.
Step 4: Within the General settings, scroll all the way down to find the “Reset” option. It is typically at the bottom of the list.
Step 5: Tap on “Reset” to access the reset options. Among the available options, select “Erase All Content and Settings” to initiate the factory reset process.
Step 6: Before the reset begins, the system will prompt you to confirm by entering your passcode or Apple ID password. This step is essential to ensure that you are the authorized user initiating the reset.
Step 7: Once you have confirmed, the factory reset process will begin. This process may take a few minutes, so be patient and do not interrupt it.
Step 8: After the reset is complete, your iPhone will be restored to its original factory settings. All data, including text messages, will be permanently erased from the device.
It is important to note that a factory reset is a drastic measure, and it erases all data on your iPhone, not just text messages. Therefore, make sure to backup any important files or documents before proceeding with this method. Additionally, once the reset is done, there is no way to recover the erased data, so it is crucial to double-check that you have backed up everything you need.
Remember to sign out of all accounts linked to your iPhone and remove your SIM card before selling or donating the device. A factory reset alone may not be enough to protect your personal information, so taking these additional steps is highly recommended.
Overall, the factory reset method provides an effective way to erase text messages permanently from your iPhone. Just remember to proceed with caution, backup your data, and follow the steps carefully to ensure a successful reset.
Conclusion
In conclusion, being able to erase text messages on iPhone is an essential skill for maintaining privacy and freeing up storage space. The built-in Messages app on iPhone provides various options to manage and delete conversations, including individual messages and entire threads. By following the step-by-step guide provided in this article, you can easily erase text messages on your iPhone and ensure that your personal information remains secure.
Remember to regularly clear out your messages to optimize your iPhone’s performance and storage capacity. Additionally, if you need to permanently erase sensitive messages, using a professional data erasure tool can provide you with an extra layer of security. Whether you need to delete a single message or clear out your entire messaging history, managing text messages on your iPhone is a simple and straightforward process when armed with the right knowledge and tools.
FAQs
Q: How can I erase text messages on my iPhone?
A: Erasing text messages on your iPhone is quite simple. You can follow these steps:
1. Open the Messages app on your iPhone.
2. Select the conversation that contains the text messages you want to erase.
3. Swipe left on the message you want to delete and tap on the “Delete” button that appears.
4. If you want to delete multiple messages, you can tap on the “Edit” button at the top right corner of the screen. Select the messages you want to delete and then tap on the “Delete” button.
5. To completely erase all messages in a conversation, you can tap on the “More” button (represented by three dots) at the top right corner of the screen, then choose “Delete All” from the options.
6. Remember that deleting messages on your iPhone only removes them from your device. They may still be visible on other devices or iCloud if you have syncing enabled.
7. If you want to permanently erase messages from all devices, you can go to Settings > Messages > Keep Messages and choose “30 Days” or “1 Year.” This will automatically delete messages older than the selected time frame.
Q: Can I recover deleted text messages on my iPhone?
A: Yes, it is possible to recover deleted text messages on your iPhone. If you have an iCloud or iTunes backup, you can restore your device to an earlier backup to retrieve the deleted messages. Alternatively, you can use third-party data recovery software specifically designed for iOS devices to recover deleted messages.
Q: Will erasing text messages on my iPhone also delete them from the recipient’s device?
A: No, erasing text messages on your iPhone will not delete them from the recipient’s device. When you delete a message on your iPhone, it only removes it from your device. The recipient will still have the message on their device unless they also delete it.
Q: Can I erase text messages selectively on my iPhone?
A: Yes, you can erase text messages selectively on your iPhone. You can either swipe left on individual messages and tap on the “Delete” button, or use the “Edit” option to select multiple messages and delete them at once.
Q: Does erasing text messages on my iPhone also delete the attachments?
A: Yes, when you erase text messages on your iPhone, any attachments or media associated with those messages will also be deleted. This includes photos, videos, audio files, and any other attachments that were shared within the message thread.